
I spent months fixating on white ink examples before I got my first one. The surprise wasn't just how subtle it looked—it's how differently white settles and heals compared with black. These 24 white-ink ideas lean quiet, refined, and a little secretive. They're the kinds of pieces that read like jewelry on skin once they're healed.
This list focuses on fine line, minimalist, and micro-realism white ink styles. Ideal placements are inner wrist, collarbone, ribcage, and behind the ear—spots that stay intimate. From what I've noticed in 2026 trends, artists are using white ink as a highlight or standalone subtle piece, and these ideas reflect what actually holds up healed.
1. Fine Line Botanical Vine on Inner Forearm
Style/Technique: Fine Line / Minimalist
Pain Level: Low-Medium (2-4/10)
Session Time: 1-2 hours
Best For: First white-ink piece, easy to hide with sleeves
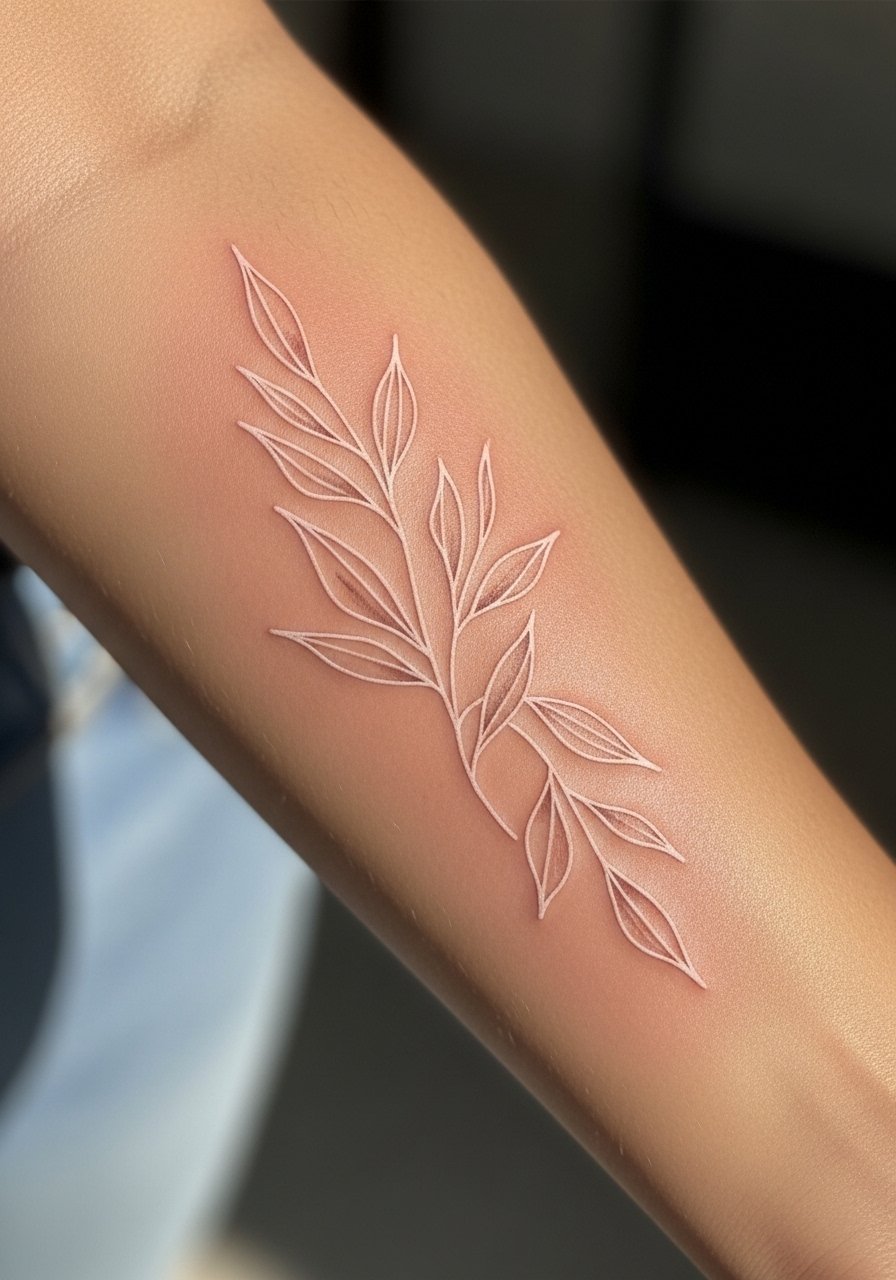
I love white vines for the inner forearm because they look like jewelry when healed. Expect a gentle scratch during the session and a couple weeks of surface healing; full settling takes a few months. White on pale skin reads brighter; on deeper skin it’s subtle and ghost-like. Common mistake: asking for lines too thin—white needs slightly heavier application to show up later. Ask your artist for healed examples of white fine line work and whether they recommend a light shadow underlay.
2. Micro-Realism Feather Behind Ear
Style/Technique: Micro-Realism / Delicate
Pain Level: Low (2/10)
Session Time: 30-60 minutes
Best For: Hidden, intimate accent
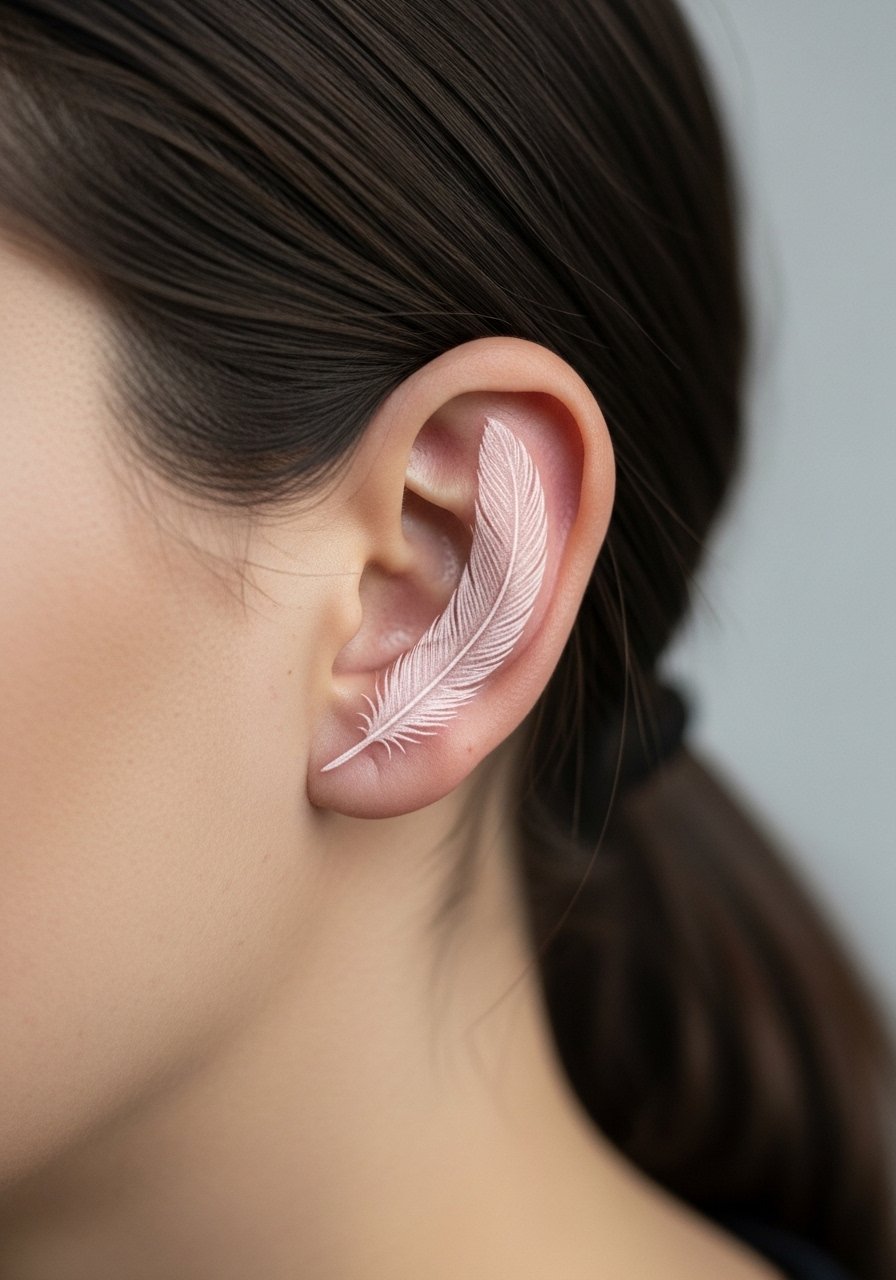
White ink feathering behind the ear reads like a private detail. Pain is minimal; sessions are quick. This placement ages well because it’s rarely sun-exposed. Healing is simple—keep it dry and moisturized. The trick is to ask your artist for slightly denser white strokes so the feather doesn't vanish as it heals. I've seen artists pair a faint gray underlay to give white some contrast; bring photos if you want that option.
3. Minimalist Line Crescent on Collarbone
Style/Technique: Minimalist / Geometric
Pain Level: Medium (4/10)
Session Time: 45-90 minutes
Best For: Subtle chest accent, shows with low necklines

A white crescent on the collarbone reads like a delicate highlight. Collarbone stings more than inner arm, but it heals cleanly. Expect scabbing for a week and gentle fading during the first month. White here can act like a highlighter; on warmer skin tones it’s softer. Avoid asking for hairline-thin crescents—white needs density. If you want longevity, plan for SPF when exposed; the collarbone gets sun.
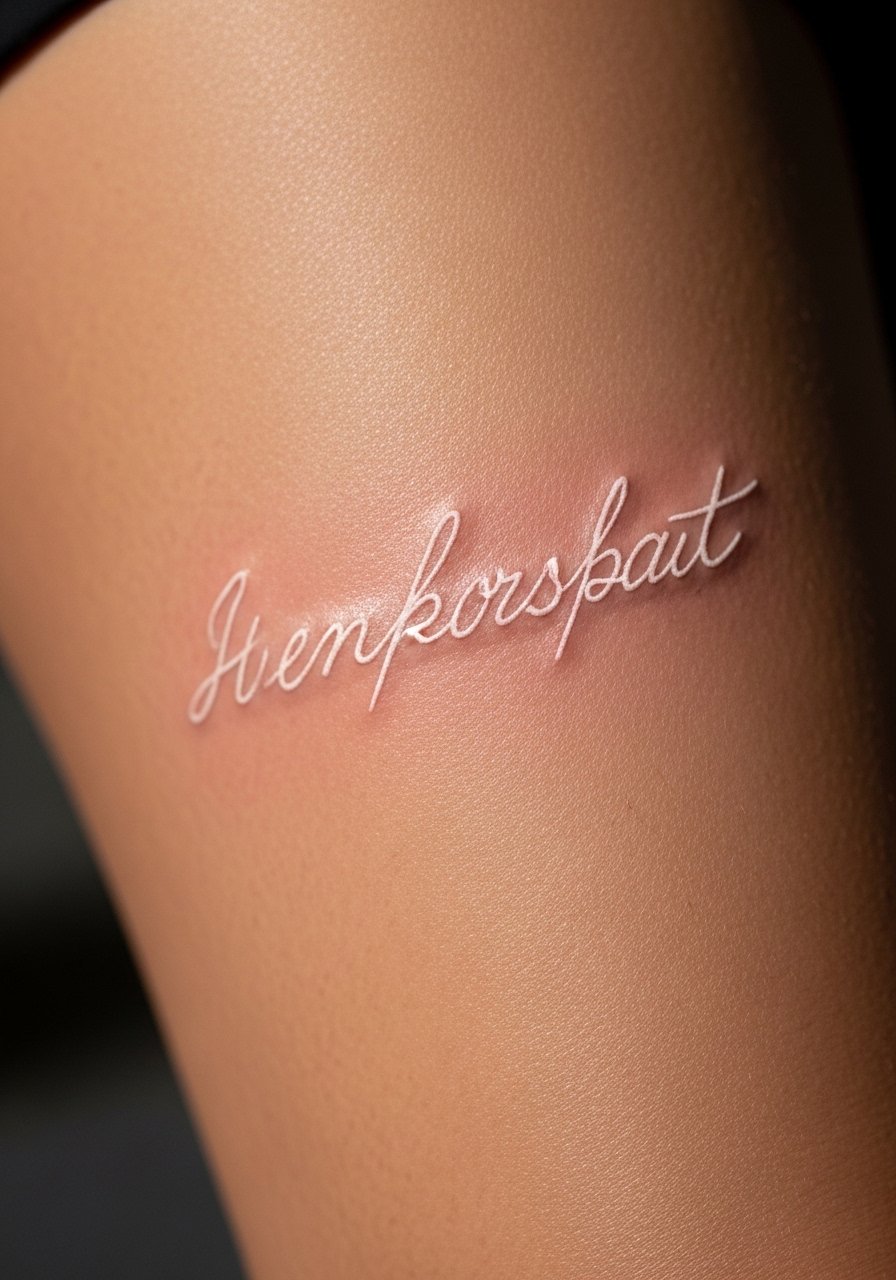
4. Script Name on Ribcage in Cursive White Ink
Style/Technique: Script / Fine Line
Pain Level: High (7-8/10)
Session Time: 1-2 hours
Best For: Hidden, meaningful pieces
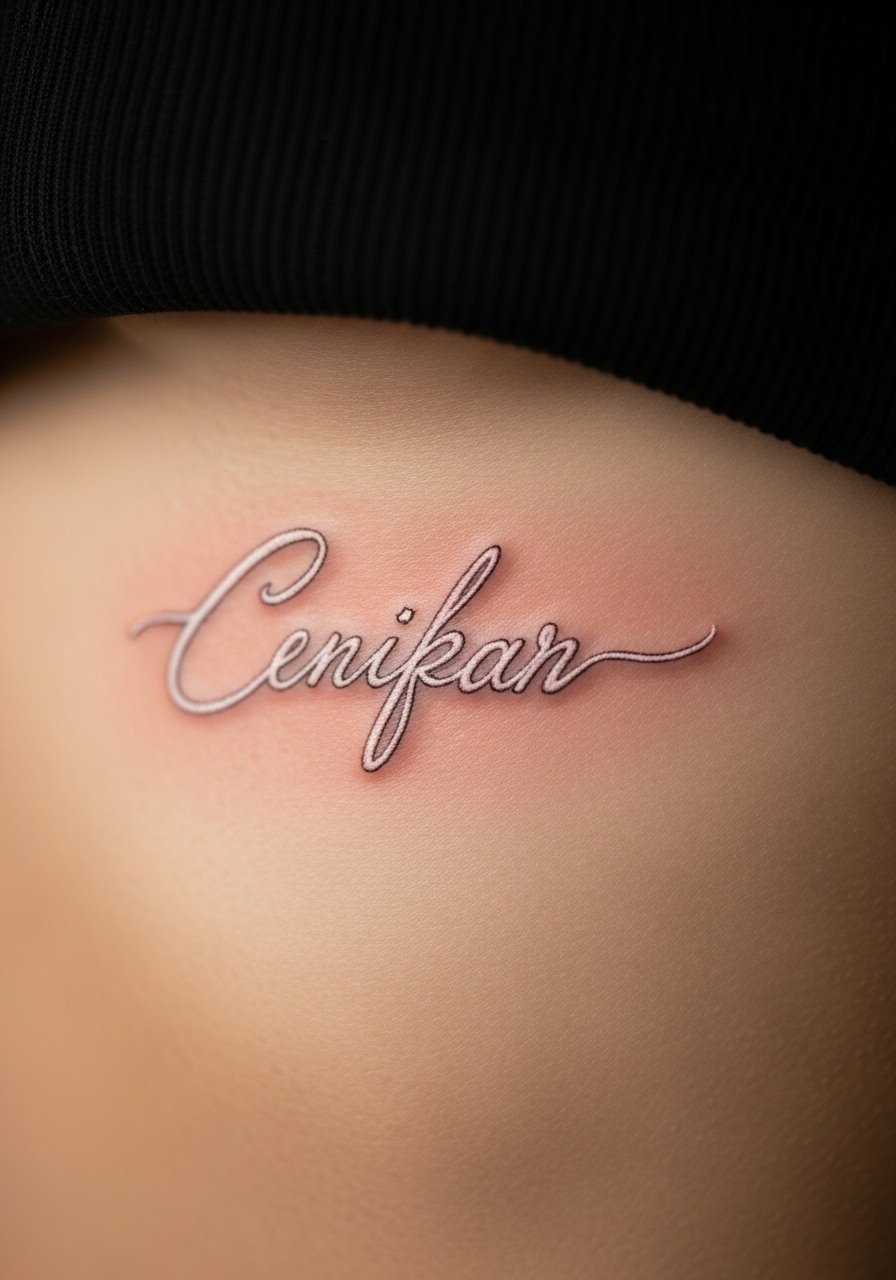
Ribcage is tender, so expect higher pain but the result is intimate. White script here sits almost like a scar and often reads as a faint whisper even when healed. Healing is slower because of movement and clothing friction; avoid tight bras or waistbands. Common mistake: too-thin cursive—choose a slightly bolder script for white. I've asked artists for healed photos of rib white script before committing.
5. Dotwork Constellation on Shoulder Blade
Style/Technique: Dotwork / Minimalist
Pain Level: Low-Medium (3-5/10)
Session Time: 1-2 hours
Best For: Subtle back detail, easy to conceal
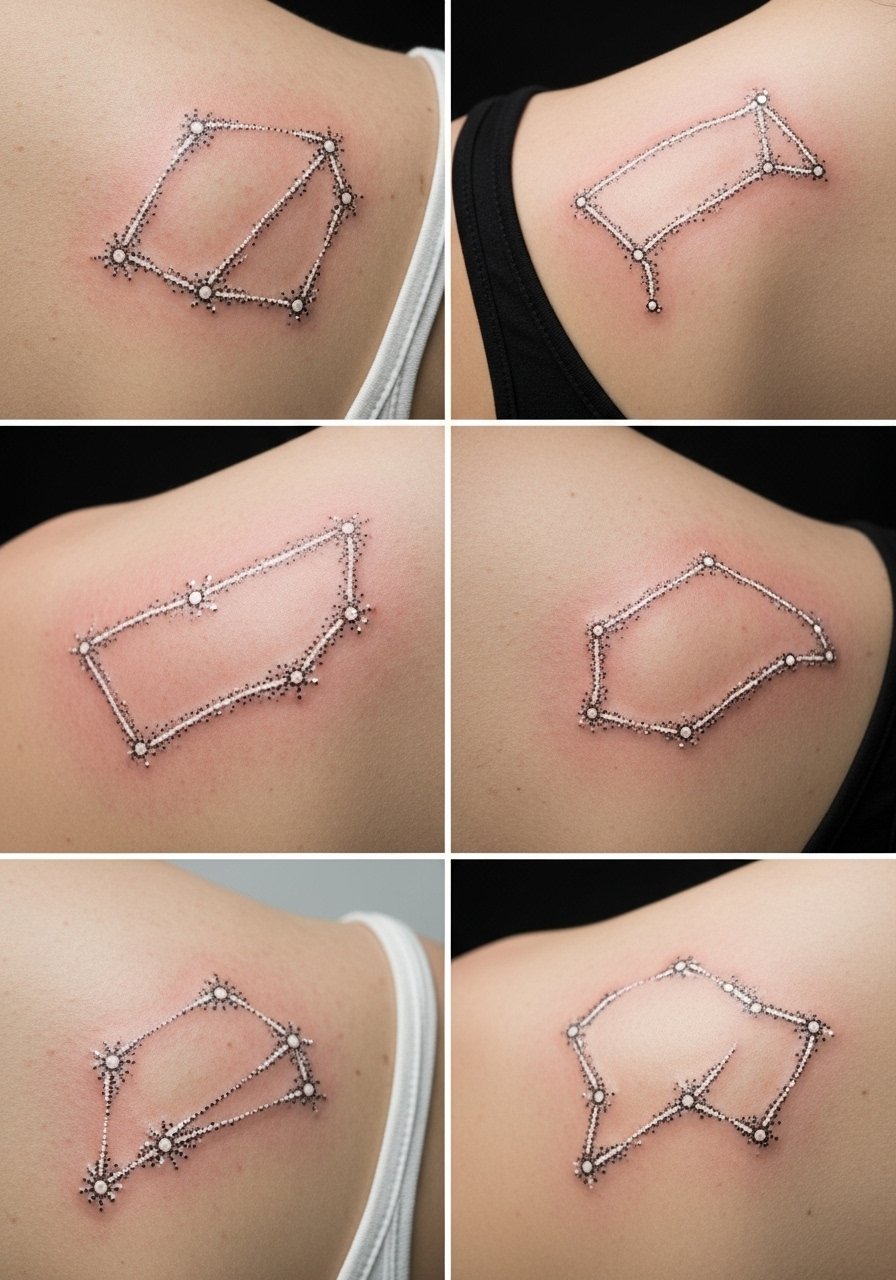
Constellation dotwork in white is discreet and meaningful. The shoulder blade rarely gets direct sun, so white preserves itself well. Dotwork can be forgiving—dots create texture rather than relying on lines. Healing is straightforward, though dots sometimes blur slightly; ask the artist about dot size. A common error is crowding stars too close; spacing keeps the constellation readable as it ages.
6. Hidden Micro-Heart on Inner Lip
Style/Technique: Micro-Realism / Minimalist
Pain Level: High (8/10)
Session Time: 30-45 minutes
Best For: Super hidden, playful choice
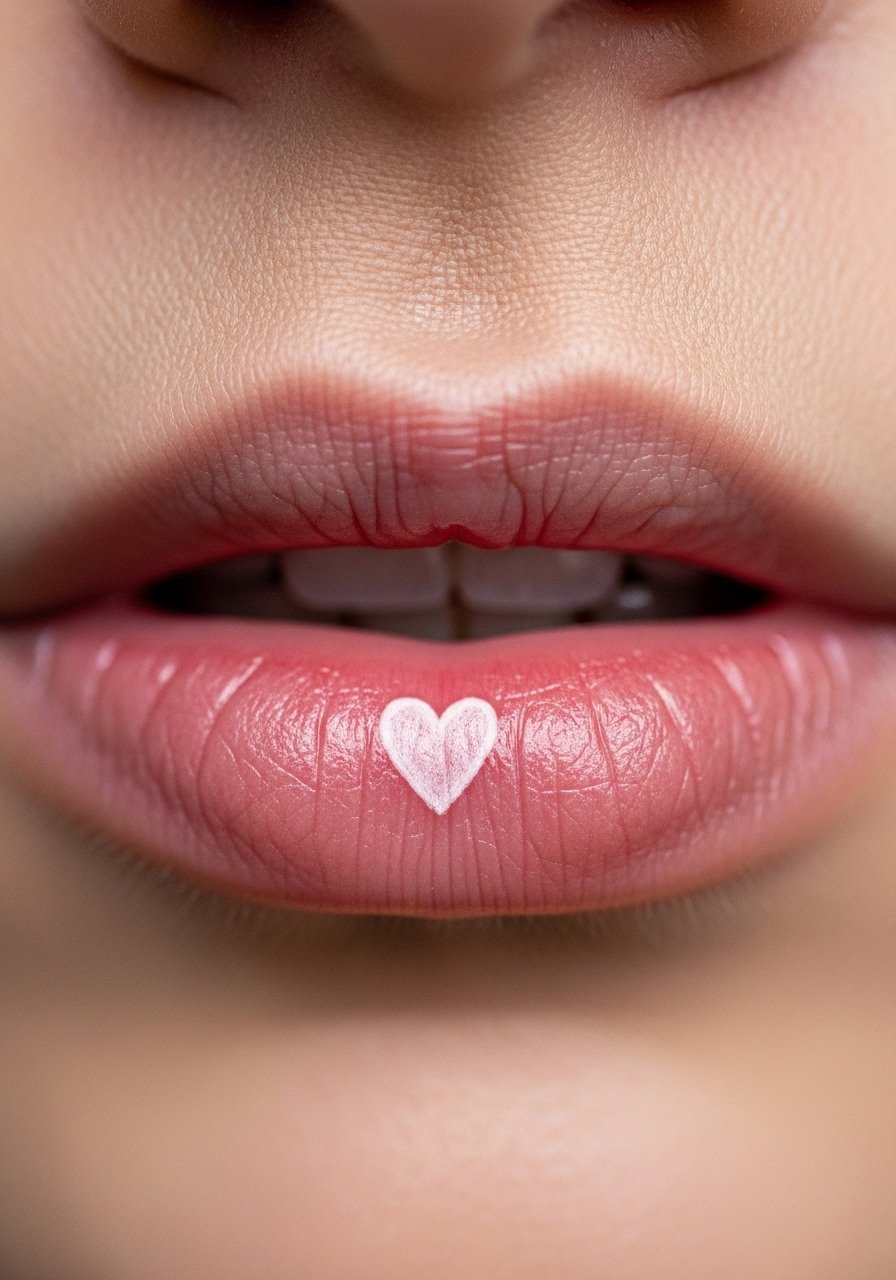
Inner lip white ink is experimental—many artists avoid it because white there can fade quickly. I’ve seen it look exclusive for a few months before becoming a faint ghost. Expect significant fading and touch-ups. If you want longevity, discuss pigments and touch-up plans with your artist. Also, oral tattoos heal differently; follow aftercare closely to avoid infection.
7. Lace-Inspired Bracelet Around Wrist
Style/Technique: Ornamental / Fine Line
Pain Level: Medium (4-5/10)
Session Time: 1-2 hours
Best For: Jewelry-like look, feminine accent
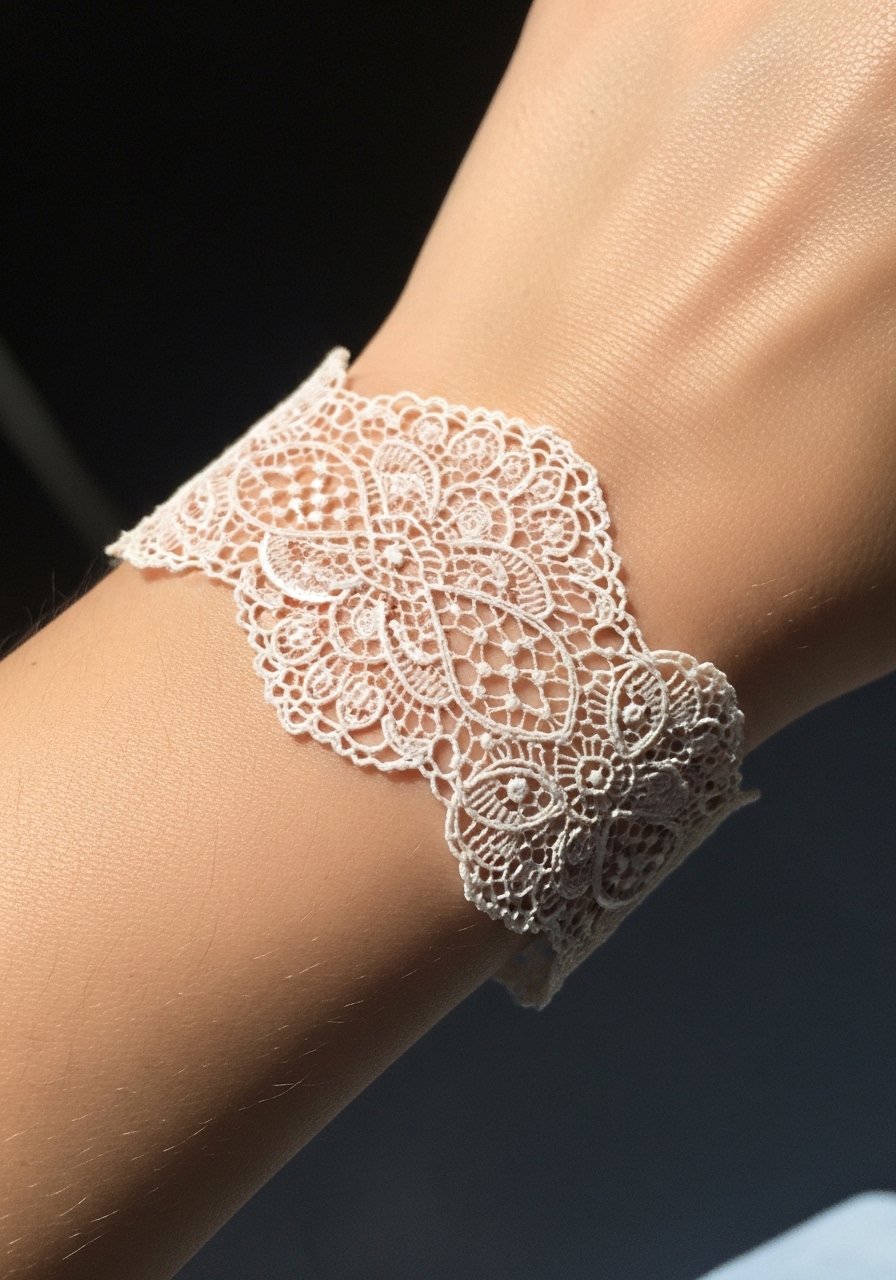
A white lace bracelet reads like a faint band of jewelry. Wrists are exposed, so sun protection matters. Healed lace can look soft and elegant, but thin filigree must be applied with enough pigment. The common mistake is over-detailing; simple patterns hold better over time. Ask your artist to show healed wrist lace examples and whether they suggest a slight gray underlayer for contrast.
8. Subtle Scar-Blend Line Along Old Scar (Rib)
Style/Technique: Scar Camouflage / Micro-Realism
Pain Level: Medium-High (5-7/10)
Session Time: 1-2 hours
Best For: Scar blending, personal restoration
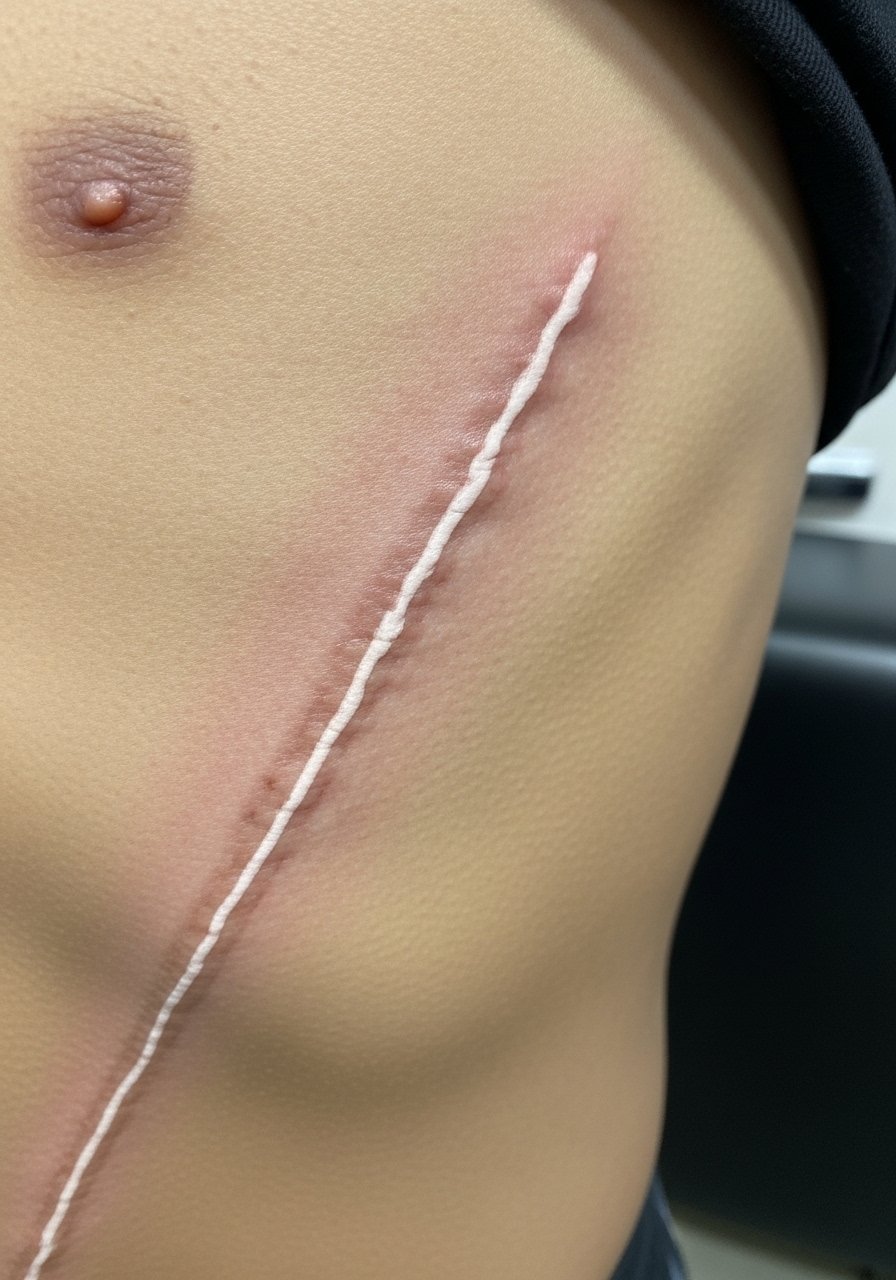
Using white ink to blend or soften a scar can create a gentle continuity on skin. It’s not a guaranteed fix; white may not show on all scar tissue. I always tell friends to bring healed photos and discuss scar texture with an artist experienced in camouflage. Healing is variable—scar tissue takes ink differently. The mistake is assuming white hides a scar completely; it’s usually a textural and visual softening.
9. Minimalist Triangle Ankle Accent
Style/Technique: Geometric / Minimalist
Pain Level: Medium (4-6/10)
Session Time: 30-60 minutes
Best For: Small visible accent, easy to cover with socks
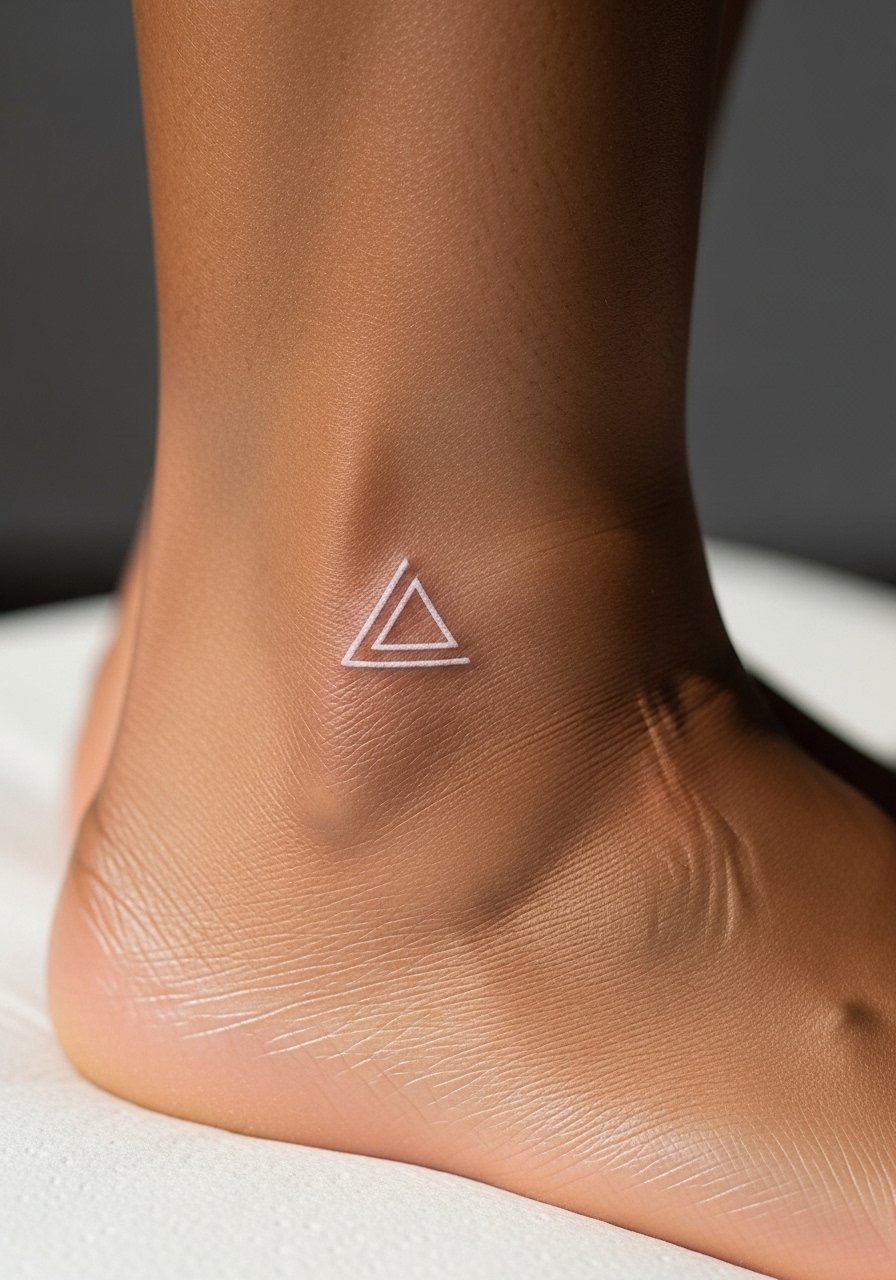
White geometric shapes at the ankle feel contemporary and low-key. Ankles are bony—expect more discomfort and slightly longer surface healing if shoes rub. White stays subtle here but can blur if lines are extremely thin. Common mistake: tiny triangles with hairline lines. Ask for slightly thicker outlines with crisp corners; that helps the triangle keep shape as it heals.
10. Micro-Arrow on Side of Finger
Style/Technique: Minimalist / Fine Line
Pain Level: High (6-8/10)
Session Time: 20-40 minutes
Best For: Tiny visible accent, risky for longevity
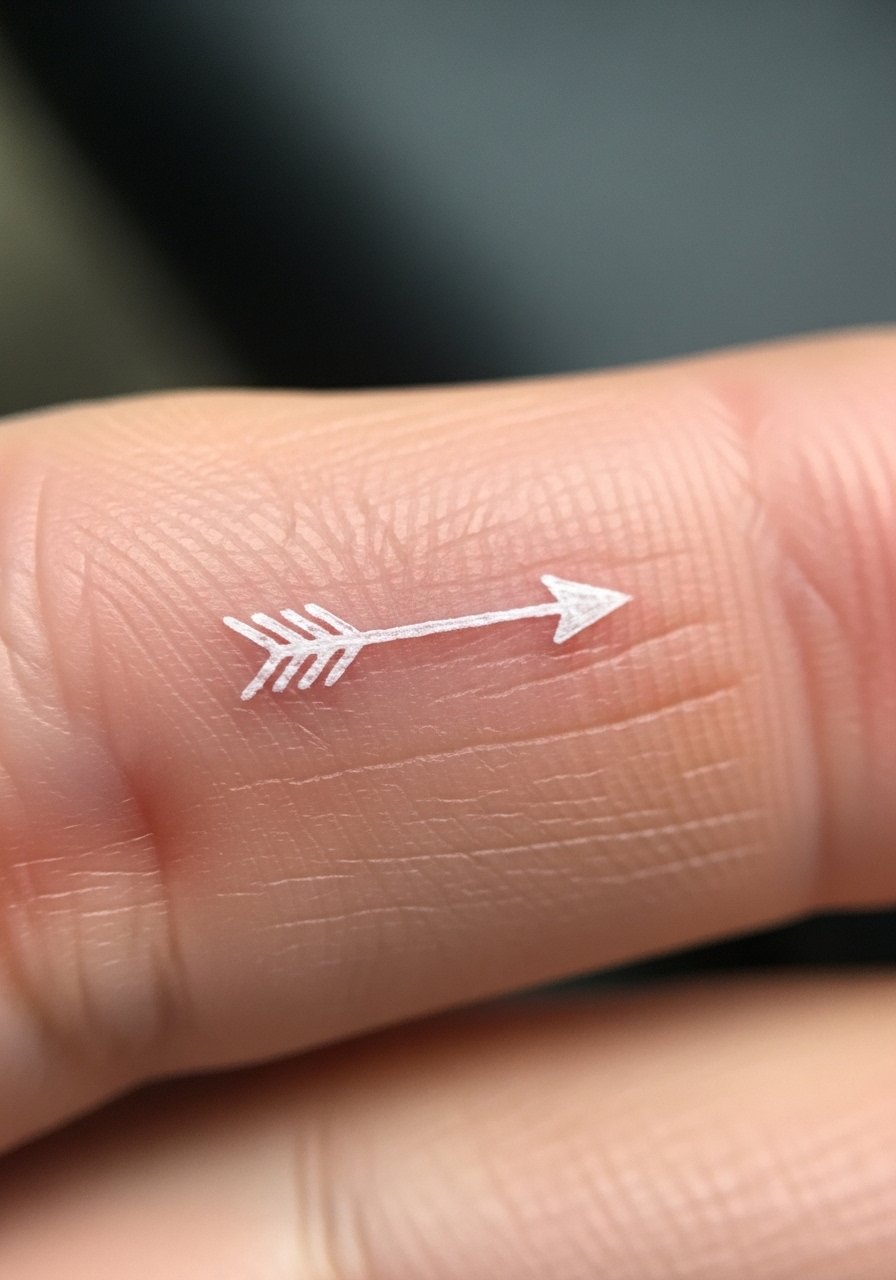
Finger placements are notorious for fading and migration; white is even more delicate. I recommend this only if you accept likely touch-ups. The arrow looks modern when fresh but will soften as skin regenerates. Avoid white alone on fingers if you need permanence. If you go for it, expect quick surface healing and more frequent maintenance.
11. Micro-Realism Pet Paw on Inner Bicep
Style/Technique: Micro-Realism / Sentimental
Pain Level: Low-Medium (3-5/10)
Session Time: 1 hour
Best For: Personal tribute, subtle but meaningful
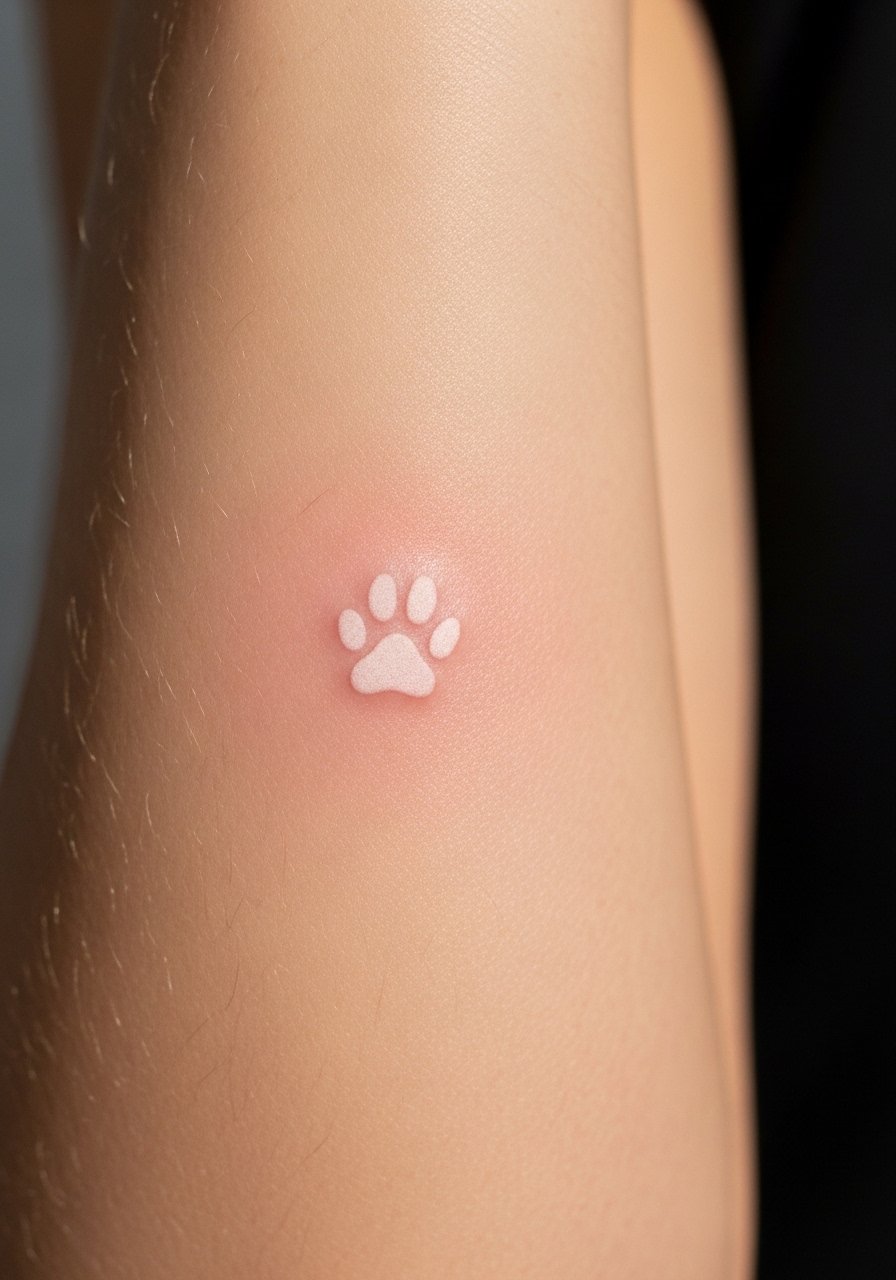
A white paw on the inner bicep reads like a private token. Inner bicep holds ink well because it's less sun-exposed and thicker. Healing is predictable. For white pet details, ask the artist whether to use a faint gray outline or keep it purely white; pure white will be more subtle, gray underlay gives definition. Avoid oversized dots that can blur into a blob.
12. Jewelry-Inspired Chain on Nape
Style/Technique: Ornamental / Fine Line
Pain Level: Medium (4-5/10)
Session Time: 1-2 hours
Best For: Neck adornment under hair
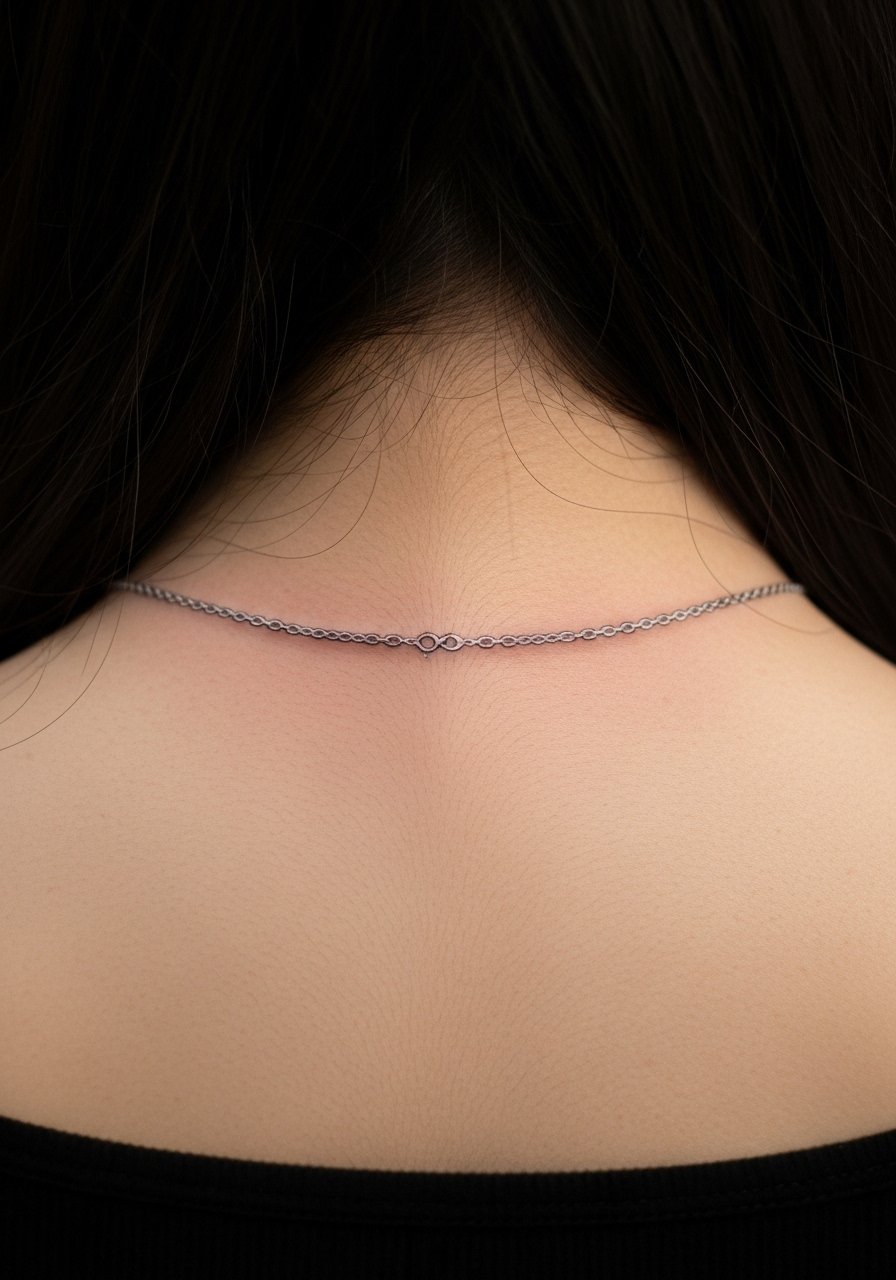
A white chain on the nape reads like an accessory. It's hidden under hair but shows when you wear updos—very exclusive. The skin there tolerates white well; sun exposure varies. Healing is straightforward; avoid tight collars while it settles. Common error: adding too many tiny links—larger, simple links last better.
13. Subtle Mandala Center on Sternum
Style/Technique: Dotwork / Geometric
Pain Level: High (6-8/10)
Session Time: 2-3 hours
Best For: Centerpiece, intimate reveal
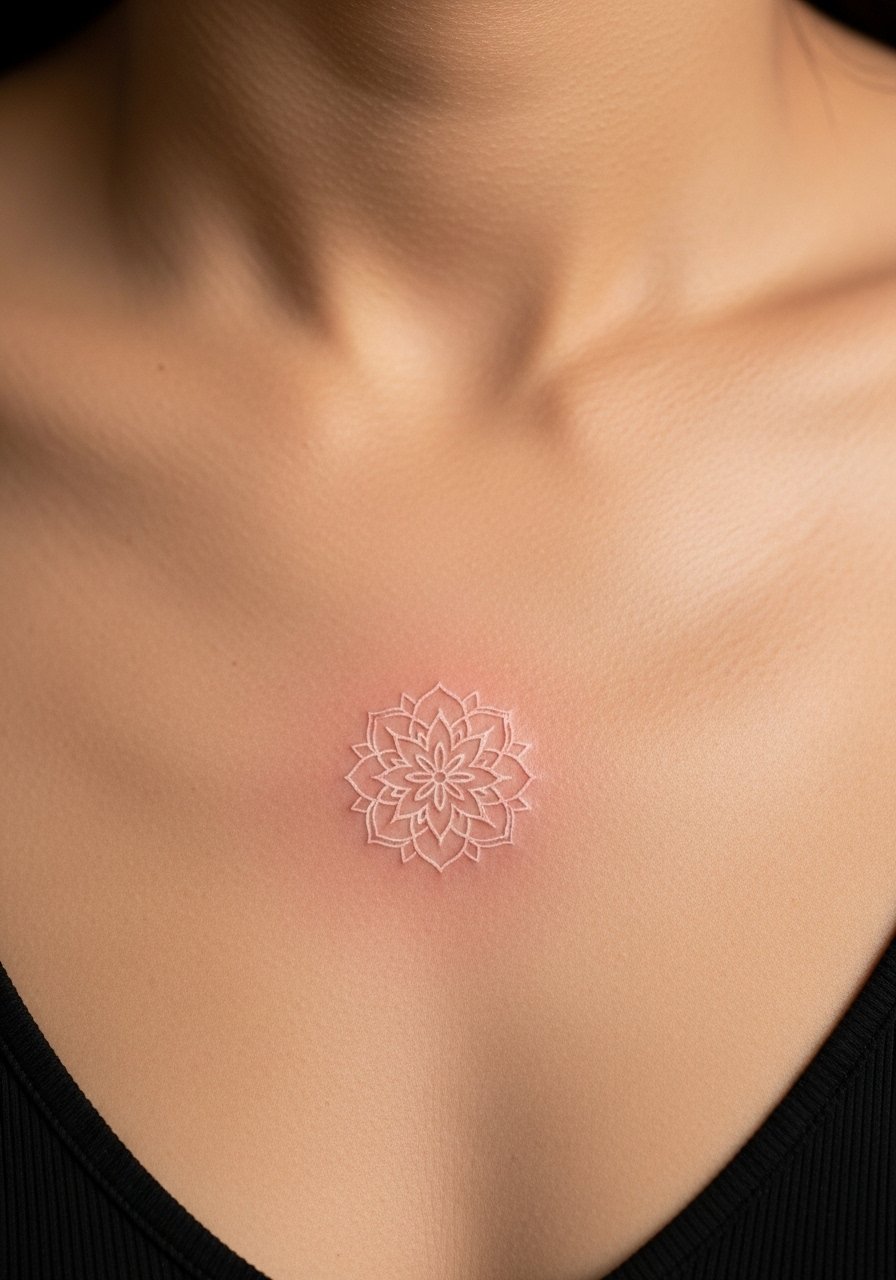
Sternum placements are painful but dramatic. White mandala dots create texture and a soft central focus. Healing needs patience—avoid tight clothing. White dotwork here can keep its pattern well if dots are sized thoughtfully. Don't overcomplicate the mandala; dense detail can blur. Ask for healed photos of sternum white work.
14. Minimalist Wave on Hip Bone
Style/Technique: Minimalist / Fine Line
Pain Level: Medium (4-6/10)
Session Time: 30-60 minutes
Best For: Hidden sensual accent, swimsuit-friendly

A tiny white wave on the hip is seaside and discreet. Hip skin can be stretchy, so expect some movement during healing. White here softens into a faint shimmer under clothes. Artists often suggest a slightly thicker curve for white. Avoid ultra-thin single strokes; they risk disappearing as the skin renews.
15. Script Single Word on Inner Wrist
Style/Technique: Script / Minimalist
Pain Level: Low (3/4)
Session Time: 30-60 minutes
Best For: Everyday reminder, subtle visibility
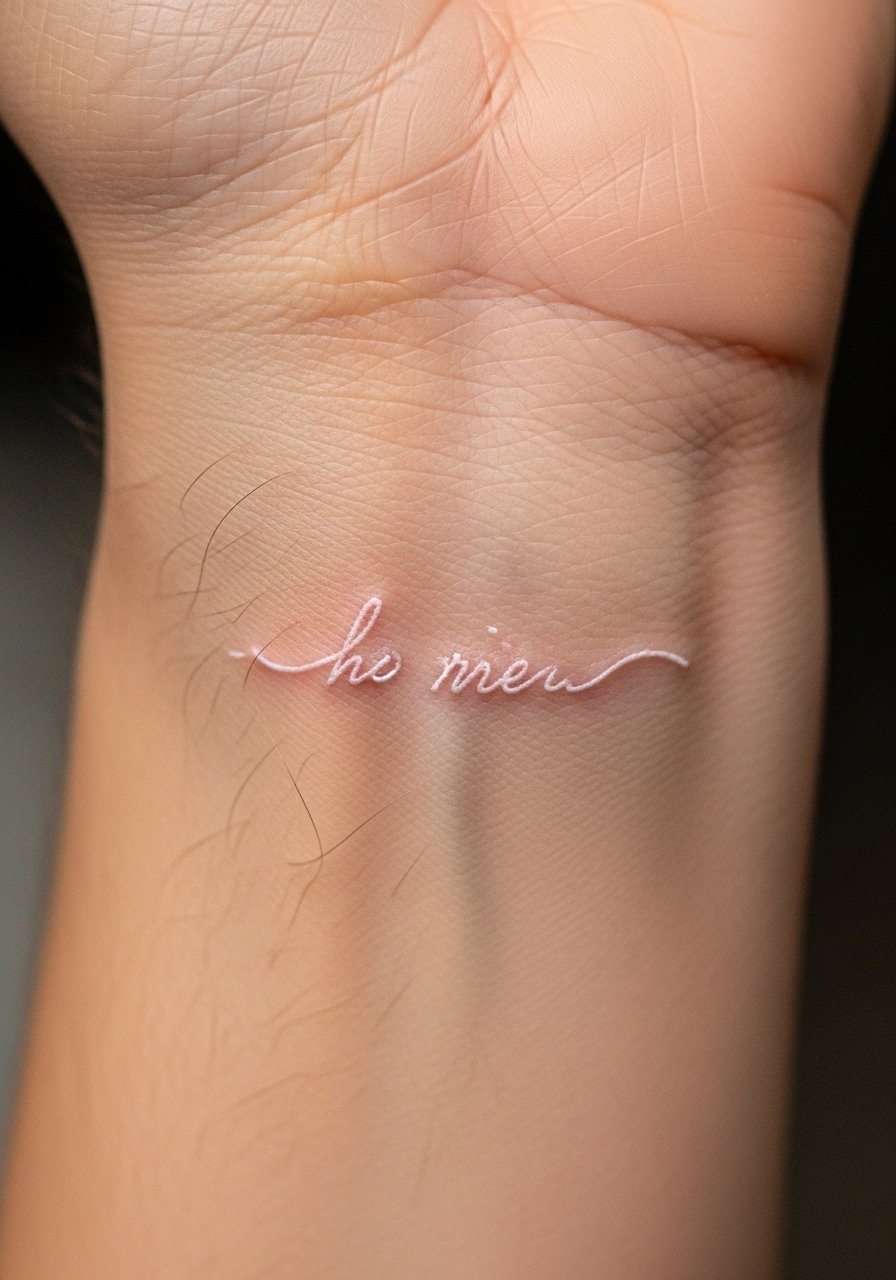
Inner wrist scripts are intimate and visible. White words can be subtle and personal, reading almost like embossed text. Expect daily visibility to speed fading if you skip sunscreen. The common mistake is choosing tiny loops and flourishes; white favors clean, simple letterforms. I always ask artists to show healed wrist white script before booking.
16. Micro-Realism Highlight in Portraits (Behind Ear)
Style/Technique: Micro-Realism / Highlighting
Pain Level: Low (2-4/10)
Session Time: 1-2 hours
Best For: Subtle portrait highlight, adds dimension
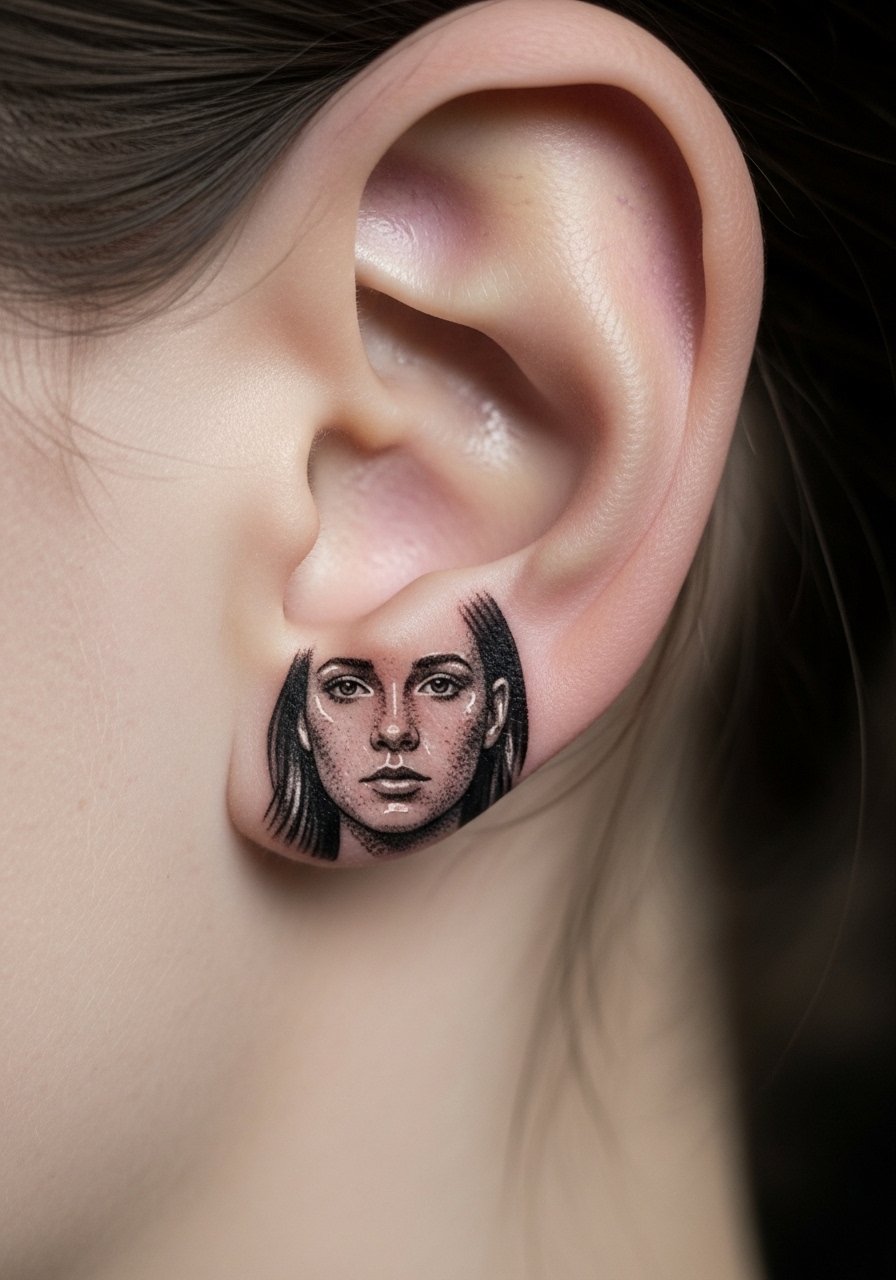
Artists use white ink sparingly to lift highlights in micro-portraits. Behind the ear is a smart spot to experiment. White here acts like a soft reflection and makes the portrait pop without bold color. Healing is quick. Important: white in portraits should be planned by an artist experienced in tonal work—ask for healed portrait examples with white highlights.
17. Invisible Script on Upper Thigh
Style/Technique: Fine Line / Hidden
Pain Level: Medium (4-6/10)
Session Time: 45-90 minutes
Best For: Private, sensual message
Upper-thigh white script stays mostly private, perfect for messages meant only for you or a partner. Thigh skin accepts white well and protects it from sun. Healing is comfortable if you avoid tight underwear. Mistake: overly ornate fonts—choose clean lettering so the word remains legible as it settles.
18. Tiny Moon Phases on Side Rib
Style/Technique: Minimalist / Symbolic
Pain Level: High (7/8/10)
Session Time: 1-2 hours
Best For: Discreet series, meaningful progression
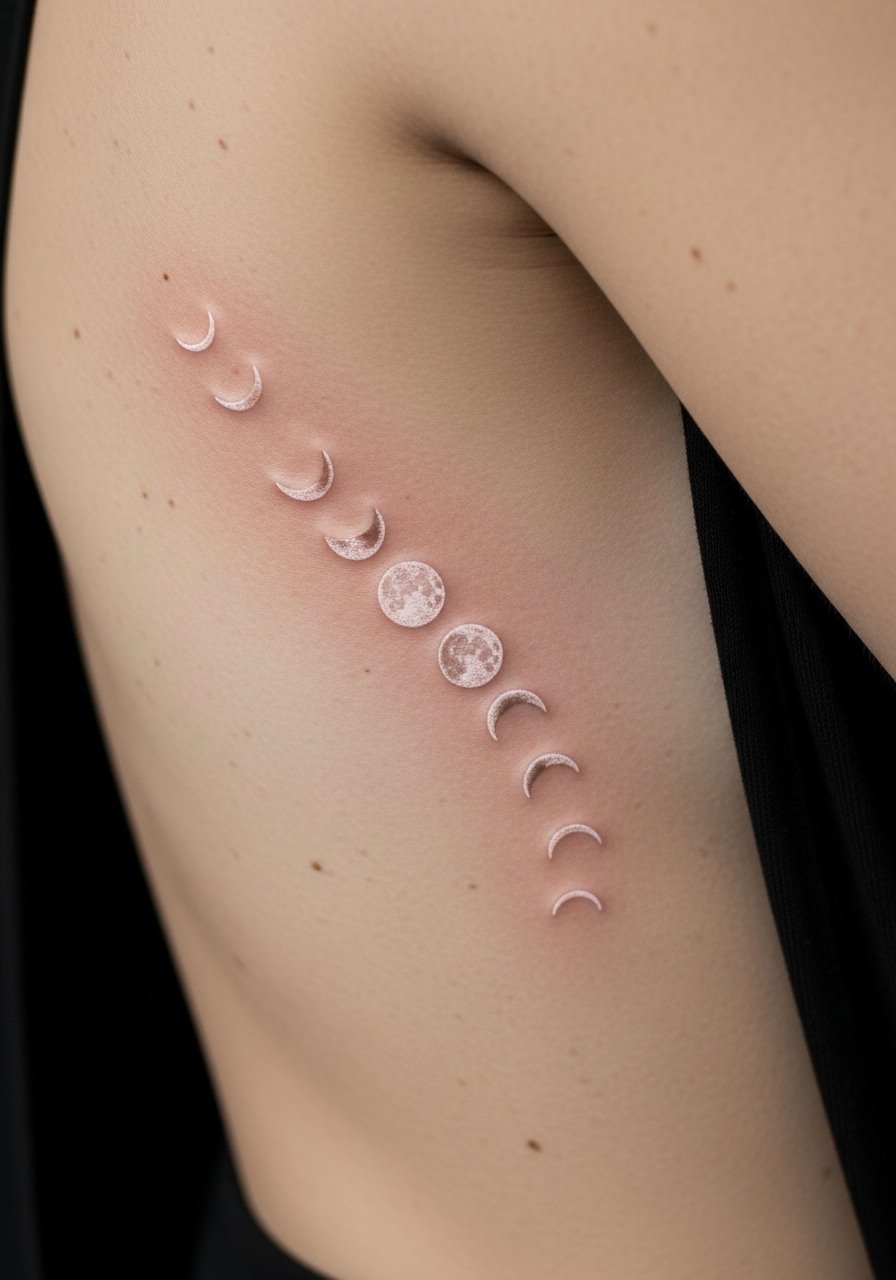
Moon phases on the rib are quietly poetic. The placement is tender, but the repeating pattern ages gracefully if dots and crescents are sized for white pigment. Healing needs gentle clothing choices. A common error is making each phase too small; slightly larger icons keep clarity longer.
19. Geometric Arrow Spine Accent
Style/Technique: Geometric / Fine Line
Pain Level: High (7-8/10)
Session Time: 1-3 hours
Best For: Vertical, discreet back detail
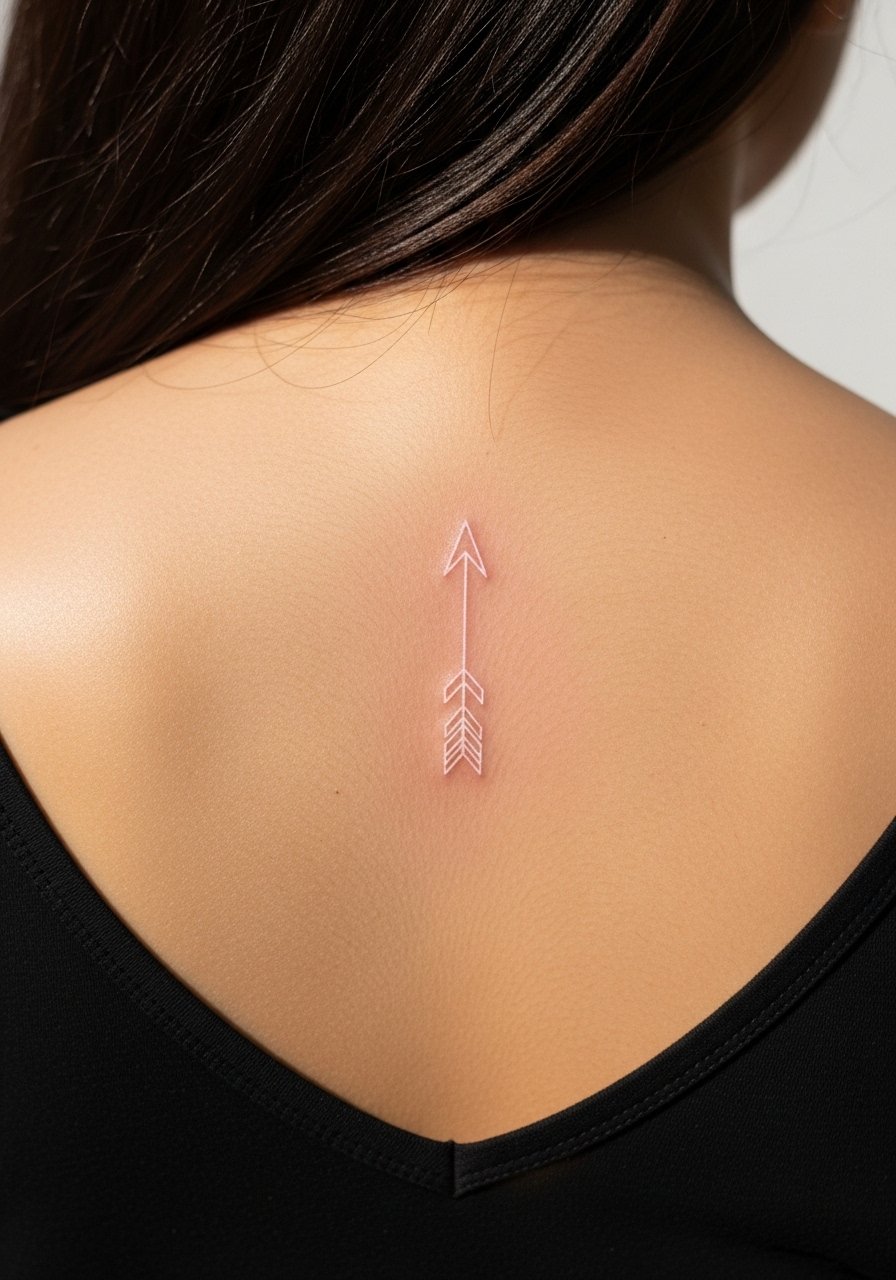
A spine arrow in white reads like a faint central stripe. Spine is a sensitive area; expect soreness for several days. White holds if the artist uses enough pigment and line weight. Avoid ultra-thin arrowheads; thicker tips survive skin settling. I usually ask to see healed spinal white work before committing.
20. Floral Single Bloom on Clavicle
Style/Technique: Fine Line / Botanical
Pain Level: Medium (4-5/10)
Session Time: 1-2 hours
Best For: Feminine, near-decolletage accent
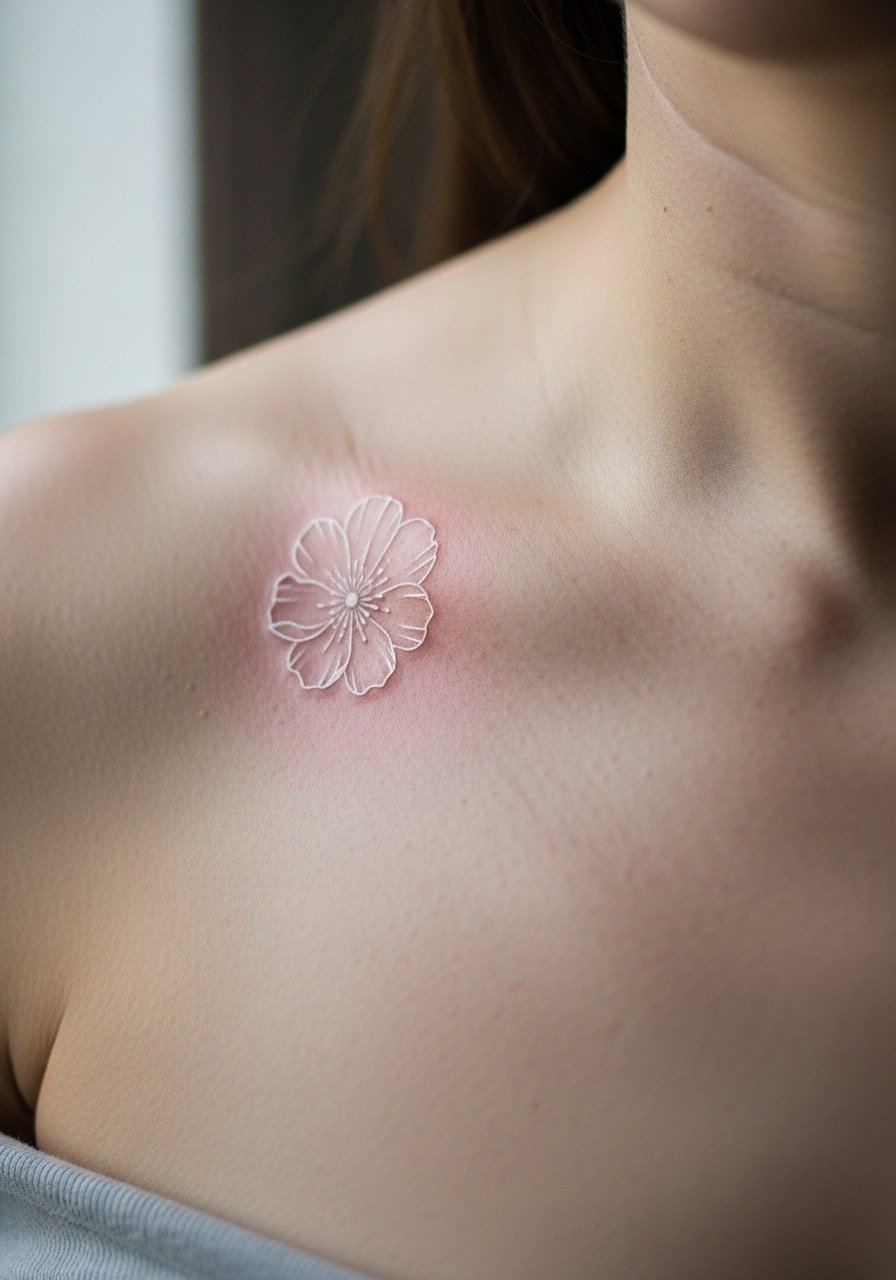
A single white bloom on the clavicle reads soft and personal. The area sees sun, so sunscreen later is important. Healing is straightforward, but delicate petals need enough pigment to remain visible. I caution against overly intricate petal lines; simplified shapes look more timeless in white.
21. Small Anchor on Outer Ankle
Style/Technique: Minimalist / Nautical
Pain Level: Medium (4-6/10)
Session Time: 30-45 minutes
Best For: Travel-themed, easy to conceal
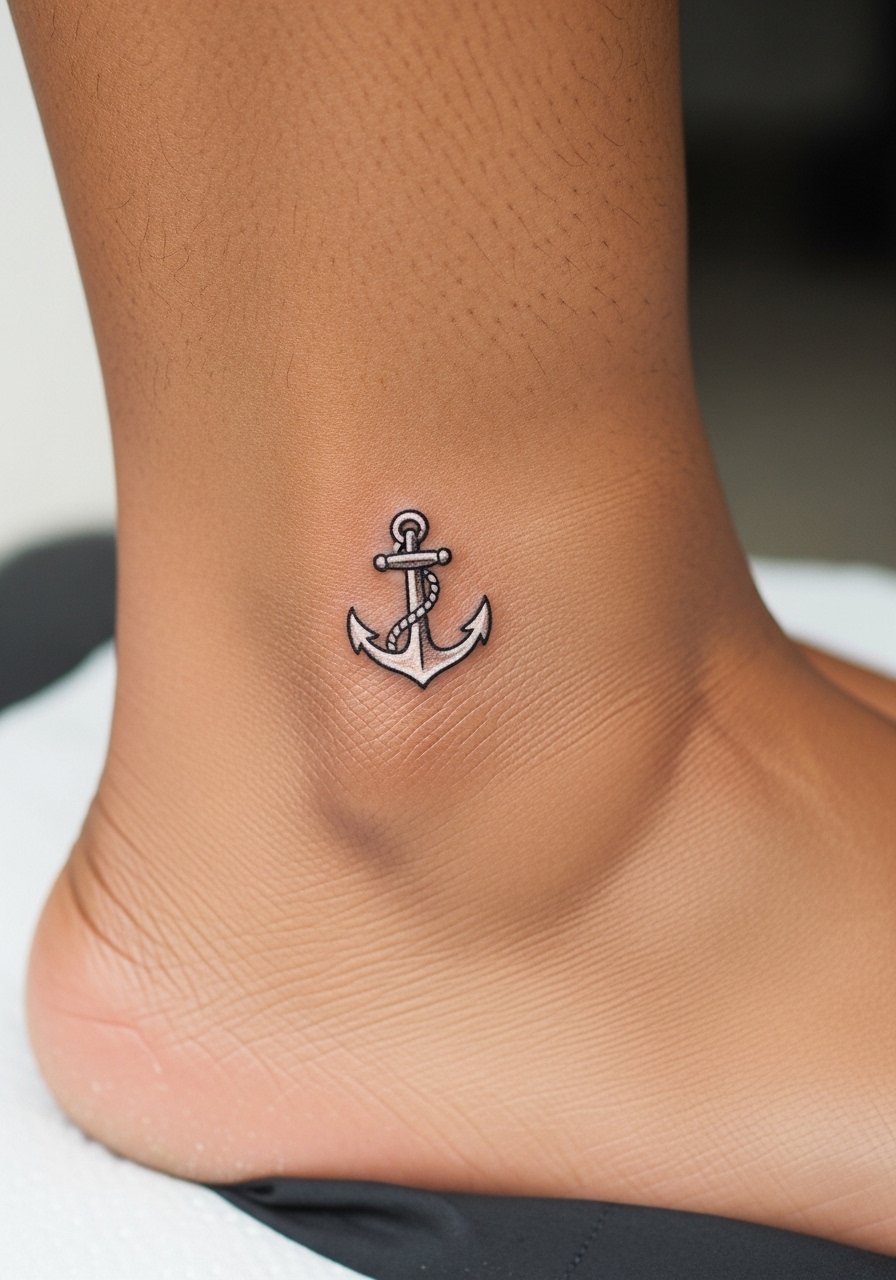
White anchors on the ankle feel like subtle reminders of journeys. Ankles can blur; choose a slightly bolder silhouette. I’ve seen anchors maintain shape when the artist sizes the negative spaces carefully. Avoid tiny rope details that can dissolve into dots.
22. Tiny Snowflake on Back of Hand
Style/Technique: Micro-Realism / Fine Line
Pain Level: High (6-8/10)
Session Time: 30-60 minutes
Best For: Visible seasonal accent, ephemeral charm
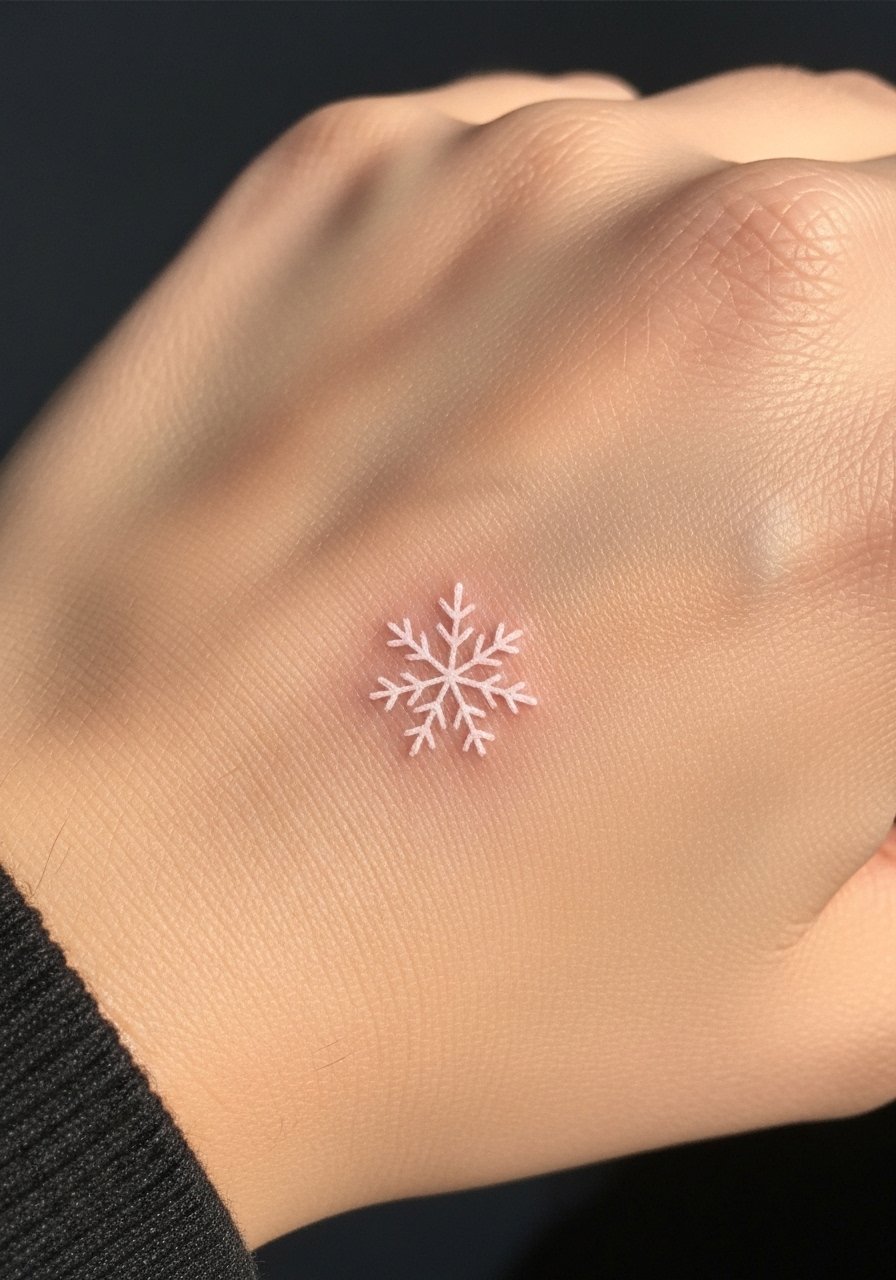
Hands wear fast and are exposed to sun and washing; white snowflakes may become faint quickly. If you want this, accept touch-up reality. A clean, slightly chunkier snowflake pattern lasts better than ultra-fine branching. I recommend asking your artist about long-term expectations for hand white ink.
23. Subtle Infinity Loop on Behind Knee
Style/Technique: Minimalist / Fine Line
Pain Level: Medium (4-6/10)
Session Time: 30-45 minutes
Best For: Hidden movement-based placement
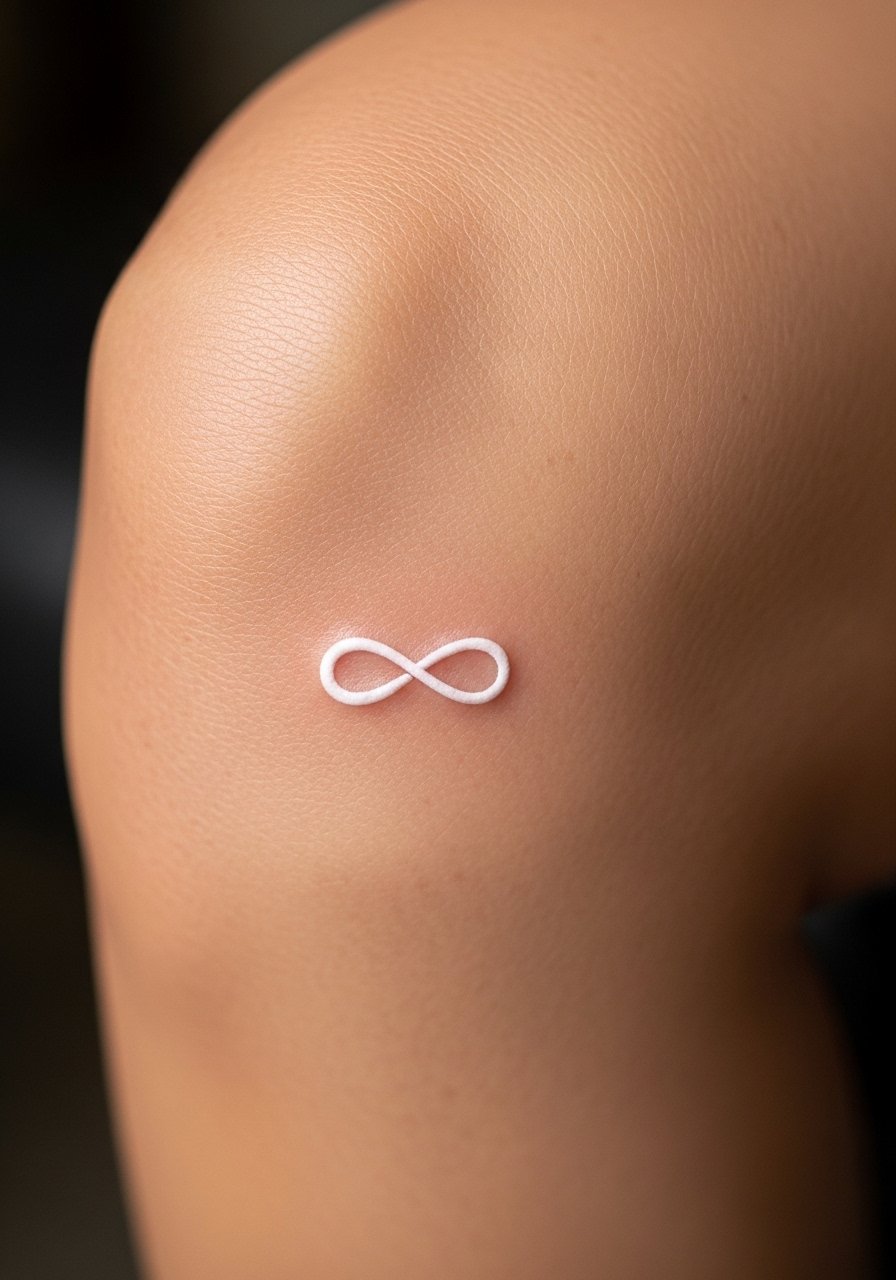
Behind-knee placements are fun but see friction; expect scabbing and possible longer healing if you move a lot. White infinity loops read like a faint symbol when healed. The trick is not to choose hairline lines—use a slightly stronger application. Discuss mobility during healing with your artist.
24. Delicate Lace Eyeliner-Style Flick
Style/Technique: Ornamental / Cosmetic-Style
Pain Level: Medium-High (5-7/10)
Session Time: 1-2 hours
Best For: Subtle cosmetic accent, near-eye detail
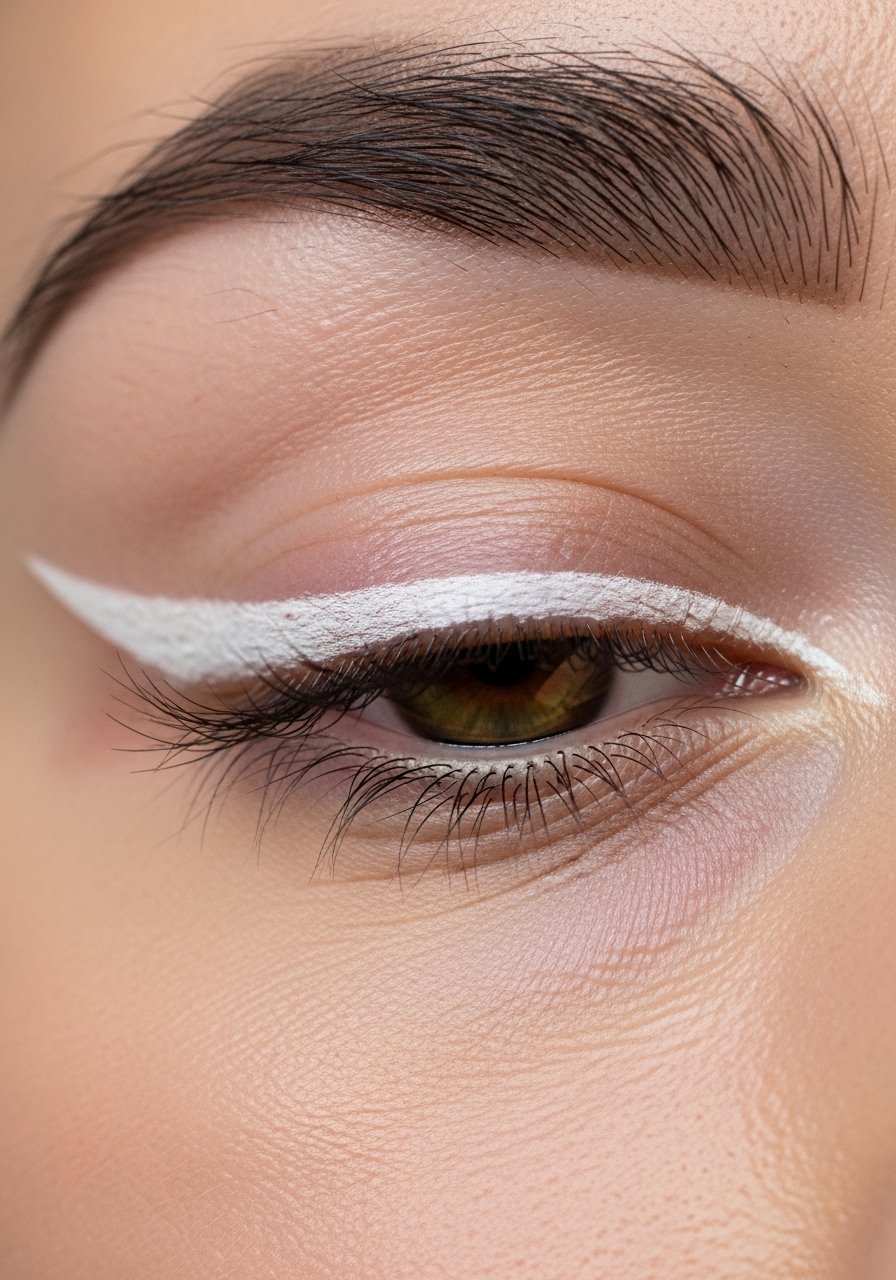
Cosmetic-style white flicks beside the eye act like long-term eyeliner highlight. The area is sensitive and requires an experienced artist. Healing is delicate—avoid makeup during the first weeks. White here can look like a soft reflective line when healed. Common mistake: making the flick too thin; a slightly bolder stroke reads better over time. Confirm your artist's experience with near-eye placements before booking.
Tattoo Prep and Aftercare Essentials
Aftercare Essentials:
- Aquaphor Healing Ointment, 14oz tube — Use first 3-5 days for sealing and protection
- Saniderm Transparent Adhesive Bandage, 6-inch roll — Second-skin method many artists recommend
- CeraVe Fragrance-Free Moisturizing Lotion — Daily moisturizer for healing days 4-30
- Dr. Bronner's Unscented Castile Soap, 32oz — Gentle cleanser for the first week
Before Your Appointment:
- Tattoo Numbing Cream with 5% Lidocaine — Apply 30-45 minutes before only if your artist OKs it
- Stencil Transfer Paper — Handy if you’re testing placement at home
Long-Term Maintenance:
- SPF 50 Sunscreen Stick for Tattoos — Daily protection to prevent fading
- Mad Rabbit Tattoo Balm — Post-healing moisturizer artists recommend
- Hustle Butter Deluxe, 4oz — Vegan aftercare option many people like
Optional Comfort & Repair:
- Tattoo Numbing Spray — For touch-ups or very sensitive spots
- Hydrocolloid Bandages, 10 Pack — For dot protection or small spots during healing
I’ve found artists frequently recommend Aquaphor for the initial seal and Saniderm for people who want a low-maintenance first 48–72 hours. For long-term vibrancy, a daily SPF stick and a fragrance-free lotion like CeraVe are what I hear over and over.
Frequently Asked Questions
Q: How bad does a white ink tattoo actually hurt?
A: Pain depends on placement. Forearm/outer thigh = 3-4/10. Ribcage/inner wrist/fingers = 7-8/10. It’s often a steady scratching sensation. For tense areas, ask about a numbing cream with 5% lidocaine—it reduces discomfort but won't remove all feeling.
Q: Will white ink show on my skin tone?
A: White reads differently by skin tone. On fair skin it pops more; on deeper tones it becomes a subtle, ghost-like accent. I've seen artists use a faint gray underlay to give white more contrast on darker skin—ask to see healed examples for your tone.
Q: How long until white ink settles and looks like the healed photos online?
A: Surface healing: 1–2 weeks. Full settling: 2–6 months for whites to integrate and soften. White can look bright at first and then become a subdued highlight. Follow aftercare—keep it clean and moisturized with CeraVe lotion.
Q: How do I keep white tattoos from fading?
A: Sunscreen is non-negotiable. From what I've seen, UV exposure ages white ink fastest. Use an SPF 50 sunscreen stick on exposed white ink and moisturize regularly with a fragrance-free lotion.
Q: Can white ink be used for scar camouflage?
A: Sometimes. Scar tissue takes ink unpredictably. White can soften contrast but rarely “erase” a scar. I recommend consulting an artist experienced in scar work and looking at healed examples before proceeding.
Q: Can I work out after getting a white ink tattoo?
A: Wait at least 48–72 hours, longer if the area flexes a lot. Sweating risks ink loss and infection. For the first week, keep the area clean with a gentle soap like Dr. Bronner's Unscented Castile Soap and moisturize as instructed.
Q: If my white tattoo fades, can it be touched up?
A: Yes. Touch-ups are common, especially with white. Some artists recommend periodic refreshes or adding a soft gray underlayer for longevity. Discuss touch-up policy when you book.
Q: Do white tattoos age differently than black or color?
A: Yes. White tends to soften into a subtle highlight and can become less visible faster than black. From what I've noticed, careful planning—slightly thicker strokes, conscious placement, and sun protection—helps white keep its intended look.
