
I spent months saving reference images of 3D work before booking my first piece. The tricky part wasn’t finding a cool design. It was figuring out which 3D styles actually read well healed and which ones only look good fresh. These 28 ideas focus on realistic 3D techniques that stand up over time—and what to expect when you get them.
This list focuses on hyper-realism, trompe-l'oeil, and micro-realism. Placements range from forearm and chest to ribs and hands. From what I’ve seen in 2026 trends, artists are pairing shadowing with subtle color for the most convincing 3D effect.
1. Micro-Realism Butterfly on Inner Forearm
Style/Technique: Micro-Realism / Photorealistic
Pain Level: Low-Medium (3-4/10)
Session Time: 1-3 hours
Best For: First realistic piece, visible but easy to cover
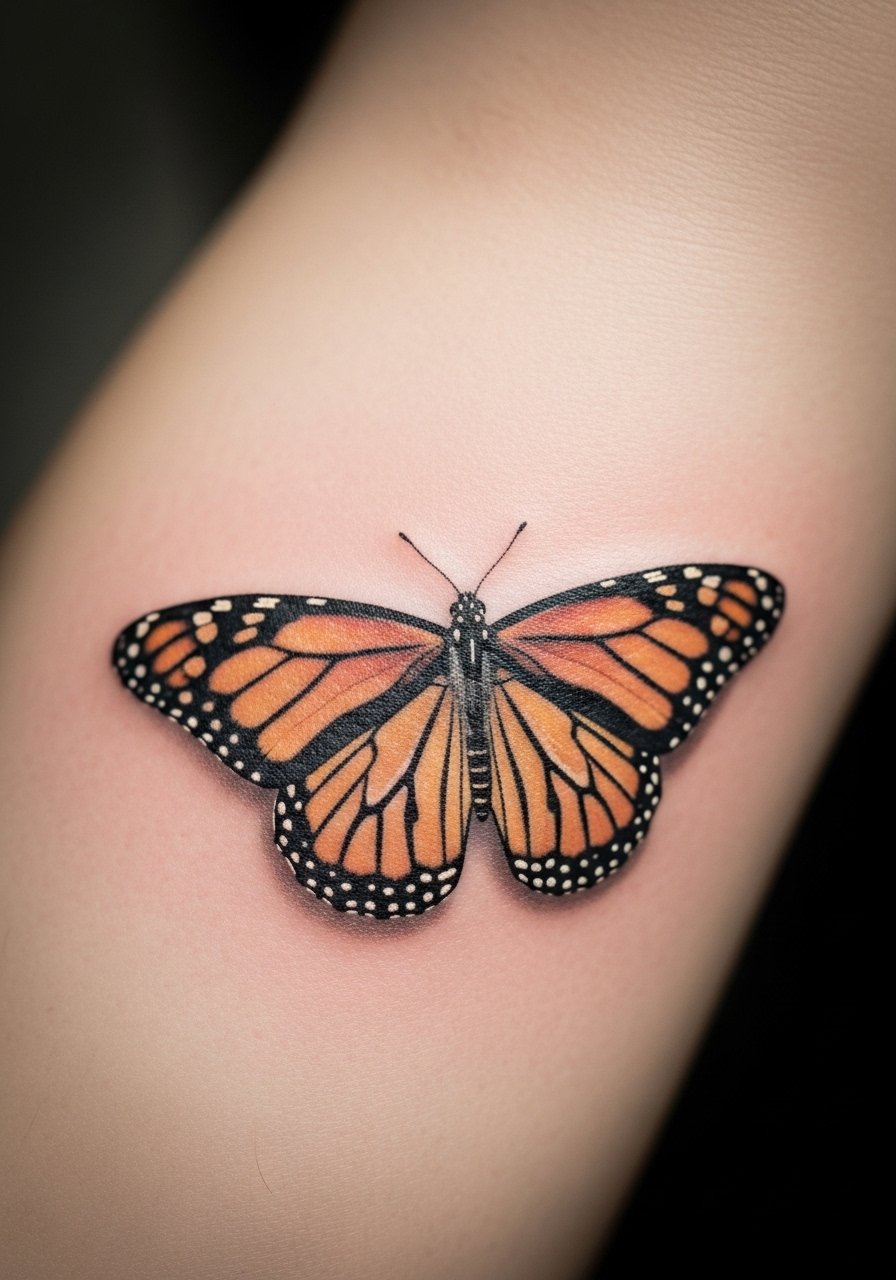
I love this as a first 3D experiment. Micro-realism gives feathered edges and soft shadows that sell depth without heavy saturation. Inner forearm is forgiving for fine needles, so pain stays manageable. Expect surface healing in 2-3 weeks and full settling at 3 months. Healed photos I’ve followed show tiny lines may blur slightly—ask your artist to bolden core shadows. A common mistake is over-detailing at too-small a scale. During consult, look for artists who show healed macro shots and who use layered shading and white highlights for lift.
2. Trompe-L’oeil Zipper on Sternum
Style/Technique: Trompe-L’oeil / Anamorphic
Pain Level: High (7-8/10)
Session Time: 2-4 hours
Best For: Statement piece, dramatic reveal
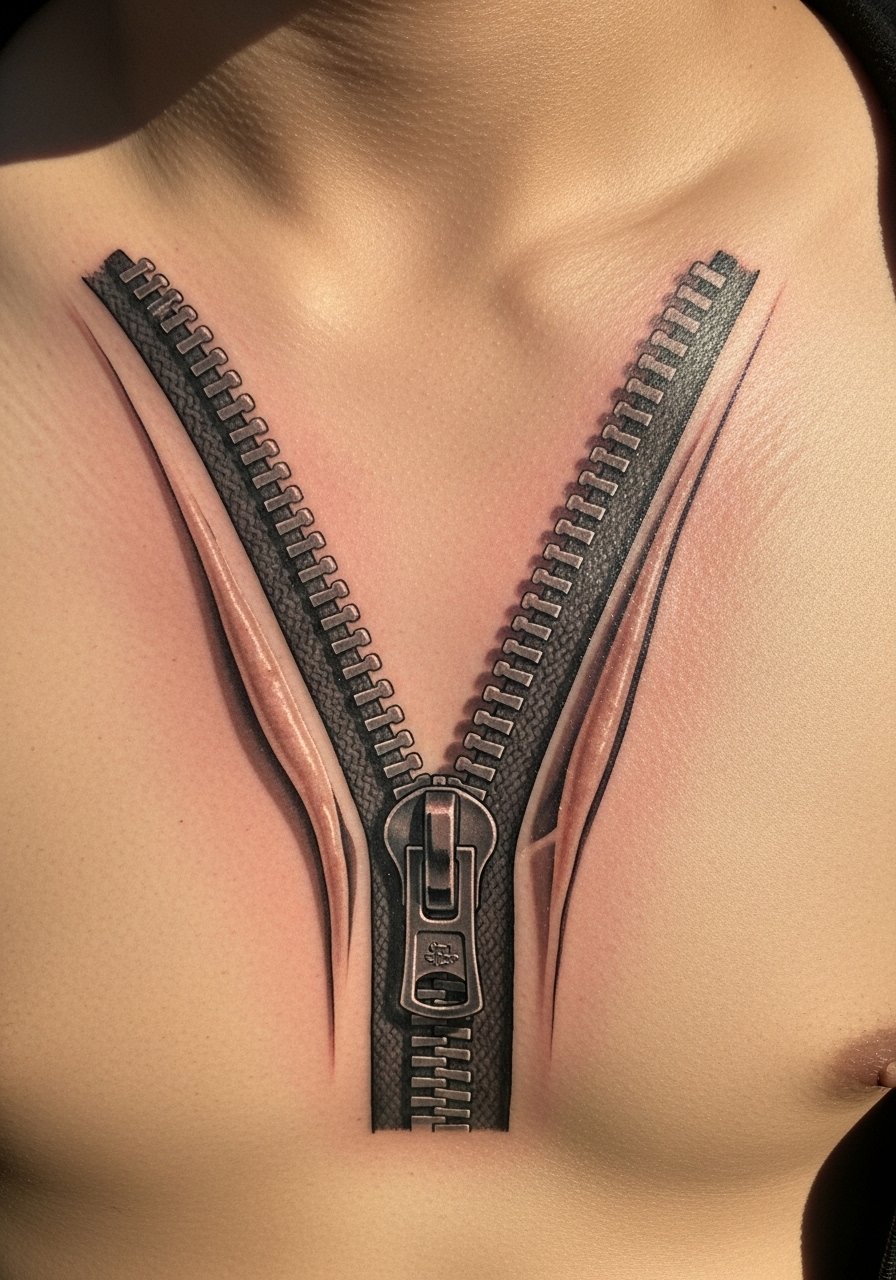
A zipper illusion looks like skin has been unzipped to reveal another layer. Sternum placement gives a centered canvas but is one of the more painful spots. The 3D effect relies on crisp white highlights and deep shadows. Heals in stages—expect tenderness for a week and slower settling near ribs. From what I’ve gathered, bold shadow contrast ages better than tiny linework. Avoid tiny zipper teeth; they can blur. Ask your artist about reference lighting and how they lay highlights so the illusion keeps reading after healing.
3. Hyper-Realistic Eye Behind Skin on Upper Arm
Style/Technique: Hyper-Realism / Photorealism
Pain Level: Medium (4-5/10)
Session Time: 3-6 hours
Best For: Conversation piece, visible arm art
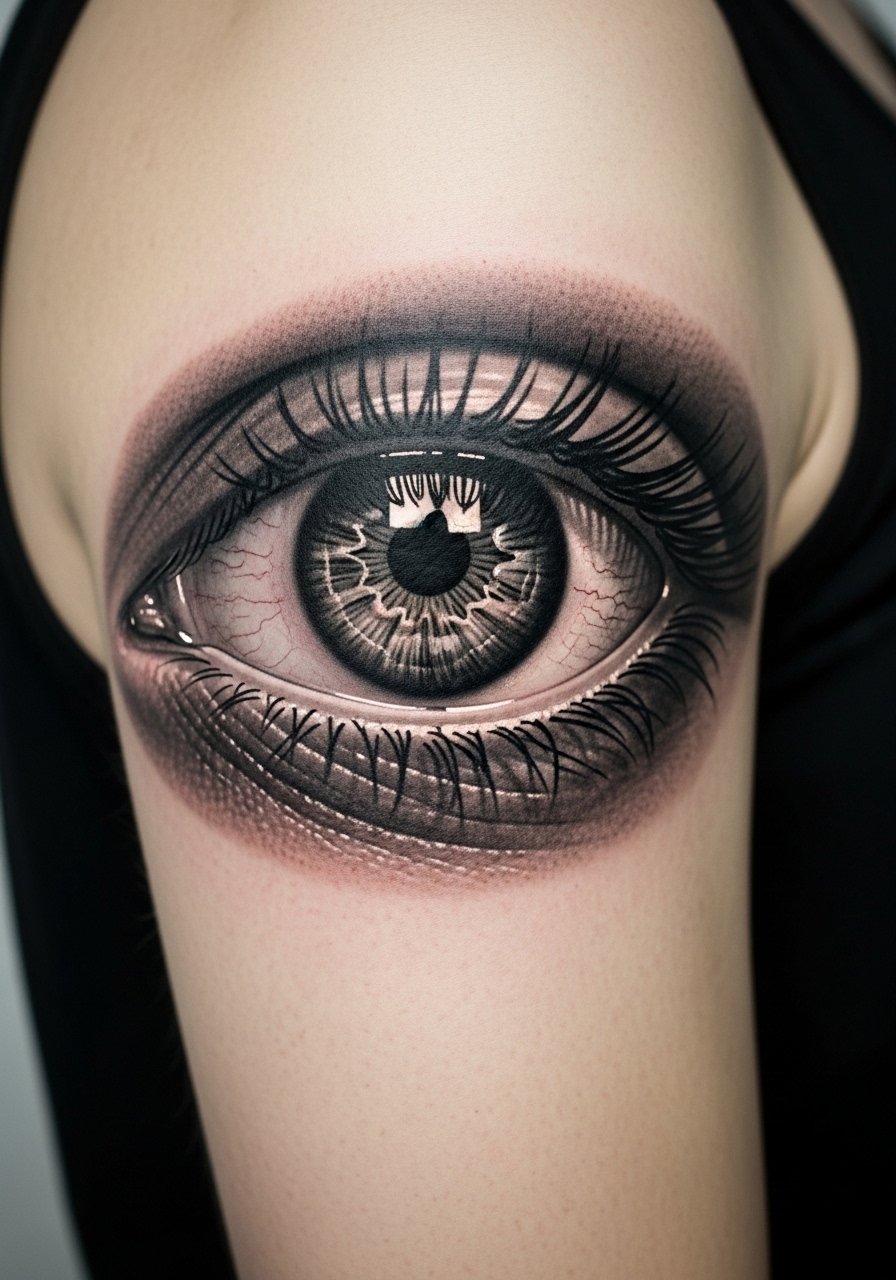
This style uses glossy highlights and deep pupil contrast to look wet and alive. Upper arm provides a smooth surface so the tiny gradations hold well. Pain is moderate; sessions can be long for perfect blending. Healed examples show color retention in darker pigments; light whites used for gleam fade faster—artists often layer whites lightly. A frequent error is over-saturating flesh tones around the eye, which flattens the illusion. Ask for healed photos of similar eyes and mention you want the gloss to remain subtle after healing.
4. 3D Anatomical Heart on Ribcage
Style/Technique: Neo-Realism / Anatomical
Pain Level: High (8-9/10)
Session Time: Multiple sessions
Best For: Personal statement, meaningful placement
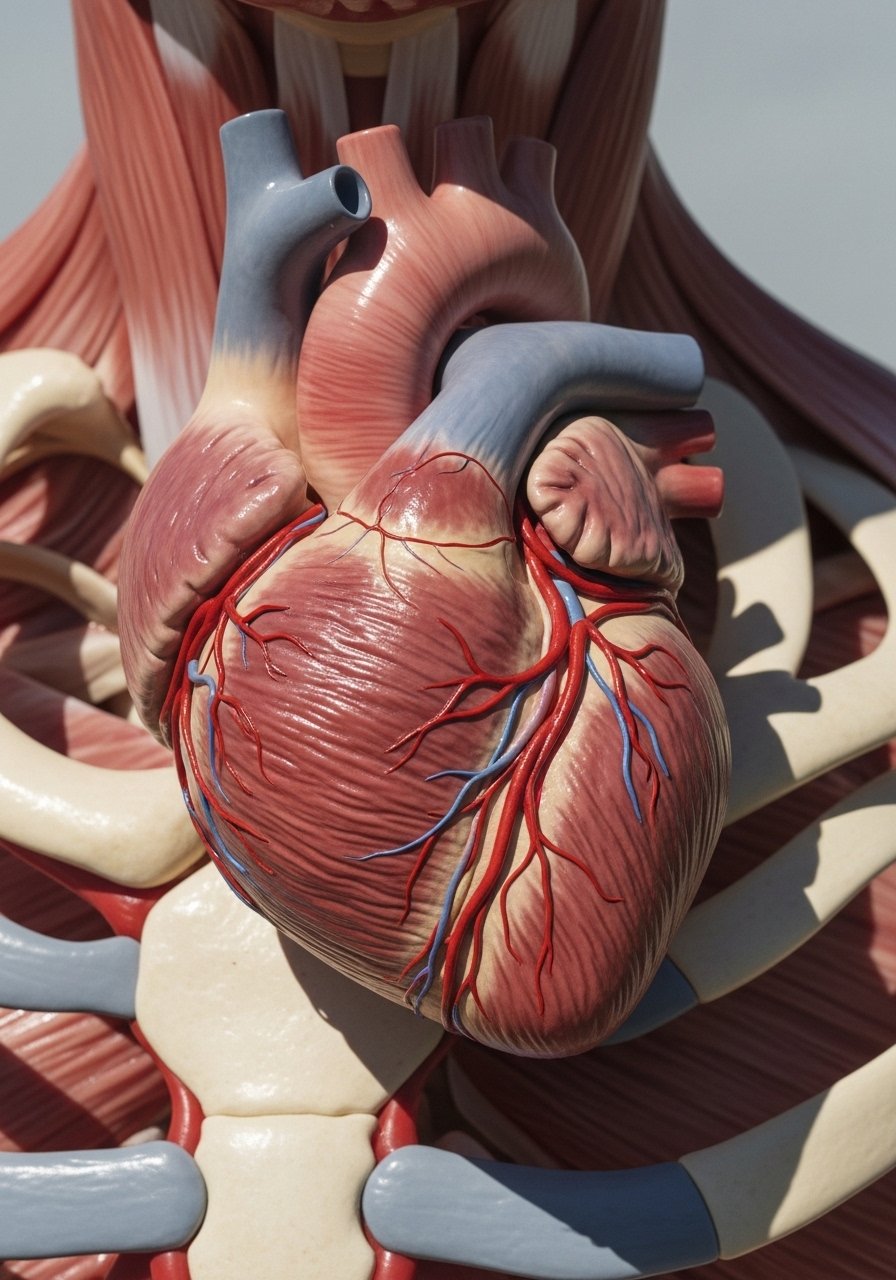
An anatomical heart uses layered shading and selective color for realistic volume. Ribcage offers a dramatic canvas but is painful and sensitive. Healing takes longer due to movement and breathing. I’ve seen these age well when artists avoid tiny cross-hatching and favor broad tonal shifts. Common mistake: too many thin highlights that disappear. During consult, ask for work with deep black supports and muted color saturation so the piece keeps its 3D feel after scabbing and peeling.
5. Faux Jewelry Bracelet on Wrist
Style/Technique: Trompe-L’oeil / Decorative
Pain Level: Medium (4-5/10)
Session Time: 1-3 hours
Best For: Stylish, easy-to-show piece
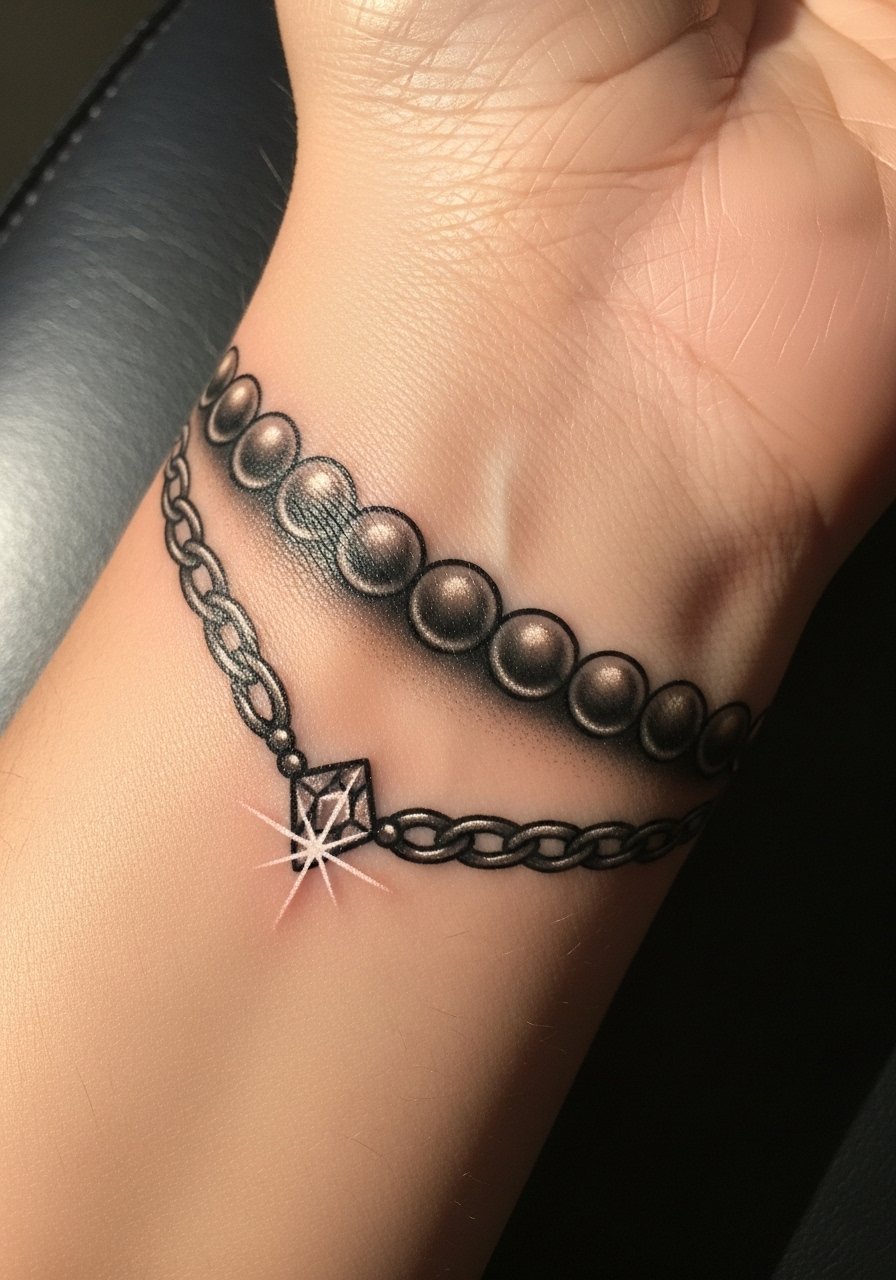
Faux jewelry uses bright whites and sharp shadows to mimic metal and gems. Wrist placement moves a lot, so expect slight fading at edges. From what I’ve observed, high-contrast shadowing keeps the metallic illusion intact. Pain is tolerable but sensitive on the inner wrist. Avoid tiny, overly intricate links that blur. Ask your artist how they’ll stack shadows under the chain so it looks raised on healed skin.
6. 3D Stitched Wound Illusion on Thigh
Style/Technique: Special Effects / Horror-Realism
Pain Level: Low-Medium (3-4/10)
Session Time: 2-4 hours
Best For: Bold statement, easily hidden
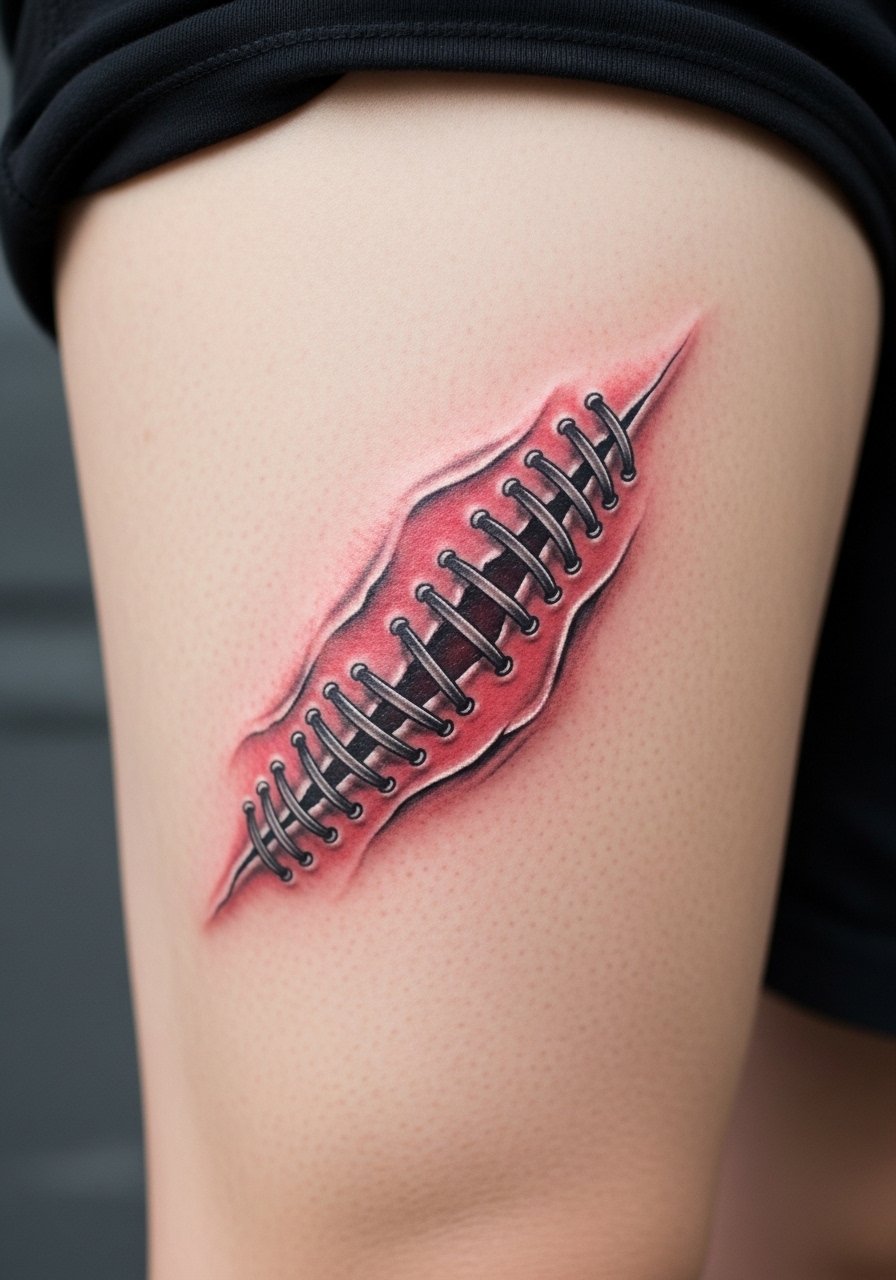
This special-effects style plays with raised stitch shadows and dark recessed centers. Thigh is forgiving; skin texture helps the illusion. Heals in 2-3 weeks, but color may soften. I’ve seen great results when artists use tiny white highlights on stitches and deep gray under-shading. A mistake is overdoing “fresh” redness—real healed work looks more muted. If you want longevity, discuss ink saturation and layering so the stitches keep dimension after the peel.
7. Photorealistic Pet Portrait on Upper Back
Style/Technique: Micro-Realism / Portrait
Pain Level: Medium (4-5/10)
Session Time: 3-6 hours or multiple
Best For: Meaningful memorial, large canvas
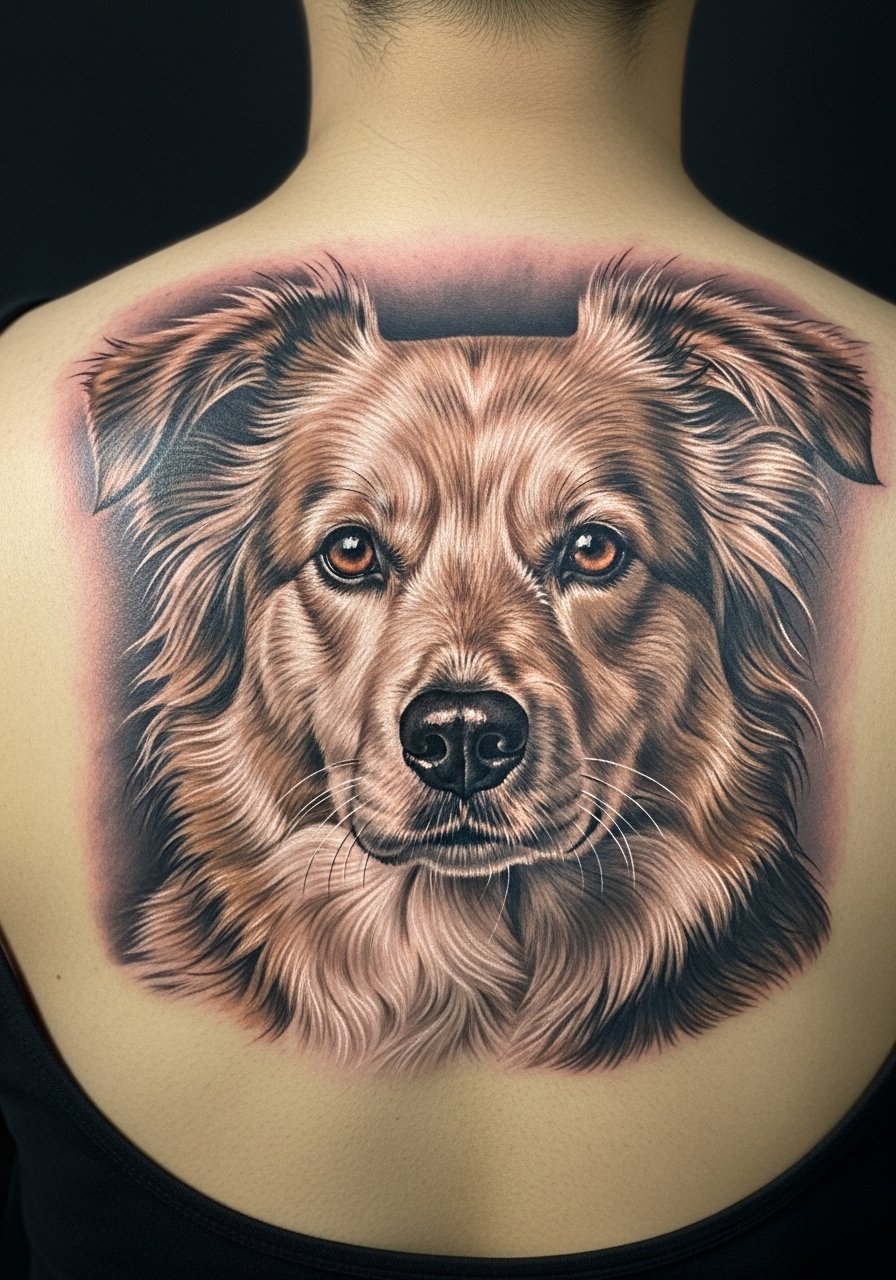
Pet portraits rely on contrast and fine stippling to create fur and depth. Upper back gives room for detail and ages moderately well because skin there is stable. Expect longer sessions for tiny strokes. I’ve noticed artists who show healed portrait photos give a better idea of how detail holds. Common error: asking for too-small portraits, which lose fur texture. Ask to see healed work on similar-sized placements and for samples of how eyes look healed.
8. 3D Mechanical Gears on Forearm
Style/Technique: Biomechanical / Black & Gray
Pain Level: Medium (4-6/10)
Session Time: 2-5 hours
Best For: Sleeve starter, mechanical aesthetic
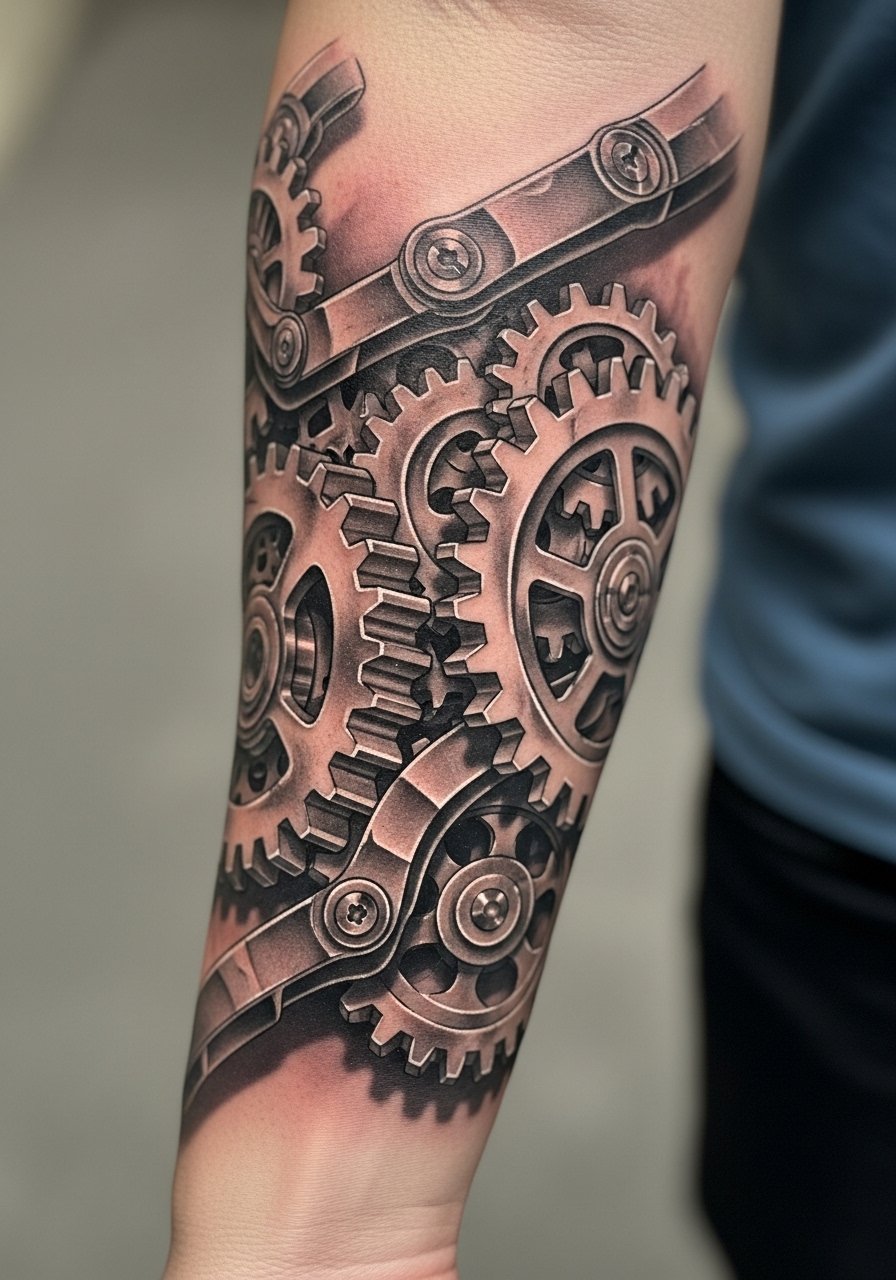
Biomechanical pieces use layered shadow and precise edge work to suggest depth. Forearm is ideal for vertical gear stacks. Healed gear tattoos keep their shape well if the artist uses strong black anchors. I’ve seen fine teeth blur if they’re too thin, so artists often recommend simplified teeth with heavier shading. Pain is moderate and placement allows for comfortable sessions. Avoid cluttering the design—clean negative space helps the gears read 3D.
9. Floating Gemstone on Collarbone
Style/Technique: Micro-Realism / Jewel-Effect
Pain Level: Medium-High (5-7/10)
Session Time: 1-2 hours
Best For: Delicate, eye-catching piece
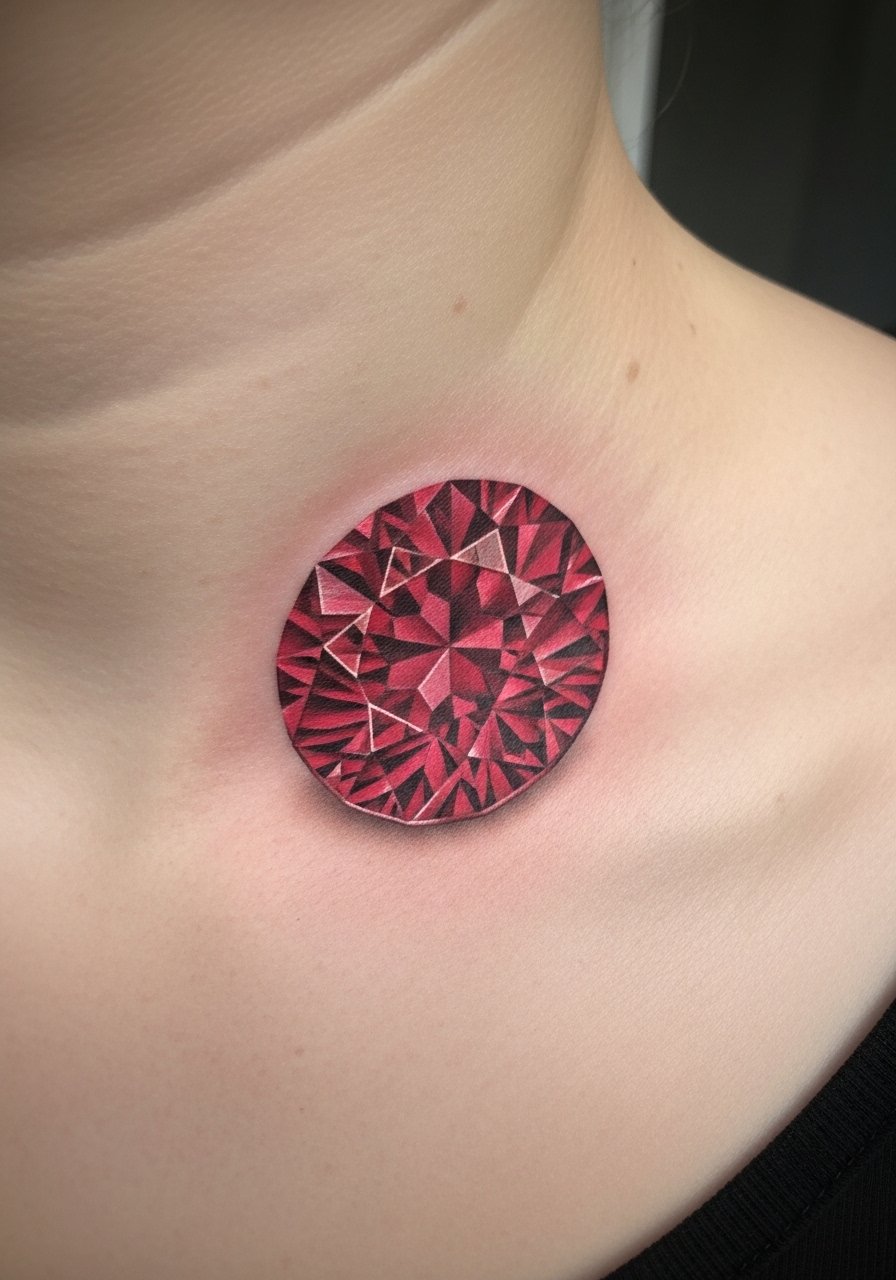
A faceted gem uses hard contrast and small white highlights to appear dimensional. Collarbone placement is shallow and sensitive, so expect higher discomfort. Heals to slightly softer highlights; crisp whites fade faster. From what I’ve seen, darker base tones and restrained highlights hold the most convincing shape. A common mistake is too many tiny sparkles; they can muddle. Ask your artist how they plan to maintain facet clarity after healing.
10. 3D Feathered Quill on Side Rib
Style/Technique: Fine Line / Textural
Pain Level: High (7-8/10)
Session Time: 2-3 hours
Best For: Elegant, elongated pieces
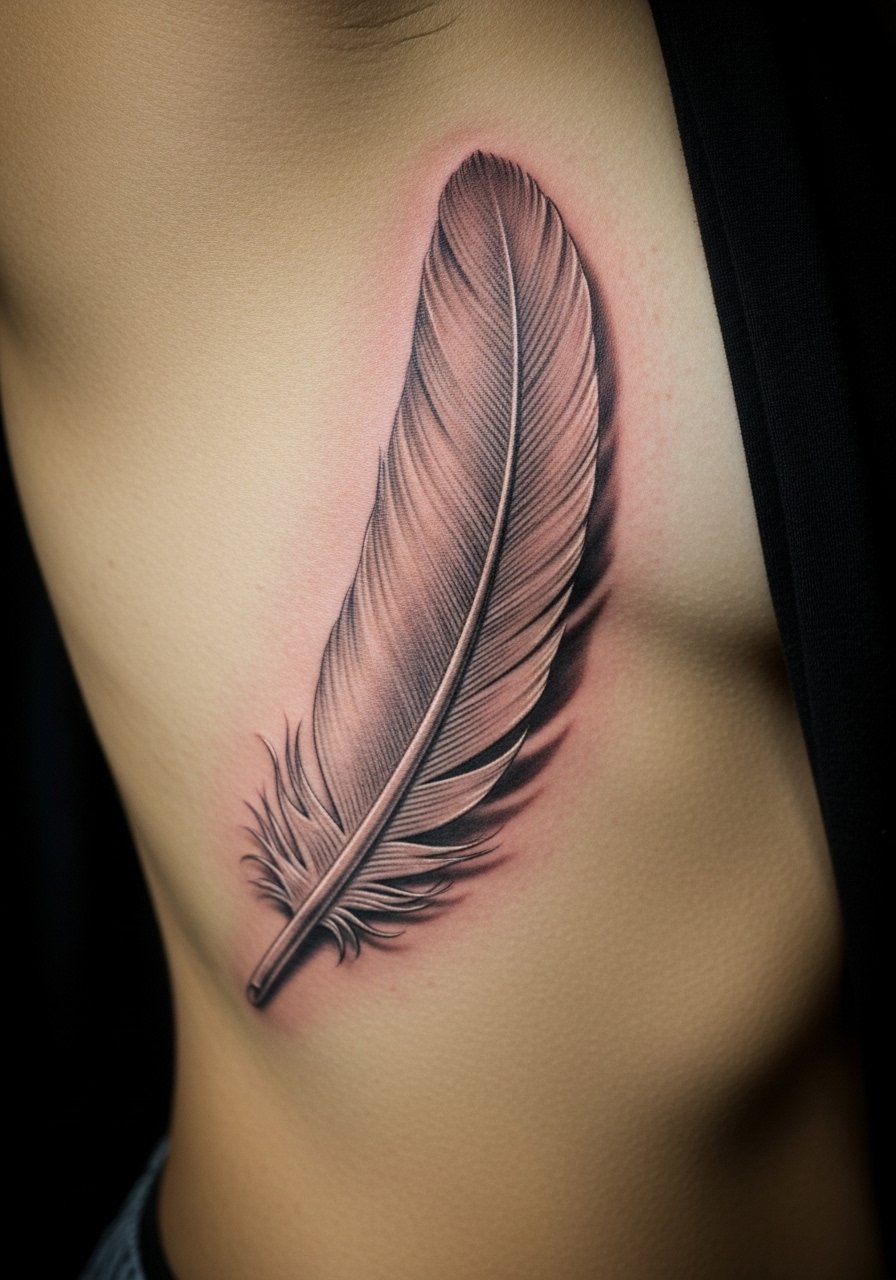
A feather quill uses delicate linework with shadow to lift it off the skin. Rib placement accentuates curve but is painful and shifts during breathing. Fine lines can blur over years, so artists often add soft shading for longevity. I’ve noticed healed feathers keep shape better when central quill lines are slightly bolder. Avoid expecting ultra-fine hairs to last forever. During consult, ask about balancing delicate lines with lasting shadow.
11. 3D Broken Glass Shard on Hand
Style/Technique: Geometric / Photorealism
Pain Level: High (7-8/10)
Session Time: 1-3 hours
Best For: Visible statement, edgy look
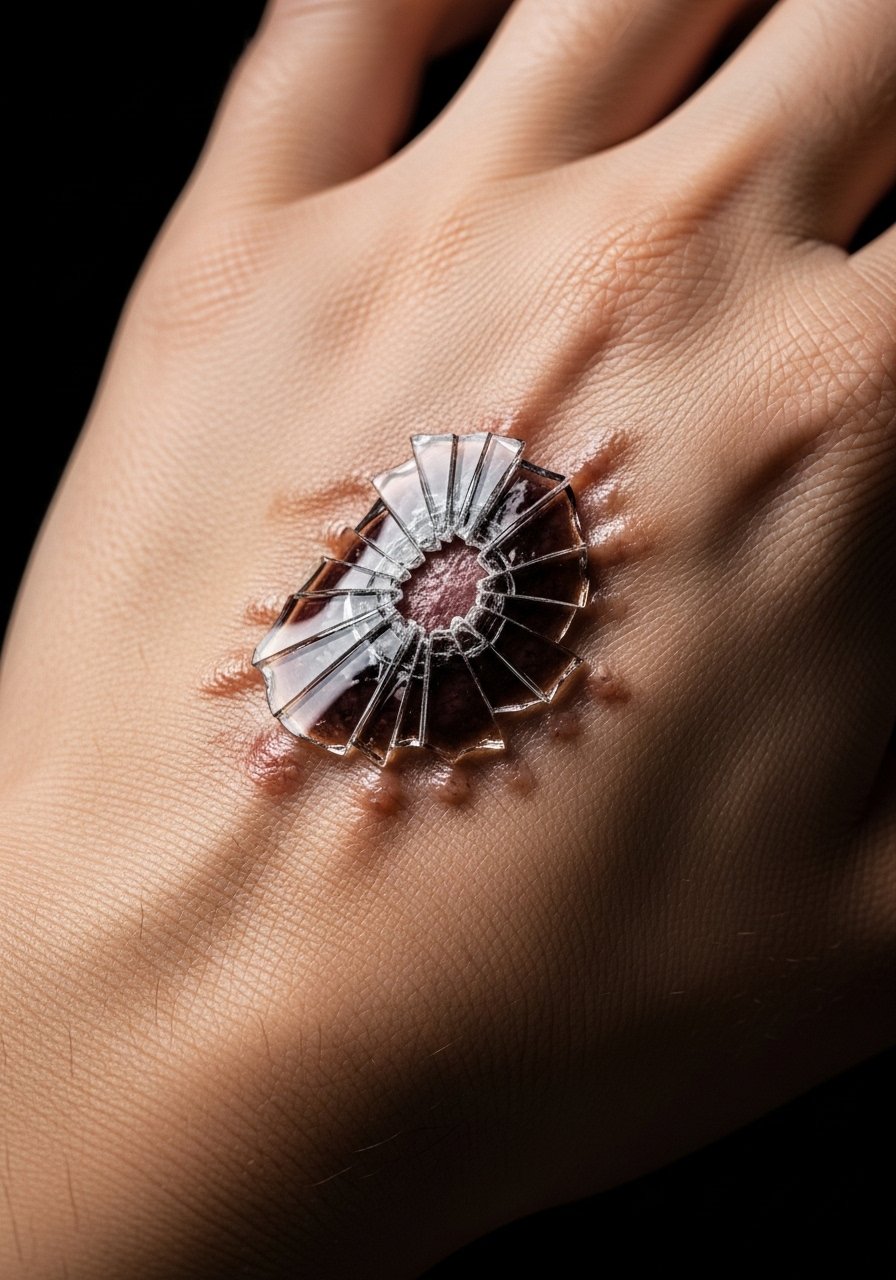
Glass illusions depend on crisp white contrasts and deep negative shadows. Hand placement is risky for longevity—hands fade faster due to washing and sun. I’ve seen glass shards remain dramatic when artists use bold blacks around edges and strategic highlights. Common mistake: placing tiny, detailed shards on the fingers; they blur quickly. If you want a hand piece, plan for refreshers and choose stronger contrast over micro-detail.
12. Pocket Watch Under Skin on Bicep
Style/Technique: Neo-Traditional / Photorealism
Pain Level: Low-Medium (3-4/10)
Session Time: 2-4 hours
Best For: Timeless, visible placement
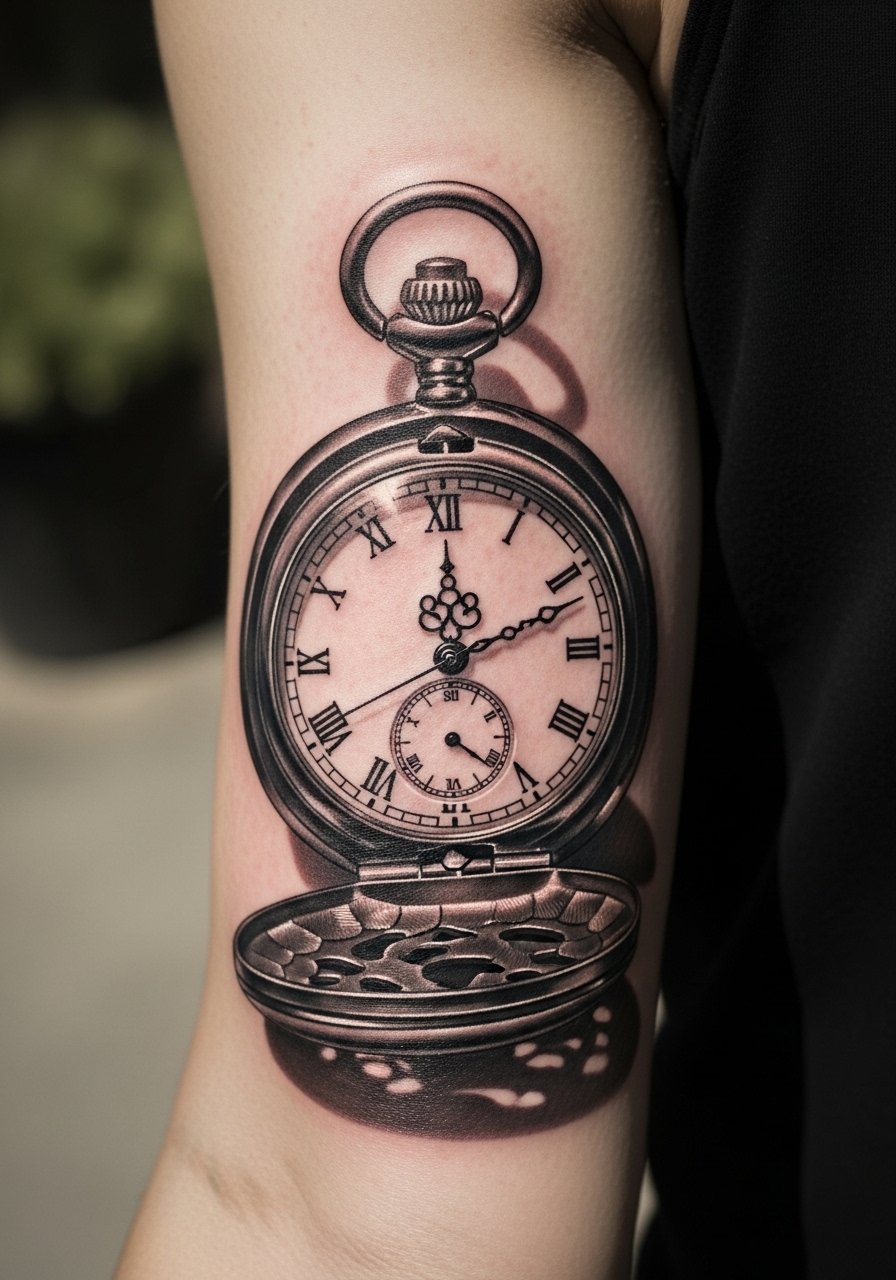
A pocket watch uses circular highlights and calibrated shadows to read as an embedded object. Bicep skin is thick and ages well. I’ve noticed this design keeps its illusion when the artist uses layered shading and a heavier outer rim. Avoid overly ornate tiny numerals—they can blend. Ask for healed photos of metallic pieces with similar placement to judge how glare translates after healing.
13. 3D Torn Skin Revealing Flower on Sternum
Style/Technique: Trompe-L’oeil / Botanical
Pain Level: High (7-9/10)
Session Time: Multiple sessions
Best For: Feminine statement, hidden or dramatic
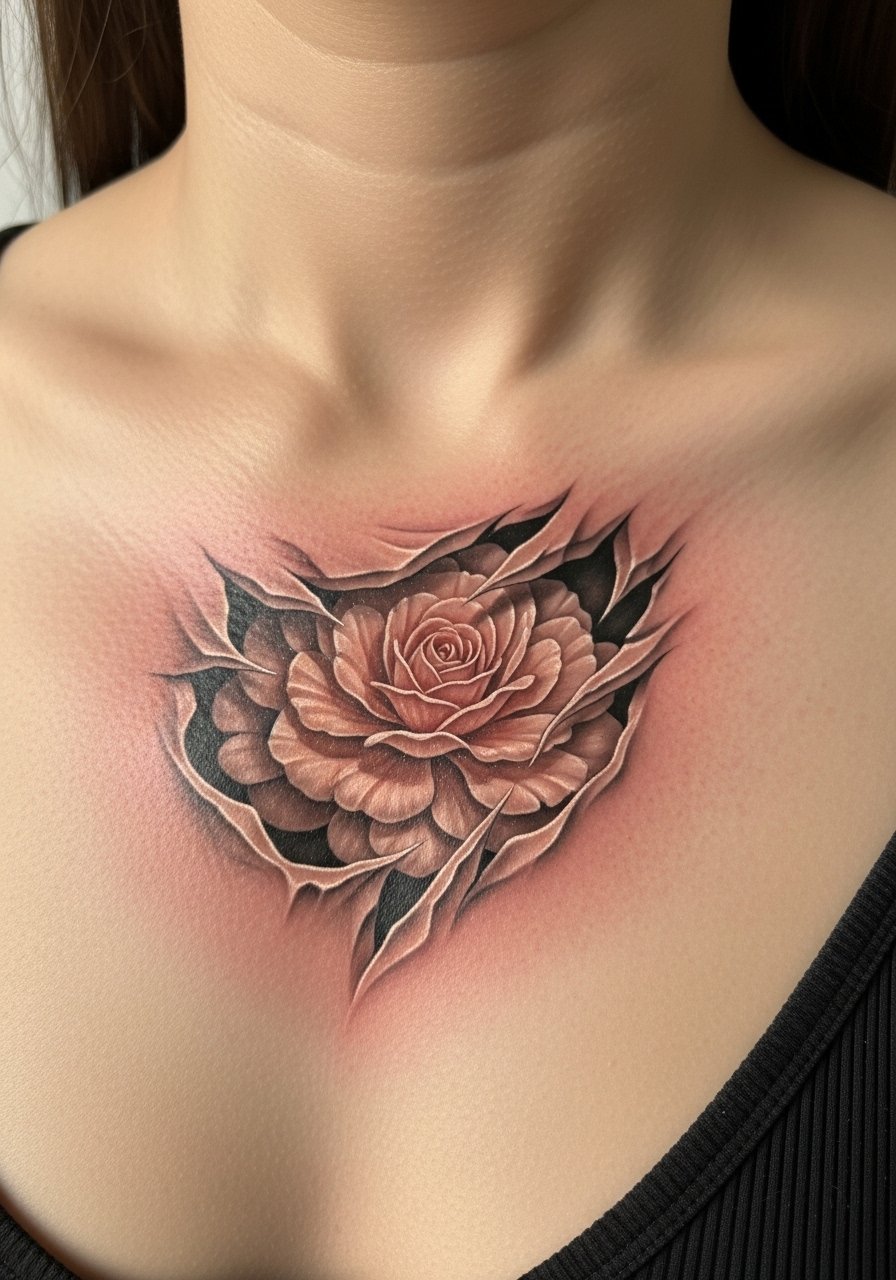
This combines softness and gore—torn skin outlines with delicate floral forms underneath. Sternum and chest are sensitive but create a powerful center piece. Heals slower near sternum; expect tenderness. From what I’ve seen, muted color on petals and strong dark under-shading keep the illusion. Avoid too-bright colors that fade quickly. Ask the artist how they plan highlights on torn edges so the “lift” persists.
14. Raised Scar Simulation on Forearm
Style/Technique: Special Effects / Scar-Effect
Pain Level: Low (3/4/10)
Session Time: 1-2 hours
Best For: Unique texture piece, conversation starter
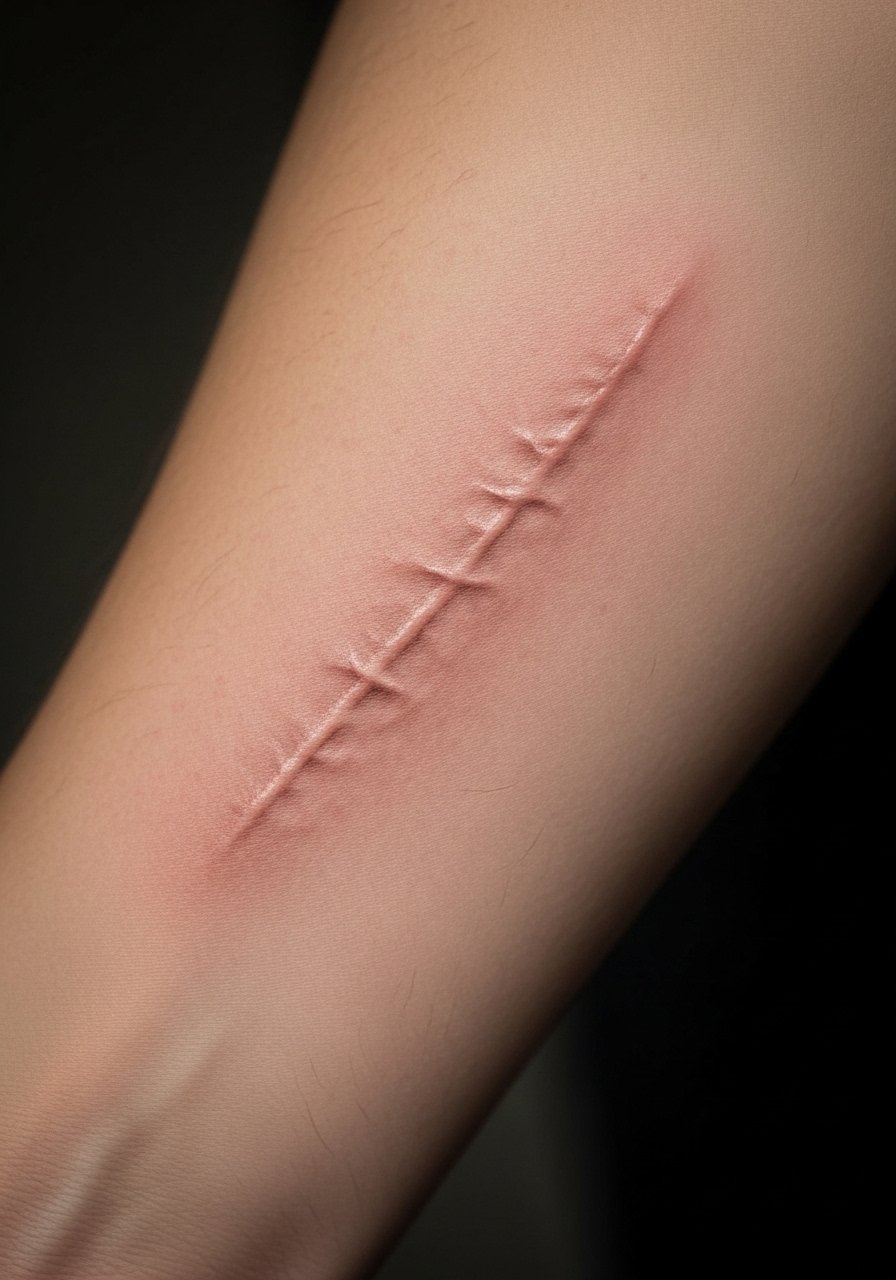
Raised-scar tattoos mimic keloids or healed wounds using shadow and white highlights. Forearm works well because skin is fairly flat. I’ve seen great long-term results when the artist keeps the ridge subtle—too much puff can look fake. Healing is typical; color settling is minimal. Common mistake is over-contrasting the scar edges. Ask for healed shots to see how the texture reads months later.
15. 3D Ribbon Wrapped Around Wrist
Style/Technique: Illustrative / Trompe-L’oeil
Pain Level: Medium (4-5/10)
Session Time: 1-2 hours
Best For: Decorative, symbolic wrist piece
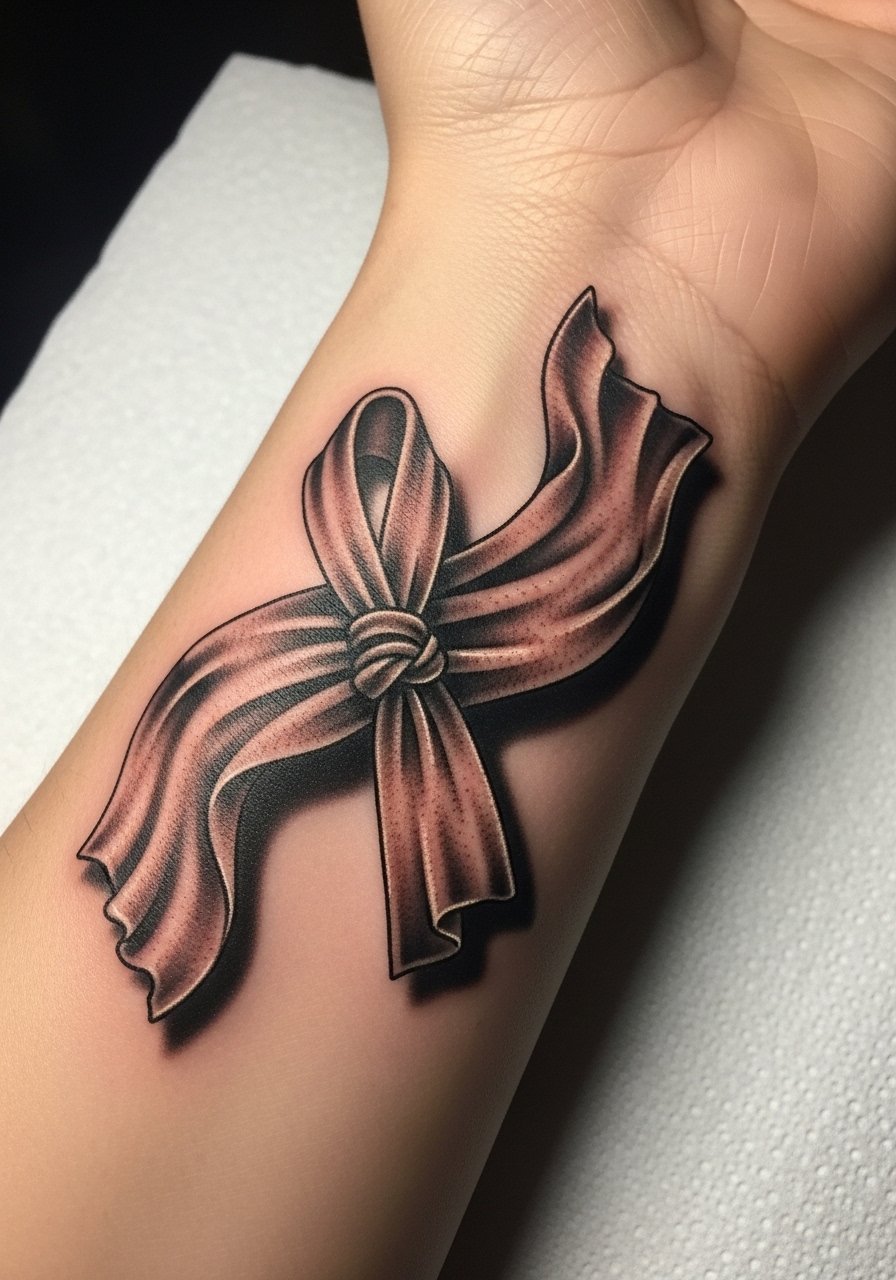
A ribbon uses curved shading and soft highlights to look like it sits on top of the skin. Wrist motion can slightly distort edges during healing. From what I’ve tracked, keeping the ribbon slightly wider helps it maintain the 3D effect. Artists who document healed movement make better calls on placement. Avoid thin ribbons that rely entirely on micro-lines.
16. Hyper-Realistic Screw or Bolt on Collarbone
Style/Technique: Photorealism / Industrial
Pain Level: Medium-High (5-7/10)
Session Time: 1-2 hours
Best For: Small but striking, visible
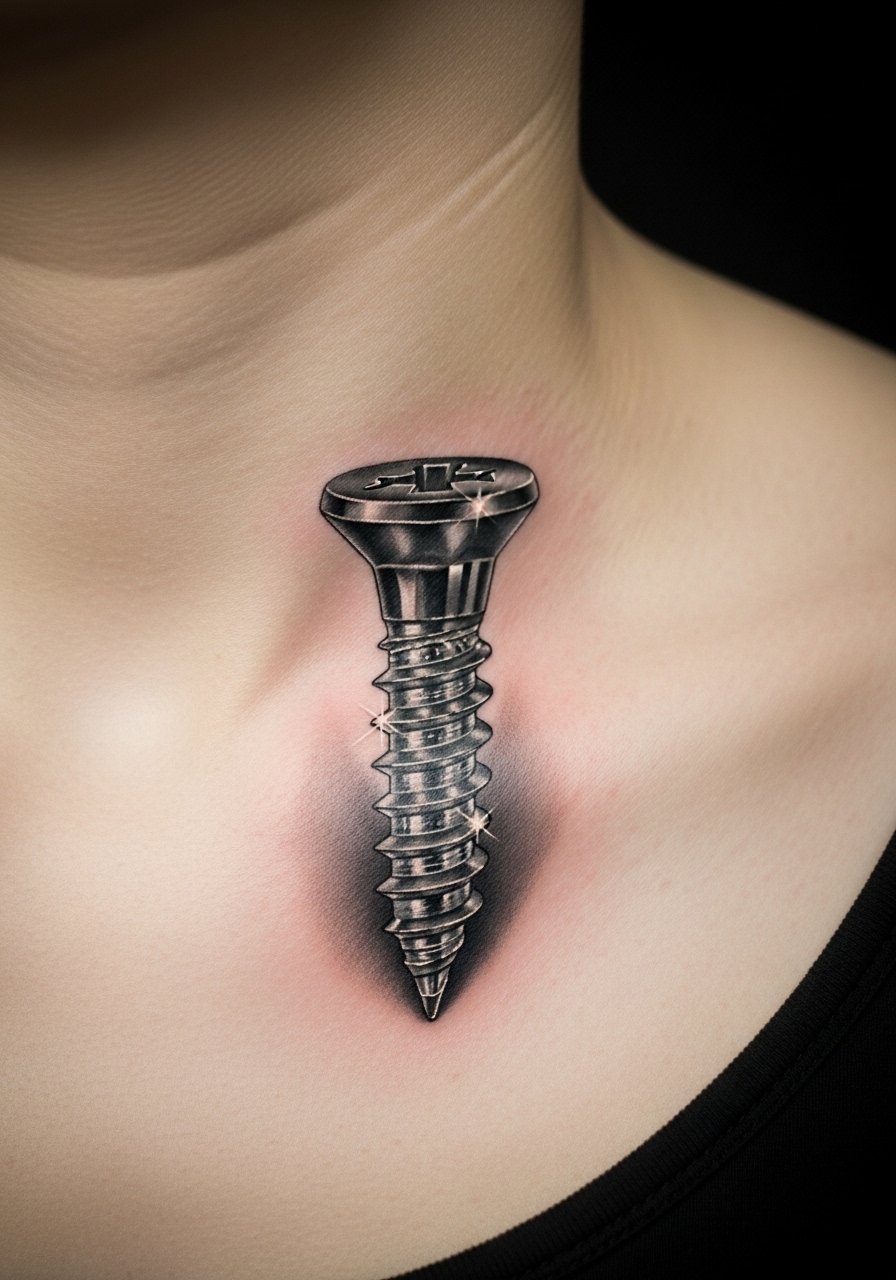
Small industrial objects read well with heavy black supports and tight white highlights. Collarbone is sensitive but showcases the piece. I’ve noticed tightened shadows around the screw head keep it appearing embedded. Avoid tiny threading that may dissolve; ask for simplified threading with strong shadow to maintain the 3D look.
17. 3D Lace Trim Along Hip
Style/Technique: Fine Line / Decorative
Pain Level: Medium (4-6/10)
Session Time: 2-4 hours
Best For: Feminine, intimate placement
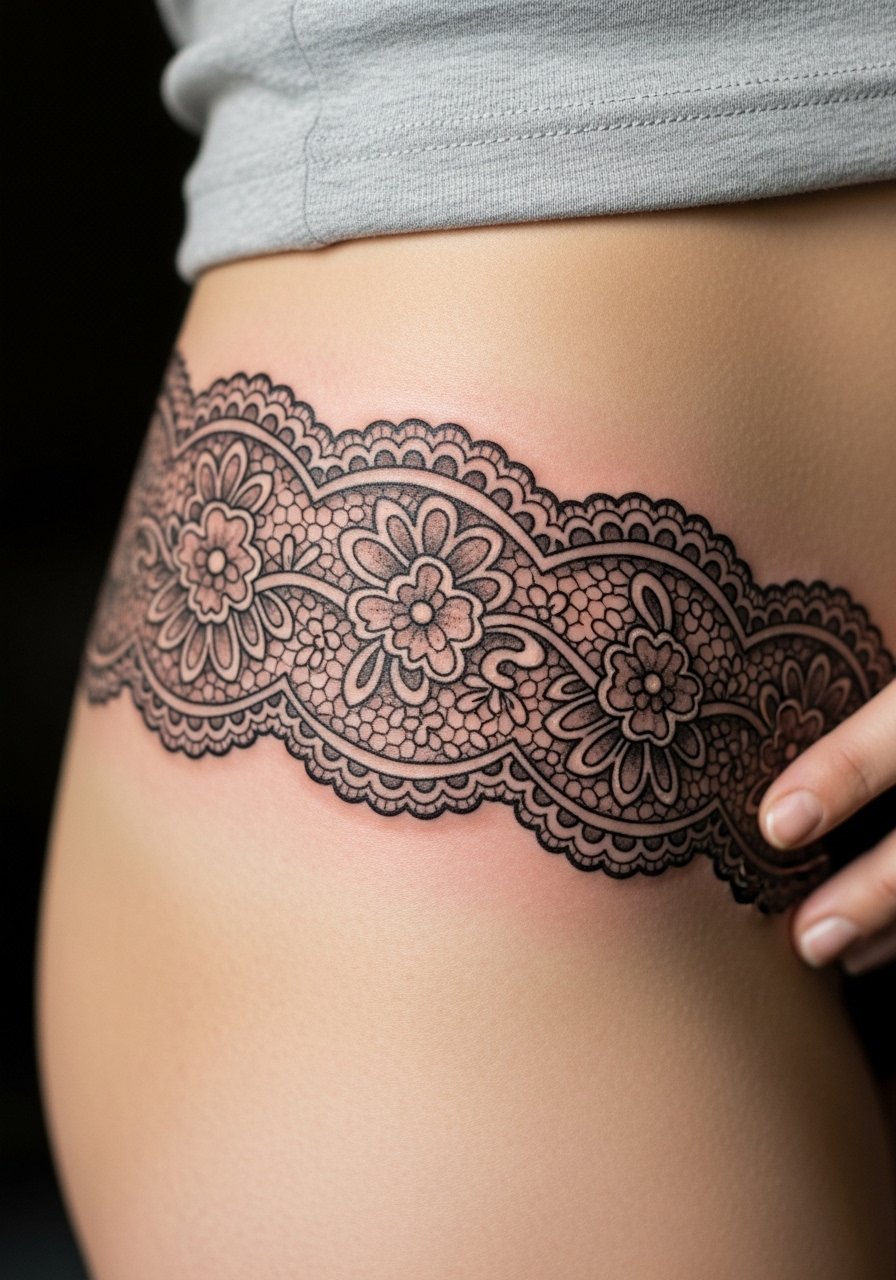
Lace uses negative space with drop shadows to mimic lace sitting on skin. Hip placement moves with clothing but generally heals well. I’ve seen lace stay elegant when shadows are soft and consistent. A common issue is making the lace too thin, which leads to blurring. Ask for a balance between fine details and supportive shading.
18. 3D Paper Crane Folded On Back Of Neck
Style/Technique: Minimalist 3D / Origami
Pain Level: Low-Medium (3-5/10)
Session Time: 1-2 hours
Best For: Subtle, symbolic piece
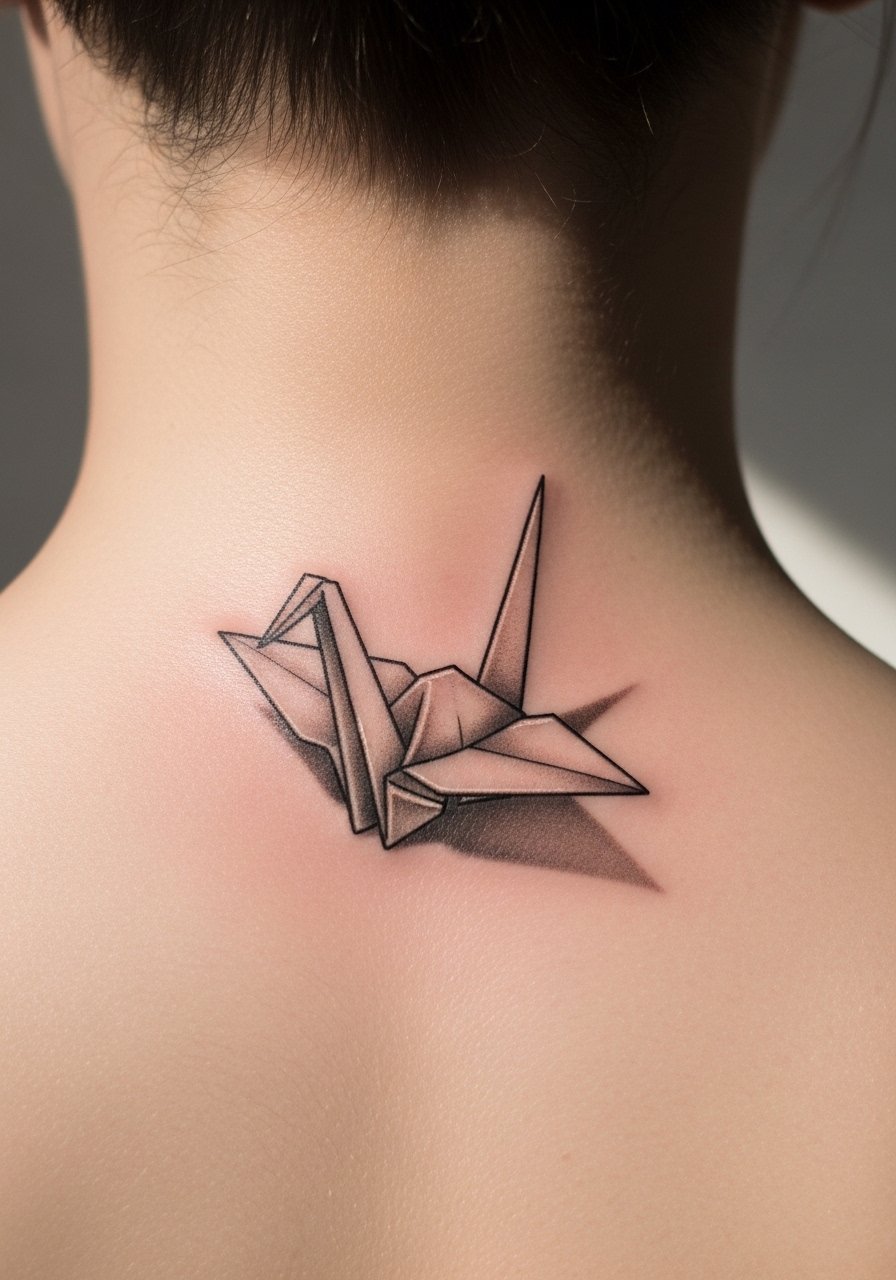
Origami 3D pieces rely on crisp edges and cast shadow to appear folded. Back of neck is small and sensitive during sessions. I’ve noticed these hold up because the shapes are bold and strokes aren’t micro. Avoid extremely thin crease lines; they can soften. Ask your artist how they’ll keep edges pronounced after healing.
19. Hyper-Realistic Fruit Slice on Calf
Style/Technique: Micro-Realism / Color-Realism
Pain Level: Low (2-4/10)
Session Time: 1-3 hours
Best For: Playful, visible leg art
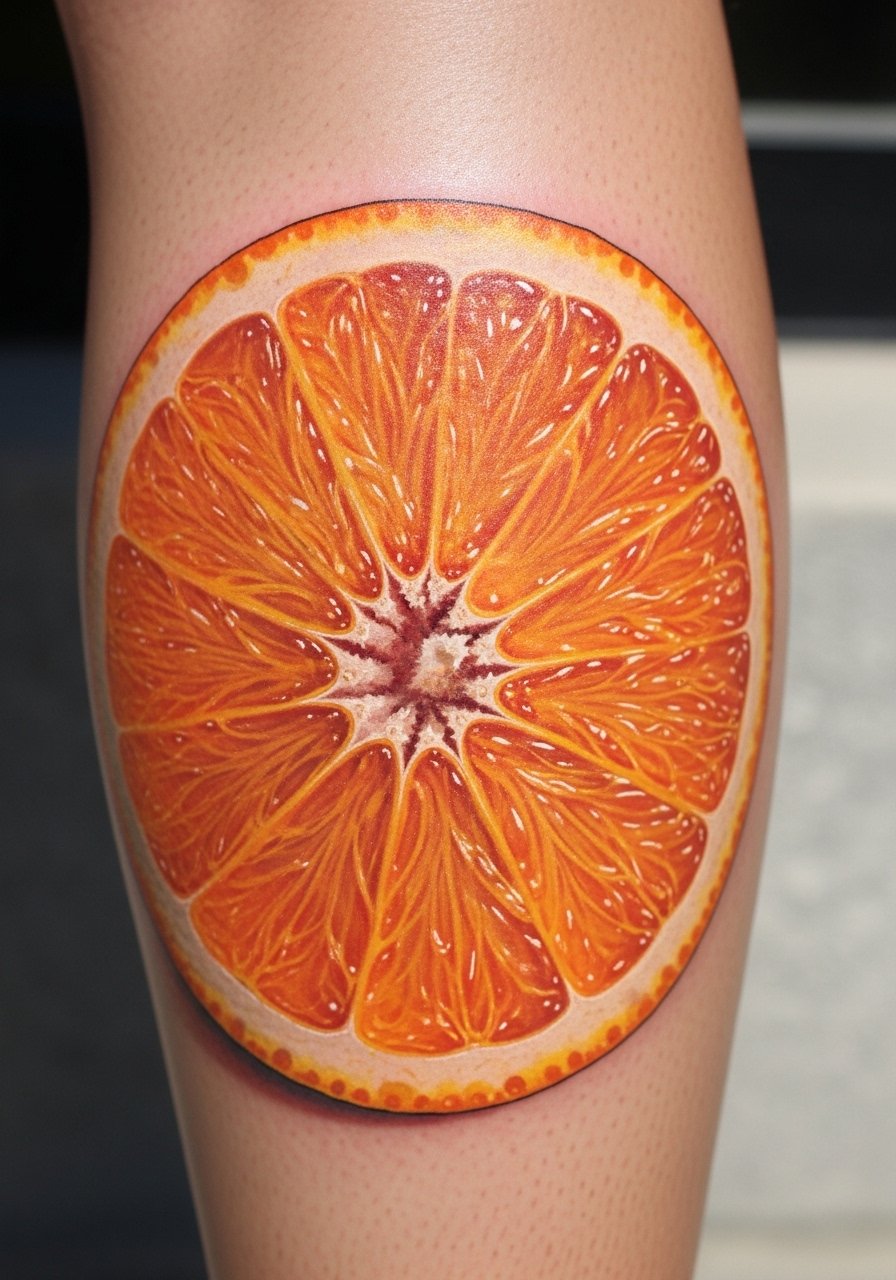
Fruity realism pops with saturated cores and soft rind shadows. Calf placement holds color well and is low on the pain scale. From what I’ve seen, darker outlines help color stay defined. Beware of tiny seed details that can blur. Discuss color layering with your artist so the juice-like gloss looks convincing after the peel.
20. 3D Keyhole Revealing Galaxy on Chest
Style/Technique: Surreal / Cosmic Realism
Pain Level: Medium-High (5-8/10)
Session Time: Multiple sessions
Best For: Surreal statement, chest placement
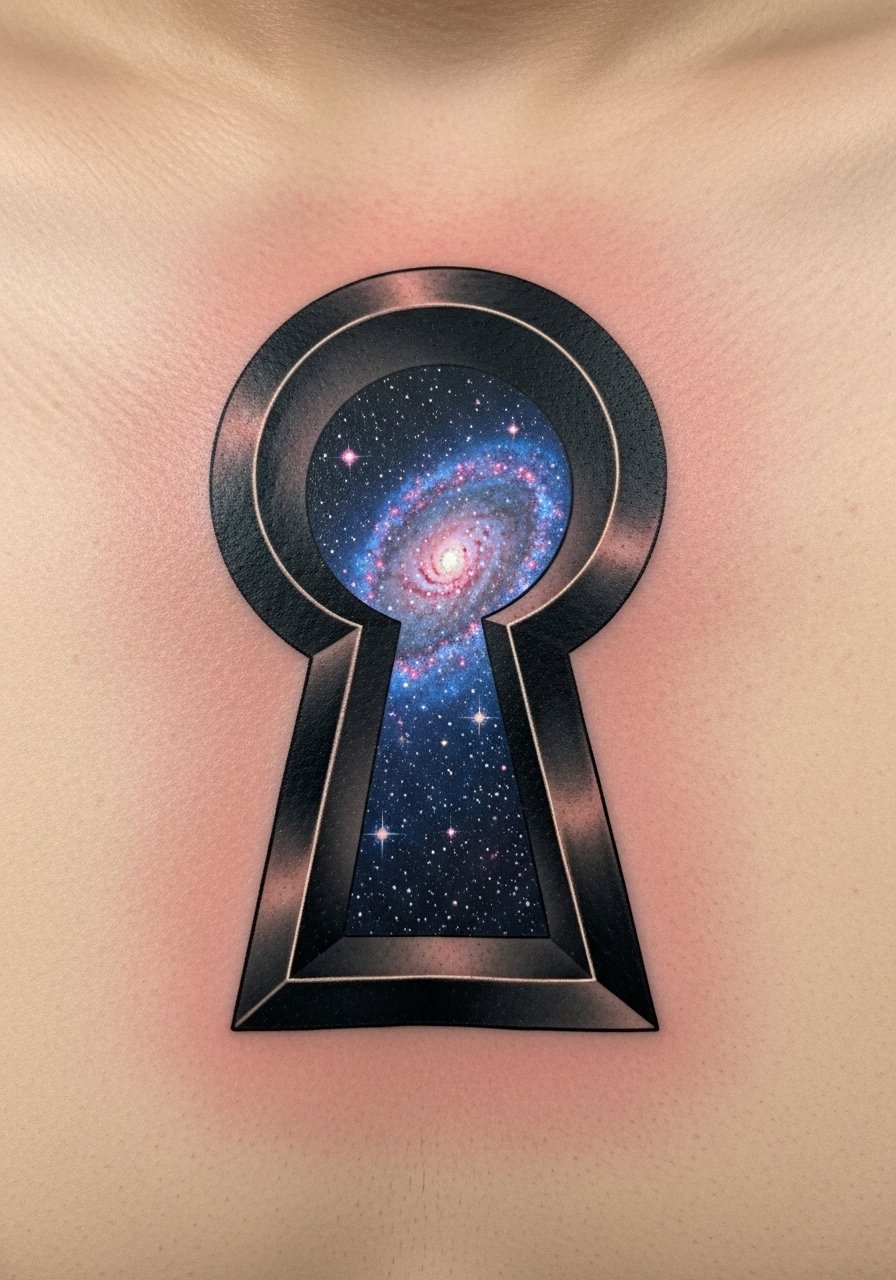
A keyhole effect uses deep negative space and tiny point highlights to suggest a portal. Chest placement can be sensitive but dramatic. I’ve noticed galaxies hold vividness when artists use saturated midtones and strategic white pins for stars. Small pinpoint whites fade faster—ask about layering and touch-up plans if you want long-term sparkle.
21. 3D Petal Crown Around Thigh
Style/Technique: Botanical / Layered Realism
Pain Level: Low-Medium (3-5/10)
Session Time: 2-4 hours
Best For: Feminine band, easy to hide
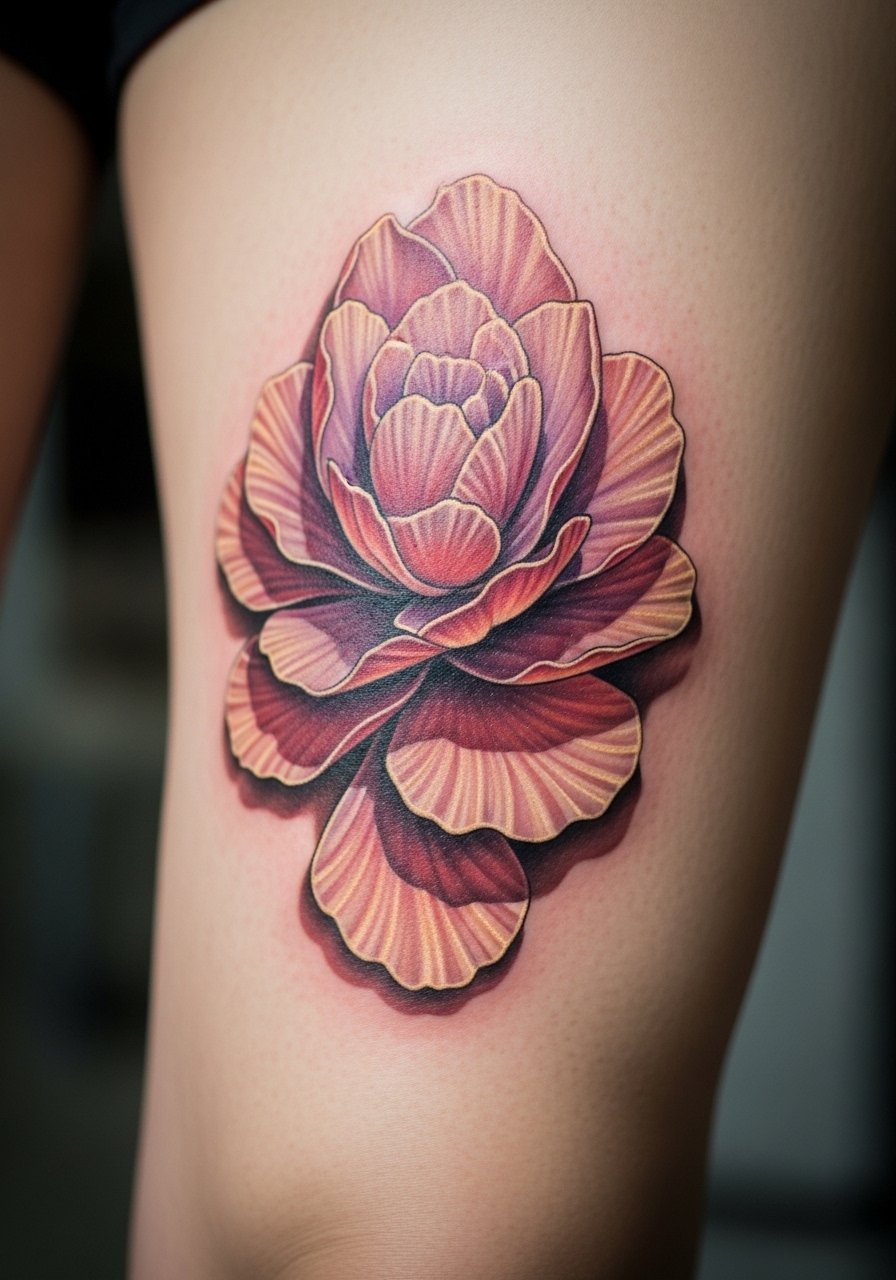
Layered petals create a floating crown effect with soft under-shadows. Thigh skin keeps detail and color well. I’ve seen this age gracefully when pigments are muted and shadows are broad. Avoid tiny vein lines that can blur. Ask the artist to space petals so the shape remains readable as the skin moves.
22. 3D Insect Pinned Under Glass on Shoulder Blade
Style/Technique: Micro-Realism / Curiosity Cabinet
Pain Level: Medium (4-6/10)
Session Time: 2-4 hours
Best For: Quirky, displayable back piece
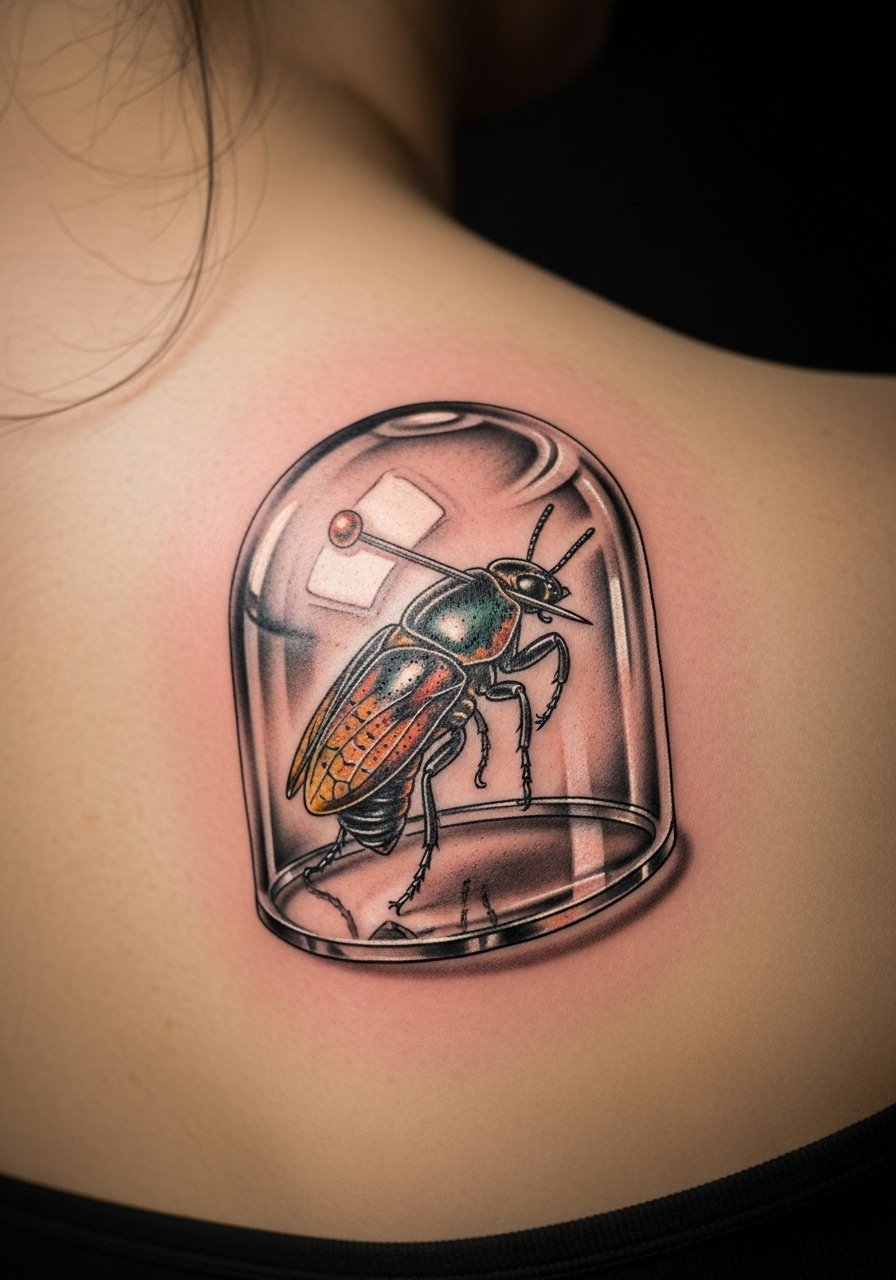
This vintage-naturalist look plays with glass glare and tiny anchors. Shoulder blade is stable and less exposed, so detail endures. I’ve noticed the glass effect reads best with fewer, stronger highlights. Tiny legs and antennae are prone to softening—ask for slightly bolder outlines on those parts.
23. Photorealistic Honey Drip on Wrist
Style/Technique: Photorealism / Liquid Effect
Pain Level: Medium (4-5/10)
Session Time: 1-2 hours
Best For: Sweet, visible wrist piece
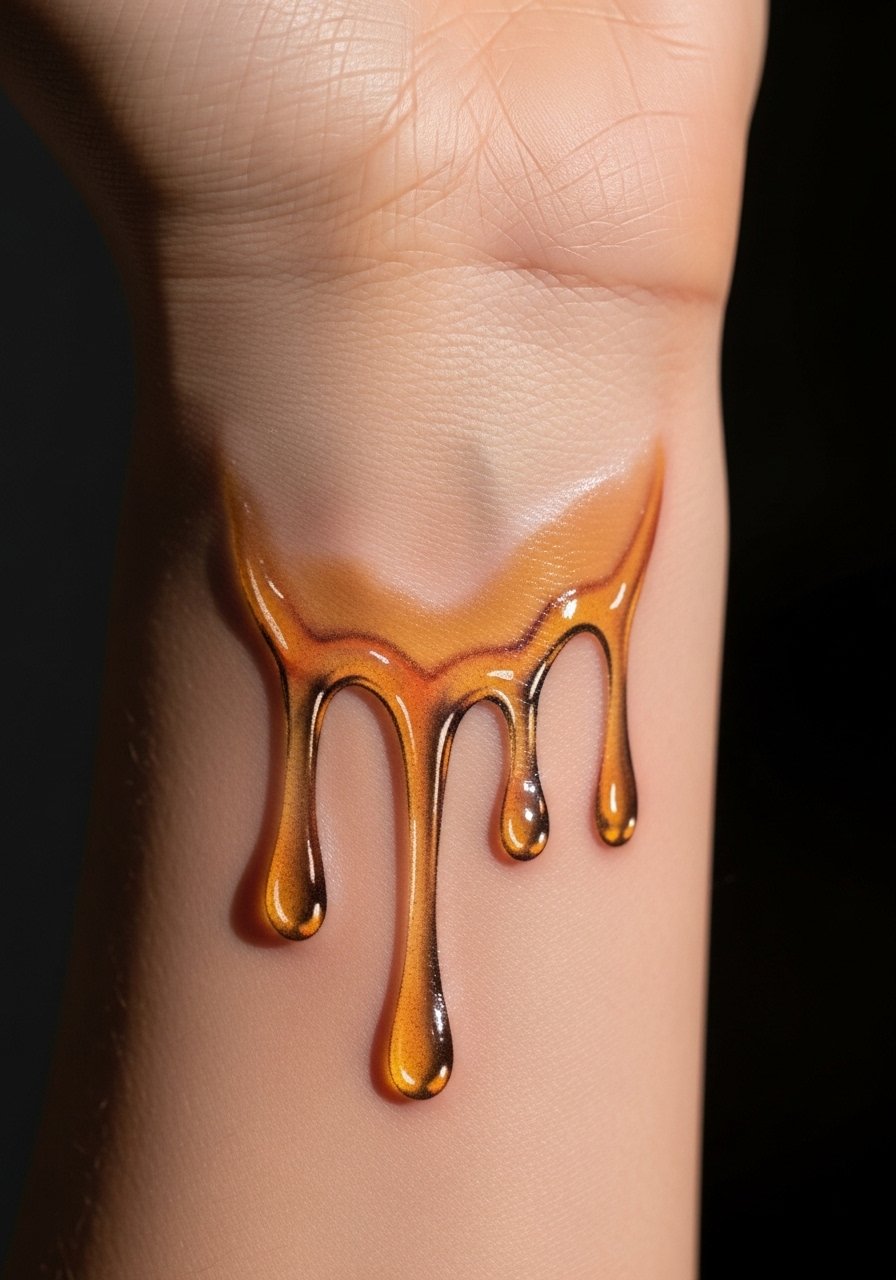
Liquid effects need layered translucency and small high-contrast highlights. Wrist moves a lot, so the artist must plan for flexibility. I’ve seen honey stay convincing when artists focus on strong core highlights and slightly simplified edges. Beware tiny reflective flecks that fade.
24. 3D Threaded Needle Going Through Skin on Forearm
Style/Technique: Trompe-L’oeil / Conceptual
Pain Level: Medium (4-6/10)
Session Time: 1-3 hours
Best For: Edgy, conceptual forearm art
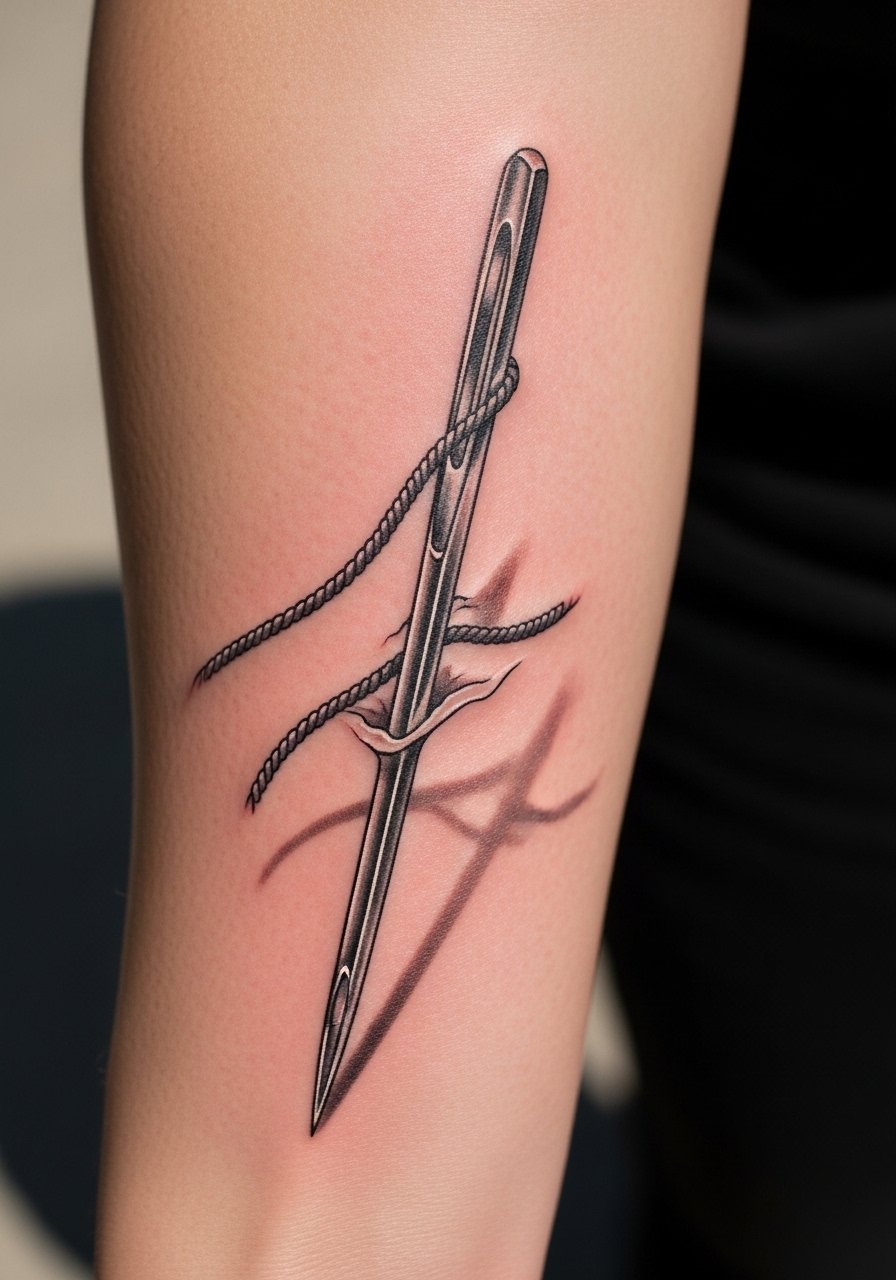
This piece uses deep shadow beneath the needle and a tiny white glint on the metal. Forearm bones can affect placement, but skin sits well for the illusion. From experience, simplifying the thread pattern helps longevity. Avoid tiny knotwork that can blur.
25. 3D Ribbon Bow on Lower Back
Style/Technique: Illustrative / Decorative
Pain Level: Medium (4-6/10)
Session Time: 1-2 hours
Best For: Backpiece, playful accent
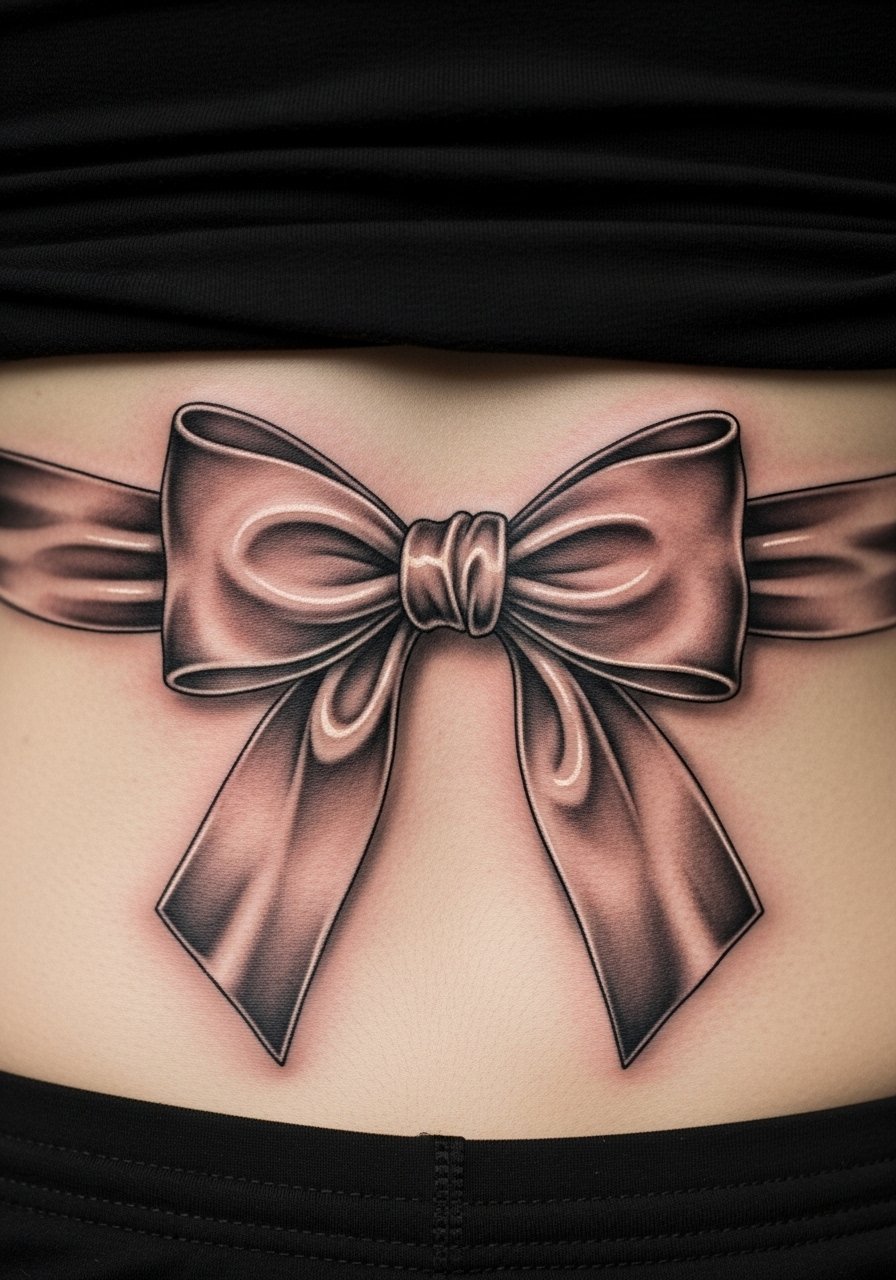
Lower back offers a larger flat area for the bow to sit naturally. The play between shadow and highlight makes the bow look real. I’ve seen better long-term definition when artists keep the knot slightly darker and the outer loops lighter. Avoid too-thin tails that can fade into the skin.
26. 3D Brain Slice with Flowers on Skull Cap
Style/Technique: Surreal Anatomical / Neo-Realism
Pain Level: High (8-9/10)
Session Time: Multiple sessions
Best For: Bold headpiece, collector work
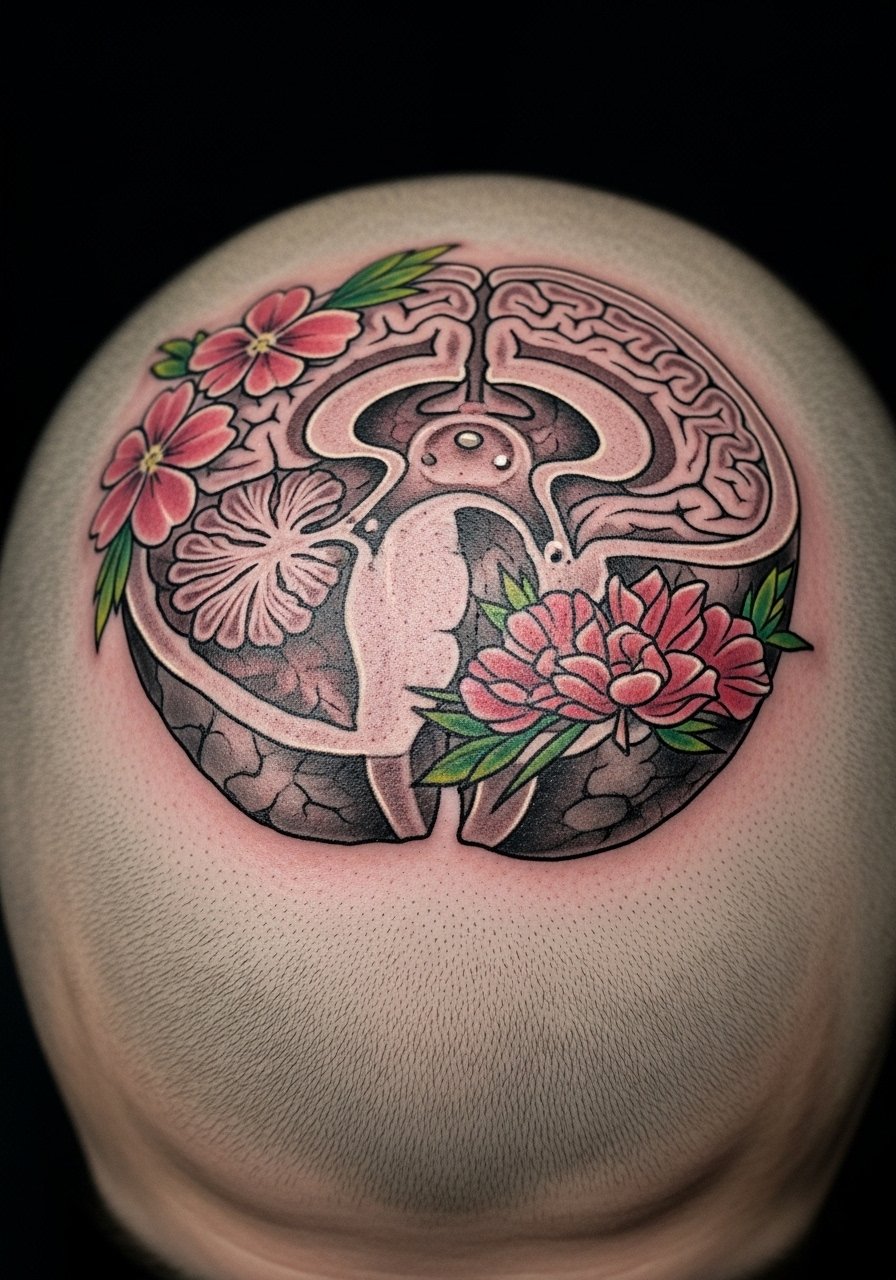
Head tattoos need experienced hands; scalp skin and curvature change how shadows sit. This surreal combo reads best when artists balance deep recesses with bright floral pops. Heals slowly and can itch. I’ve noticed artists recommend multiple short sessions to control swelling and saturation. Avoid cramming tiny floral details; scale them to the canvas.
27. 3D Shell Embedded on Outer Thigh
Style/Technique: Naturalism / Shell-Effect
Pain Level: Low-Medium (3-4/10)
Session Time: 1-2 hours
Best For: Beachy, organic thigh piece
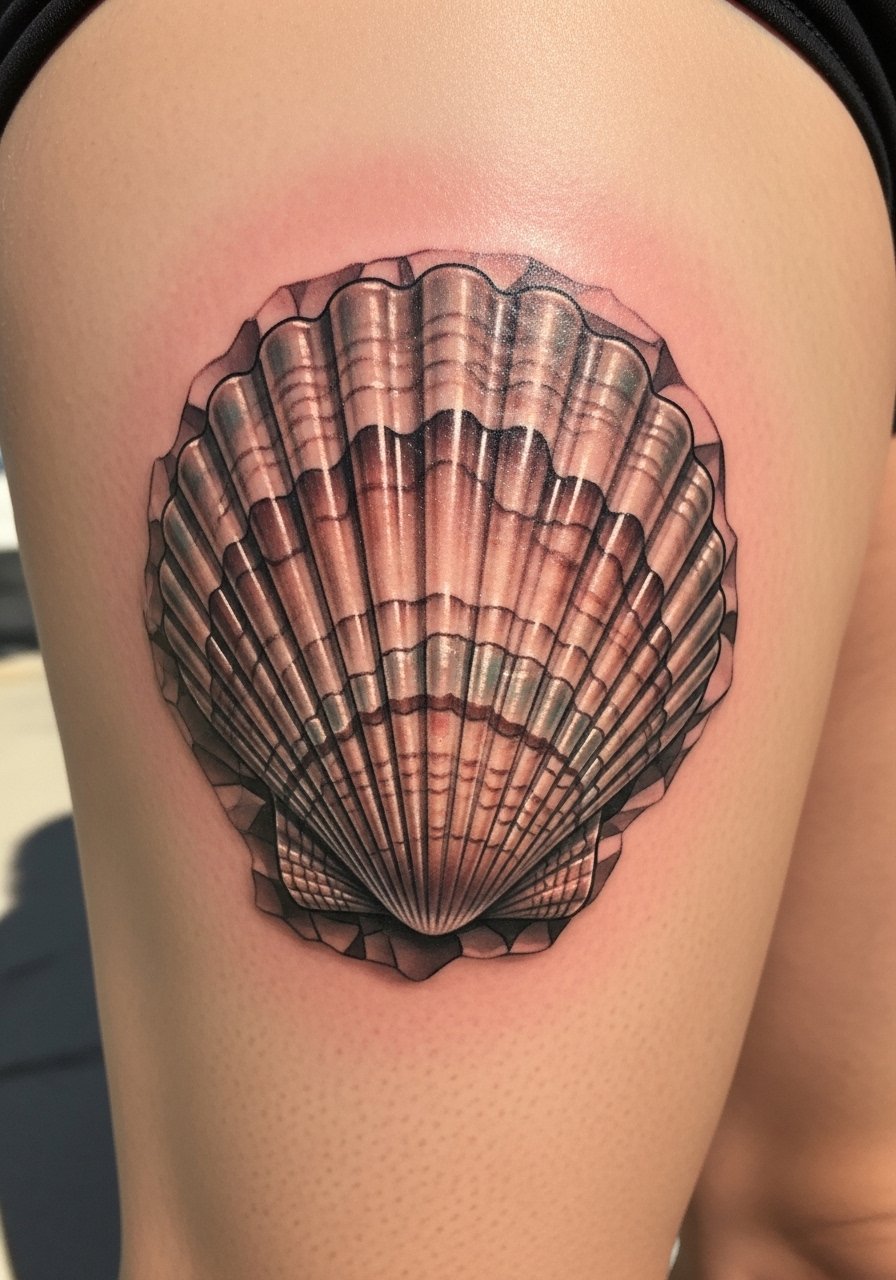
Shells get depth from groove shading and small iridescent highlights. Thigh flesh holds pigment well and moves with clothing. From my experience, keeping highlights slightly toned down preserves the pearl effect after healing. Avoid tiny nacre details that vanish.
28. Glow-In-The-Dark UV Ink Veins on Shoulder
Style/Technique: UV Ink / Subtle 3D Veining
Pain Level: Medium (4-6/10)
Session Time: 1-2 hours
Best For: Nightlife, subtle daytime look
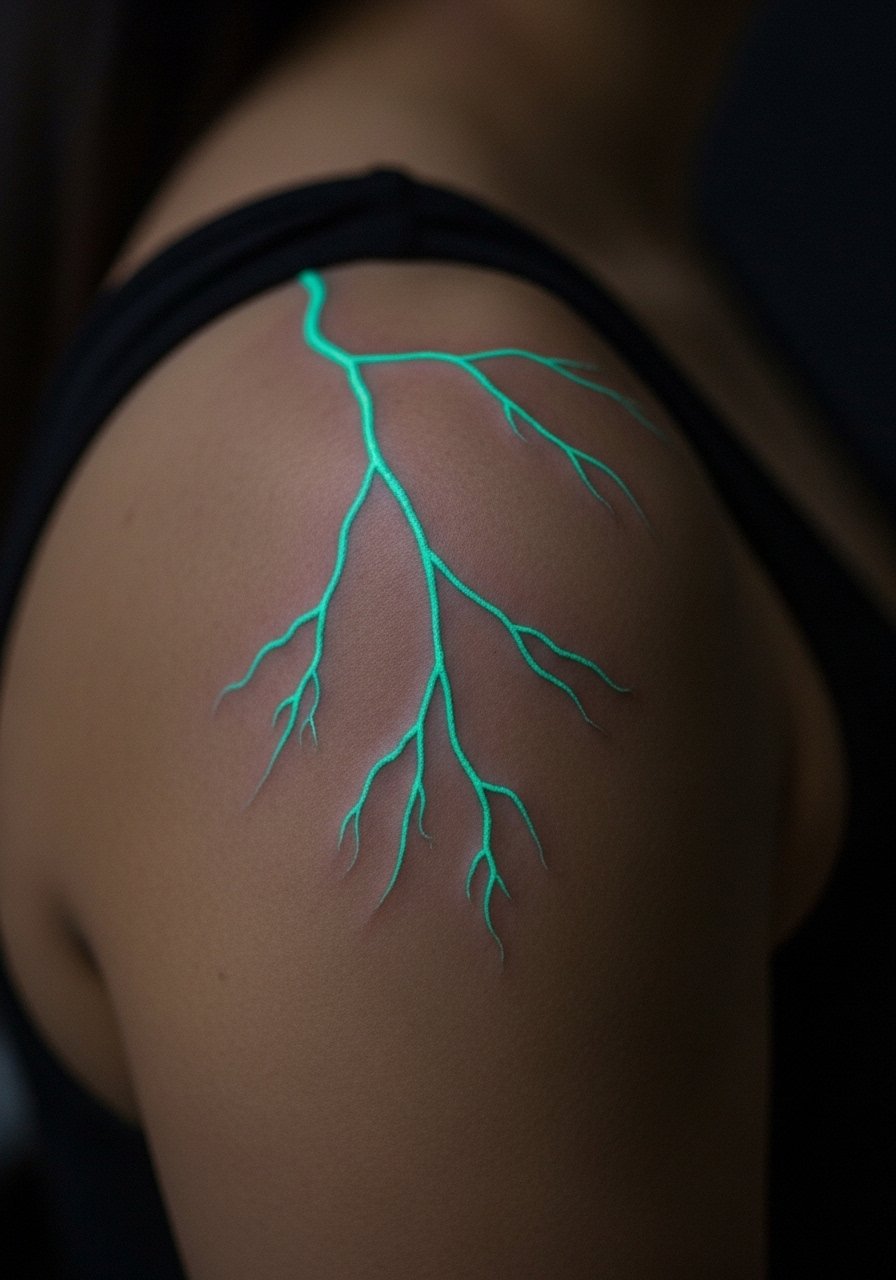
UV ink can add a hidden layer of 3D when viewed under blacklight. Daytime the veins appear muted—under UV they pop. I’ve seen artists combine normal ink shadows with UV highlights for a layered effect. Note: UV ink longevity varies; discuss safety and fading with an artist experienced in UV work. Common mistake: relying solely on UV for the 3D effect—pair it with standard shading.
Tattoo Prep and Aftercare Essentials
Aftercare Essentials:
- Aquaphor Healing Ointment, 14oz Tube — Industry standard first 3-5 days
- Saniderm Transparent Adhesive Bandage, 6-Inch Roll — Second-skin healing option
- CeraVe Fragrance-Free Moisturizing Lotion, 12oz — For days 4-14 of healing
- Dr. Bronner's Unscented Castile Soap, 32oz — Gentle cleaning
Before Your Appointment:
- Tattoo Numbing Cream with 5% Lidocaine — Use only if your artist approves
- Tattoo Stencil Transfer Paper — Useful for at-home sketch transfer
Long-Term Maintenance:
- SPF 50 Sunscreen Stick for Tattoos — Daily protection to prevent fading
- Mad Rabbit Tattoo Balm, 2oz — Keeps healed ink vibrant
- Hustle Butter Deluxe, 4oz — Vegan aftercare alternative
Optional Comfort & Repair:
- Hydrocolloid Bandages (Large) — For spot healing and scab protection
- Tattoo Aftercare Soap & Balm Kit — Starter kit with mild soap and moisturizer
From what I’ve learned, artists often recommend Saniderm for the first few days, then a gentle fragrance-free lotion like CeraVe. Aquaphor is great for initial moist healing, while Mad Rabbit or Hustle Butter are for ongoing vibrancy.
Frequently Asked Questions
Q: How bad does a 3D tattoo actually hurt?
A: Pain depends on placement. Outer arm/calfs = 3-4/10. Ribs/sternum/scalp = 7-9/10. It’s often more of an annoying pressure than sharp pain. For sensitive areas, consider asking about numbing cream with 5% lidocaine ahead of time.
Q: How long until a 3D tattoo looks like the healed photos I see online?
A: Surface healing is 2-3 weeks. Full settling is often 2-3 months. Whites and tiny highlights can fade faster, so healed photos at 6+ months give the best idea of how volume lasts.
Q: What if parts blur and the 3D effect fades?
A: From my experience, heavy contrast and bold anchor shadows age best. If detail softens, touch-ups or slight re-saturation can restore depth. Keep daily sunscreen like an SPF 50 sunscreen stick on your tattoo to slow fading.
Q: Can I work out after getting a 3D tattoo?
A: Wait 48-72 hours before light activity. For placements that move a lot (ribs, shoulders), wait longer—about a week before intense workouts. Sweat risks infection and slows healing. Keep the area clean with mild soap like Dr. Bronner's Unscented Castile Soap.
Q: Are certain skin tones better for 3D work?
A: Black and gray shading reads well on all tones. Bright colors can be more muted on deeper skin. I always look for artists with healed examples on similar skin tones before booking.
Q: Should I expect multiple sessions for hyper-realistic 3D pieces?
A: Often yes. Complex tonal work or full-color realism usually takes multiple sessions so the artist can layer saturation and let skin settle between passes.
Q: How do I keep a 3D tattoo looking lifelike long-term?
A: Daily SPF, regular moisturizing with a fragrance-free lotion, and periodic check-ins with your artist for touch-ups are key. I use Mad Rabbit or Hustle Butter for maintenance and an SPF stick whenever the tattoo sees sun.
Q: Is UV ink safe for 3D accents?
A: UV ink can add a hidden layer, but longevity varies. Seek an artist experienced with UV work and ask to see healed UV examples. If you choose UV accents, pair them with standard shaded ink so the piece still looks dimensional in daylight.
