
I spent months curating dark, moody designs because I kept seeing sharp pieces that looked amazing fresh but blurred into mud healed. The real trick was finding styles that keep visual punch long term. These 25 dark tattoos lean into blackwork, micro-realism, and neo-traditional lines that age well—and a few under-the-radar ideas I keep spotting in artist portfolios.
This list focuses on dark tattoos—blackwork, micro-realism, neo-traditional, and geometric black pieces. These work on arms, chest, ribs, and legs. From what I've seen in 2026 artist posts, high-contrast black holds longest and small white highlights help maintain depth.
1. Fine Line Botanical Sleeve on Inner Forearm
Style/Technique: Fine Line / Illustrative
Pain Level: Medium (3-4/10)
Session Time: 3–5 sessions, 2–4 hours each
Best For: Statement piece, covered with long sleeves
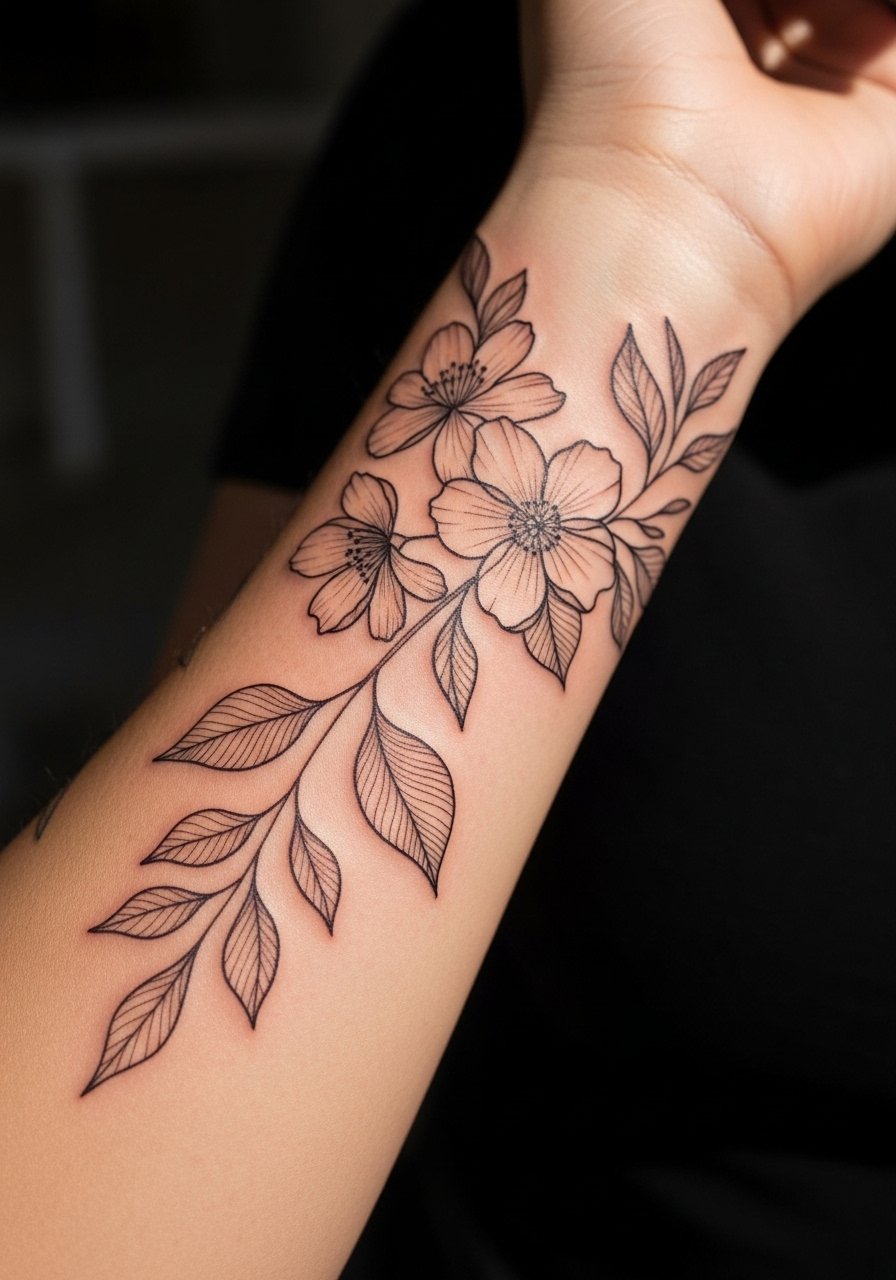
I picked this because delicate black stems and tiny stippling feel mysterious without color. It reads dark when photographed close, but from a distance it’s airy. Inner forearm tolerates needle work well—expect medium discomfort. Healing takes 2–3 weeks surface, a few months to settle. Fine lines blur faster on oily skin; I tell people to ask artists for slightly bolder anchor lines so the piece survives. Avoid over-detailing tiny veins and hairs—those can fill in. Ask for an artist who specializes in botanical fine line and steady single-needle work.
2. Blackwork Geometric Mandala on Spine
Style/Technique: Blackwork / Geometric
Pain Level: High (6-8/10)
Session Time: Multiple sessions, 2–4 hours each
Best For: Centerpiece, dramatic back placement
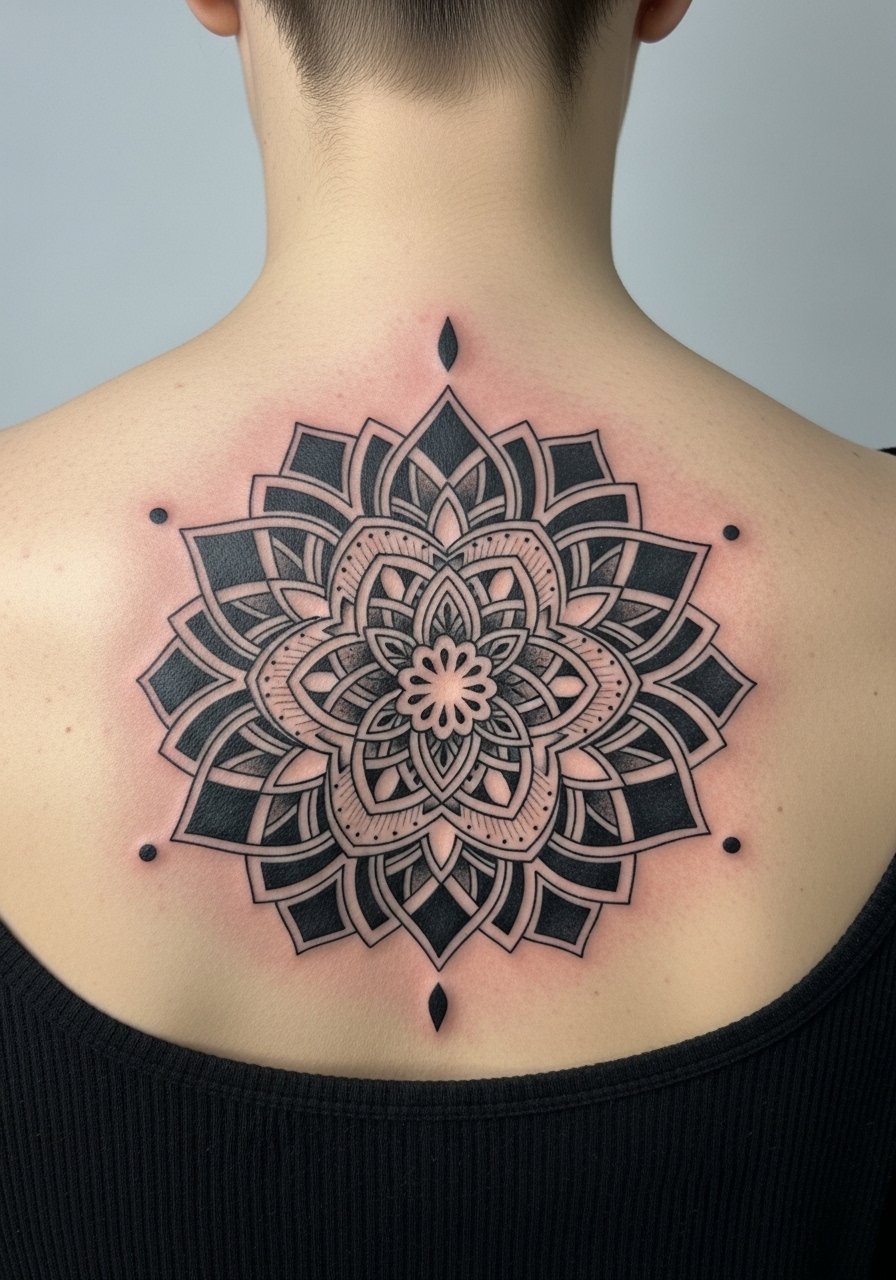
Spine work is intense, but a solid black mandala reads like a visual anchor. The symmetry and heavy black areas keep contrast as it ages. Pain is higher along the spine; expect longer sessions or breaks. Heavy black fills heal reliably but require attention to scabbing—overzealous picking damages saturation. I’ve seen mandalas lose crispness if the artist uses too-fine dotwork without backup lines. Ask for bold primary shapes with dotwork accents so the design still reads if minor blur happens. Surface healing is 2–3 weeks; full settle can be months.
3. Micro-Realism Crow Portrait on Upper Arm
Style/Technique: Micro-Realism / Black & Gray
Pain Level: Low-Medium (2-4/10)
Session Time: 2–4 hours
Best For: Visible statement, easy to cover with short sleeves
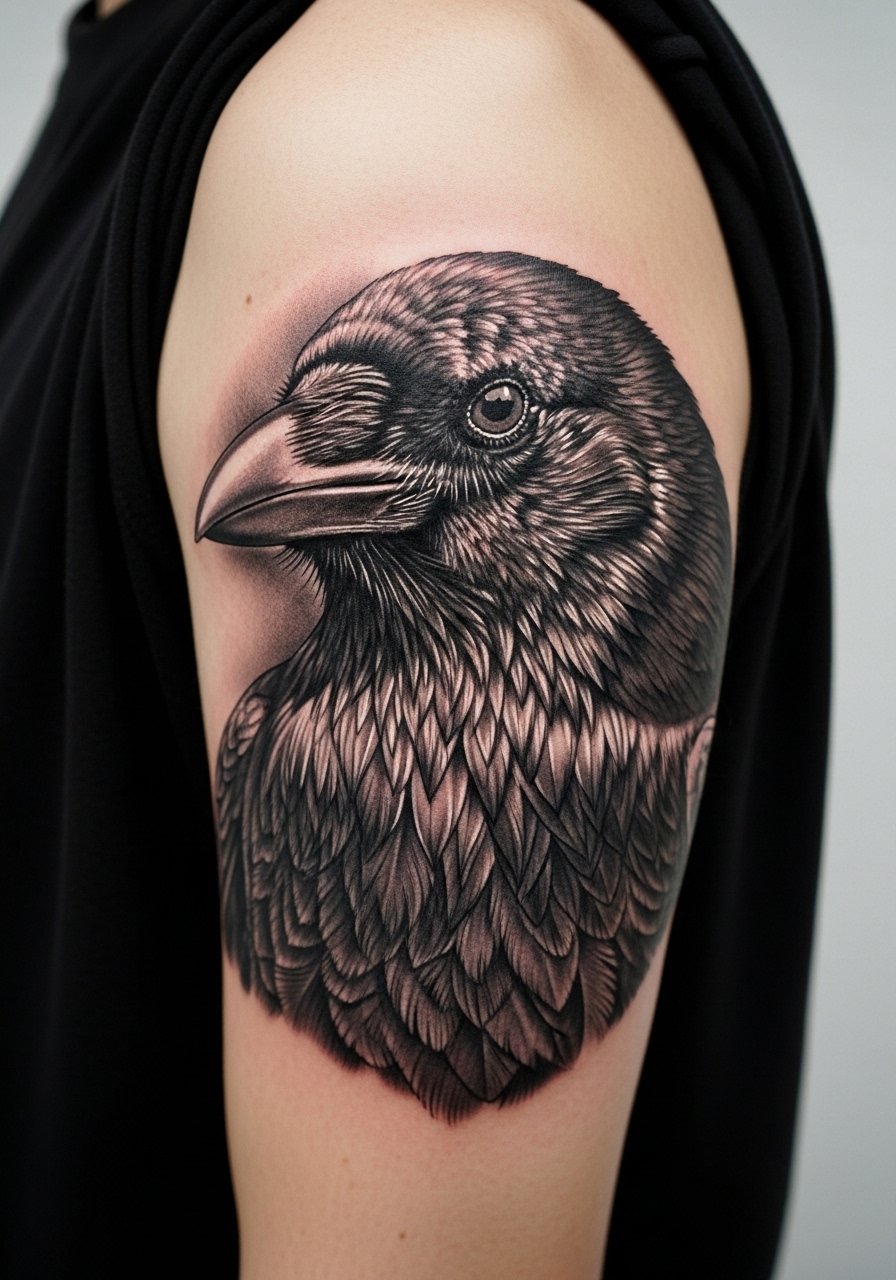
Micro-realism in black and gray gives a dark, mysterious feel without full black block. A crow or raven portrait works great for symbolism. Upper arm is forgiving for pain and healing. The trick is balanced contrast—too much soft shading loses detail post-heal. I tell clients to pick an artist with strong photographic realism and healed examples on similar skin tones. Common mistake: requesting extreme tiny details that won’t hold. Healing: keep moisturized but not over-occluded to keep gradients intact.
4. Neo-Traditional Skull with Roses on Thigh
Style/Technique: Neo-Traditional / Bold Shading
Pain Level: Medium (4-5/10)
Session Time: 2–4 hours
Best For: Large statement, easy to hide
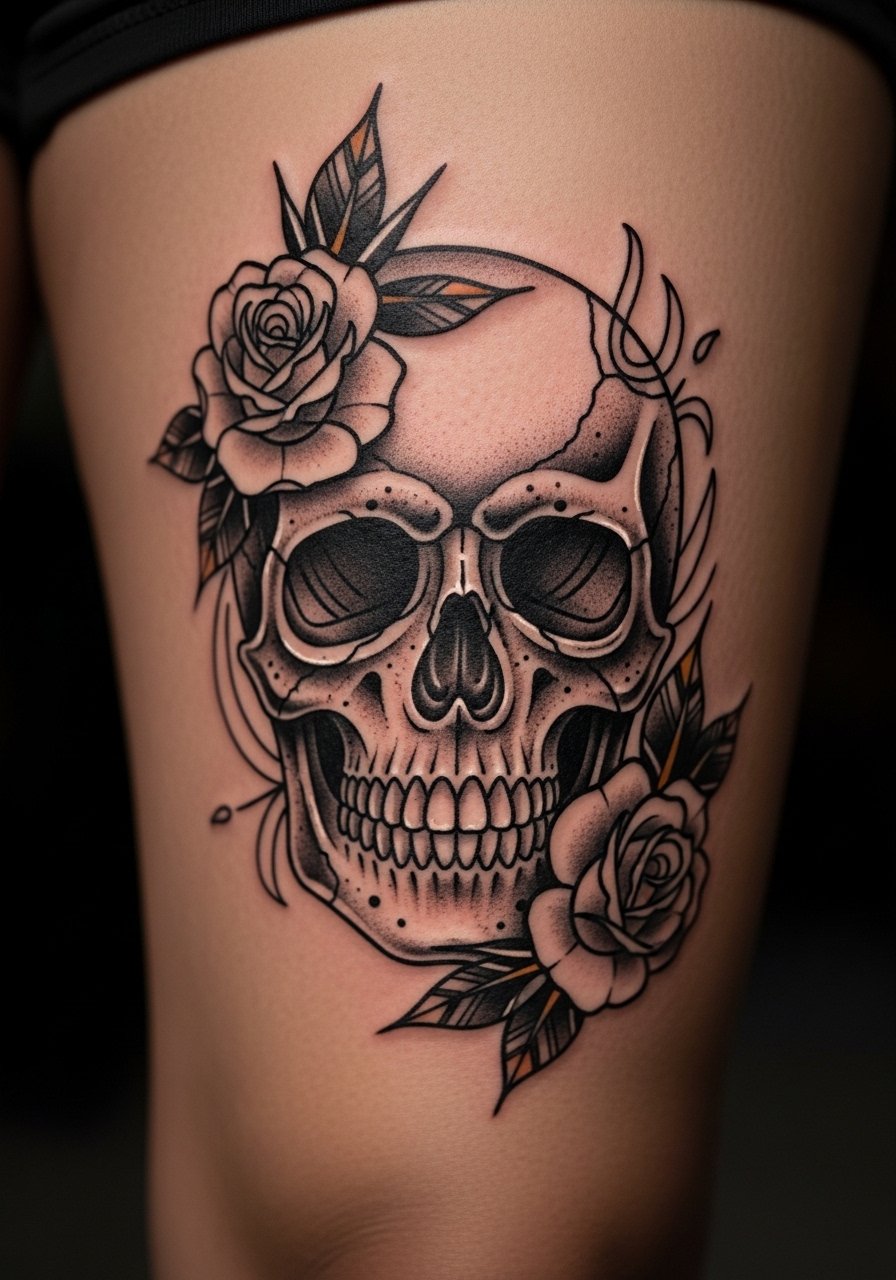
A dark skull with heavy blacks and selective highlights hits visually and retains presence over time. Thighs handle larger sessions and heal with less movement-related issues. Pain is moderate. The heavy black anchors the piece and prevents premature fading. Artists I like combine clean outline work with gradient black packing. Avoid tiny, intricate filigree inside heavy black—those details can vanish. For best results, ask for areas of solid black balanced with negative space to keep the image readable as it softens.
5. Minimalist Line Art Mountains on Ankle
Style/Technique: Minimalist / Single-Line
Pain Level: High (6-7/10)
Session Time: 1–2 hours
Best For: Small, subtle visibility, easy hide with socks
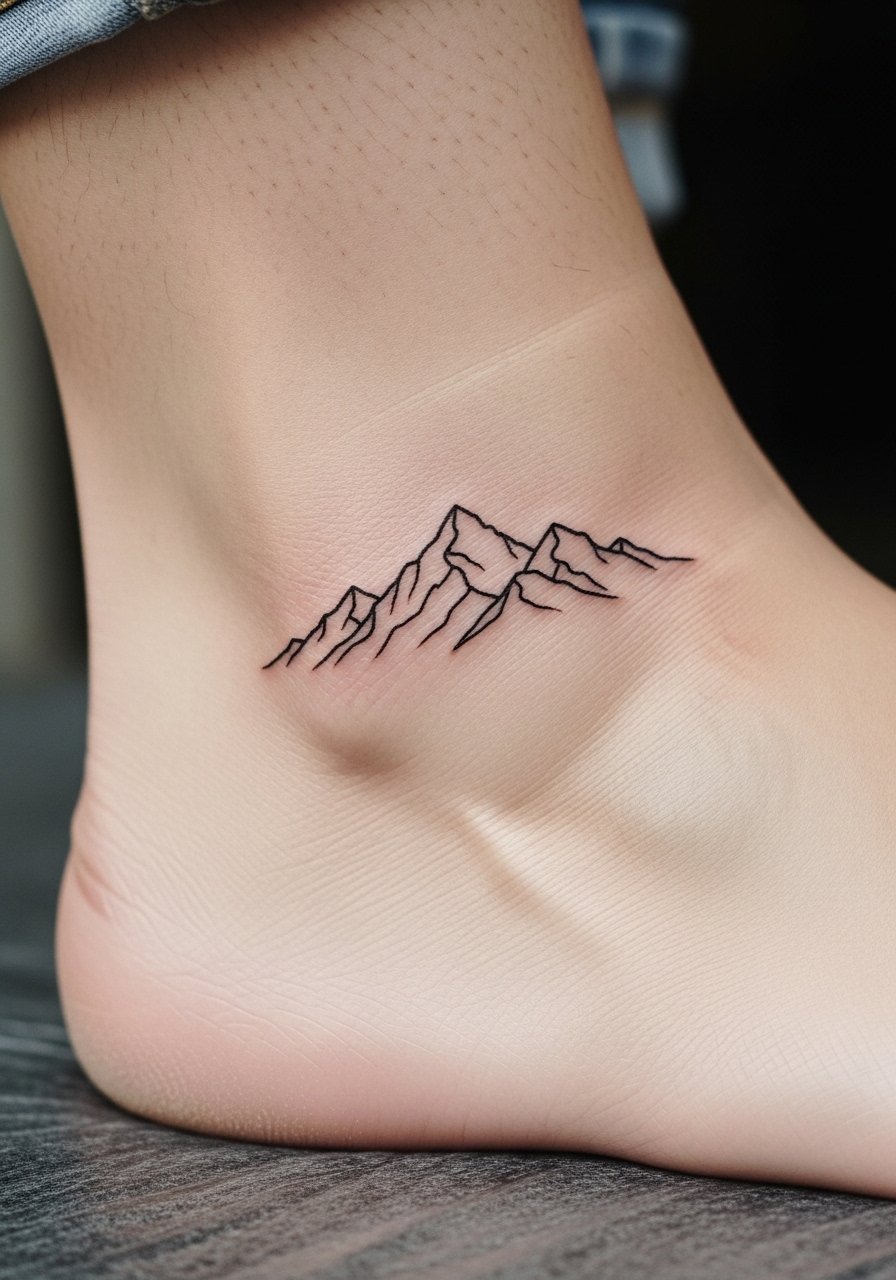
Thin single-line designs on the ankle look elegant but can blur faster because of movement and thin skin. I’ve seen minimalist mountains soften within a year if lines are too hairline thin. Pain is higher near bone. If you want the minimalist look to last, ask the artist to slightly thicken the line and allow a small amount of negative space within peaks. Healing: 2–3 weeks surface. Avoid ankle bands that rub during healing.
6. Blackout Forearm Band with Negative Space Pattern
Style/Technique: Blackout / Negative Space
Pain Level: Medium-High (5–7/10)
Session Time: Multiple sessions, 2–5 hours each
Best For: Bold concealment, modern look
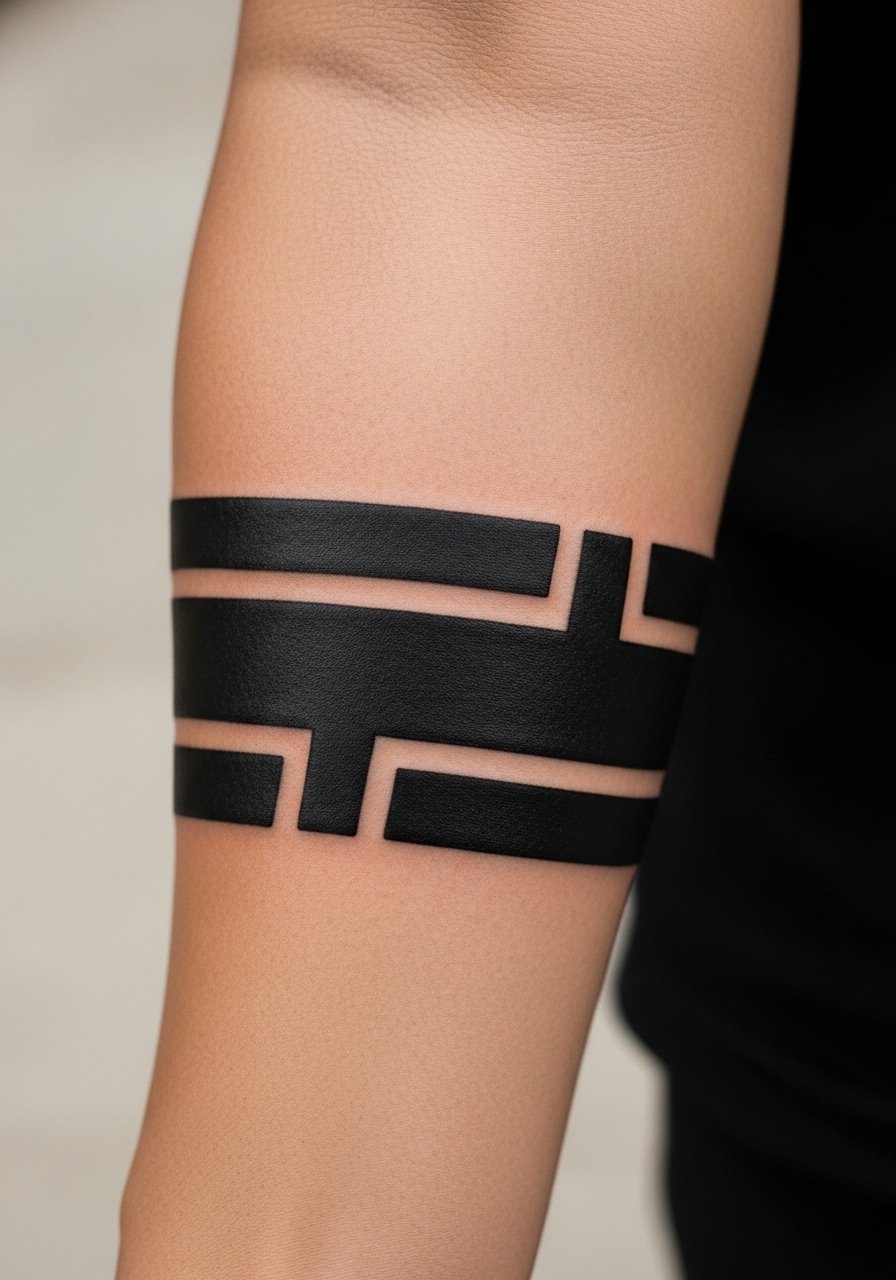
Blackout pieces command attention. When paired with precise negative space patterns, the visual effect is dramatic and dark without relying on color. Forearm blackout tolerates sessions but can be sensitive. Solid black ages well—less risk of patchy fade if packed correctly. Common mistake: uneven fills from rushed sessions. I recommend an artist experienced in large black fills. Aftercare must focus on preventing scab picking to maintain saturation.
7. Dotwork Astronomical Sleeve on Upper Arm
Style/Technique: Dotwork / Black & Gray
Pain Level: Medium (4-6/10)
Session Time: 3–6 sessions
Best For: Gradient texture, mysterious vibe
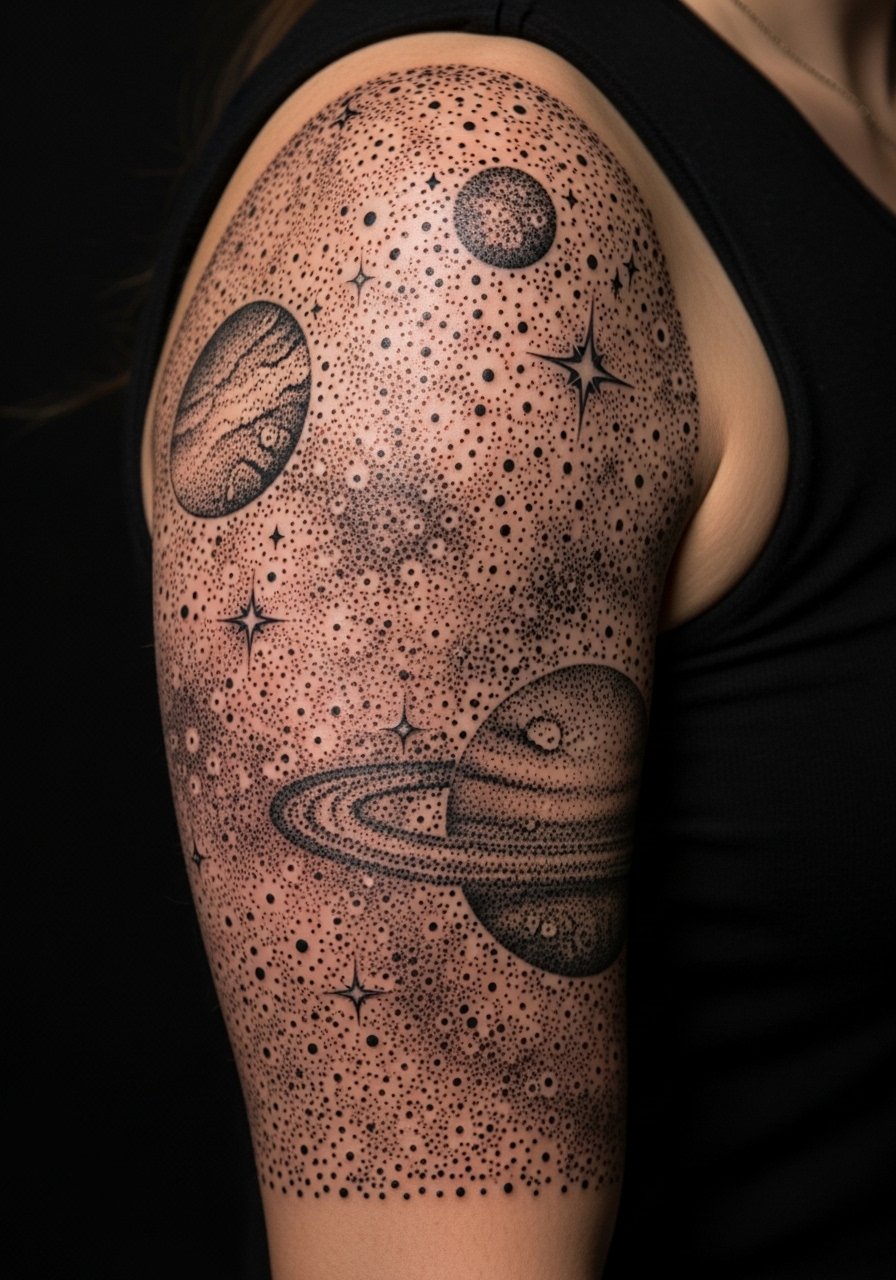
Dotwork builds shadow and depth subtly. An astronomical motif—stars, moons, nebulae—reads dark and textured. Upper arm lets the artist layer dots gradually. Pain is moderate. Dotwork can soften into gray wash over time; choose contrasts and anchoring lines to prevent losing the form. I often advise clients to avoid overly dense micro-dot fields that flatten—mix dot sizes and some solid blacks to retain dimension. Healing needs gentle moisturizing to keep dots distinct.
8. Single-Needle Script Behind Ear
Style/Technique: Fine Line / Script
Pain Level: High (6-7/10)
Session Time: 30–60 minutes
Best For: Hidden, meaningful text
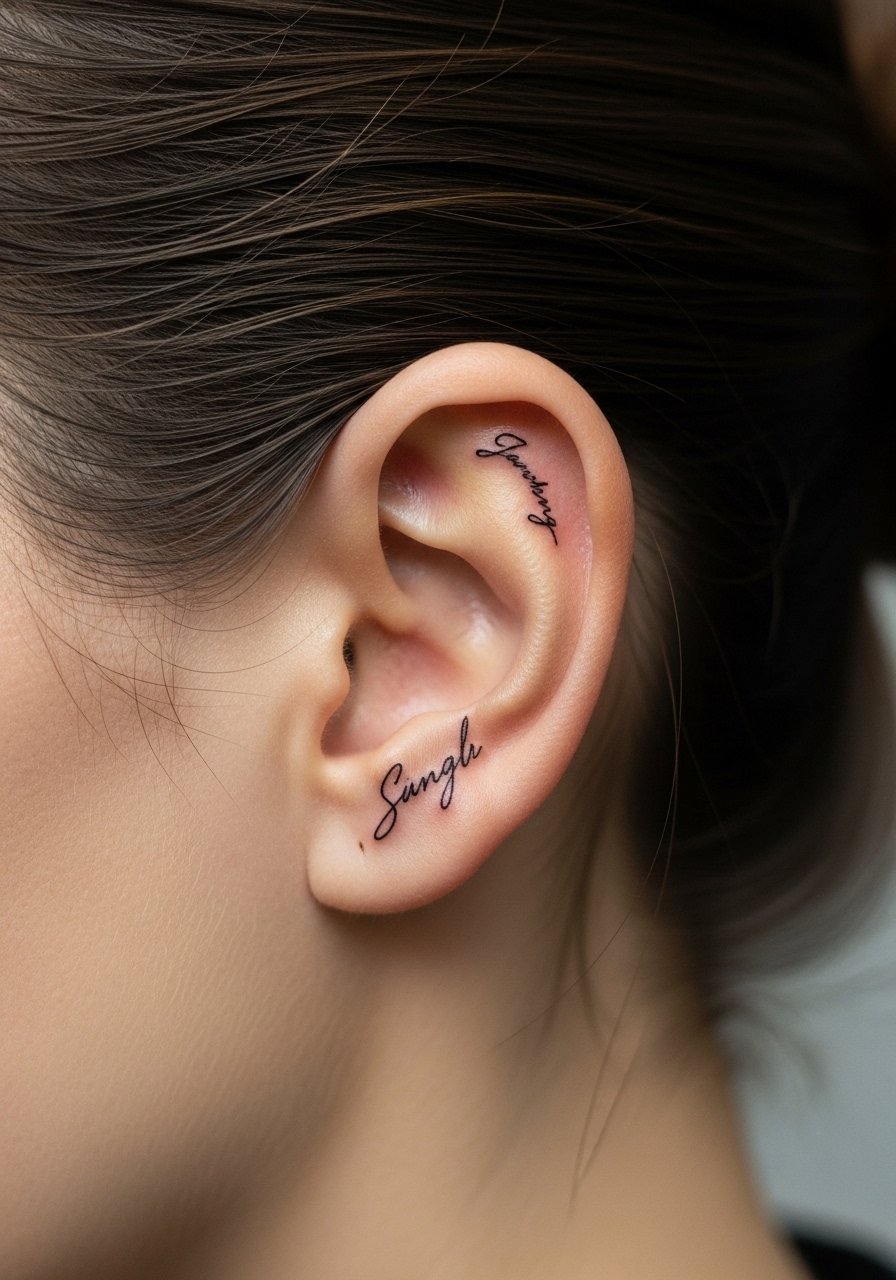
Behind-ear script reads intimate and dark when done in black. It's a discreet placement, but skin here is thin, so pain spikes. Single-needle scripts can blur, especially if the letter strokes are hairline. I tell people to pick slightly thicker strokes and avoid tiny flourishes. Healing is fast superficially but avoid sleeping on the area. Ask for healed examples from the artist showing longevity on similar skin.
9. Micro-Realism Insect on Ribcage
Style/Technique: Micro-Realism / Black & Gray
Pain Level: High (7-9/10)
Session Time: 2–4 hours
Best For: Private, detailed statement
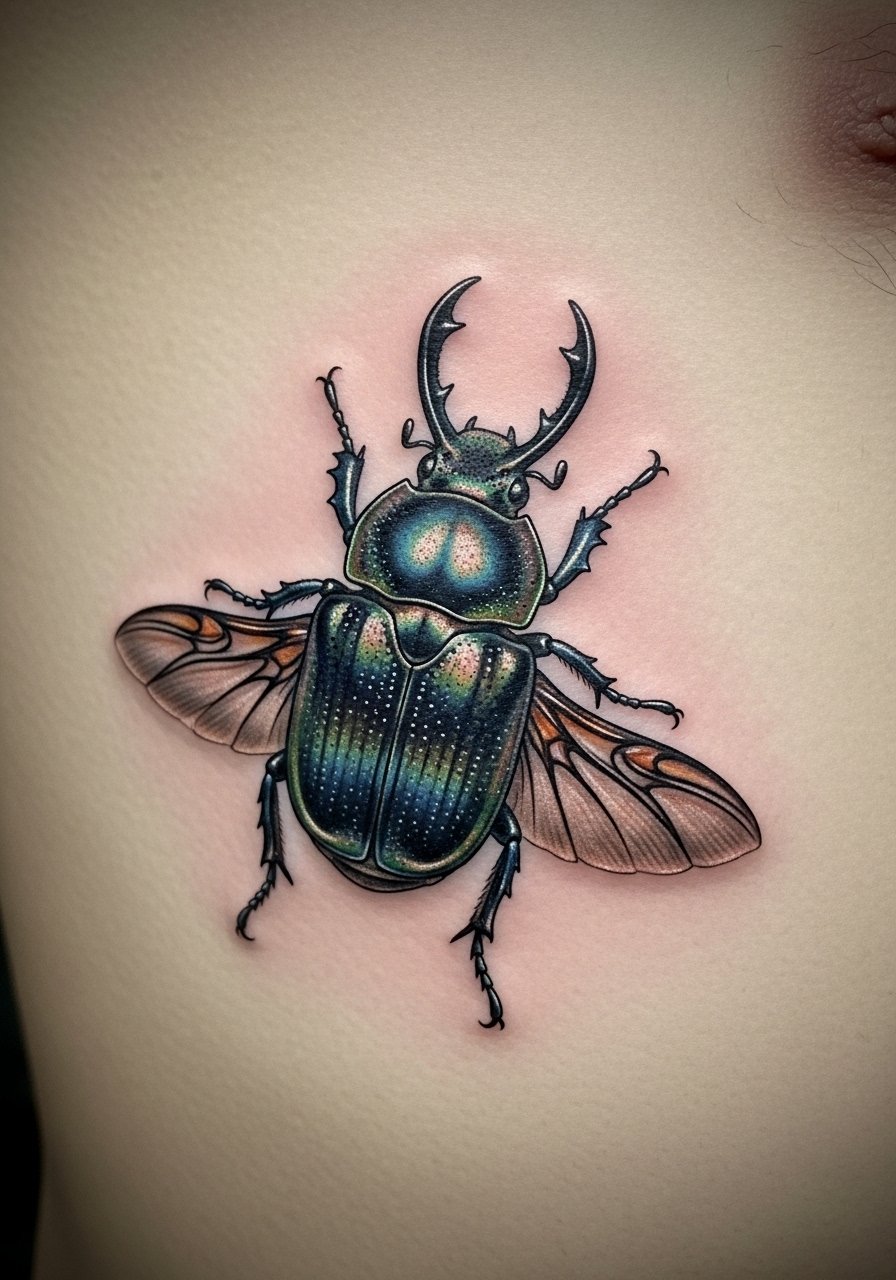
Ribcage tattoos are rewarding but painful. A dark insect—beetle, moth—reads moody and intricate. Micro-realism showcases texture in scales and wings, but ribs can cause extra movement during sessions. Healing: slow, and keep clothing soft against it. I suggest asking artists to slightly exaggerate contrast in shadow areas to survive natural softening. Avoid ultrafine hairs or micro stippling that will disappear on the rib’s thin skin.
10. Blackwork Baroque Chest Piece
Style/Technique: Blackwork / Ornamental
Pain Level: Medium-High (5-8/10)
Session Time: Multiple sessions
Best For: Bold upper chest statement
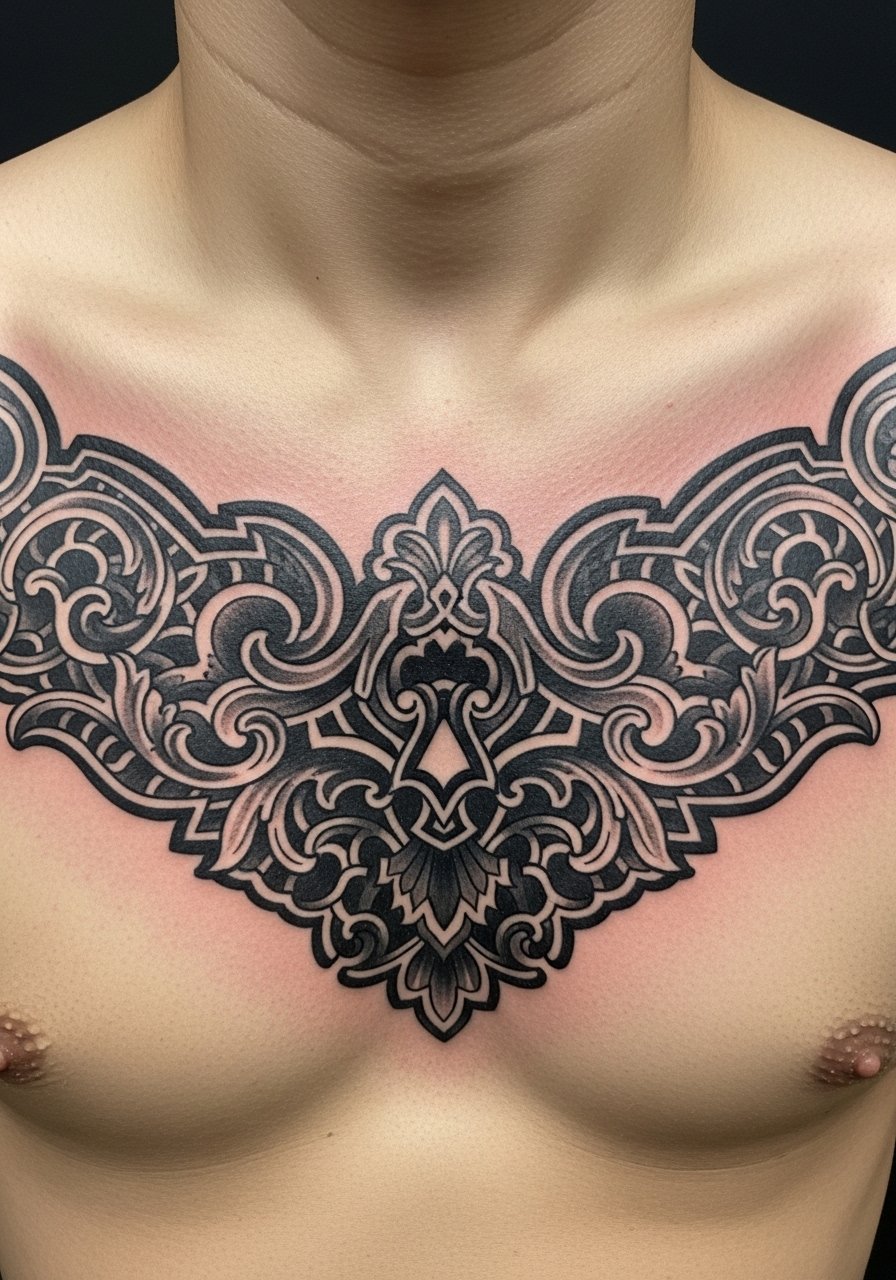
Baroque ornamentals in heavy black create dramatic silhouettes across the chest. The chest area can be sensitive near sternum and ribs. Solid black areas maintain presence over years, while ornamental voids create pattern. I’ve seen these stay readable if the artist balances heavy blacks with negative space. Common error: too many tiny loops; they can merge later. Seek an artist who plans long-term readability.
11. Framed Micro-Realism Eye on Forearm
Style/Technique: Micro-Realism / Black & Gray
Pain Level: Medium (4-6/10)
Session Time: 2–3 hours
Best For: Watchful, meaningful piece
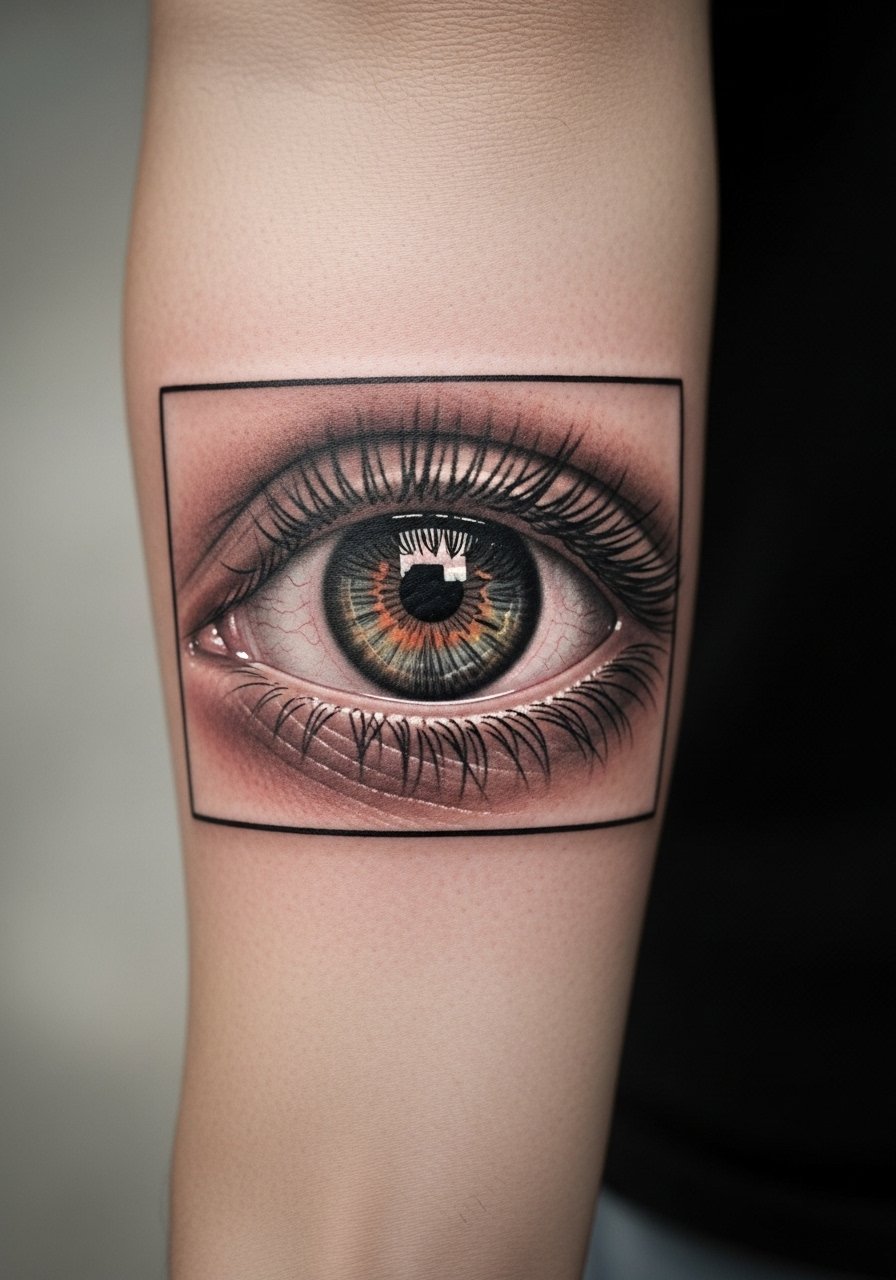
An eye in black and gray has immediate visual power. A subtle frame of black helps the central realism read even as shading softens. Forearm placement is forgiving for healing. I always tell clients that eyes need clean contrast; if shading is too faint, the iris looks flat when healed. Choose an artist known for portraiture and healed shots of similar detail. Watch for smudged edges—those indicate too-soft work.
12. Tribal-Inspired Mandible Linework on Jawline
Style/Technique: Blackwork / Tribal Linework
Pain Level: High (7-9/10)
Session Time: 1–2 hours
Best For: Edge placement, bold profile look
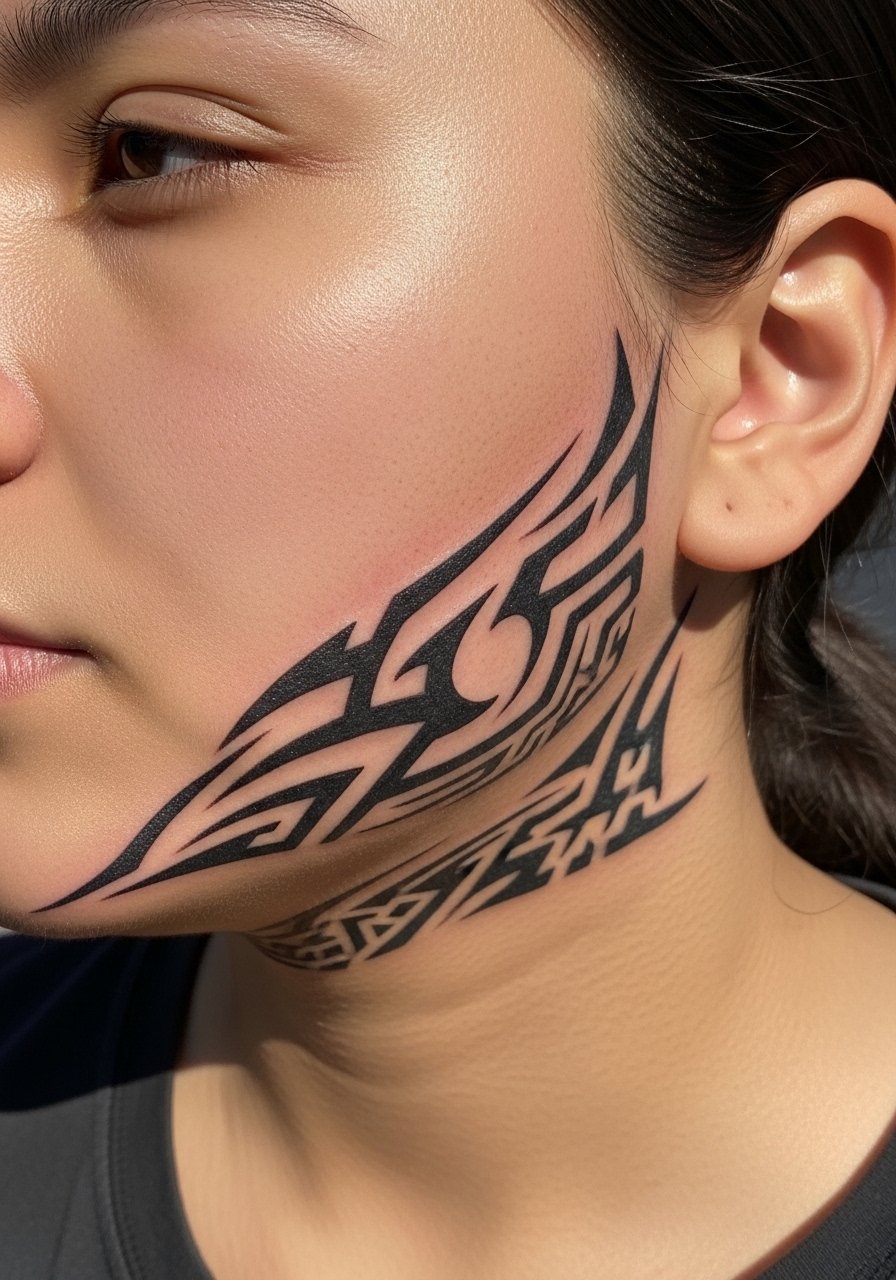
Face and jaw tattoos are a strong commitment. Tribal-inspired black linework along the jaw has a dark, cinematic effect. Pain is high and aftercare must be meticulous to avoid infection. Lines here need consistent depth; if an artist punctures unevenly, lines heal patchy. I’ve seen bold linework hold better than micro-detail on the jaw. If you want subtlety, choose a small area elsewhere first. Discuss healed examples with your artist.
13. Black & Gray Religious Icon on Upper Back
Style/Technique: Black & Gray / Micro-Realism
Pain Level: Medium (4-6/10)
Session Time: 2–5 hours
Best For: Spiritual statement, coverable
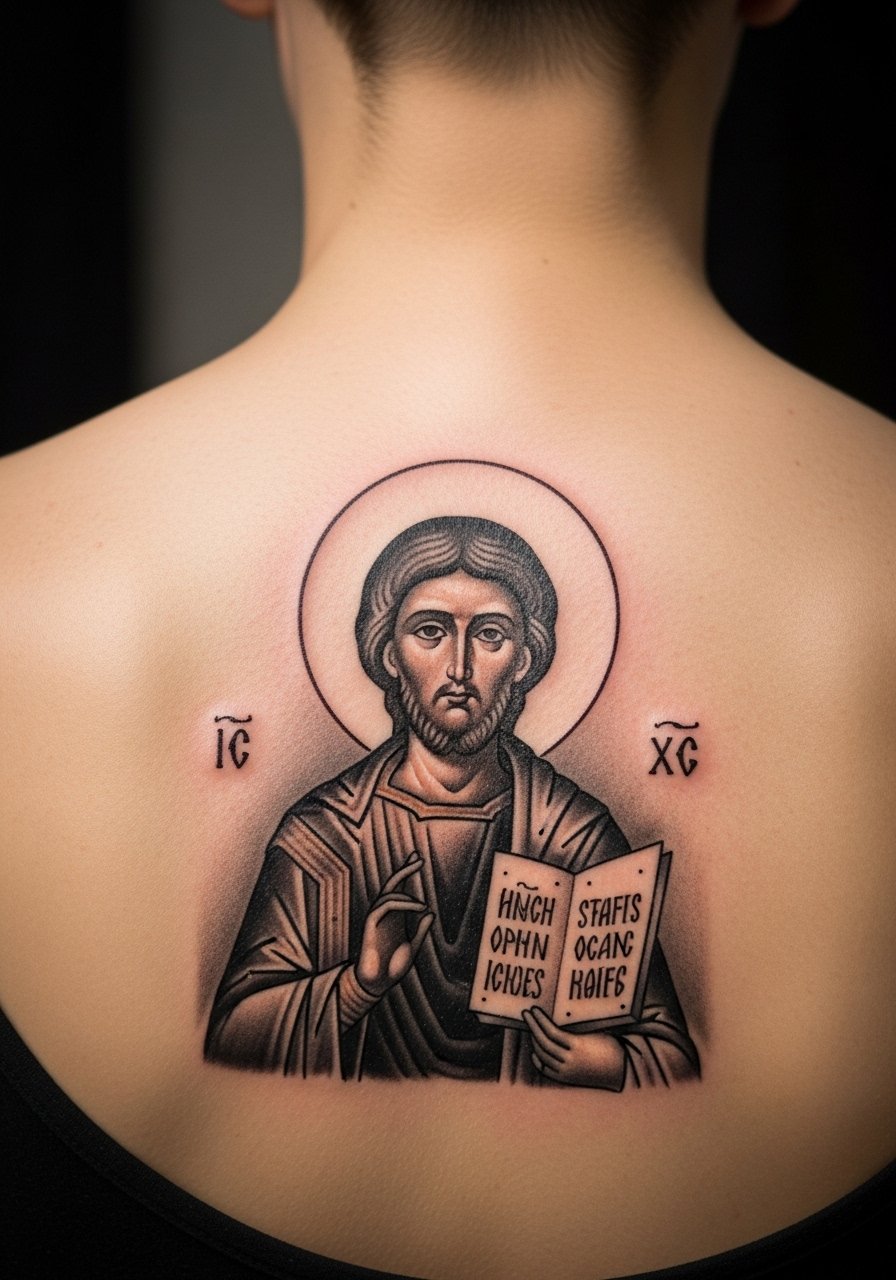
Religious iconography in black and gray conveys depth and mood. Upper back fits larger compositions and heals reliably. The biggest challenge is keeping facial features readable without overcrowding. I recommend artists who show healed portrait/icon work. Healing requires avoiding friction from straps and bras. If you want a timeless look, stick to classic black-and-gray shading rather than trends.
14. Shadowed Animal Silhouette on Calf
Style/Technique: Blackwork / Silhouette
Pain Level: Low-Medium (3-5/10)
Session Time: 1–2 hours
Best For: Bold, leg visibility, easy to conceal with pants
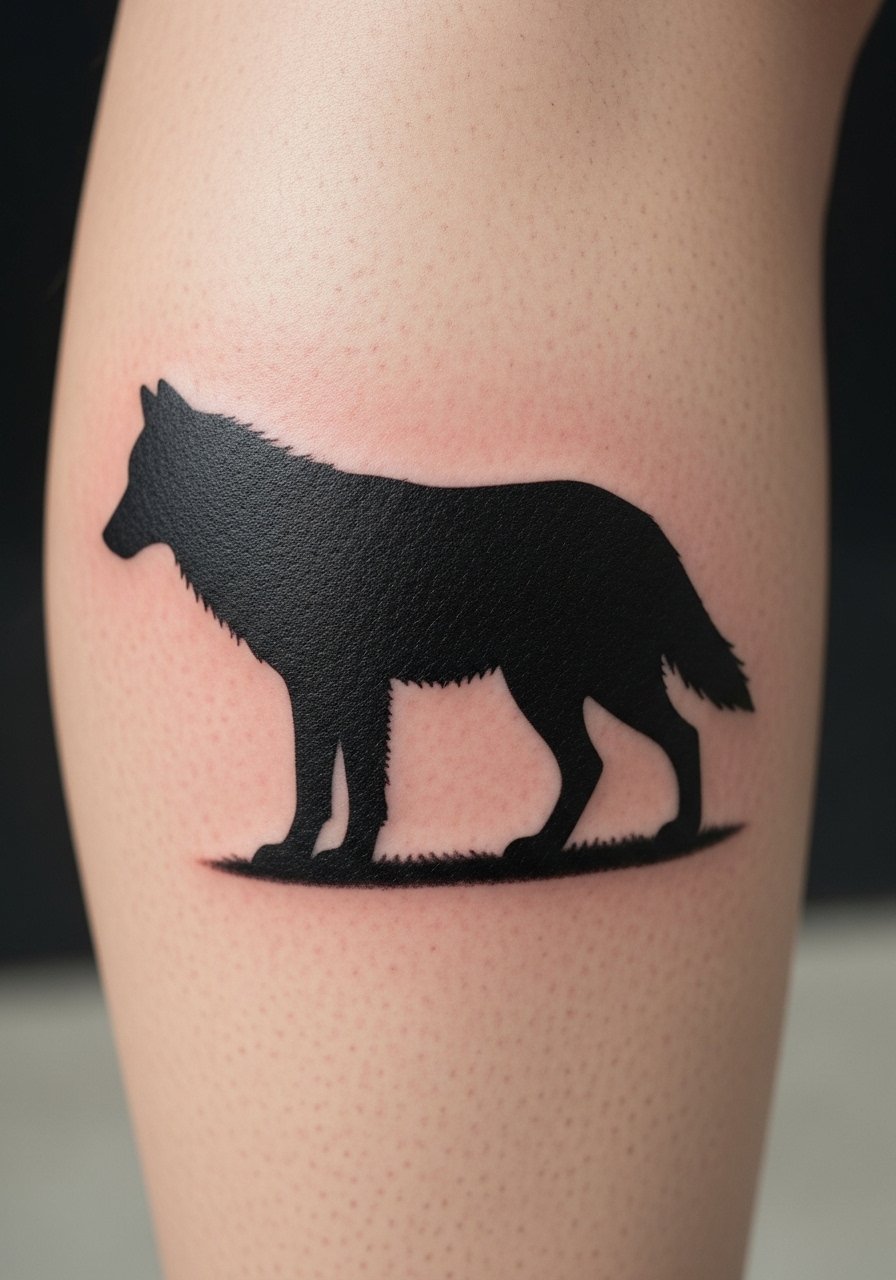
A solid animal silhouette reads strong and mysterious. Calf placement is low-to-moderate pain and allows for clear solid fills. Solid silhouettes age well because there’s no fine interior detail to lose. The common pitfall is uneven fill—get an artist who packs black consistently. Aftercare: keep the area moisturized and avoid tight socks rubbing the fresh ink.
15. Black Floral Ankle Bracelet
Style/Technique: Blackwork / Ornamental
Pain Level: High (6-8/10)
Session Time: 1–2 hours
Best For: Delicate yet dark ankle accent
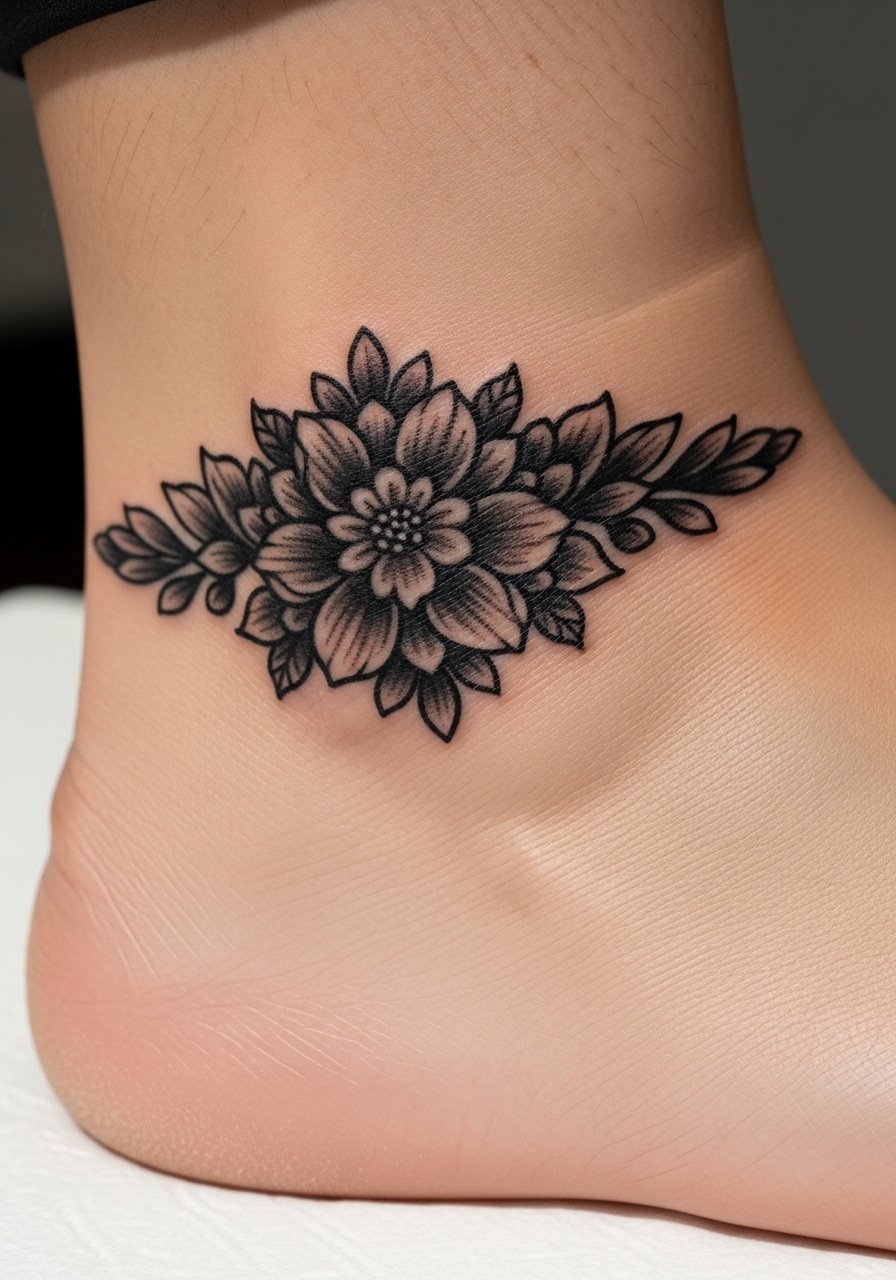
An ankle bracelet in black florals is subtle but mysterious. The ankle’s thin skin and movement make it pricier in pain and risk of line softening. I’ve seen artists recommend slightly bolder petals instead of hairline filigree to keep the bracelet visible. Healing needs careful shoe selection during the week after. Avoid designs with tiny stems that might disappear.
16. Grayscale Wave and Storm on Ribcage
Style/Technique: Black & Gray / Neo-Japanese Influence
Pain Level: High (7-9/10)
Session Time: Multiple sessions
Best For: Flowing body art, dramatic motion
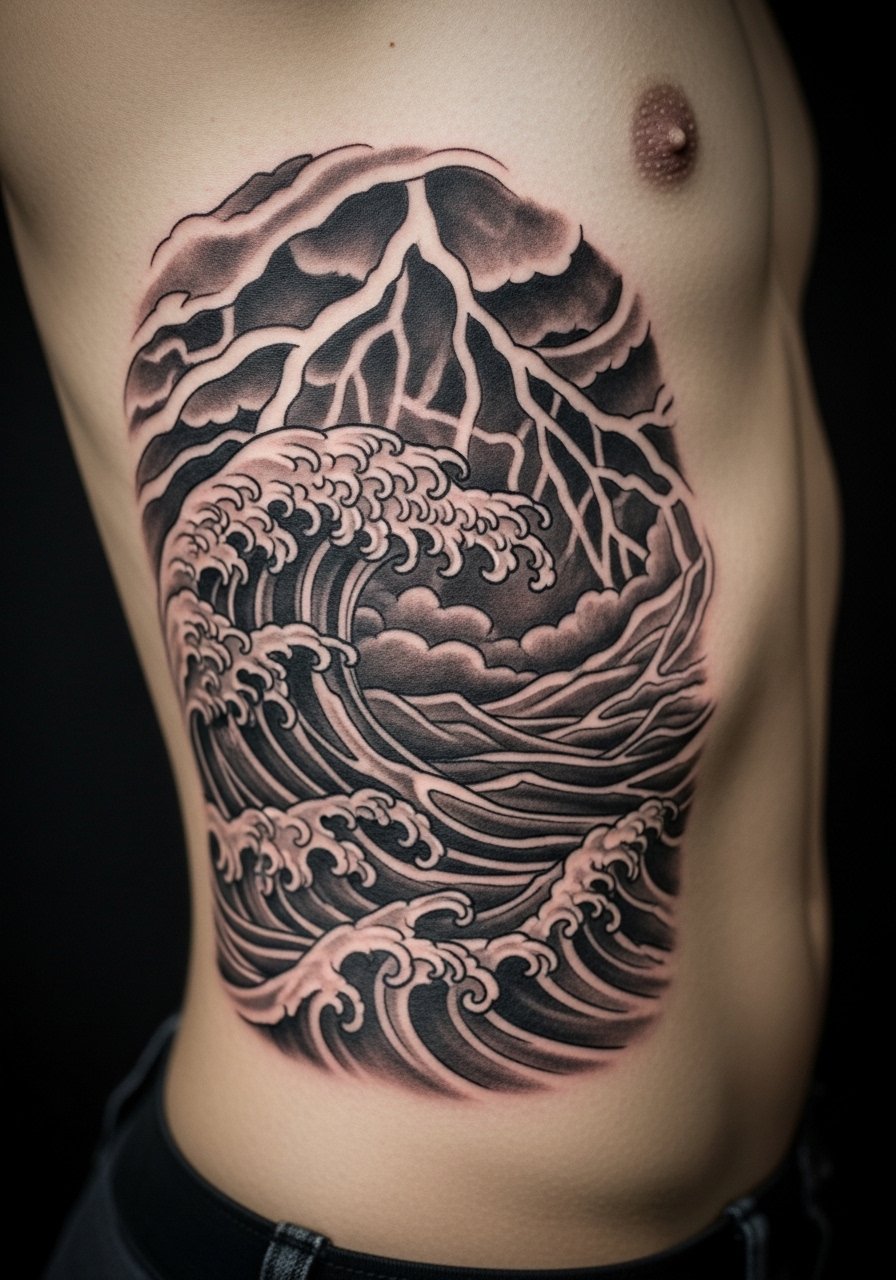
Neo-Japanese wave work in dark grayscale creates movement and drama. Rib placement intensifies pain but allows large compositions. The contrast between deep black waves and soft foam highlights keeps the piece readable long-term. Artists who understand flow and negative space make these age well. Avoid cramming too many small motifs; keep the main waves dominant.
17. Dark Botanical Ankle Tattoo with Bold Shadows
Style/Technique: Blackwork / Botanical
Pain Level: High (6-8/10)
Session Time: 1–2 hours
Best For: Small but bold detail

Instead of airy fine line botany, go bold at the ankle. Heavy shadows keep the design readable against movement and wear. The ankle is sensitive, so expect higher pain. Artists should use robust black packing for longevity. A common mistake is relying solely on thin outlines at this spot—those vanish. Choose a balanced mix of line and packed shadow.
18. Negative Space Geometric Thigh Panel
Style/Technique: Blackwork / Negative Space Geometry
Pain Level: Medium (4-6/10)
Session Time: 2–4 hours
Best For: Large leg statement, coverable
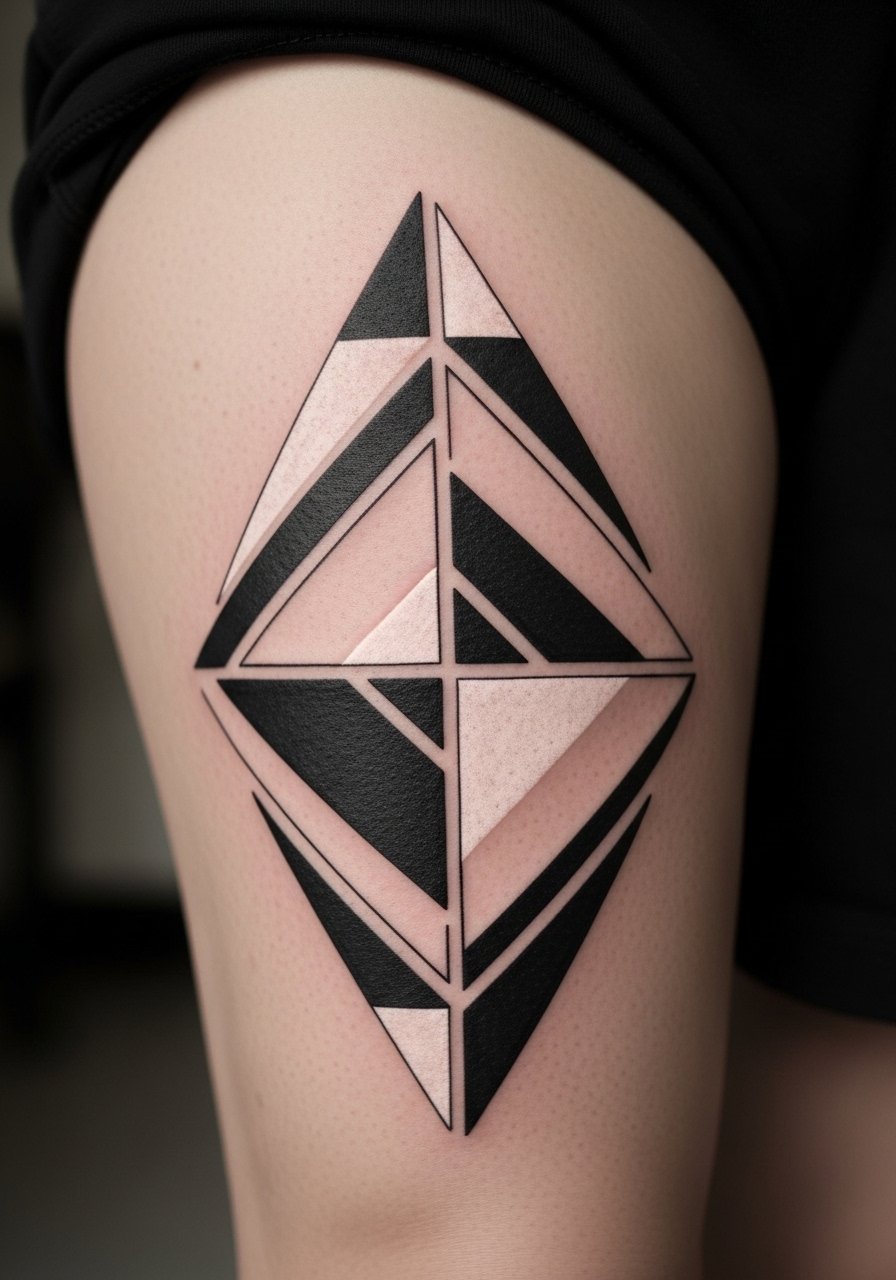
Thigh panels are forgiving for size and detail. Using negative space inside heavy black shapes creates a stark, dark aesthetic that stays legible as the piece softens. Pain is moderate. I recommend alternating solid black segments with open areas to let the skin show—this preserves structure long term. Don’t over-detail the negative shapes; keep them bold.
19. Gothic Script Chest Wordmark
Style/Technique: Black Lettering / Script
Pain Level: Medium-High (5-7/10)
Session Time: 1–2 hours
Best For: Bold text, meaningful phrases
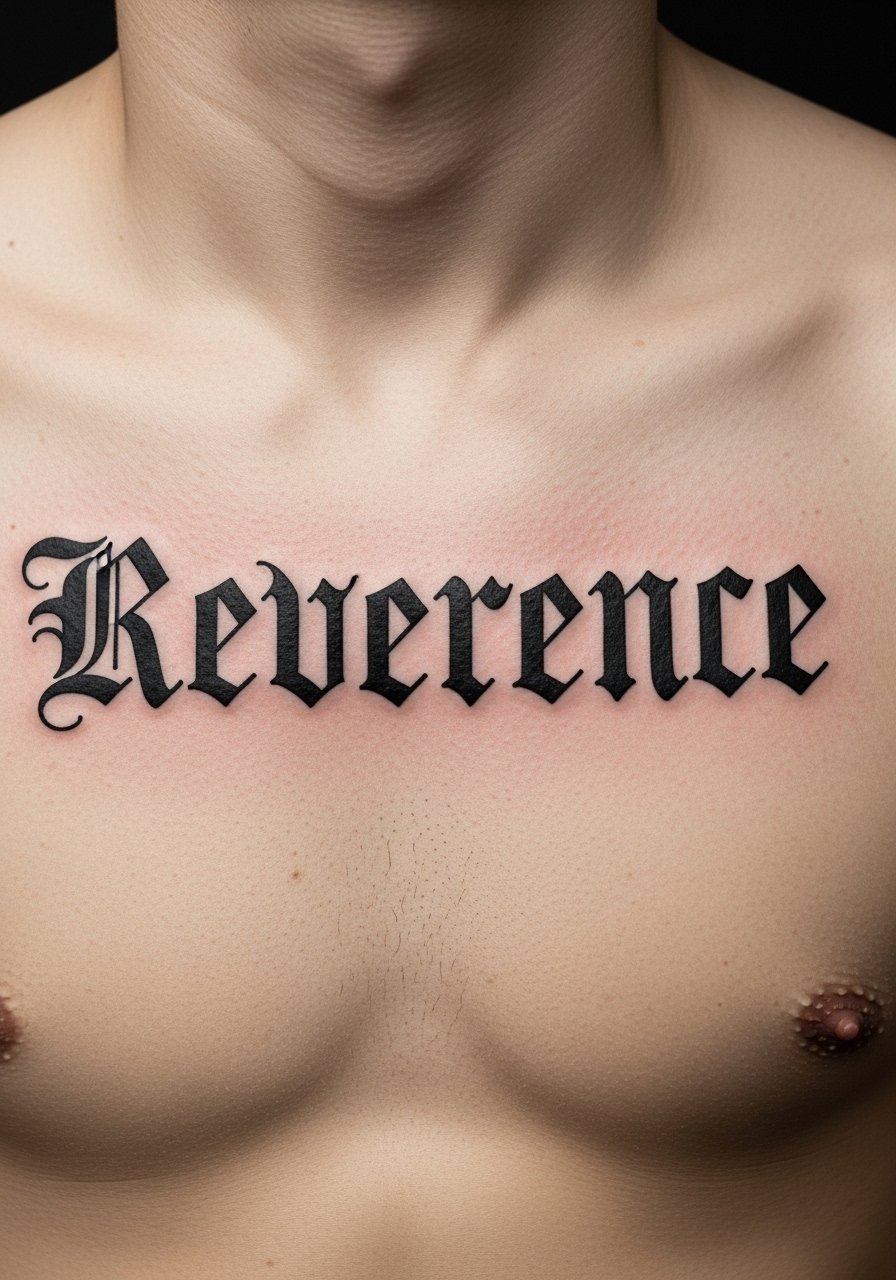
Black letter scripts carry weight and mood. On the chest, they read like a proclamation. Thick strokes age better than delicate calligraphy, especially if you want longevity. Expect sensitivity near the sternum. I tell people to check healed examples; some artists over-finesse the terminals and the letters blur. Bold initial strokes and open counters help preserve legibility.
20. Dark Surrealist Pocket Portrait on Inner Bicep
Style/Technique: Micro-Realism / Surreal
Pain Level: Medium (4-6/10)
Session Time: 2–4 hours
Best For: Intimate, symbolic statement

Inner bicep is a nice spot for a pocket-sized surreal portrait—dark elements pop against skin. Pain is moderate and healing is usually smooth if clothing doesn’t rub. Surreal additions (fractured lines, shadowed voids) look strong in black ink. The risk is over-detailing tiny surreal bits; keep primary facial forms clear. Seek artists who do small portraits with solid healed outcomes.
21. Heavy Black Anchor on Wrist
Style/Technique: Blackwork / Symbolic
Pain Level: High (6-8/10)
Session Time: 1 hour
Best For: Small statement, daily visibility
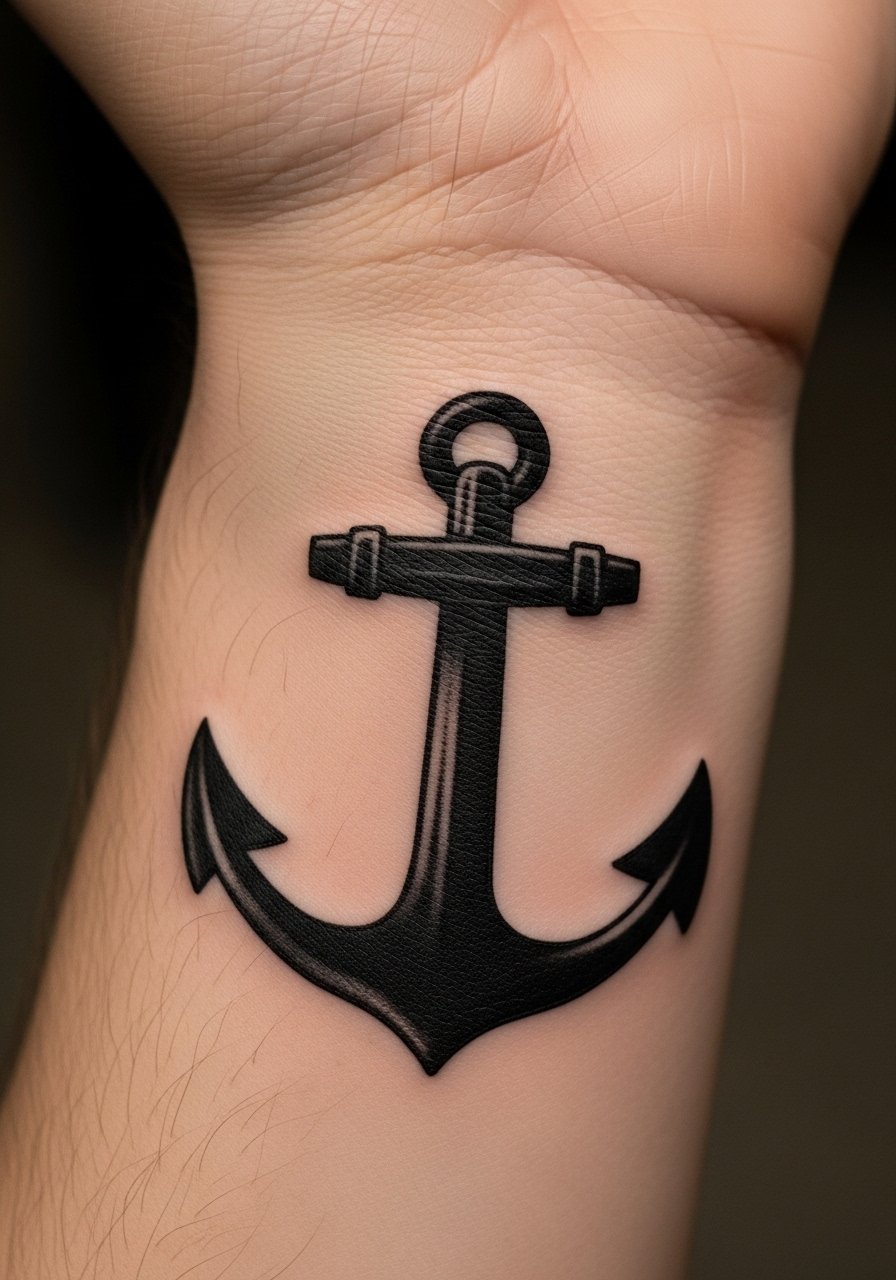
Wrist pieces show immediately and take daily wear. A heavy black anchor keeps its silhouette even with light fading. The wrist is sensitive; expect higher pain. Ask for confident bold lines rather than tiny ornamental touches. Healing requires avoiding bracelets that rub during the first week.
22. Inverted Skull Negative Space on Shoulder Blade
Style/Technique: Blackwork / Negative Space
Pain Level: Medium (4-6/10)
Session Time: 1–2 hours
Best For: Dark motif, hiding under clothing
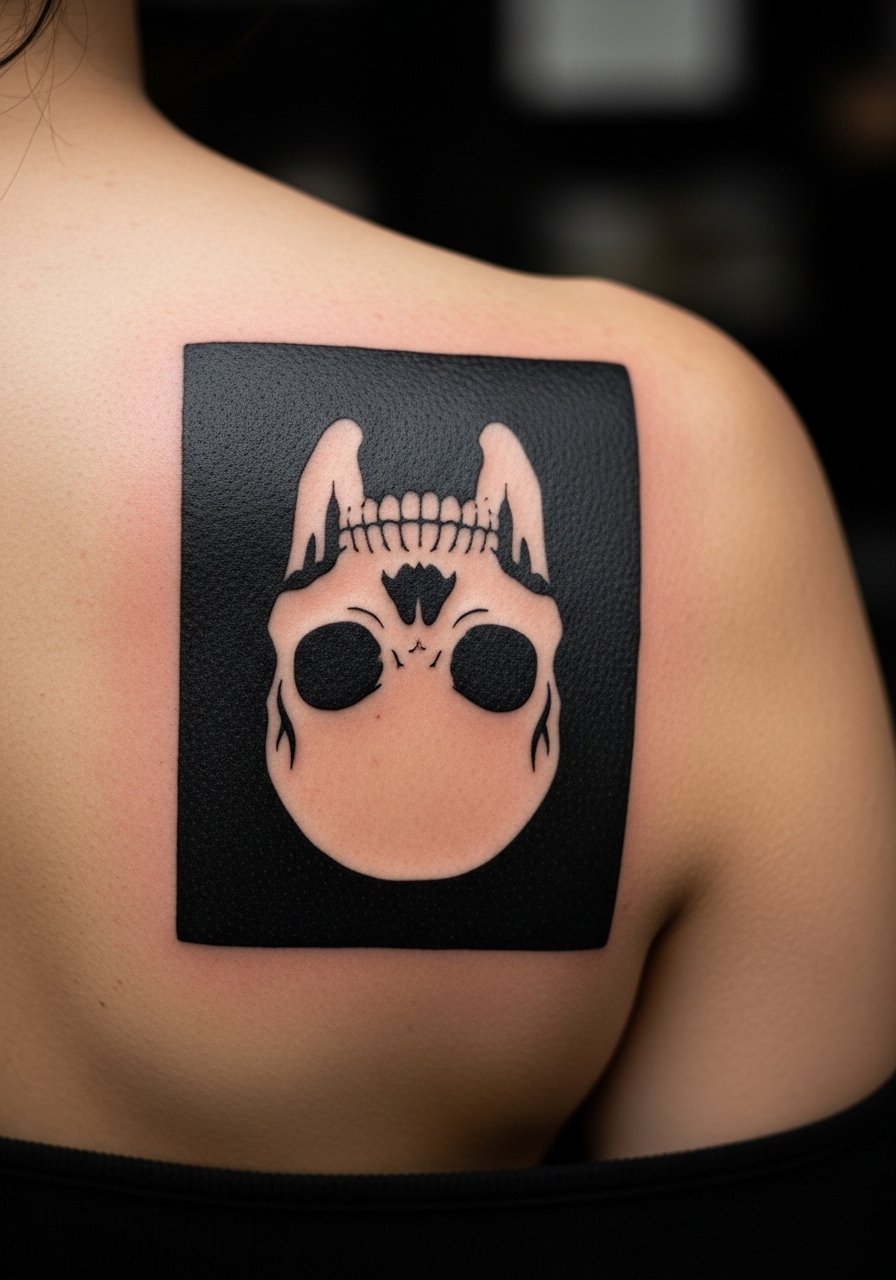
Using negative space to carve a skull out of black fields is visually powerful. Shoulder blade placement is moderate for pain and tends to heal well. This technique preserves the skull’s silhouette as edges soften. Artists should plan the negative shapes carefully to avoid merging lines later. Keep the surrounding blacks even and saturated.
23. Black Lace Rib Panel with Openwork
Style/Technique: Blackwork / Ornamental Lace
Pain Level: High (7-9/10)
Session Time: Multiple short sessions
Best For: Sensual, coverable design
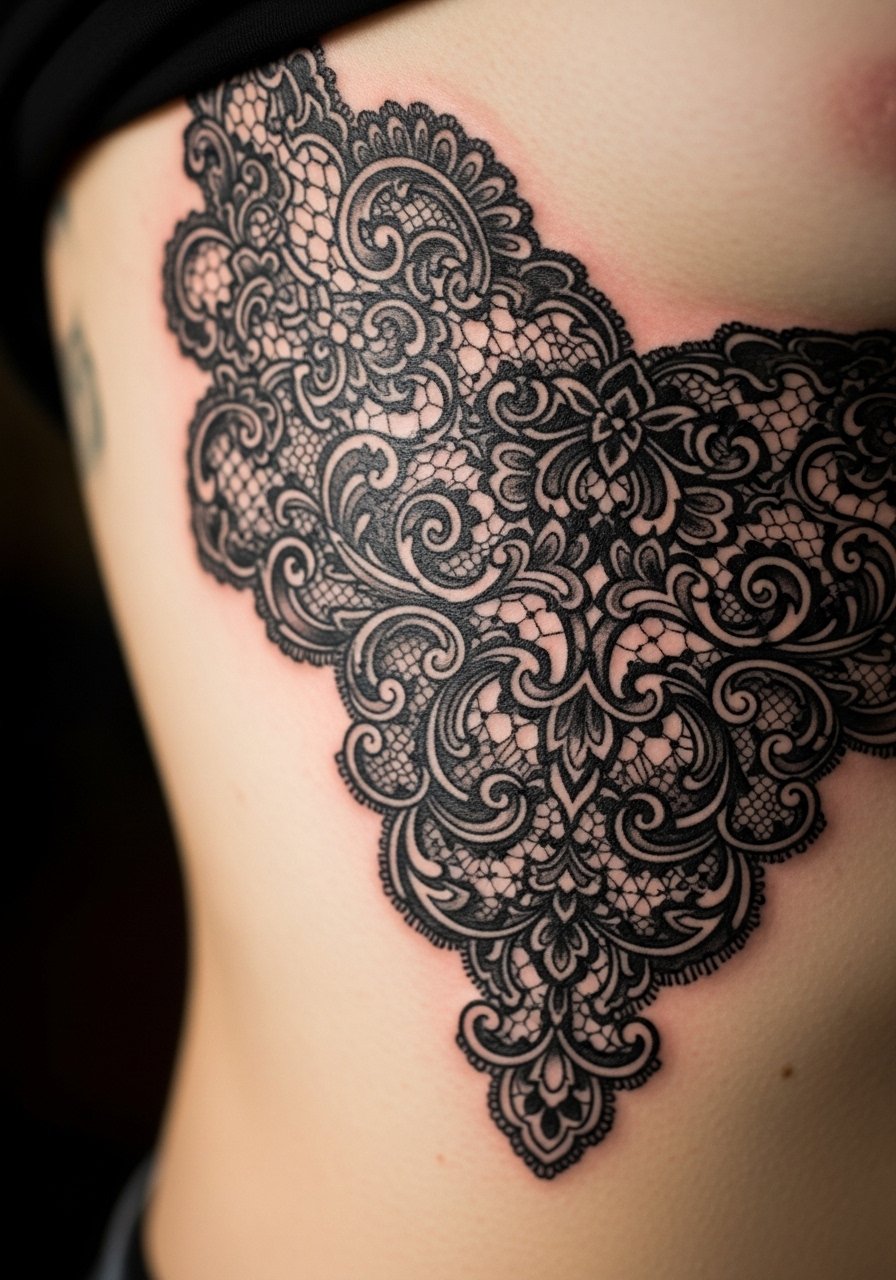
Lace panels on ribs look intimate and gothic. The challenge is combining heavy blacks with delicate openwork so the lace remains readable. Ribs are painful, so plan for short sessions. I’ve seen lace lose internal detail if the voids are too fine—artists should scale the lace to long-term visibility. Keep aftercare strict to prevent scab pulling.
24. Black Compass Neo-Traditional on Chest
Style/Technique: Neo-Traditional / Bold Linework
Pain Level: Medium (4-6/10)
Session Time: 1–3 hours
Best For: Timeless symbol, central chest placement
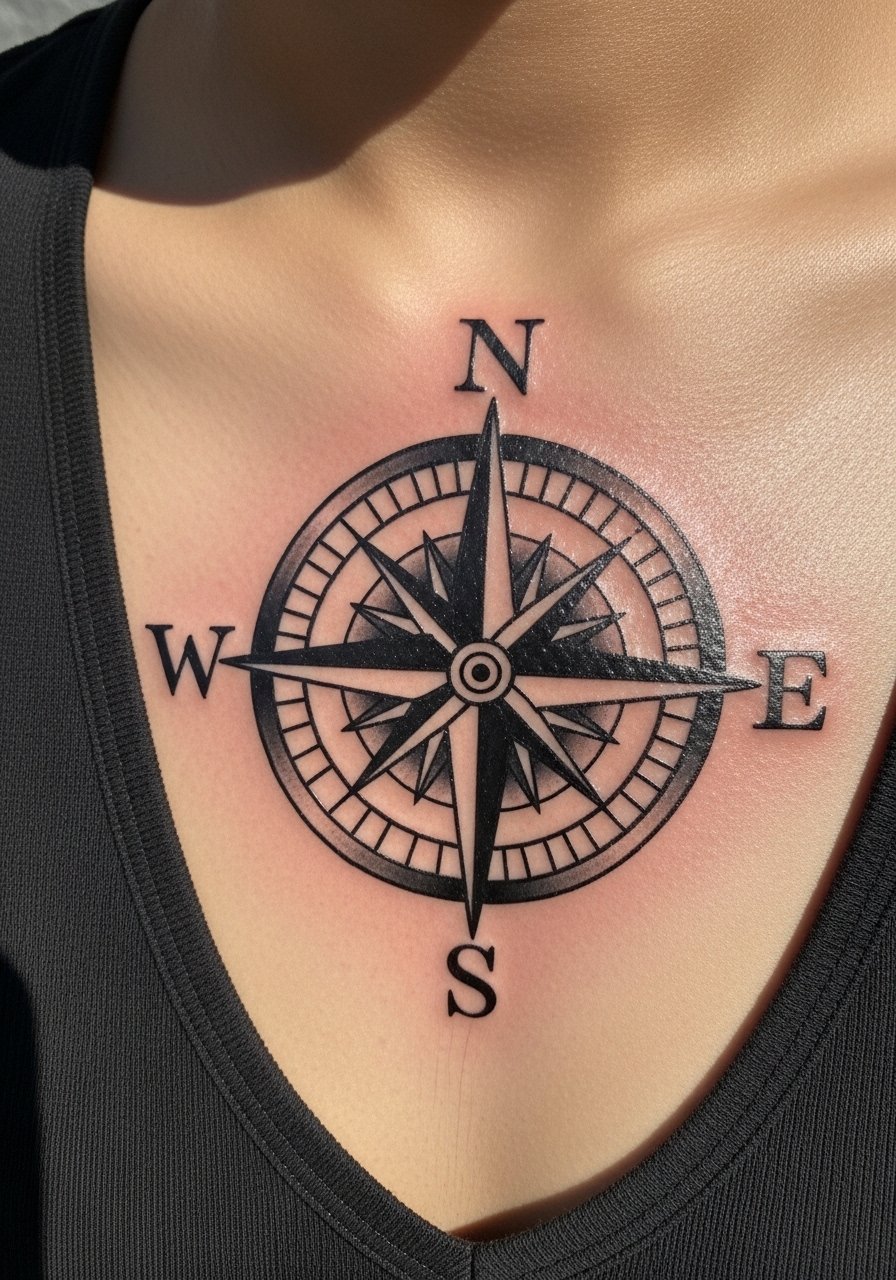
Compasses in neo-traditional black carry classic symbolism with visual weight. Center-chest placement makes the motif central and impactful. Bold outlines and selective shading help the design age. Beware of tiny directional ticks—they can fade. Ask for clear cardinal markers with solid black fills to retain contrast as the piece softens.
25. Dark Botanical Collarbone Accent
Style/Technique: Blackwork / Minimal Ornamental
Pain Level: High (6-8/10)
Session Time: 1–2 hours
Best For: Subtle, visible neckline piece
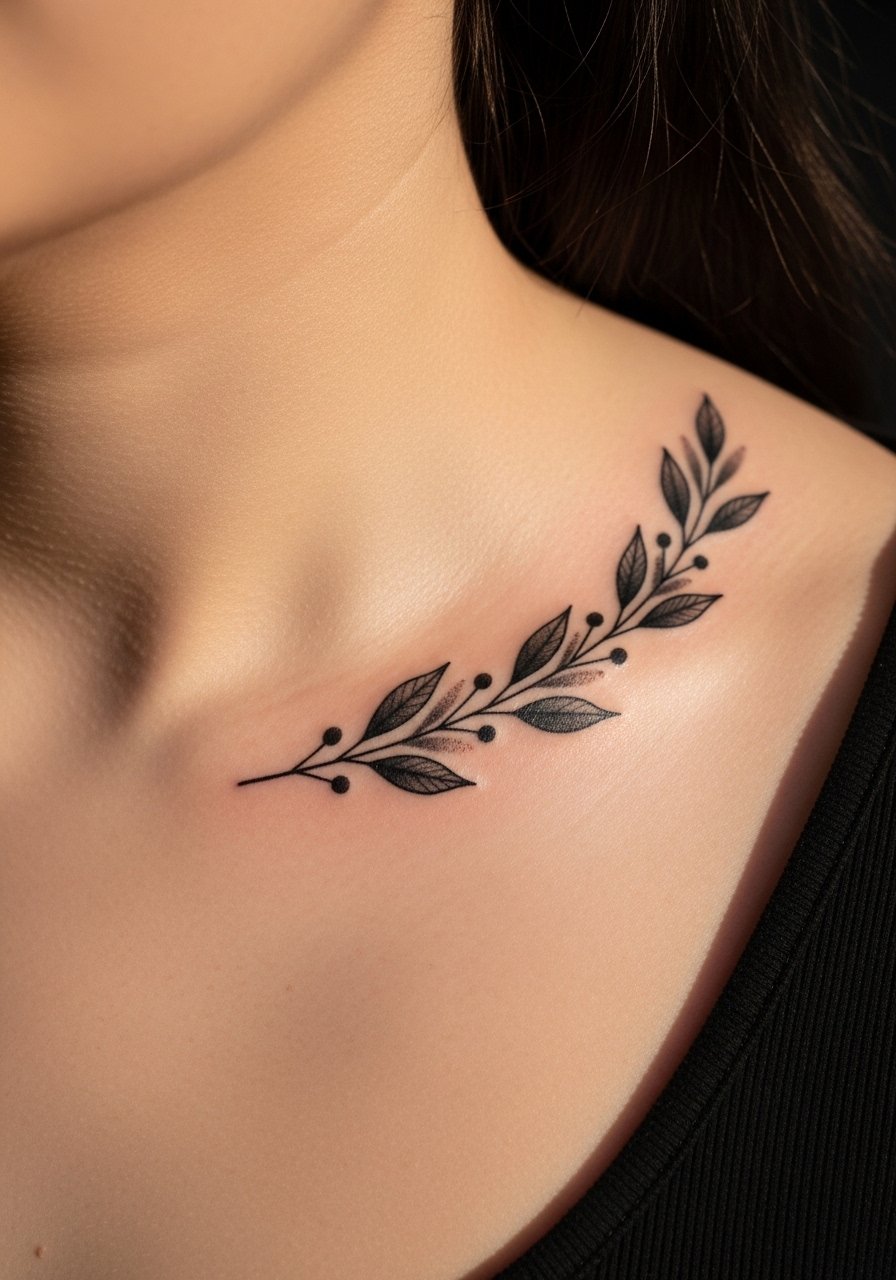
Collarbones are exposed and sharp; tattoos here feel intentional. A dark botanical accent hugs the bone and creates a moody frame for the neck. Pain is high near bone, and healing needs careful clothing choices. Thin, continuous stems can blur; I advise slightly chunkier leaves balanced with open skin gaps. Artists who work well with collarbone curvature deliver the best healed results.
Tattoo Prep and Aftercare Essentials
Aftercare Essentials:
- Aquaphor Healing Ointment, 14oz tube — Use first 3–5 days to prevent cracking
- Saniderm Transparent Adhesive Bandage, 6-inch roll — Second-skin option for sticky-day care
- CeraVe Fragrance-Free Moisturizing Lotion, 12oz — For days 4–14 to keep skin supple
Before Your Appointment:
- Numbing Cream with 5% Lidocaine, 30g — Ask your artist before using; helps sensitive spots
- Disposable Razor Pack — For last-minute hair removal if your artist requests
Long-Term Maintenance:
- SPF 50 Sunscreen Stick for Tattoos, 0.5oz — Daily sun protection keeps blacks punchy
- Mad Rabbit Tattoo Balm, 2oz — For keeping healed tattoos vibrant
- Hustle Butter Deluxe, 2oz — Vegan aftercare alternative artists often recommend
Optional Comfort Items:
- Tattoo Numbing Spray — For touch-ups or very sensitive spots
- Hydrocolloid Bandages, Pack of 12 — For spot protection during healing
- Dr. Bronner's Unscented Castile Soap, 16oz — Gentle cleanser I use for first wash
Artists I’ve worked with and followed usually recommend Aquaphor or Saniderm for the first phase, then fragrance-free lotion after the initial peel. I keep a sunscreen stick on hand to protect visible pieces.
Frequently Asked Questions
Q: How bad does a tattoo actually hurt?
A: Pain varies by spot. Outer arm and thigh = low-to-medium. Ribs, spine, ankle, collarbone = high. It’s more an annoying burning or scratching than sharp agony. For very sensitive spots, consider a numbing cream with 5% lidocaine after checking with your artist.
Q: What if I regret my tattoo?
A: Sit on ideas for months. Choose placements you can hide if unsure—upper thigh, ribs, upper arm. If regret happens later, removal exists but is a long process. I’ve learned it’s better to pick a design with personal meaning than chase a viral trend.
Q: How do I keep my tattoo from fading?
A: Sunscreen is non-negotiable. From what I’ve seen, UV exposure is the main fading cause. Use an SPF 50 sunscreen stick on the area daily. Keep skin moisturized and avoid long soaking early in healing.
Q: Can I work out after getting a tattoo?
A: Wait at least 48–72 hours before light exercise. If your tattoo is in a flex area (elbow, knee), give it a week before heavy movement. Sweat and friction on a fresh tattoo increase infection risk and can pull out ink.
Q: Should I get a small tattoo first to test my pain tolerance?
A: Only if you genuinely want a small tattoo. Pain depends more on placement than size. A tiny wrist tattoo can hurt more than a larger piece on the outer arm. Choose placement thoughtfully.
Q: How long does a tattoo take to heal?
A: Surface healing is typically 2–3 weeks. Full settling can take 2–3 months. Expect peeling around day 3–7; don’t pick. Use a gentle cleanser like Dr. Bronner's Unscented Castile Soap and a fragrance-free lotion afterward.
Q: Do tattoos look different on different skin tones?
A: Yes. Black and gray pieces show well across tones. Bright colors may appear muted on deeper skin tones. White ink often disappears on darker skin. I always ask artists to show healed work on people with my skin tone before booking.
Q: Which aftercare products do artists actually recommend versus hype?
A: From conversations and my experience, Aquaphor and Saniderm are artist favorites for the initial days. After that, fragrance-free lotions and a gentle tattoo balm like Mad Rabbit are commonly recommended. Avoid scented creams and petroleum-only regimens beyond the first few days.
