
Fine-line small tattoos age differently than the viral photos make you think. Some micro pieces settle into soft, readable marks that still look deliberate years later. Others collapse into indistinct smudges because the design was too tight for the placement or the lineweight was too thin. Read these 27 compact ideas with practical notes on placement, how they heal, what to tell the artist in the consult, and clothes to wear on session day so the tattoo gets the best shot at lasting exactly the way you want.
1. Micro Dot Cluster on the Wrist
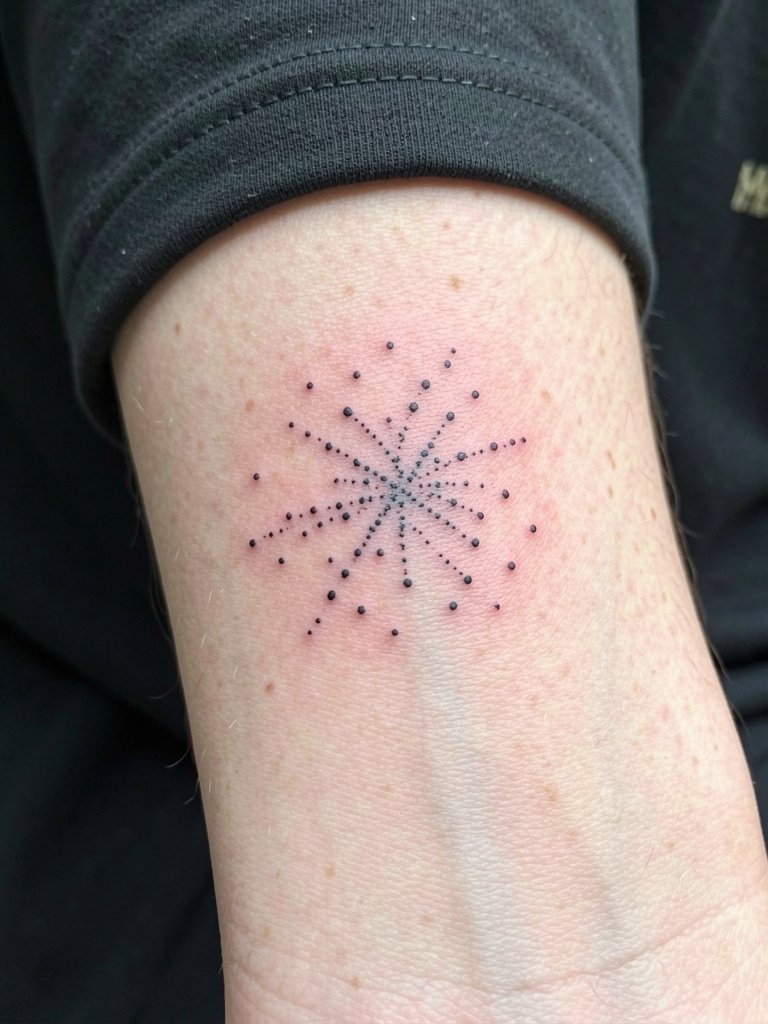
Micro dot clusters read as modern and quiet. They are single-needle work and heal clean on low-friction zones like the wrist. Pain is low to moderate. Session time is typically under 30 minutes. Tell your artist you want slightly more spacing between dots than the reference so the dots do not merge over a few years. A common mistake is packing dots too close, which looks great fresh but softens into an undistinguished patch. Expect touch-up in 1–2 years if some dots settle lighter. For showing the wrist, try a thin chain bracelet set that does not compete with the micro work.
2. Parallel Fine Lines, Inner Forearm or Ribcage

Fine-line stacked lines are calming and versatile. Pain is low on the inner forearm and higher on the ribcage. Artists are split on ribs. One camp says fine lines on ribs blur within two to four years because the skin stretches and clothing rubs the area. The other camp says properly spaced linework with correct needle depth settles fine and can look sharp for years. If you pick ribs, ask for slightly wider spacing than the photo and a mockup at the intended scale so the artist can show how much breathing room the lines need. For forearm wear, rolled linen sleeves in neutral tones frame the lines and keep attention on the work. Wear a linen button-down shirt women to your appointment for easy access.
3. Tiny Palm Tree Silhouette, Ankle or Outer Thigh

A tiny palm tree is a travel-friendly emblem that scales. Ankle is a low-pain placement, outer thigh is moderate. The main longevity risk at the ankle is constant rubbing from socks and shoes. For a long-lasting silhouette, get slightly thicker trunk lines than the reference and avoid tiny frond detail. A session runs 20 to 45 minutes. During the appointment wear flat slide sandals and pants you can roll up. If you want it visible in summer try anklet styling with a thin anklet bracelet.
4. Sun and Crescent Moon Pair, Opposite Wrists

Small celestial pairs read clearly because they use bold negative space. Pain is low on the wrist and the session usually lasts 20 to 40 minutes. Ask the artist to balance the sun and moon at the same visual weight rather than scaling one up. A common mistake is placing both too small and expecting the details to hold. Expect fading from sun exposure, so plan to use sunscreen after healing. For outfits, V-neck or scoop-neck tops do not affect wrists, but show-off styling works best with rolled sleeves and a minimalist watch small face if you want the pairing to read editorially.
5. Single-Word Cursive Script on the Nape
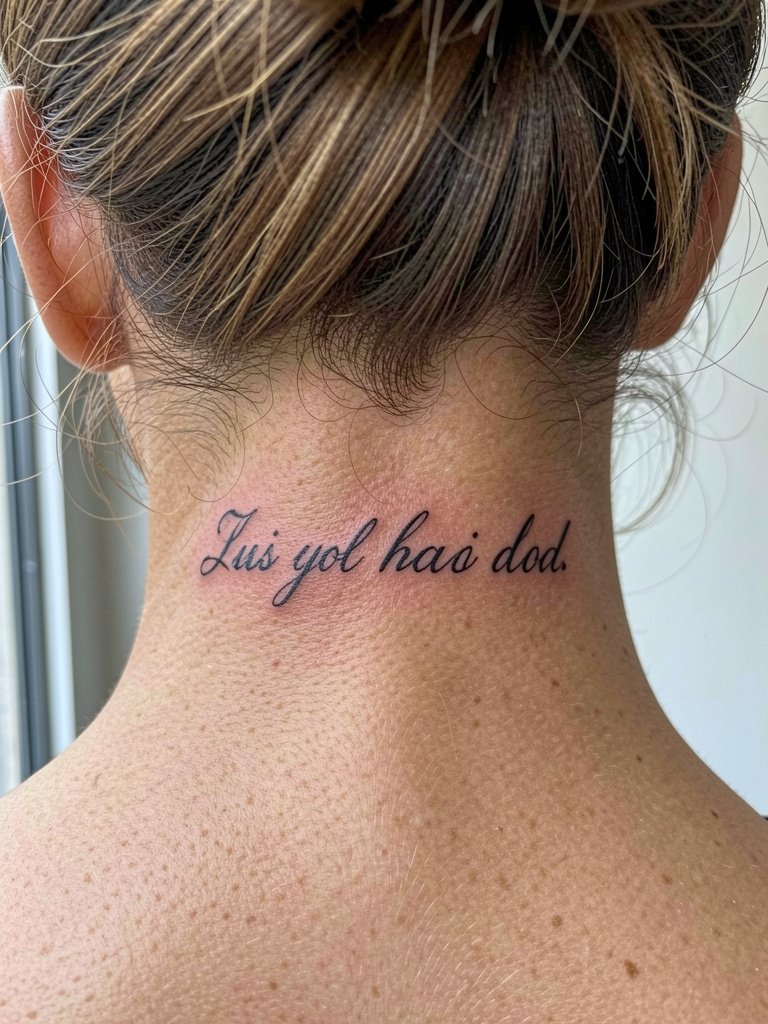
Script on the nape is discreet and intimate. Pain is low to moderate. Tell the artist the exact font size and request healed examples on similar skin if available. A mistake is using hair-thin strokes that vanish on darker skin or after healing. Expect a touch-up at year one if stroke ends feather. For session wear keep hair up and bring an elastic. Show-off styling works with high ponytails and a delicate drop necklace when you want the nape visible. Note that nape work may need a specialist who regularly tattoos neck areas.
6. Tiny Solid Heart, Behind the Ear

A filled micro heart reads reliably because saturation prevents line loss. Pain is low to moderate and the session is short. Ask for a solid fill rather than an outline to avoid line thinning with time. Common error is choosing a heart too small for the area, which can heal patchy. During the session pull hair back and wear a top with an easy neckline. For showing off, tuck hair behind the ear or use clear hair clips. Behind-ear placements need careful hygiene and an artist used to the mastoid area.
Session Day Picks
The wrist, nape, and ankle pieces above all benefit from small session conveniences that reduce friction and speed comfort.
- Tattoo Aftercare Spray. Spray formats cut down on touching fresh ink and help with gentle cleansing during the first few days.
- Vitamin E Oil. Useful after the initial healing phase to keep skin supple and reduce flaking around tiny linework.
- Aquaphor Advanced Healing Ointment. A barrier option some artists prefer for very fine black lines because it locks moisture in without thick residue.
- Japanese Tattoo Aftercare Balm. Lightweight balms are handy for fine-line tattoos in humid climates because they leave less residue on clothing.
- Aquaphor Healing Ointment. A cheap, widely available option for the first few days if your artist recommends an ointment.
7. Minimalist Butterfly Outline, Shoulder Blade

A simplified butterfly on the shoulder blade scales well. Pain on the shoulder blade is low. Ask the artist for single-needle outline with minimal wing veins to avoid future blur. A common mistake is adding tiny wing patterns that soften into indistinct shading. For outfits, sleeveless tops and off-shoulder styles reveal the piece. Bring a sleeveless tank top to the appointment so the artist has clear access and the fabric will not bug the fresh ink.
8. Single Leaf Stem on the Inner Upper Arm
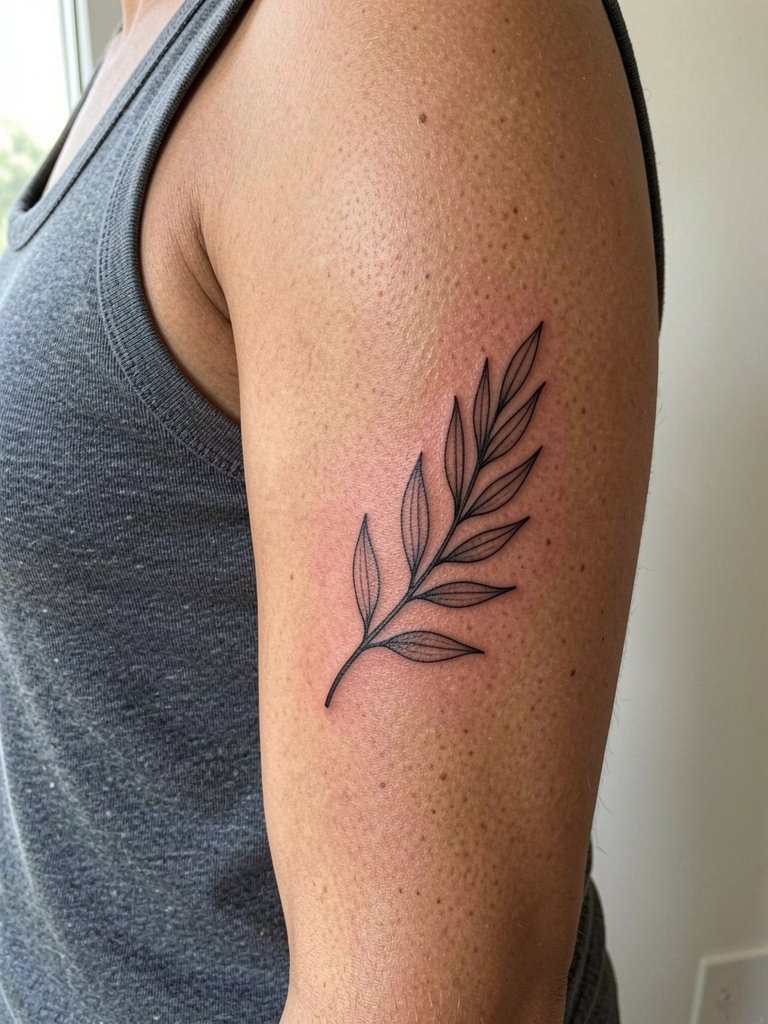
A vertical leaf stem sits well on the inner upper arm and is low to moderate on the pain scale. Tell the artist you want a slightly heavier midrib so the leaf holds contrast on darker skin. Many people make the error of tiny veins that disappear over time. Session time is 30 to 60 minutes. This placement pairs well with rolled short sleeves and thin bracelets on the opposite arm. Wear a linen button-down shirt women that unbuttons easily so the arm is free without removing your top.
9. Tiny Doodle Face on the Finger

Finger tattoos are trendy but high-maintenance. Pain is higher and fading is faster because of constant washing and skin turnover. Keep the design bold enough and expect touch-ups within 6 to 12 months. A frequent mistake is choosing too thin a line for knuckle edges. During the appointment avoid alcohol for 24 hours prior. For visibility and session access wear a short-sleeve top and remove rings. A thin band ring will complement the doodle after it heals.
10. Micro Constellation Cluster, Upper Chest

Constellation clusters make elegant collarbone accents. Pain is moderate. Ask for spaced star dots rather than tiny five-point stars so the cluster keeps clarity over time. A common mistake is compressing stars into a shape too small to read after a year. Session time is 30 to 50 minutes. For show-off styling pick scoop or V-necks and layer with a collarbone necklace to draw the eye down.
11. Tiny Angel Wing, Upper Chest or Inner Arm
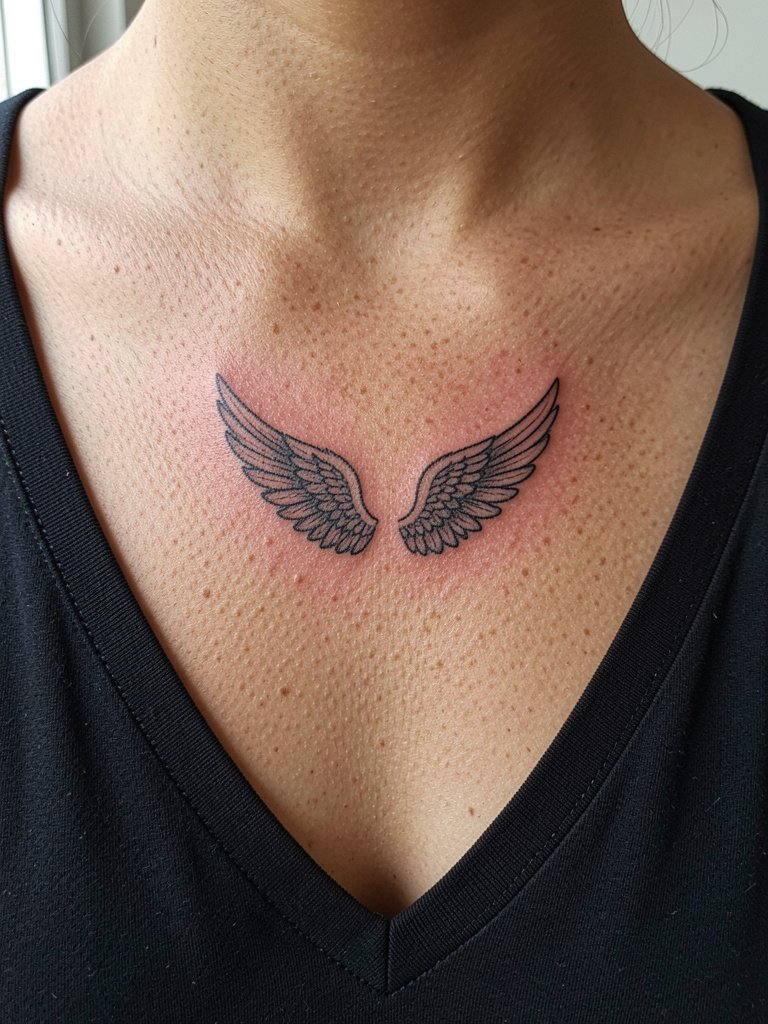
A small wing reads well as an understated symbol. Pain is moderate at the upper chest due to thinner tissue. Request a slight taper to the feathers so the wing retains shape as it settles. People sometimes ask for overly intricate feather detail that blurs. For session wear an easy-to-remove sports bra or button-down. For showing off layer delicate chains or wear a V-neck shirt women.
12. Minimalist Smile Line on the Wrist or Finger

A tiny smile or frown arc is playful and low-commitment. It heals well on low-friction areas. Pain is minimal. The main error is making the line too thin, which can vanish over time. Ask the artist for a hair heavier line than your screenshot. The session is quick. Pair with a small watch face to balance wrist attention. A minimalist watch women small face helps the arc read as intentional.
13. Tiny Skull Outline on the Ankle or Hand

Micro skulls can read edgy without shouting. Pain is low at the ankle and moderate on the hand. Hands require frequent touch-ups because of constant use. A common mistake is adding tiny dental detail that disappears fast. For the ankle wear sandals and cuffed jeans on session day. Consider an anklet like a thin anklet bracelet to frame the work once healed.
14. Sinuous Snake Line on the Side Torso or Forearm

Snakes make strong narrow shapes that follow contours. Pain on the ribcage is high. Artists are split about fine-line ribs. One camp says repeated skin movement causes line blur in two to four years. The other camp points to healed photos from three to five years that show careful spacing and depth hold up well. If you choose ribs, request slightly wider spacing and a mockup at full size so the artist can show how the curve will read when you lie down and stand. For session wear bring a removable top like a bikini top high-waist so the artist can access the area without fabric rubbing.
15. Tiny Arrow on the Side of a Finger
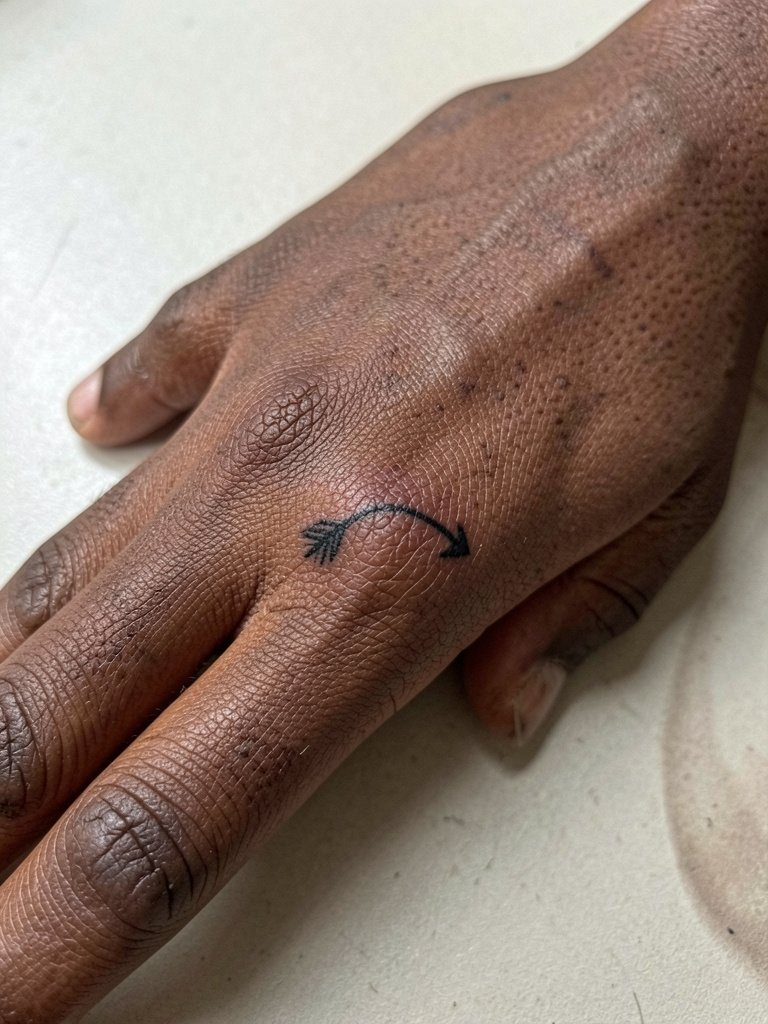
Finger-side micro arrows are discreet but high-maintenance. Pain is moderate. The error is choosing too thin a shaft that fades unevenly. Ask for a slightly bolder shaft and a quick follow-up touch-up slot. Session time is usually under 20 minutes. Avoid tight rings for the first few weeks. For styling, a thin chain bracelet set on the opposite wrist balances small hand work.
16. Tiny Planet with Ring on the Ankle or Wrist
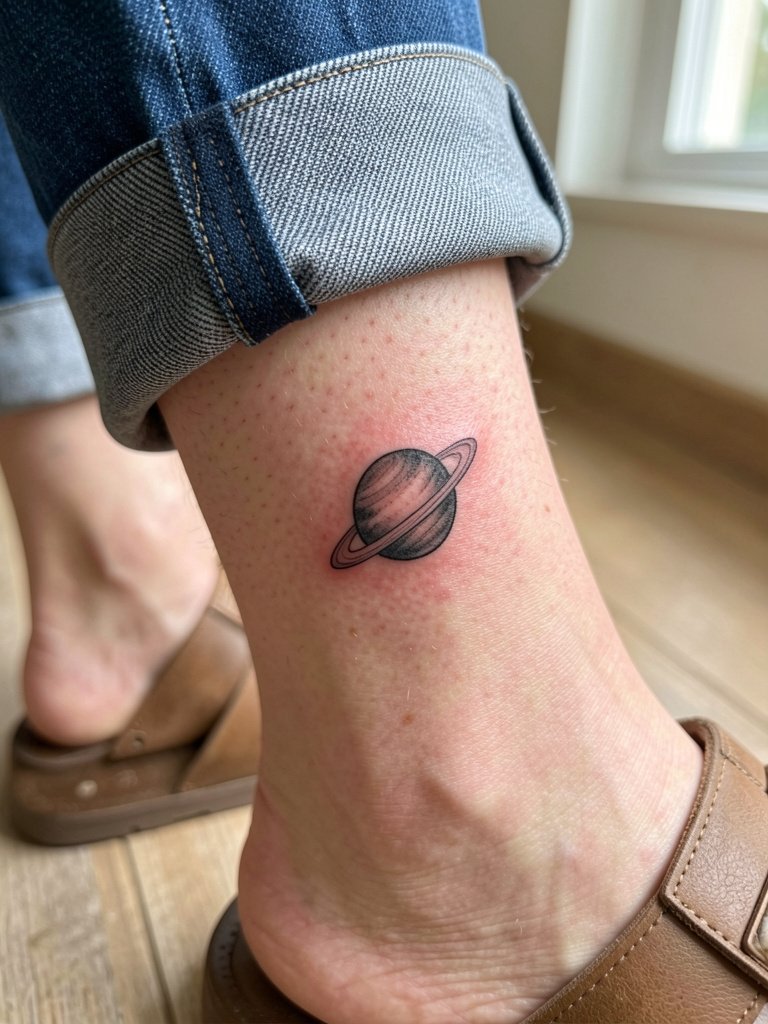
A micro planet is cute and translates well across skin tones. Pain is low at the ankle. Ask the artist for a slightly thicker ring line so it stays legible as edges soften. Avoid tiny pips of dot shading that can vanish. Session time is 15 to 30 minutes. For show-off outfits, wear ankle-strap heels or cuffed pants to make the piece visible.
17. Minimalist Wave on the Inner Forearm

A single wave is simple and age-friendly on the inner forearm. Pain level is low and the session is short. Tell the artist you want one continuous line with a slightly heavier start and end point so the curve remains visible as edges soften. A mistake is adding internal shading at this scale. Pair the forearm with rolled sleeves and a dainty gold stacked bracelet set for a polished look.
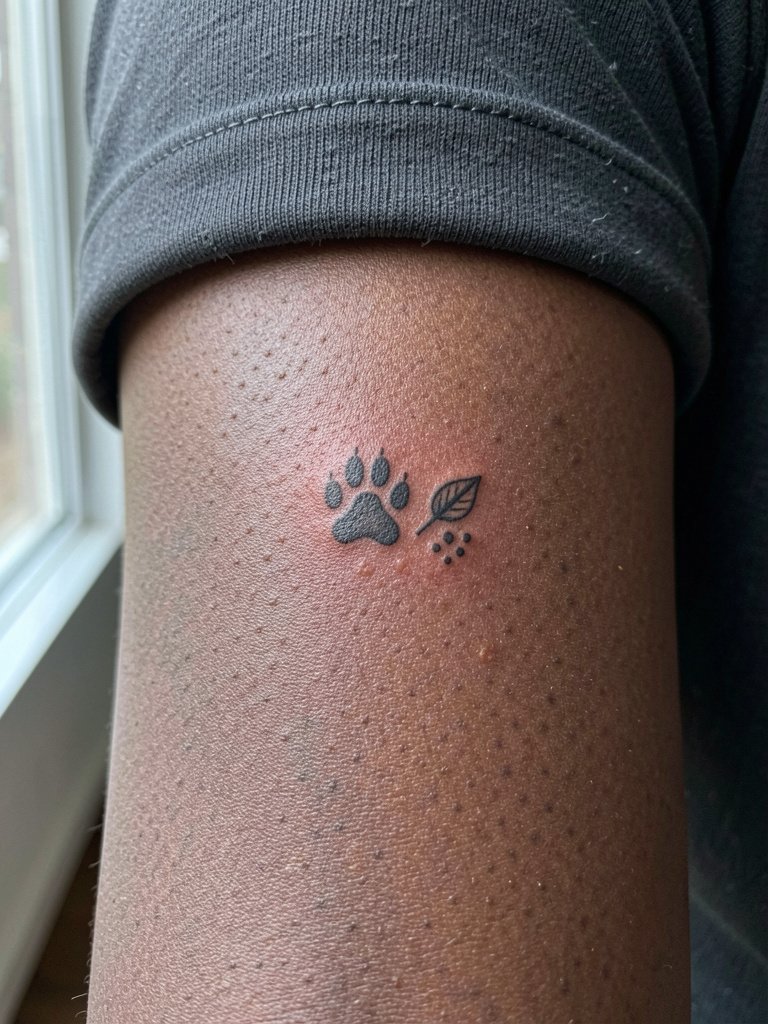
18. Tiny Paw Print on the Ankle or Sternum

A tiny paw print is a compact tribute. Pain is low on the ankle and moderate at the sternum. Choose a slightly larger pad so the black holds over time. The typical mistake is making the toes too small. Session time is brief. For ankle work wear flat slide sandals and roll pant cuffs to keep the area clean while healing.
19. Micro Geometric Mountain, Outer Thigh

Mountains translate well to larger small placements like the outer thigh. Pain at the outer thigh is low. Ask for bold peak outlines rather than tiny internal linework. People sometimes over-detail a small peak and lose clarity after healing. Session time is 30 to 60 minutes. Show it off with high-waisted shorts or a high-cut swimsuit. Bring high-waisted shorts women to your appointment so the artist can place the design without interference from waistbands.
20. Tiny Anchor at the Wrist or Ankle

Tiny anchors are classic micro motifs. Pain is low on wrist and low at ankle. Request slightly thicker shank lines for longevity. Avoid tiny rope detail that will blur. Touch-up is common at one year for small wrist pieces. Pair with a thin chain bracelet to balance the composition.
21. Single Tiny Star on the Finger or Behind the Ear

A single star is minimalist and easy to care for. Pain is low behind the ear and moderate on fingers. Choose a slightly larger star than your phone screenshot to retain its shape after healing. The error is too small a star that looks like a speck later. For display tuck hair behind ears or wear small studs. Consider tiny stud earring set to draw attention without overwhelming the area.
22. Small Infinity Symbol on the Wrist or Nape
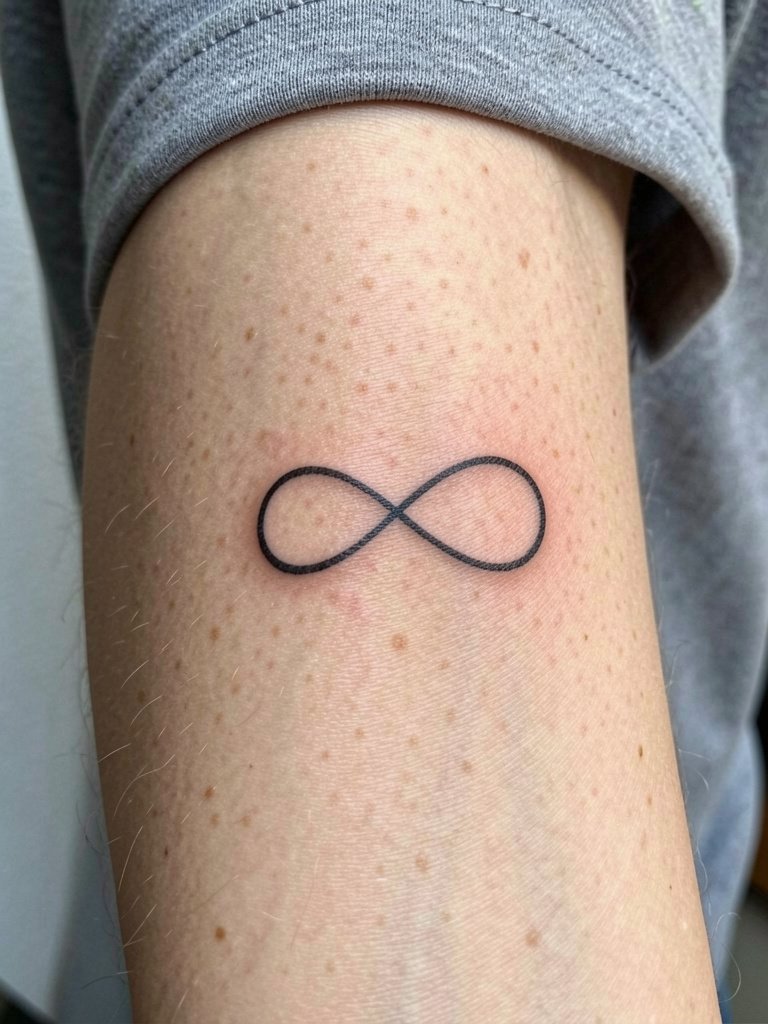
An infinity loop is compact and low-pain on the wrist. Ask the artist to thicken junction points slightly so the shape keeps integrity as edges soften. Too thin a loop becomes faint. Expect a small touch-up in the first year. Pair with a slim watch or delicate bracelets to emphasize the wrist. A dainty bracelet set complements the line without hiding it.
23. Tiny Semicolon on the Inner Forearm or Wrist

Semicolon tattoos are tiny and legible when the mark is slightly larger than you expect. Pain is low and session time is minimal. The common error is choosing too small a punctuation mark. Ask for a touch-up slot because punctuation points often need reinforcement. For visibility pair with rolled sleeves and a thin chain bracelet on the opposite wrist.
24. Micro Compass on the Upper Chest or Wrist

A tiny compass reads graphic and neat when lines are slightly bolder. Pain at the upper chest is moderate. Avoid tiny directional ticks that blur. Ask for a simple north indicator rather than ornate filigree. Session time is 30 to 45 minutes. Layered necklaces help frame collarbone work. Try a layered delicate necklace for an elegant finish.
25. Minimalist Key Outline on the Rib or Inner Forearm
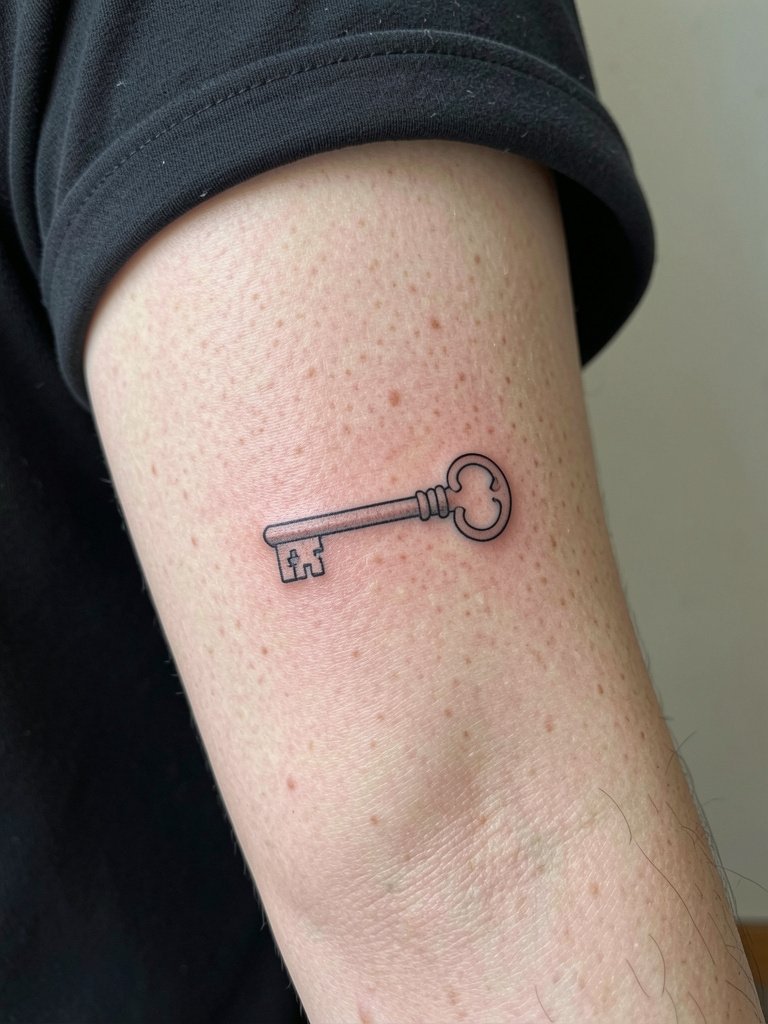
A key outline is narrow and elegant. Pain is low on the forearm and high on ribs. For rib placements note that fine-line pieces demand spacing for movement. Ask for a slightly bolder shaft to prevent loss of definition. Avoid tiny ornamental teeth that get lost. Session time varies from 20 to 60 minutes. Wear a tank top that the artist can move aside without stretching the fabric.
26. Tiny Paw or Leaf Cluster for a Patchwork Sleeve
Patchwork clusters let you build a sleeve one small piece at a time. The key planning move is a through-line like consistent lineweight or shared motif. A misstep is mixing styles without a unifying element which makes future additions look disjointed. Discuss future plans with the artist and ask for spacing that allows additional pieces to breathe. Session times vary by piece. For display wear rolled sleeves and a dainty bracelet set to balance the cluster.
27. Micro Compass Rose or Simple Mandala Accent

Tiny compass roses or compact mandala rings work as focal accents. Pain is moderate on the upper chest. Ask for stipple shading rather than tiny solid fills for longevity. A mistake is cramming too many spokes into a small radius. Expect a follow-up touch-up at one year. Pair with layered necklaces for an elegant reveal and wear a scoop neck tank top to the session for easy access.
Frequently Asked Questions
Q: How do I find a reliable fine-line artist near me without naming anyone?
A: Search style-specific hashtags like #finelinetattoo and #smalltattoo on Instagram and filter by your city. Browse Tattoodo or studio sites for healed-portfolio photos. Reddit communities such as r/tattoos and r/tattooadvice are useful for peer recommendations and healed shots. For access and cost savings check guest-spot announcements and local tattoo conventions. When you call a studio, ask specifically if they have healed examples of the exact placement and lineweight you want.
Q: Will a tiny fine-line tattoo blur on high-movement areas like the ribs?
A: Artists split into two camps on this. One camp says the constant stretch and friction on ribs causes fine lines to blur within two to four years. The other camp says properly spaced lines and the right needle depth let fine-line rib work settle well and remain readable for years. The safest route is a mockup at the intended scale and a slightly wider spacing than tiny reference photos show.
Q: Should I use Saniderm or traditional dry healing for a small tattoo?
A: There are two clear views here. Some people prefer Saniderm because it keeps the area sealed and moist which can reduce scabbing. Others favor traditional ointment and air exposure because they worry second-skin products trap moisture and bacteria. My observation is both methods can work. Follow the exact aftercare your artist recommends and watch for how your skin reacts, then adjust if needed.
Q: How much should I plan for touch-ups on small tattoos?
A: Expect many fine-line micro pieces to benefit from a touch-up one year after the initial session. Budget for a touch-up fee that is a portion of the original booking. This is normal maintenance, not a failure of the first session. If you plan long-term, ask the artist at booking what their typical touch-up timeline looks like for that design and placement.
Q: What should I wear to the appointment for different placements?
A: Wear clothing that gives the artist clear access without you having to undress. For inner forearm and wrist wear a rolled cuff shirt or tank. For ribs bring a removable top like a bikini top or cropped tank. For nape and behind-ear work have hair ties ready. Loose, non-restrictive clothes are best for healing after the session.
Q: Will small black ink read differently on darker skin?
A: Black fine-line reads well across skin tones but grey wash and very faint grey shading can disappear on darker skin. If you have medium to dark skin, favor slightly heavier lineweight or stronger negative-space forms instead of pale grey fills. Request healed examples on similar skin from the studio when possible.
