
I spent months collecting cross tattoo ideas before getting my own. The hard part wasn't finding pretty designs — it was knowing which styles actually age well and fit my life. These 27 faith-based cross tattoos reflect what I keep seeing from artists in 2026 and what I've watched heal on real skin.
This list focuses on fine line, neo-traditional, blackwork, and tribal crosses. These ideas work well on forearms, chests, ribs, and wrists. From my experience, fine line florals and blackwork geometrics are trending—and they often age very differently.
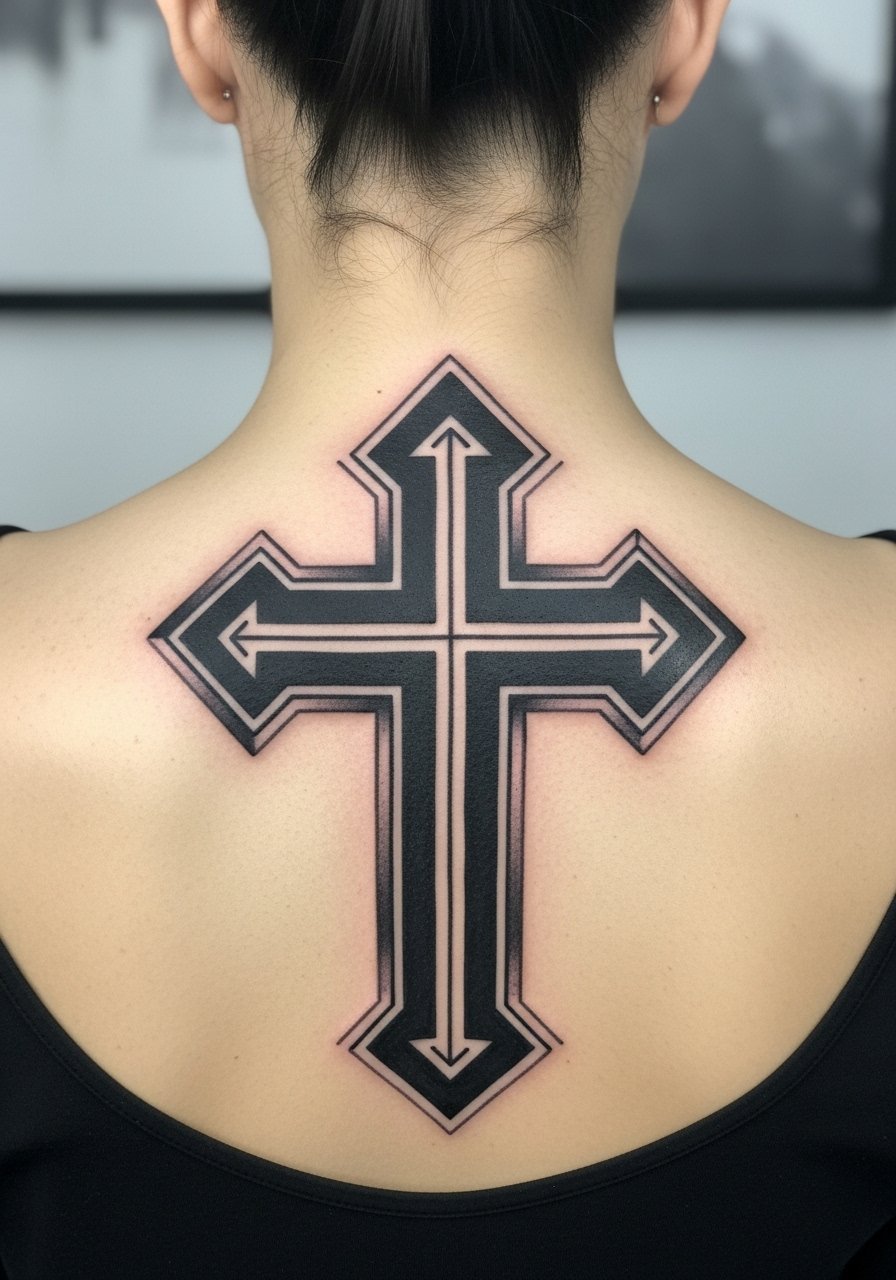
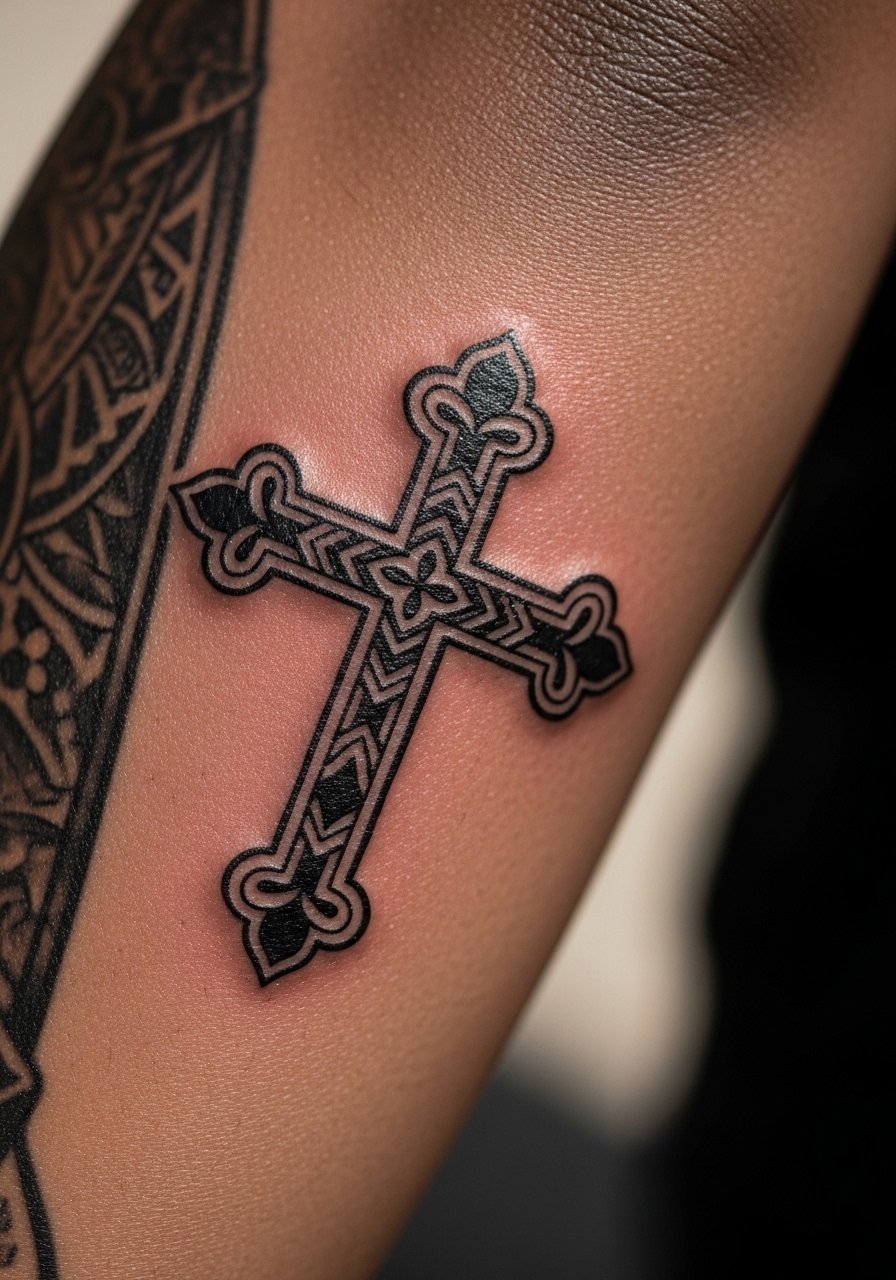
1. Celtic Cross on Upper Forearm
Style/Technique: Celtic / Knotwork
Pain Level: Medium (3-4/10)
Session Time: 1-3 sessions
Best For: Heritage pieces, visible faith
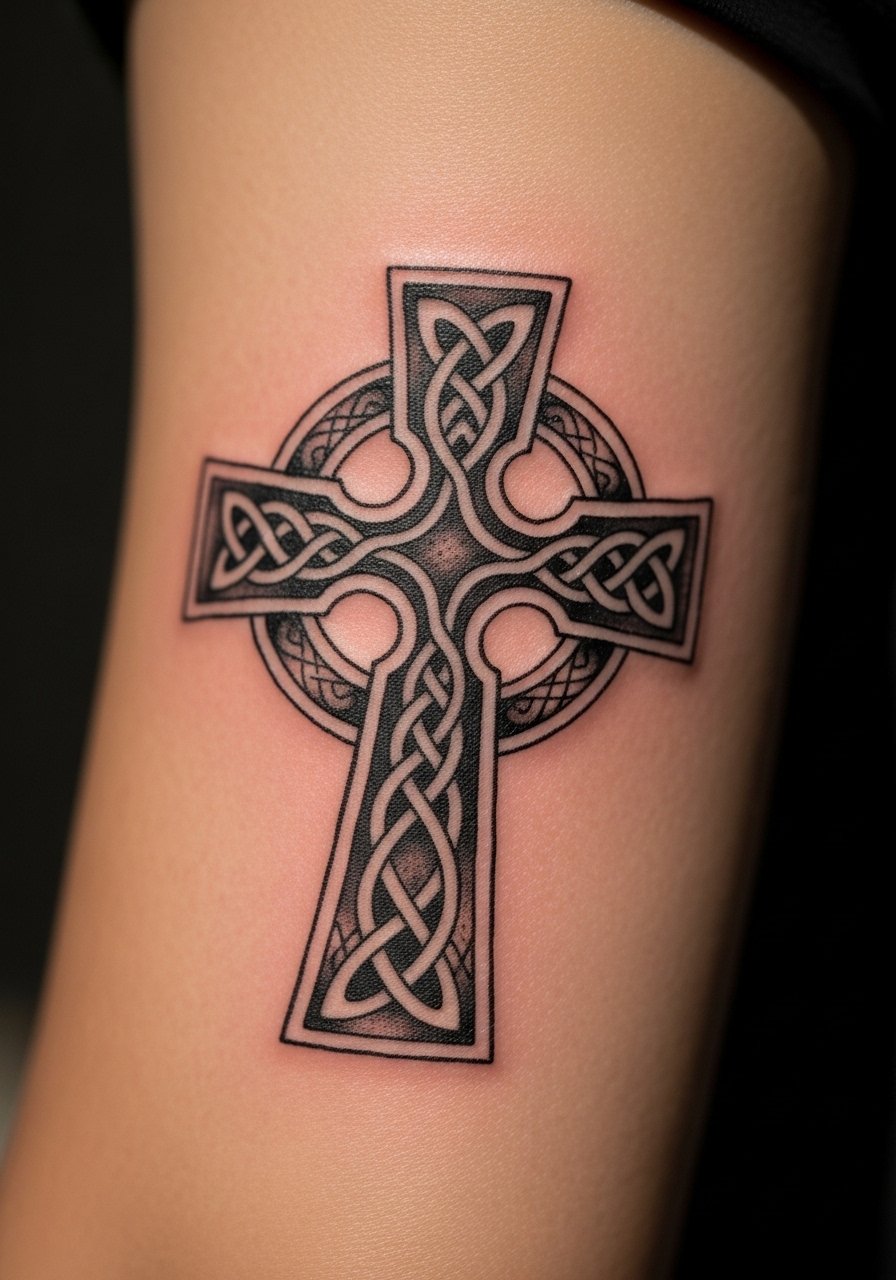
I chose a Celtic cross once because the knotwork reads as both heritage and faith. It looks bold on the forearm and flows with the arm’s shape. Expect tighter outline work to soften a bit as it heals, so tell your artist you want slightly stronger line weight. Avoid thin knots if you plan low-contrast black only—ask for subtle negative space. For longevity, blackwork base with small color accents helps the detail stay readable.
2. Three Crosses on Upper Back
Style/Technique: Realistic / Symbolic
Pain Level: Low-Medium (2-4/10)
Session Time: 1-2 sessions
Best For: Memorial or crucifixion scene
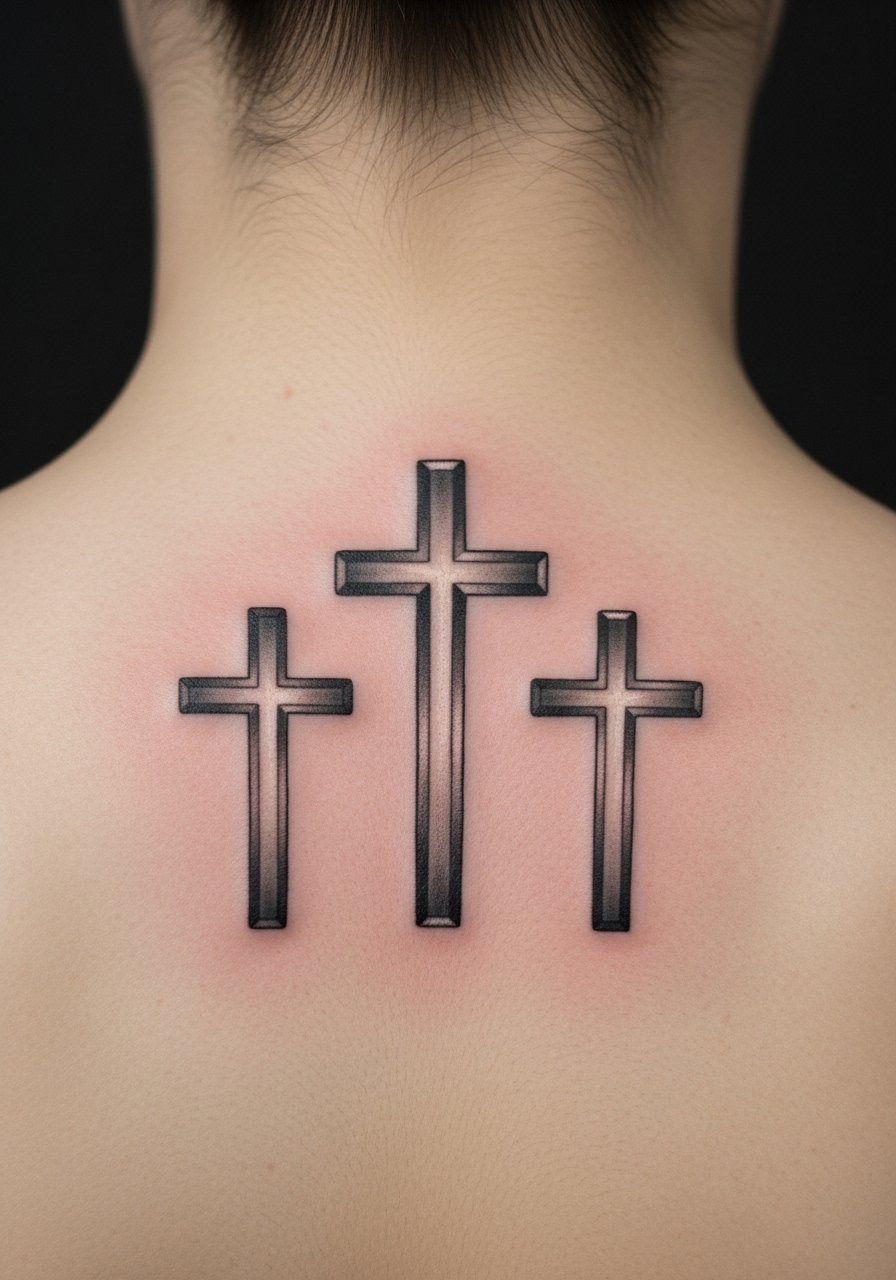
Three small crosses stacked across the upper back make a quiet statement. I saw one as a memorial that still reads clean after healing because the artist kept contrast high. This placement feels less painful than ribs and hides easily. Common mistake: over-detailing tiny crosses—scale up the main lines so the shading doesn't become muddy after a year.
3. Cross Chest Centerpiece
Style/Technique: Bold Traditional / Center Chest
Pain Level: Medium (4-5/10)
Session Time: Multiple sessions for large pieces
Best For: Statement near the heart
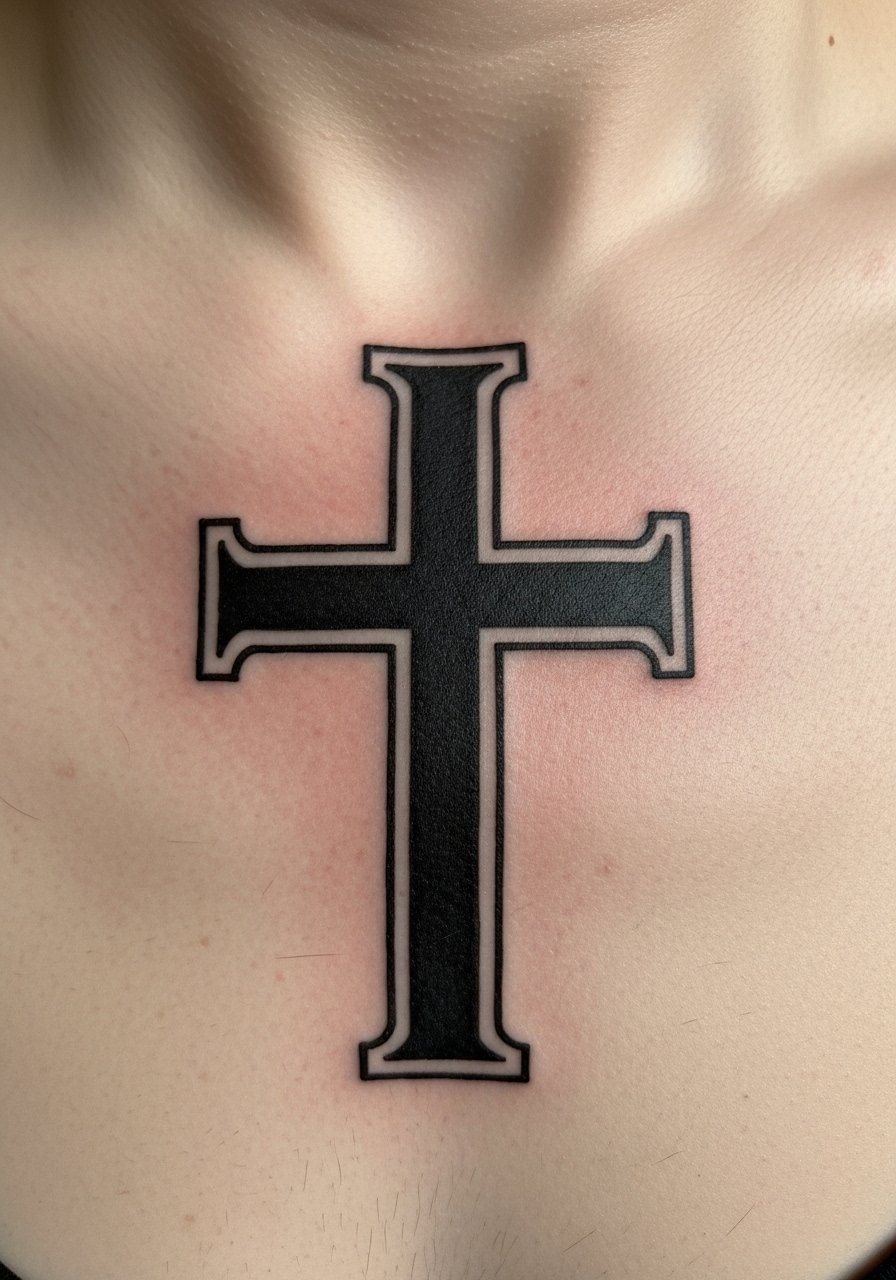
A chest cross feels intimate and powerful. I picked a bold traditional version to keep it readable over time. Chest skin moves and stretches, so strong outlines and bold fill age better than fragile script. Pain is real but manageable; chest sessions can be split. Ask your artist about how the design follows the sternum curves—flow matters for daily wear and shirts.
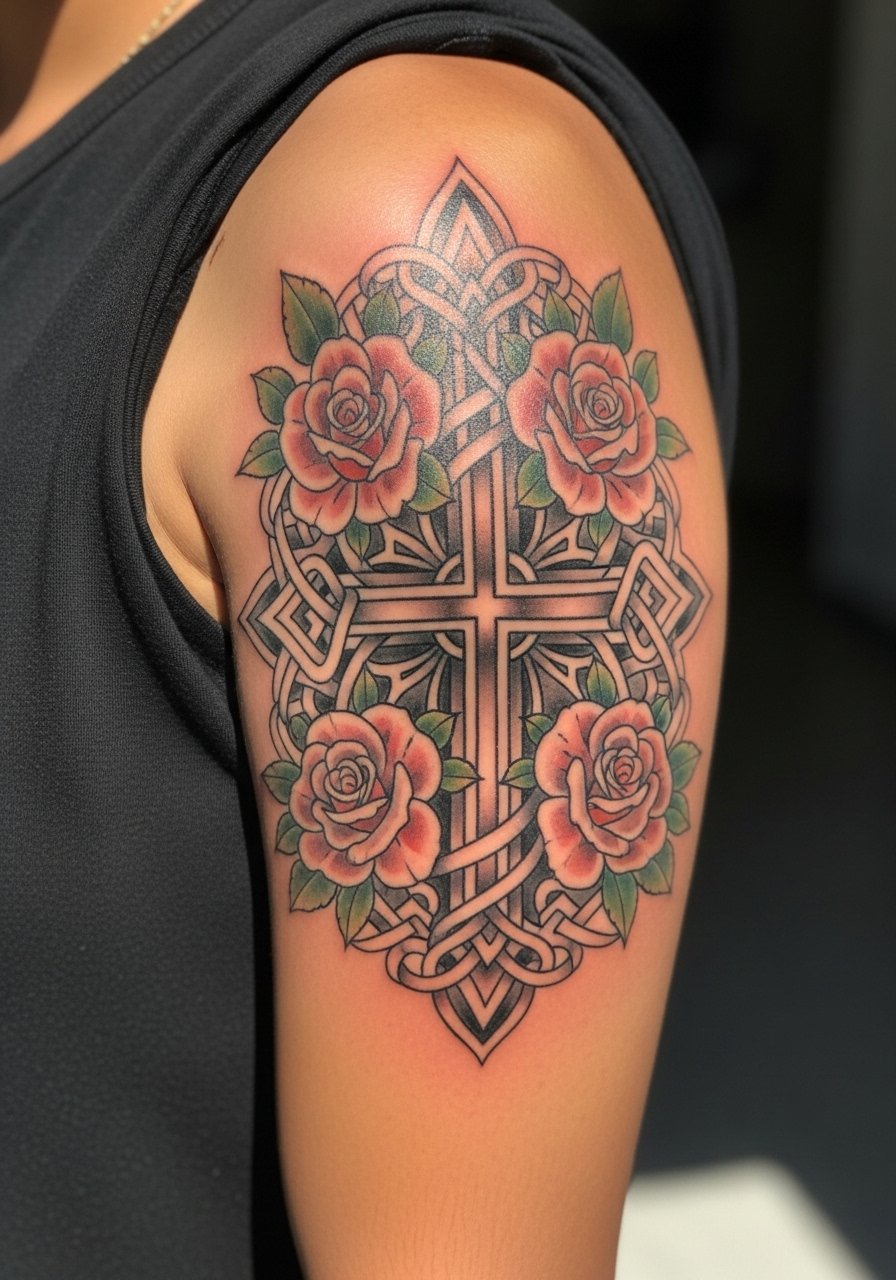
4. Cross with Roses on Shoulder
Style/Technique: Neo-Traditional / Floral
Pain Level: Low-Medium (2-4/10)
Session Time: 1-3 sessions
Best For: Romantic-faith combos
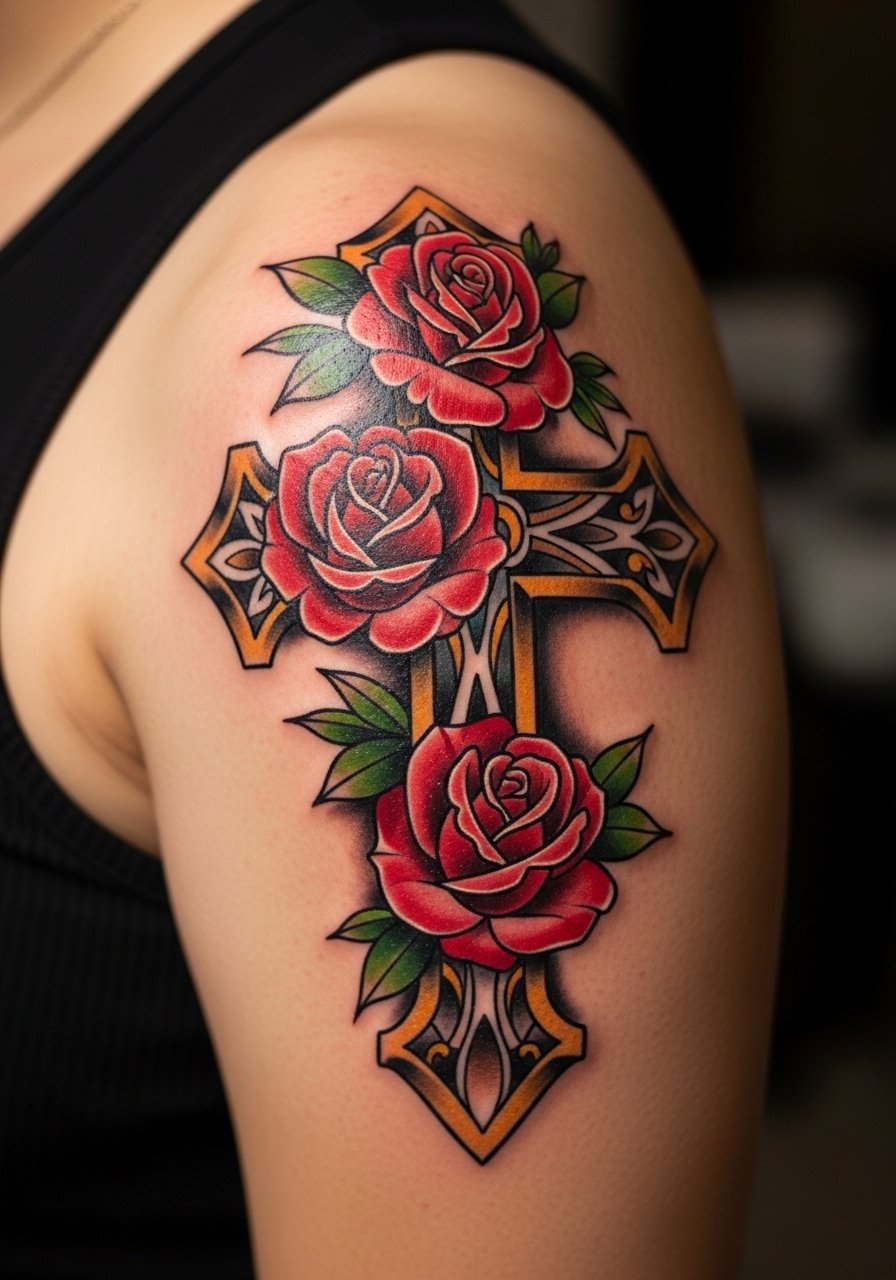
Pairing a cross with roses gives a romantic, grounded vibe. I’ve seen rose petals retain color moderately well when healed, but reds can tone down. Shoulder placement sits nicely under clothing and hurts less than ribs. Tip: ask the artist for color saturation that compensates for future fading and for healed photos of similar skin tones so you know how colors will settle.
5. Cross Forearm Minimalist Line
Style/Technique: Minimalist / Fine Line
Pain Level: Low (2-3/10)
Session Time: 1 session
Best For: First tattoos, visible faith
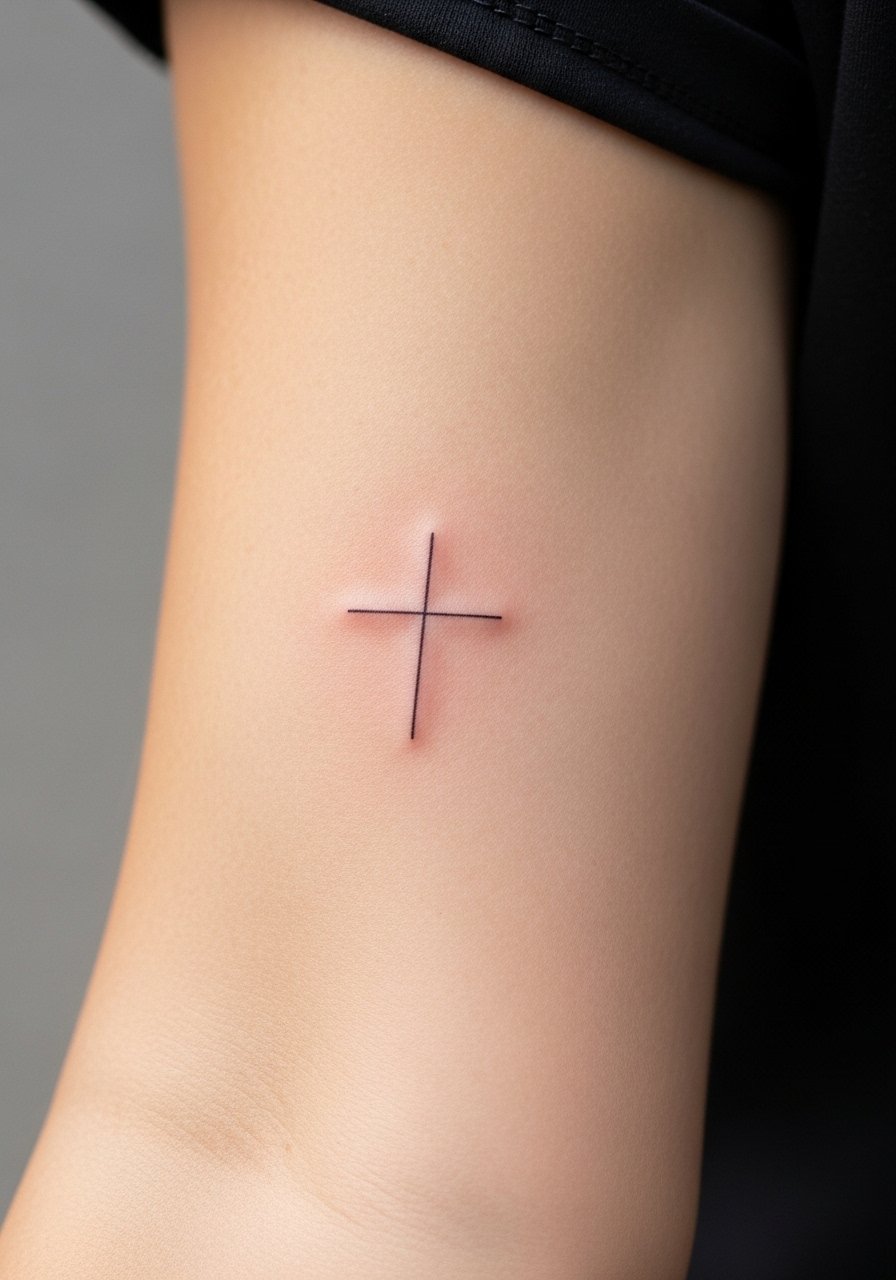
A simple forearm cross is an easy starter. From what I’ve seen, fine-line crosses on the forearm look elegant but can blur if lines are too hairline-thin. For a first tattoo, this placement heals quickly and is easy to check. One mistake: choosing a line too thin to last. Ask for slightly heavier fine lines and expect a touch-up down the road.
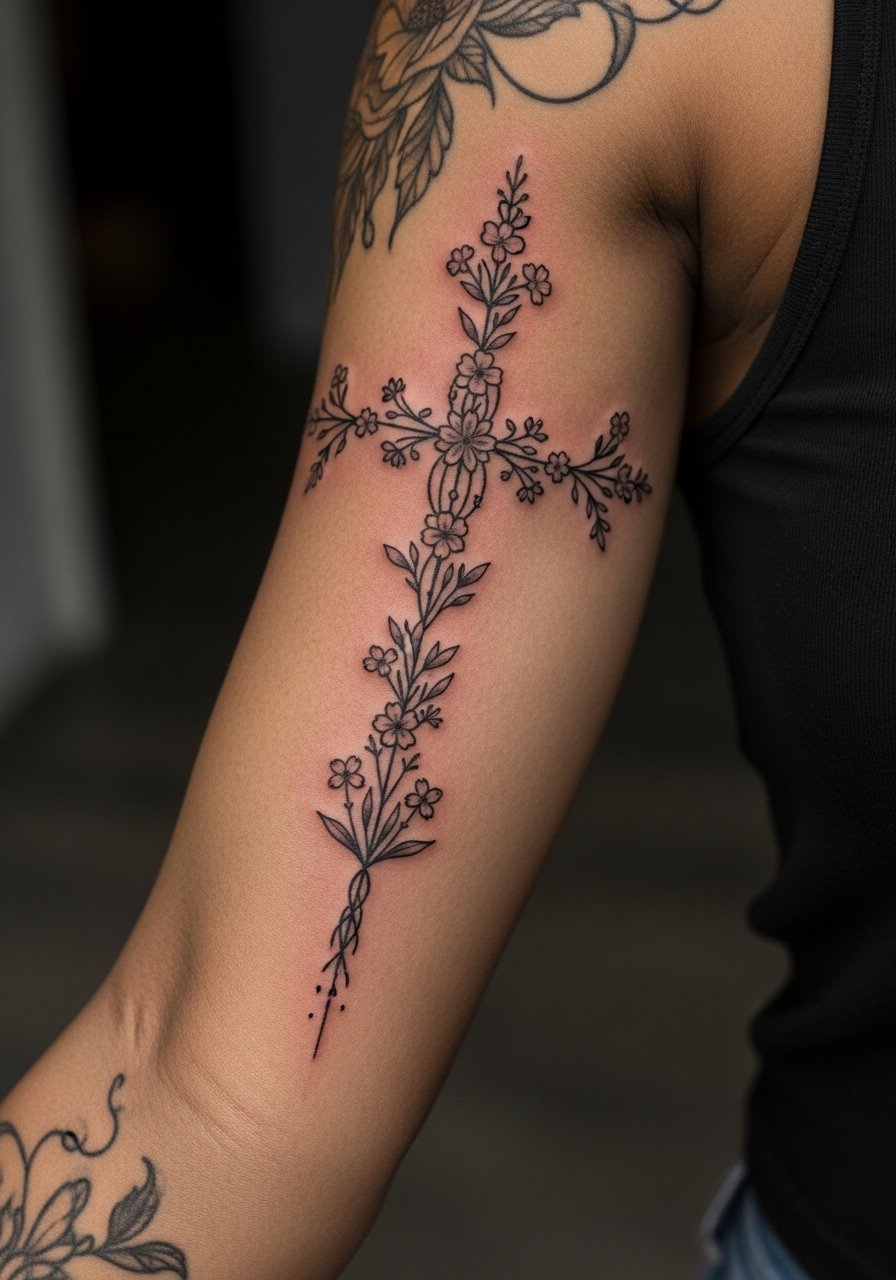
6. Floral Cross on Ribcage
Style/Technique: Illustrative / Botanical
Pain Level: High (7-8/10)
Session Time: 1-2 sessions
Best For: Personal, hidden meaning
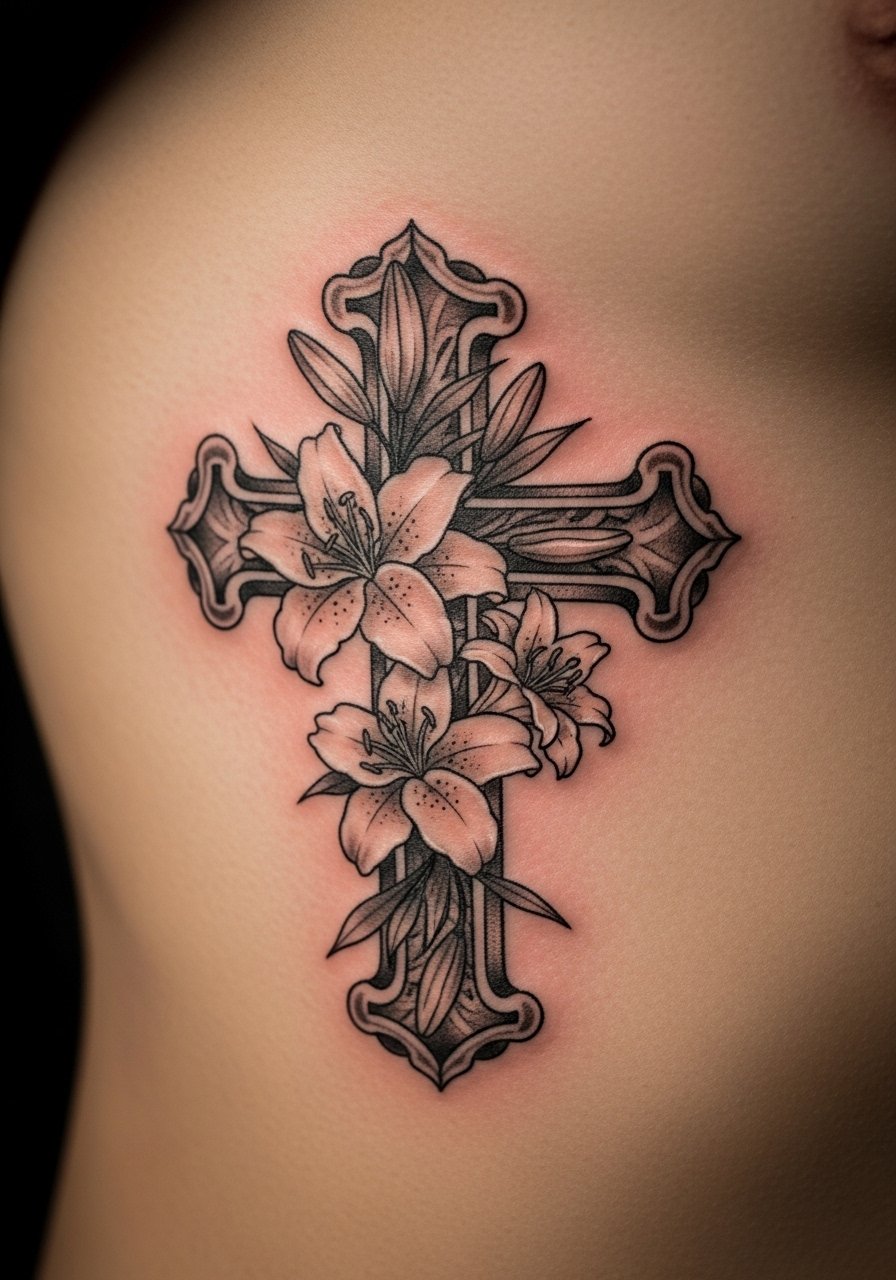
Ribcage floral crosses are gorgeous but honest: ribs hurt. I’ve sat with friends through rib sessions and the soreness is high but brief. The result is worth it for those who want a private piece. Choose larger petals and bold cross lines so the floral detail survives movement and time. Don’t pick tiny script—rib movement and scabbing can ruin fine text.
7. Lion and Cross on Bicep
Style/Technique: Realism / Blackwork
Pain Level: Medium (4/5/10)
Session Time: Multiple sessions for realistic shading
Best For: Powerful, symbolic pieces
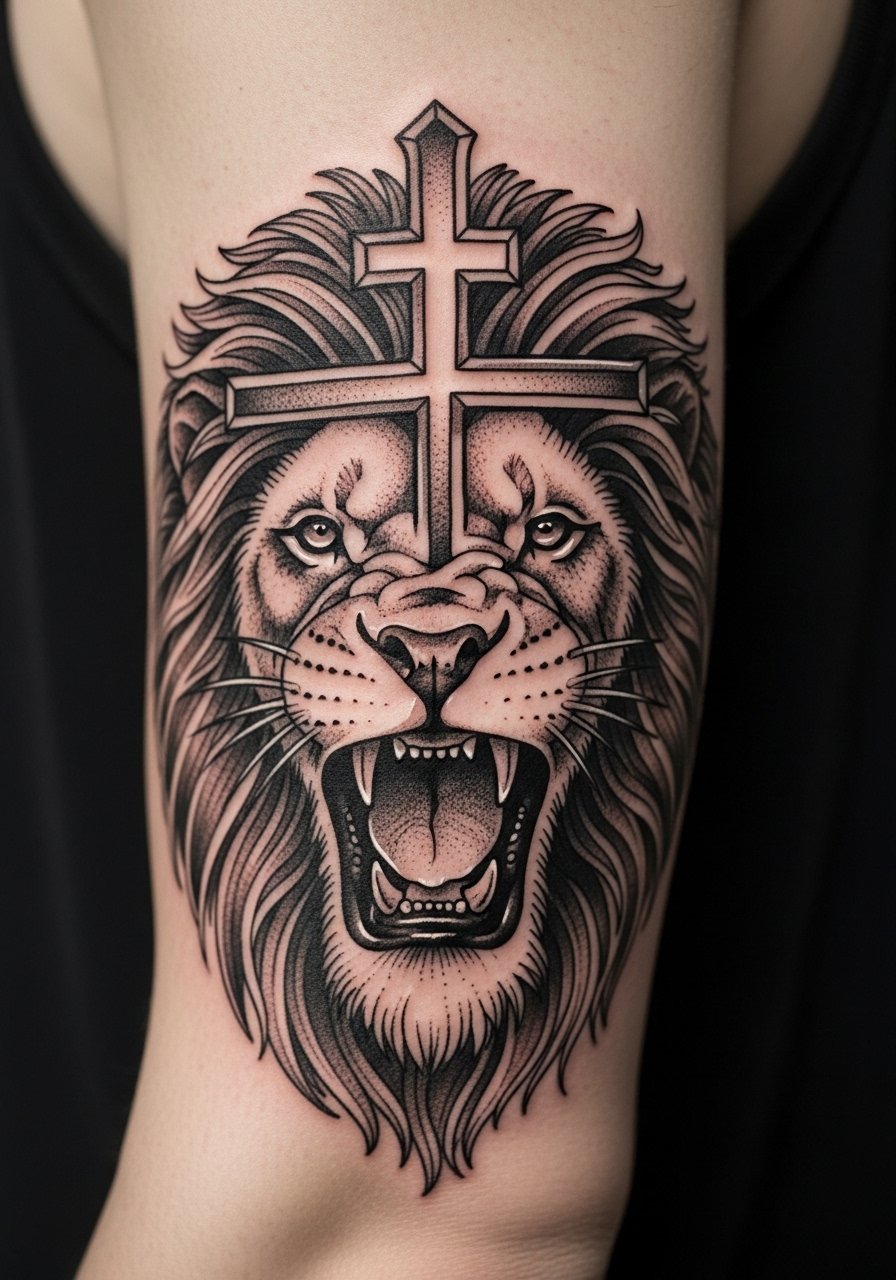
A lion-cross combo reads as courage and faith. I admired one where the lion’s mane visually formed the cross—clever composition. Realism needs an artist who excels in shading; if you pick someone who specializes in blackwork realism (think Boris Bianchi-esque names), the piece will age fine if contrast is left high. Expect several hours for shading, and avoid tiny facial details that can blur.
8. Tribal Cross on Shoulder Blade
Style/Technique: Tribal / Bold Lines
Pain Level: Medium (3-5/10)
Session Time: 1-2 sessions
Best For: Cultural statement, back placement
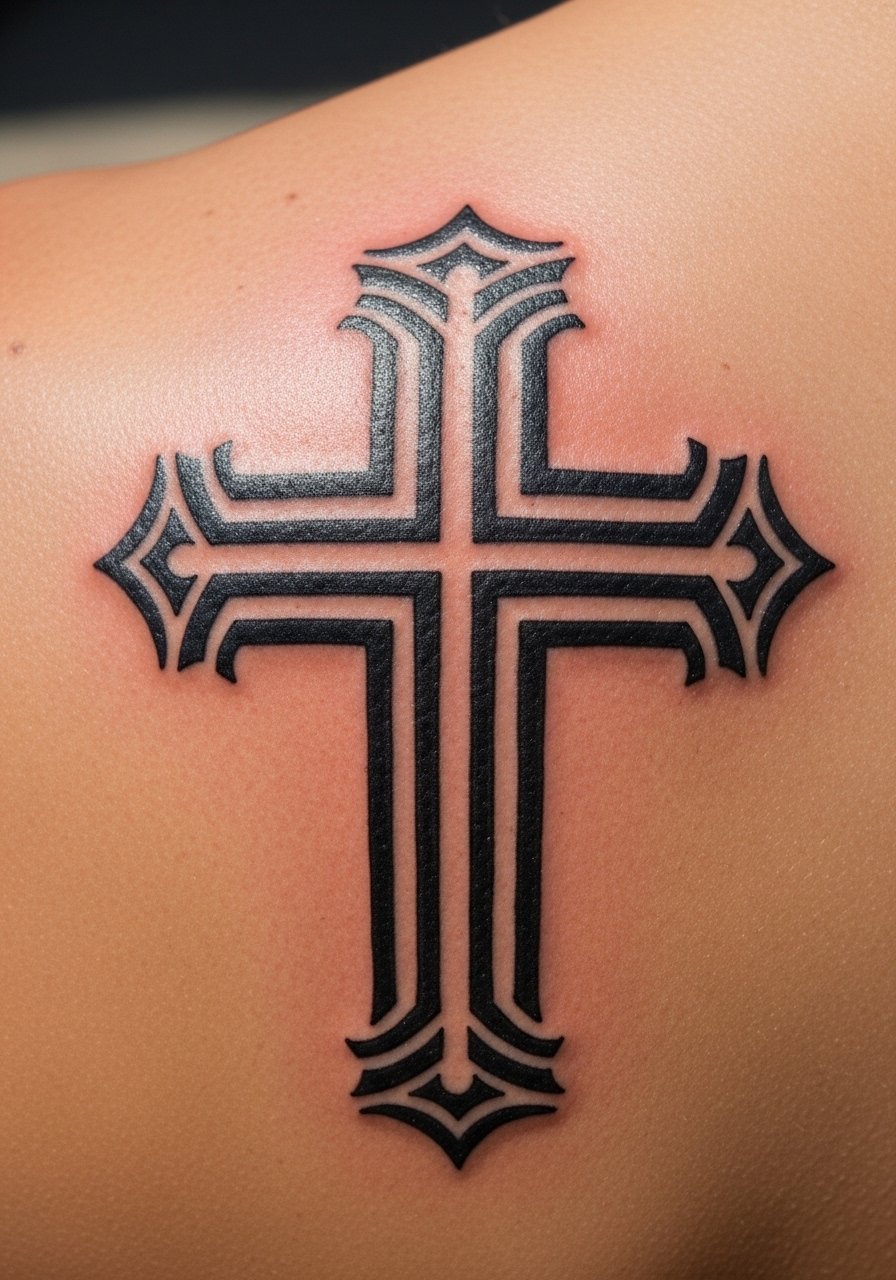
Tribal crosses connect culture and faith. Shoulder blade placement lets the pattern breathe and look good with movement. I’ve noticed Y2K tribal revivals use finer filigree; be mindful—fine tribal details can soften. Ask for simplified bold blocks and test with a temporary transfer to ensure it flows with your shoulder anatomy.
9. Hand Cross Tiny Top-Hand
Style/Technique: Minimalist / Bold Line
Pain Level: Very High (8-9/10)
Session Time: Quick single session
Best For: Max-visibility faith statement
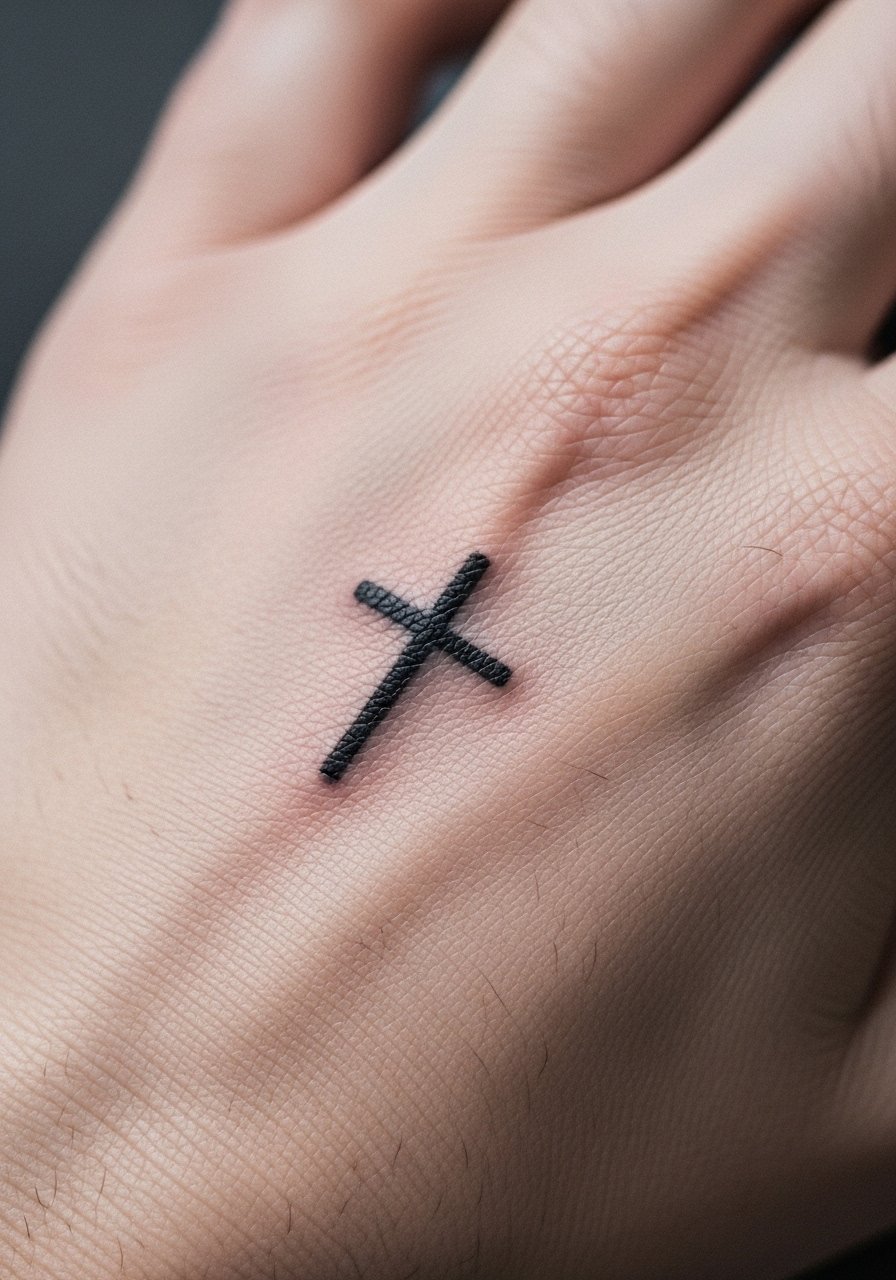
A hand cross says you mean it. I’ve seen these heal with more diffusion than expected—hand skin and constant washing blur lines. Pain is intense and healing is fussy. If you want visibility, accept touch-ups. Common mistake: choosing a thin cross. Pick a bold, simple silhouette and plan for a touch-up a year in.
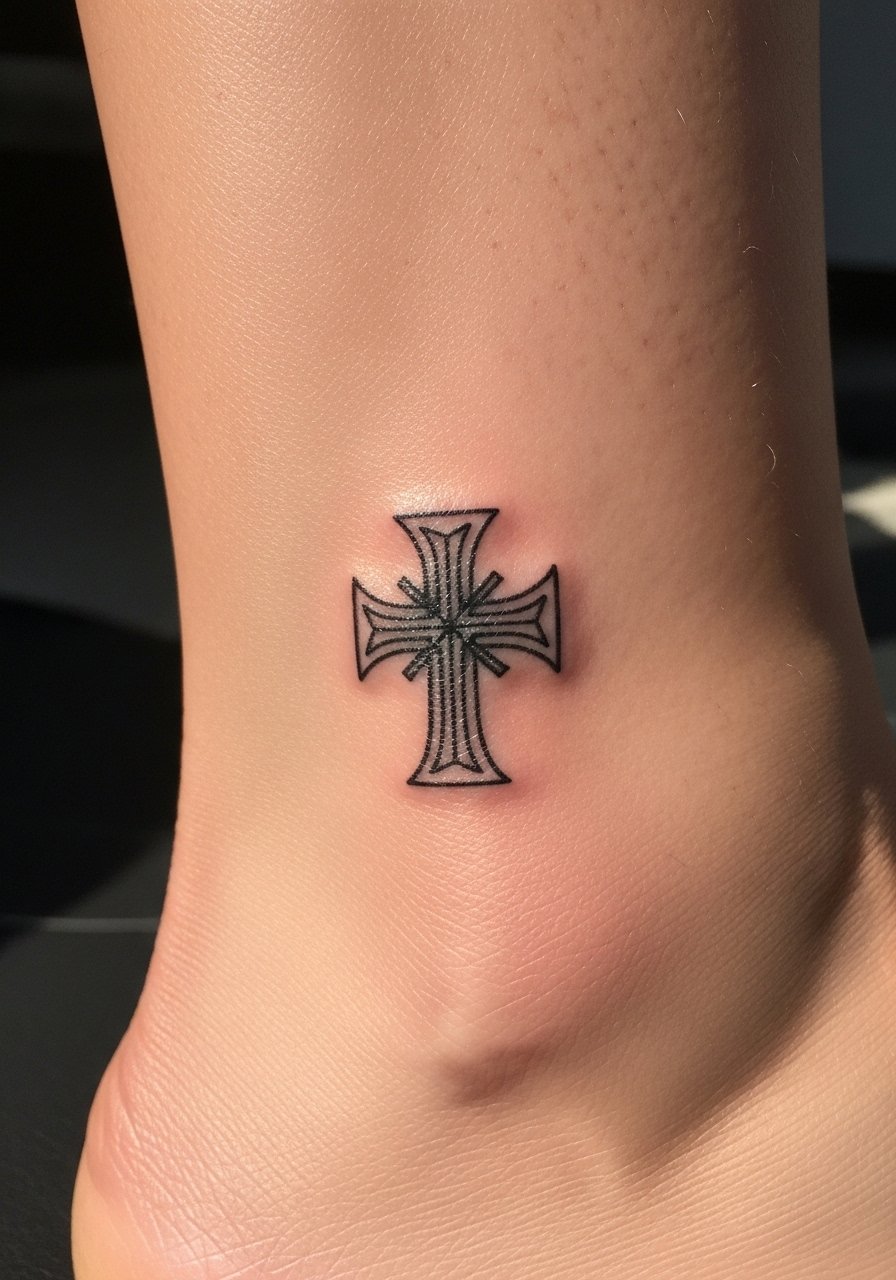
10. Coptic Cross on Wrist
Style/Technique: Geometric / Coptic
Pain Level: Low (2-3/10)
Session Time: 1 session
Best For: Cultural identity, subtle visibility
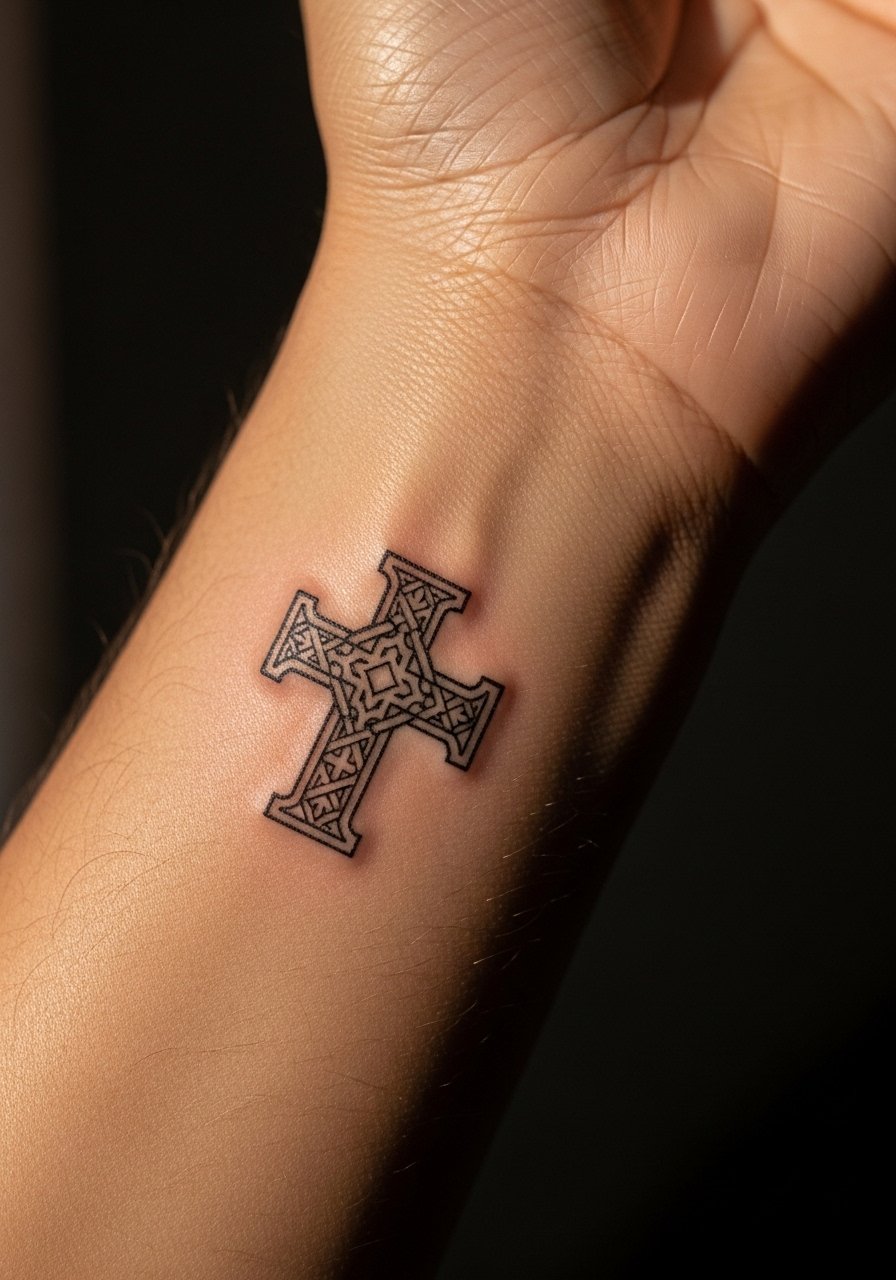
Coptic crosses carry deep cultural meaning. A wrist placement keeps it visible but discreet. I recommend artists who’ve worked with Coptic motifs—ask to see healed wrist photos on similar skin tones. Fine geometric lines can blur, so request slightly bolder strokes and minimal dotwork in high-movement areas.
11. Tiny Cross Behind Ear
Style/Technique: Micro Minimalist / Subtle
Pain Level: Medium-High (5-6/10)
Session Time: 30–60 minutes
Best For: Hidden yet symbolic
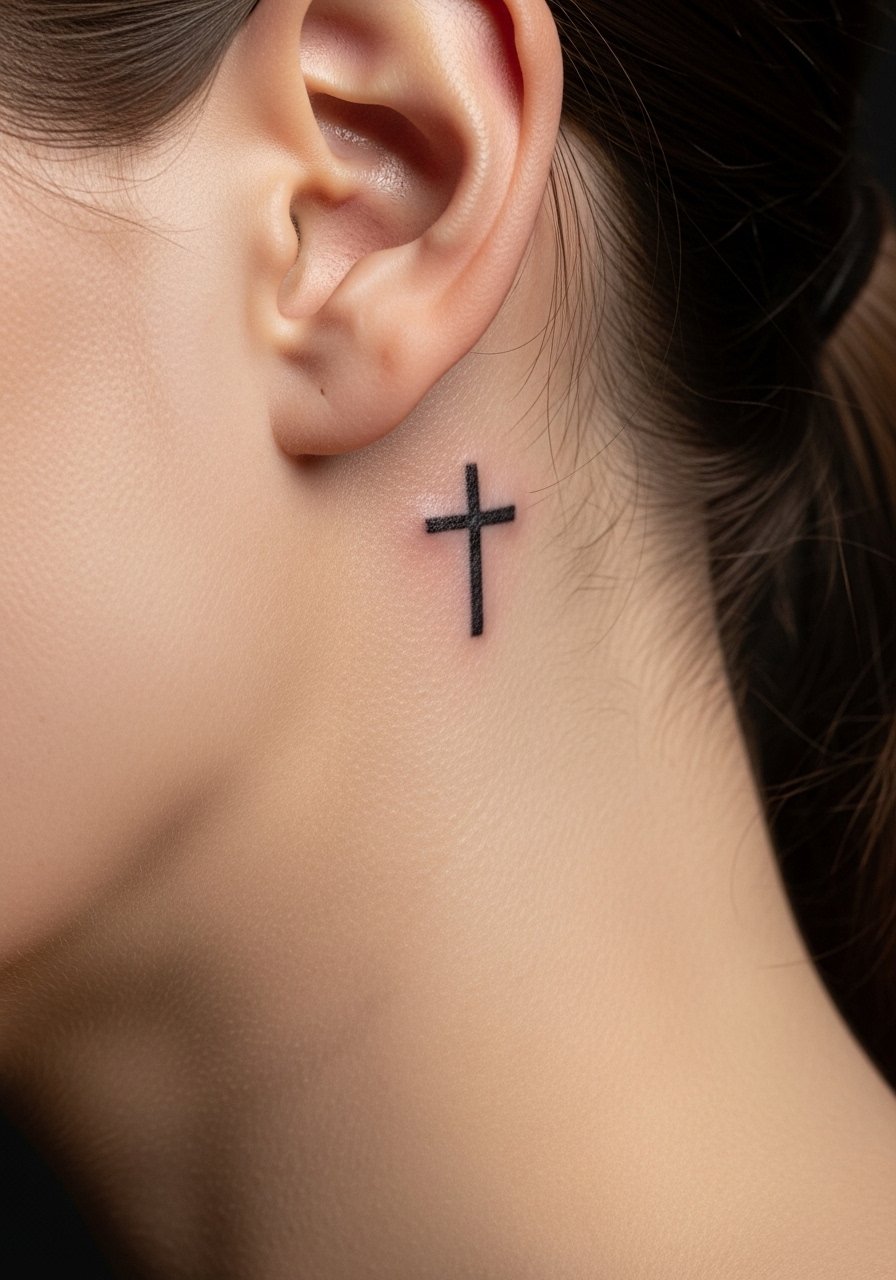
Behind-the-ear crosses are intimate and discreet. I got one to test visibility without full commitment. It hurts more than you expect due to bone proximity but heals fast. Avoid over-detail; a clean simple cross reads best. Tell your artist you want it to be visible from a distance so they’ll ink slightly thicker lines.
12. Chrome Heart Cross on Collarbone
Style/Technique: Neo-Traditional / Metallic Effect
Pain Level: Medium (4-5/10)
Session Time: 1-2 sessions
Best For: Fashion-forward collarbone pieces
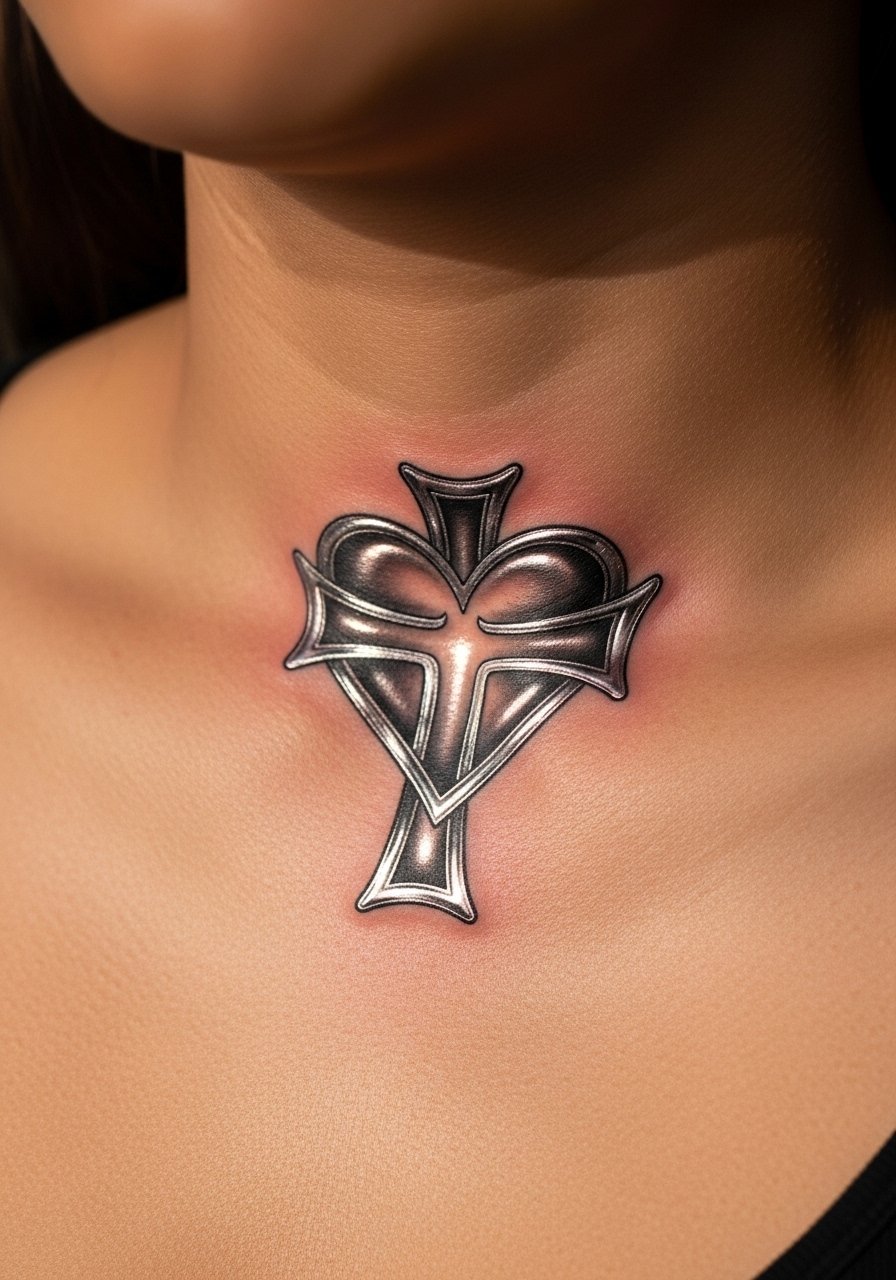
Chrome heart crosses bring a Y2K luxe feel. I’ve seen artists simulate metallic sheen with gray gradients and white highlights; it photographs well but requires a skilled colorist. Collarbone placement is visible and slightly tender. Ask for healed examples of metallic effects on your skin tone—white highlights sometimes disappear on deeper skin, so plan accordingly.
13. Infinity Cross on Inner Wrist
Style/Technique: Minimalist / Symbolic
Pain Level: Low (2-3/10)
Session Time: 30–60 minutes
Best For: Eternal faith symbolism, first-timers
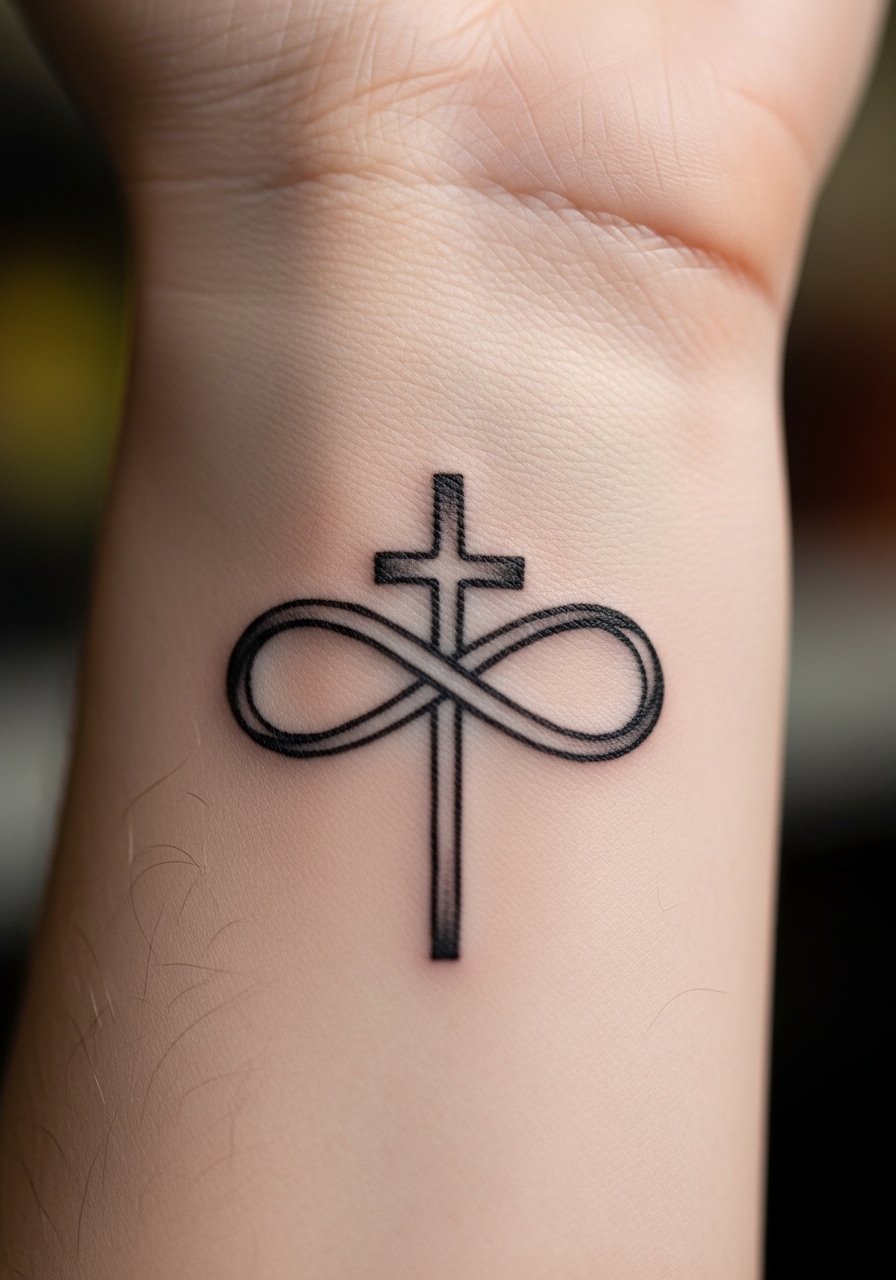
An infinity cross is personal and customizable. I picked this style when I wanted subtle symbolism. Wrist movement can soften ultra-fine lines, so ask for slightly thicker line weight. Healing is quick. A common error is adding tiny script nearby; it rarely stays crisp on the wrist—keep the motif simple.
14. Rose Cross on Thigh
Style/Technique: Realistic / Neo-Traditional
Pain Level: Low (2-3/10)
Session Time: 2–3 sessions
Best For: Large, romantic designs that can be hidden
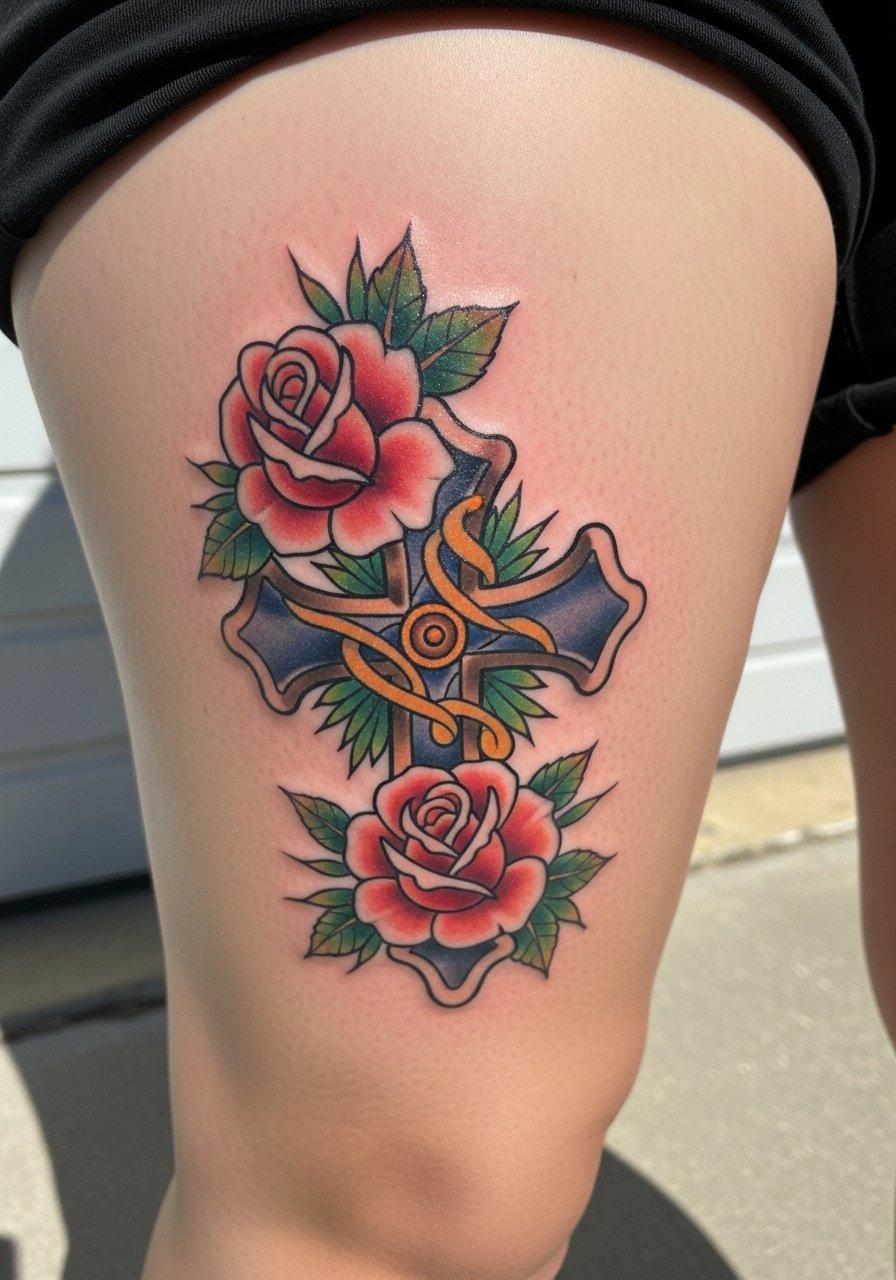
Thigh placements are forgiving and age well. Rose crosses on the thigh let artists add color and detail without visibility stress. I’ve seen vibrant roses retain tone better here because the skin sees less sun. Avoid over-saturating tiny petals; ask for bold center lines so the image reads when healed.
15. Small Cross on Finger Side
Style/Technique: Minimalist / Micro
Pain Level: High (6-8/10)
Session Time: 30–60 minutes
Best For: Discreet, on-hand placement for rings alternative
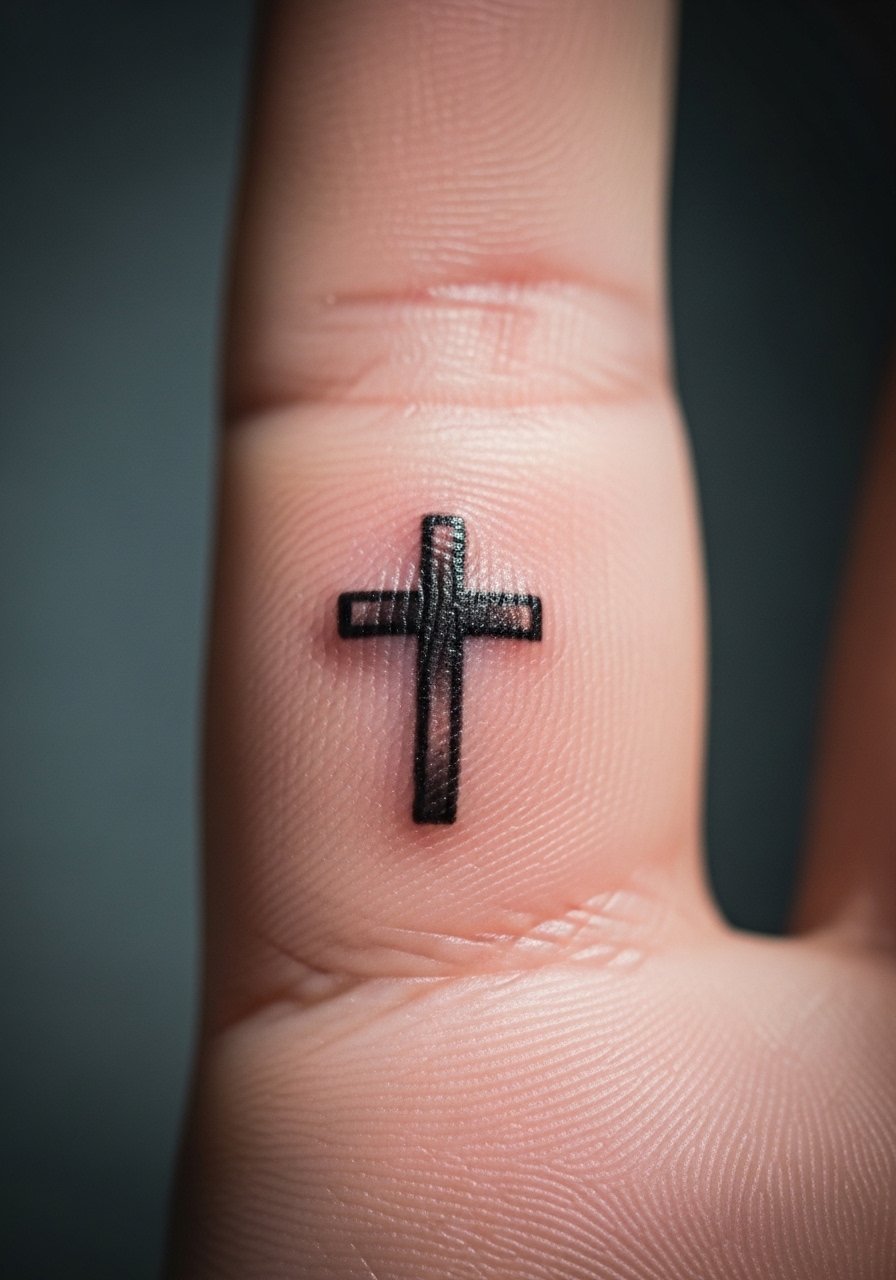
Finger crosses look delicate but are high-maintenance. From what I’ve seen, finger skin sheds faster and ink spreads. If you want a finger cross, choose thicker lines and expect periodic touch-ups. Don’t pick white ink here; it often vanishes. Consider inner finger or base of finger if you want better longevity.
16. Cross Behind Sternum with Script
Style/Technique: Fine Line / Script Combo
Pain Level: Medium-High (5-7/10)
Session Time: 1–2 sessions
Best For: Personal motto plus faith
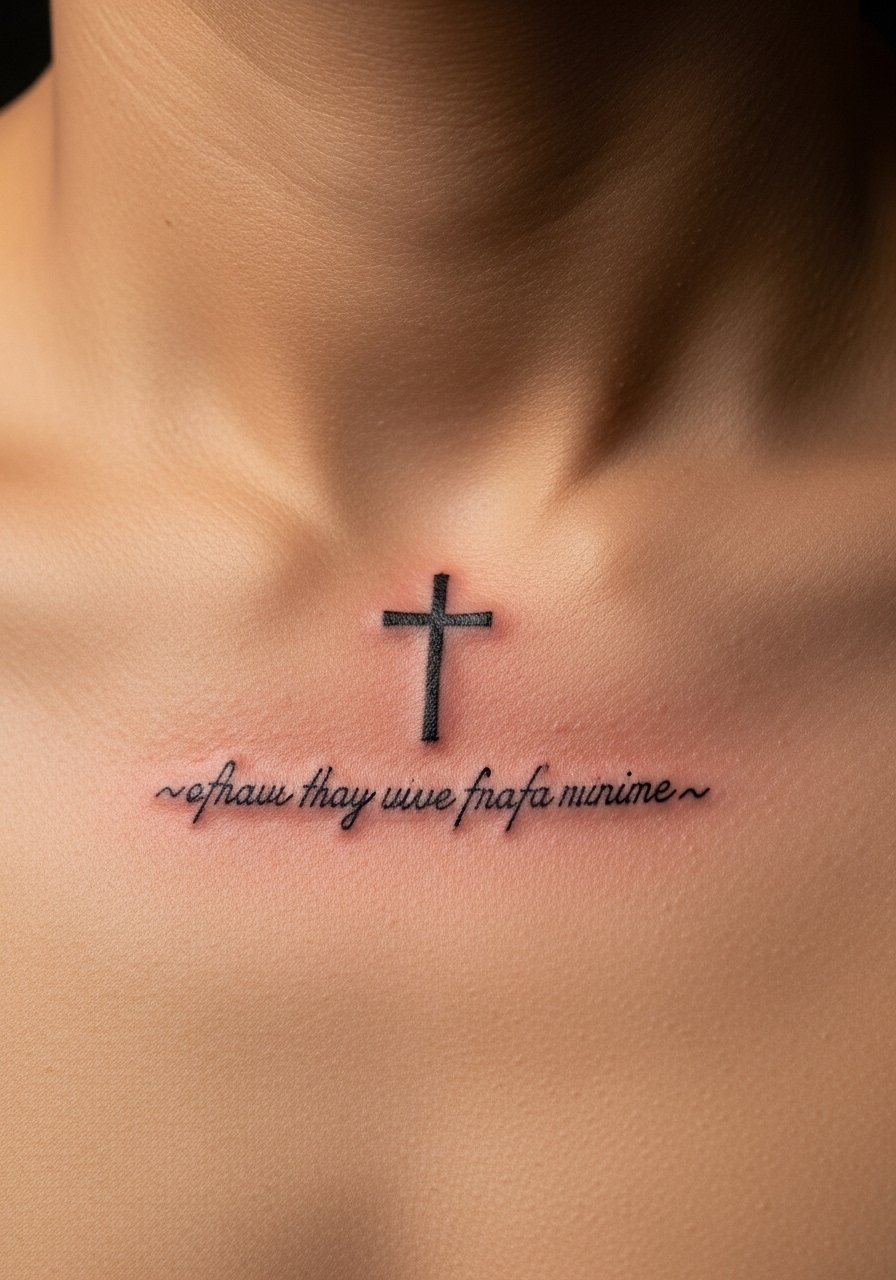
Combining a cross with a date or short line under the sternum reads intimate. I’ve watched script fade if letters are too thin—ask for slightly bolder script and spacing. Sternum placement requires an artist who considers chest movement so letters don’t warp. Healing requires patience; keep the area moisturized.
17. Blackwork Geometric Cross Down Spine
Style/Technique: Blackwork / Geometric
Pain Level: High (7-8/10)
Session Time: Multiple sessions
Best For: Dramatic statement, vertical flow
Spine placements are dramatic and painful. I’ve seen geometric crosses down the spine read like armor when done in bold blackwork. Detail should be simplified to maintain clarity as skin moves. Expect longer sessions. Ask for healed photos of similar large blackwork pieces so you know how lines settle.
18. Heart-Shaped Cross on Rib Side
Style/Technique: Illustrative / Romantic
Pain Level: High (7-8/10)
Session Time: 1–2 sessions
Best For: Private, emotional designs

Merging a heart with a cross makes the symbolism very personal. Rib pain is intense but fine for folks who want a private piece. Choose bolder edges on the cross portion to prevent floral or heart details from blending. Hydration during healing helps the pigment settle smoothly.
19. Cross and Anchor on Calf
Style/Technique: Traditional / Nautical Fusion
Pain Level: Low-Medium (3-4/10)
Session Time: 1 session
Best For: Durable, visible leg art
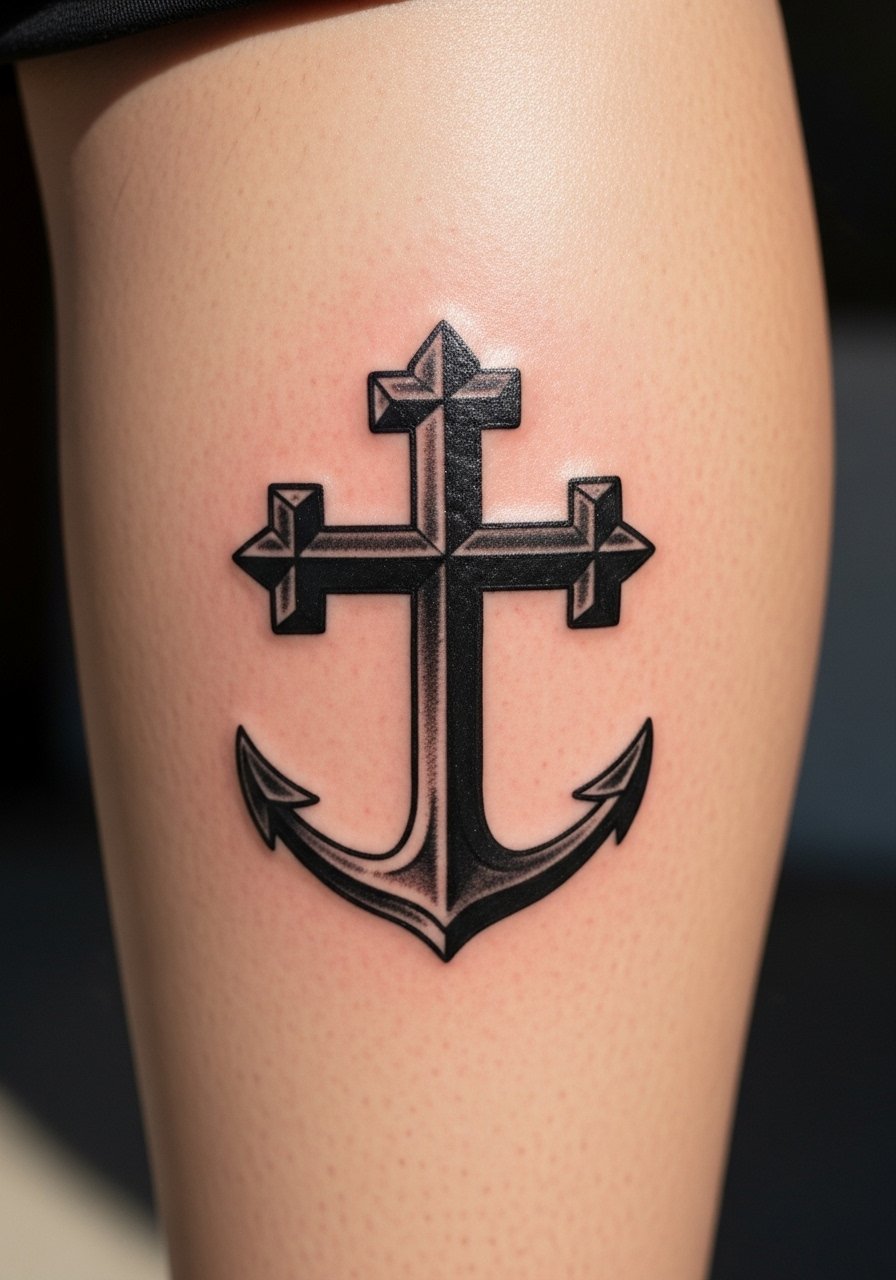
An anchor-cross fusion reads like steadfast faith. Calf skin is forgiving and ages well. I like this combo because it photographs nicely and the bold lines hold up. Avoid overly detailed rope work in small areas—scale up the rope thickness to keep texture visible over time.
20. Cross Mandala on Upper Arm
Style/Technique: Ornamental / Dotwork Hybrid
Pain Level: Medium (4-5/10)
Session Time: Multiple sessions for dotwork
Best For: Decorative, meditative pieces

Ornamental crosses framed by mandalas feel meditative. Dotwork can age well if contrast is preserved; I recommend strong central lines. Upper arm placement is low-pain and easy to hide. One mistake: packing too many tiny dots—ask your artist about negative space to let designs breathe.
21. Cross Face Accent Near Temple
Style/Technique: Bold Traditional / Tiny Accent
Pain Level: Very High (8-9/10)
Session Time: Single quick session
Best For: Max-visibility, bold faith statements
Face crosses are a commitment. I’ve seen them read raw and honest, but they require acceptance of visibility and potential social consequences. Pain and healing are intense; lines can spread more here. If you go for it, keep the design tiny and bold—micro detail rarely survives on facial skin.
22. Rose and Cross Half-Sleeve on Upper Arm
Style/Technique: Neo-Traditional / Floral Sleeve
Pain Level: Medium (4-5/10)
Session Time: Multiple sessions across appointments
Best For: Storytelling sleeves with faith motifs
A rose-and-cross half-sleeve gives narrative room. I helped plan one and watched how flow and negative space made each element readable. Sleeves require an artist who thinks about composition across months. Avoid cramming too many small icons around the cross—give each motif breathing room so it ages clearly.
23. Patchwork Small Crosses on Collarbone Array
Style/Technique: Patchwork / Minimal Mix
Pain Level: Low-Medium (3-4/10)
Session Time: Multiple short sessions
Best For: Curated small-ink collections
Patchwork-style crosses let you collect variations without committing to one large piece. I like this for people who want a series of meanings. Collarbone array ages well if each cross has deliberate spacing. Mistake: random alignment—plan a composition so it looks intentional when you wear different necklines.
24. Botanical Cross Sleeve Extension
Style/Technique: Fine Line / Botanical Sleeve
Pain Level: Medium (3-5/10)
Session Time: Many sessions for full sleeve
Best For: Nature lovers blending faith with flora
Building a cross into a botanical sleeve lets you tell a long story. I’ve watched vine work age nicely when line weight varies—slightly thicker stems, finer leaf veins. Sleeve work takes time; plan the negative space so the cross remains a focal point. Hydration and sun protection are crucial for color retention.
25. Coptic Micro Cross on Ankle
Style/Technique: Geometric / Micro
Pain Level: Medium (4-5/10)
Session Time: 1 session
Best For: Subtle cultural nods, ankle placement
Ankle placements are discrete and elegant. I recommend a slightly bolder micro Coptic cross so the geometry keeps form as the ankle skin moves. Avoid tiny filigree that can fill in. Ankle heals well but can be irritated by shoes—plan footwear post-session.
26. Cross with Date on Ribcage Memorial
Style/Technique: Fine Line / Memorial
Pain Level: High (7-8/10)
Session Time: 1 session
Best For: Memorial pieces tied to a date
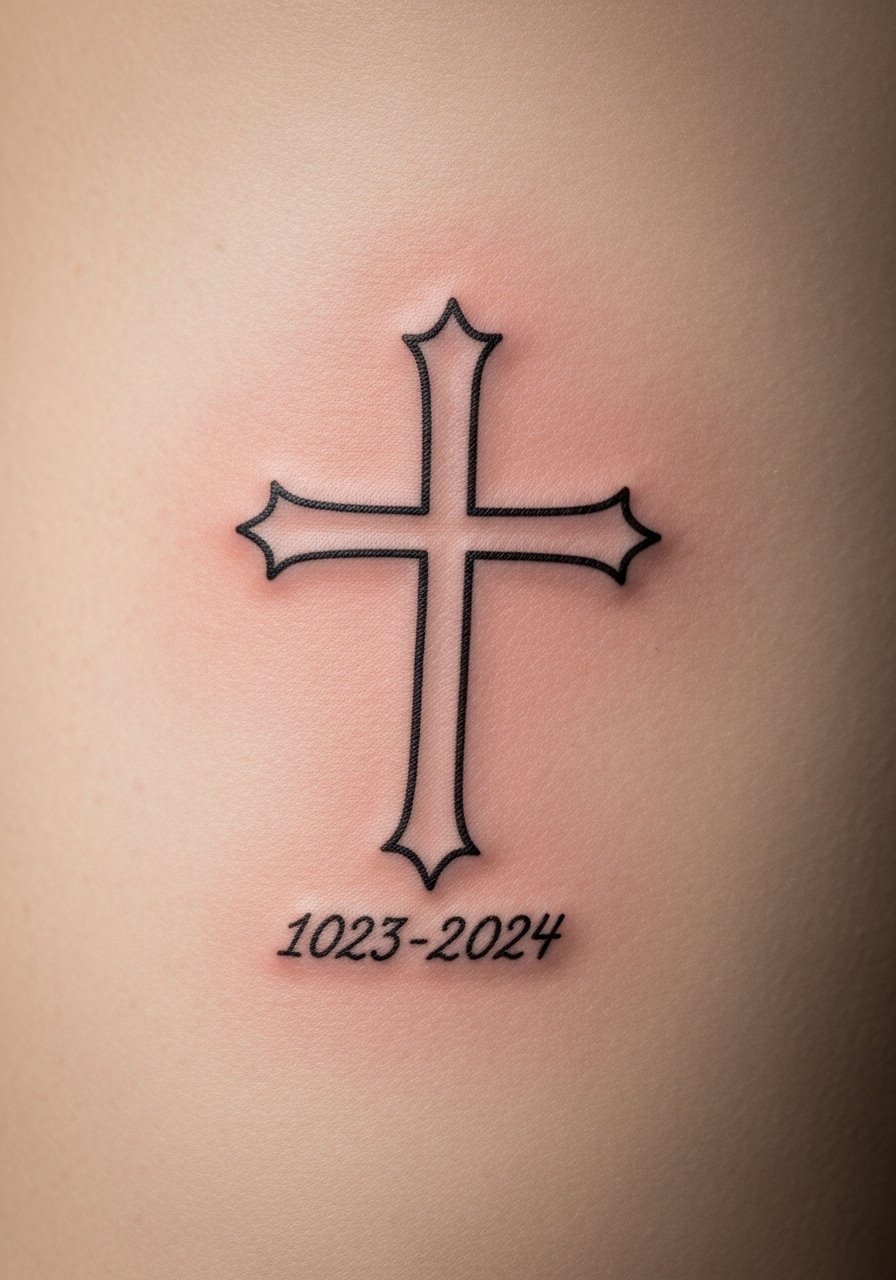
Memorial crosses with dates hold deep meaning. I’ve helped friends design these—keep the date spacing airy so numbers don’t blur together with healing. Ribs are painful but the place lends privacy. Choose clear numerals and a bold enough cross so the whole piece reads at a glance.
27. Blackwork Cross Sleeve Connector
Style/Technique: Blackwork / Sleeve Connector
Pain Level: Medium-High (5-7/10)
Session Time: Multiple sessions
Best For: Connecting existing tattoos into a faith-based sleeve
Using a blackwork cross as a sleeve connector unifies disparate pieces. I’ve seen artists like Roxx excel at this—bold shapes and negative space anchor the sleeve. Blackwork holds up well over time; ask for ample contrast so the connector remains a visual spine for the rest of your arm.
Tattoo Prep and Aftercare Essentials
Aftercare Essentials:
- Aquaphor Healing Ointment, 14oz tube — For first 3–5 days to protect fresh ink
- Saniderm Transparent Adhesive Bandage, 6-inch roll — Second-skin method many artists recommend
- CeraVe Fragrance-Free Moisturizing Lotion, 12oz — For daily moisturizing after initial healing
- Dr. Bronner's Unscented Castile Soap, 32oz — Gentle cleaning for days 1–14
Before Your Appointment:
- Tattoo Numbing Cream with 5% Lidocaine — Use only if your artist agrees, apply 30–45 minutes prior
- Tattoo Stencil Transfer Paper, 8.5×11 — Handy if you sketch a concept in Procreate first
Long-Term Maintenance:
- SPF 50+ Sunscreen Stick for Tattoos — Daily sun protection protects color and lines
- Mad Rabbit Tattoo Balm, 1oz — For keeping healed ink vibrant
- Hustle Butter Deluxe, 4oz — Vegan aftercare alternative many artists mention
Optional Comfort Items:
- Hydrocolloid Bandages (Large) — For small areas or to protect while traveling
- Tattoo Numbing Spray — For touch-ups or sensitive zones
Frequently Asked Questions
Q: How bad does a tattoo actually hurt?
A: Pain varies by placement and tolerance. Forearm and upper arm are often a 2–4/10 in my experience. Ribs, hands, face, and spine trend 7–9/10. Numbing cream helps but doesn't erase sensation—ask your artist before using it. For sensitive spots try short sessions and breaks.
Q: What if I regret my cross tattoo?
A: Sit with the idea 6+ months and try temporary tattoos in visible spots first. Hidden placements (thigh, ribcage) let you keep the meaning private. Laser removal exists but it's long; better to plan than to remove.
Q: How do I keep my cross from fading?
A: From what I’ve seen, sunscreen is essential. Use an SPF 50+ stick daily and moisturize with fragrance-free lotion. Black ink holds best; bright pigments need more protection and touch-ups.
Q: Can I work out after getting tattooed?
A: Wait at least 48–72 hours and longer for flex areas. Sweating on fresh ink raises the risk of infection and can affect healing. Keep heavy workouts light the first week.
Q: Is a small cross a good first tattoo to test pain?
A: Only if you actually want the design. Small doesn't always mean less painful—area matters more than size. If nervous, choose the outer arm or thigh for a gentler first session.
Q: How long does a tattoo take to heal fully?
A: Surface healing is usually 2–3 weeks; deeper skin can take 2–3 months. The first week is critical—clean gently, moisturize, and avoid sun and soaking. Expect peeling around day 3–7; don't pick.
Q: Do tattoos look different on different skin tones?
A: Yes. Black and gray usually show beautifully across tones. Bright colors may read differently on deeper skin; white ink can be near-invisible. I always ask artists to show healed examples on clients with similar skin tones.
