
I spent months collecting tree tattoo images and asking artists questions before I got my own small oak; the real challenge wasn't choosing a pretty picture but picking a style that would still read like me years from now. Below are 25 tree tattoo ideas that symbolize growth, with real-life notes on placement, pain, healing, and what to avoid.
This list focuses on tree tattoo ideas that read as growth, resilience, or renewal. These designs work for forearms, backs, ribs, ankles, and thighs—placements I’ve watched age differently. From what I’ve seen, fine line silhouettes and black-and-gray realism are the trends that actually hold up healed.
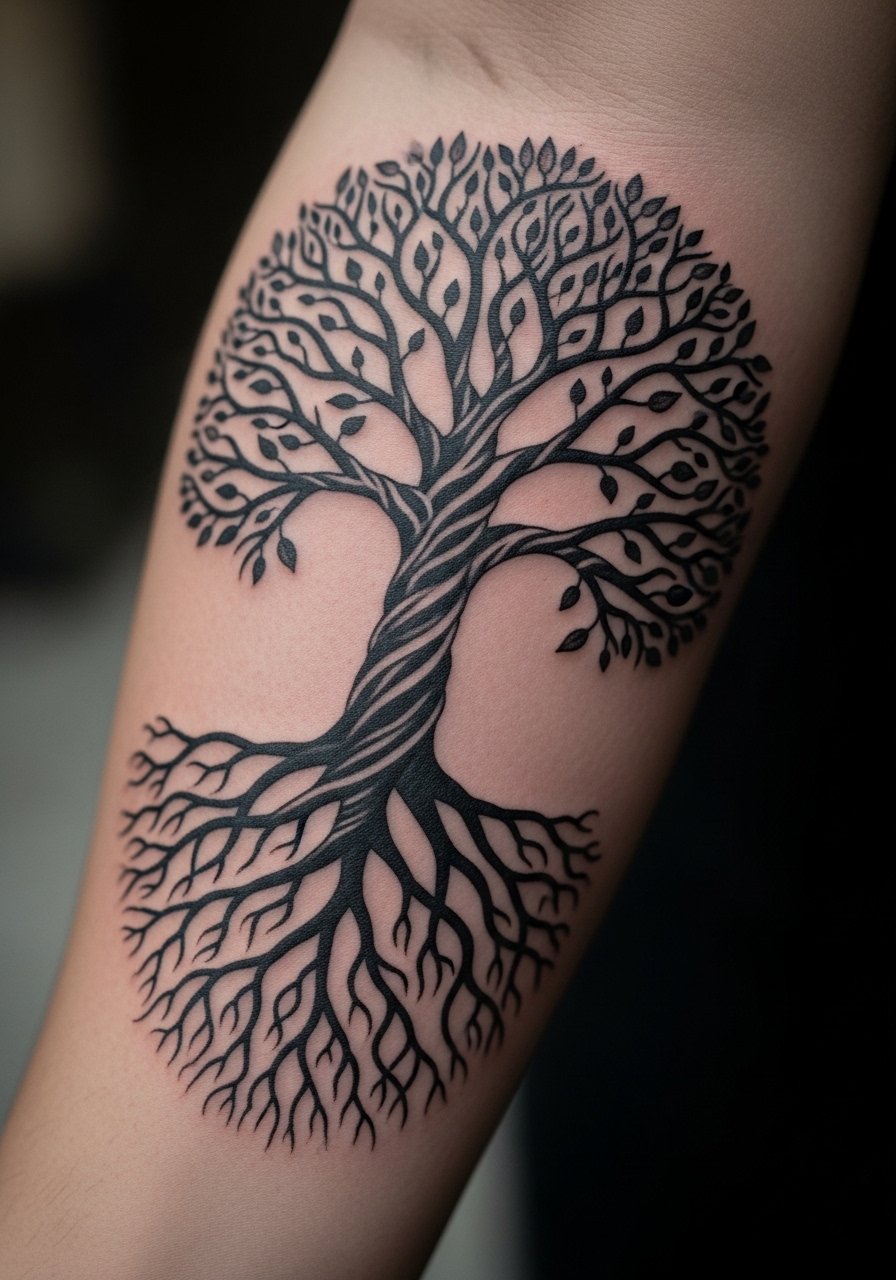
1. Tree of Life With Intertwining Roots on Upper Back
Style/Technique: Realistic / Illustrative
Pain Level: Medium (4/10)
Session Time: Multiple sessions for full detail
Best For: Statement piece, back canvas
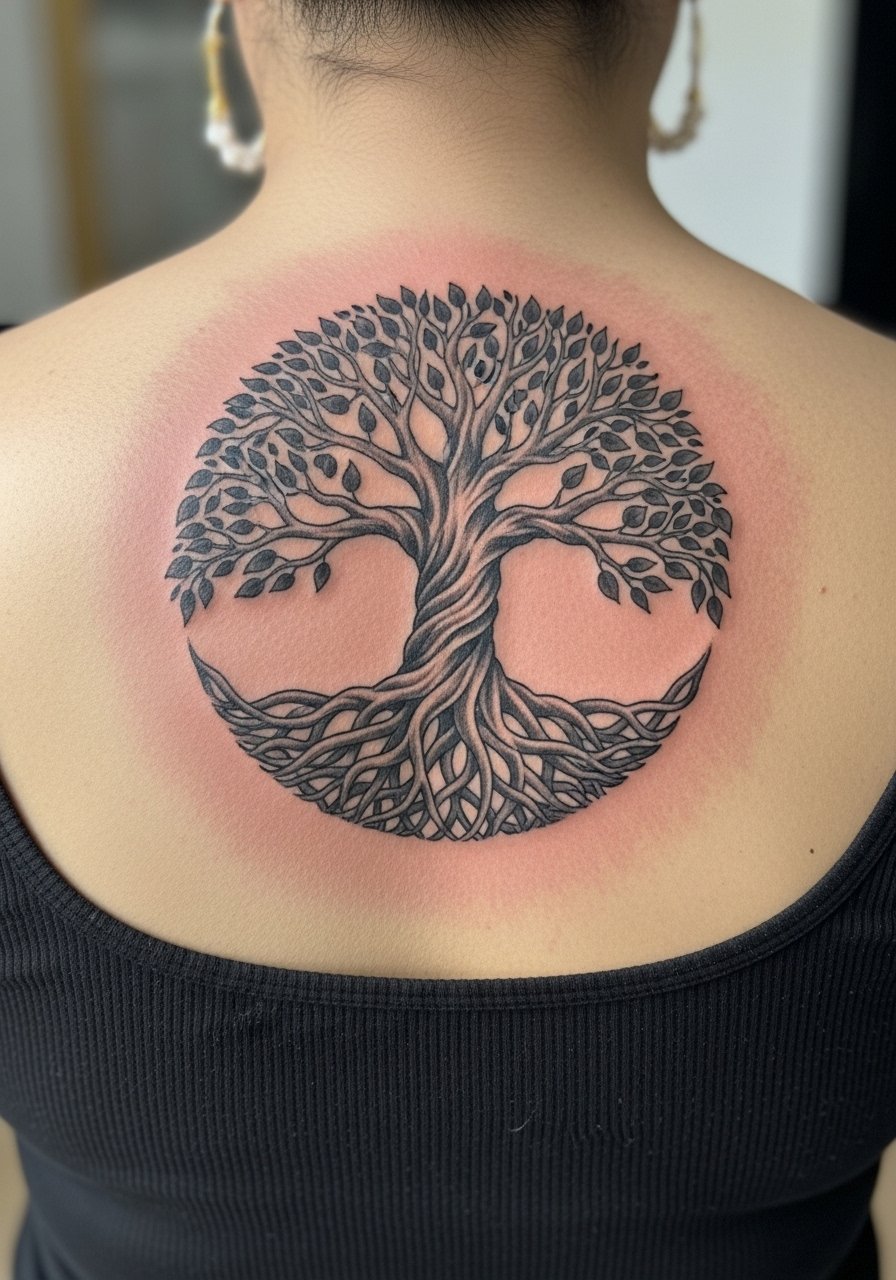
I love the Tree of Life for representing interconnected growth and family roots. On the upper back it reads like a personal emblem—plenty of space for intricate roots and subtle shading. Pain is moderate and sessions depend on detail; larger root work needs patience. For aftercare, keep it out of direct sun while healing and use fragrance-free lotion. This style ages well in black-and-gray; a common mistake is overloading the branches with tiny leaves that blur together years later. Ask for clear negative space in the design and look for artists who show illustrative tree work in their portfolios.
2. Minimalist Pine Tree Silhouette on Calf
Style/Technique: Minimalist / Silhouette
Pain Level: Low-Medium (3/10)
Session Time: 1 session, under 2 hours
Best For: First tattoo, easy to hide with pants
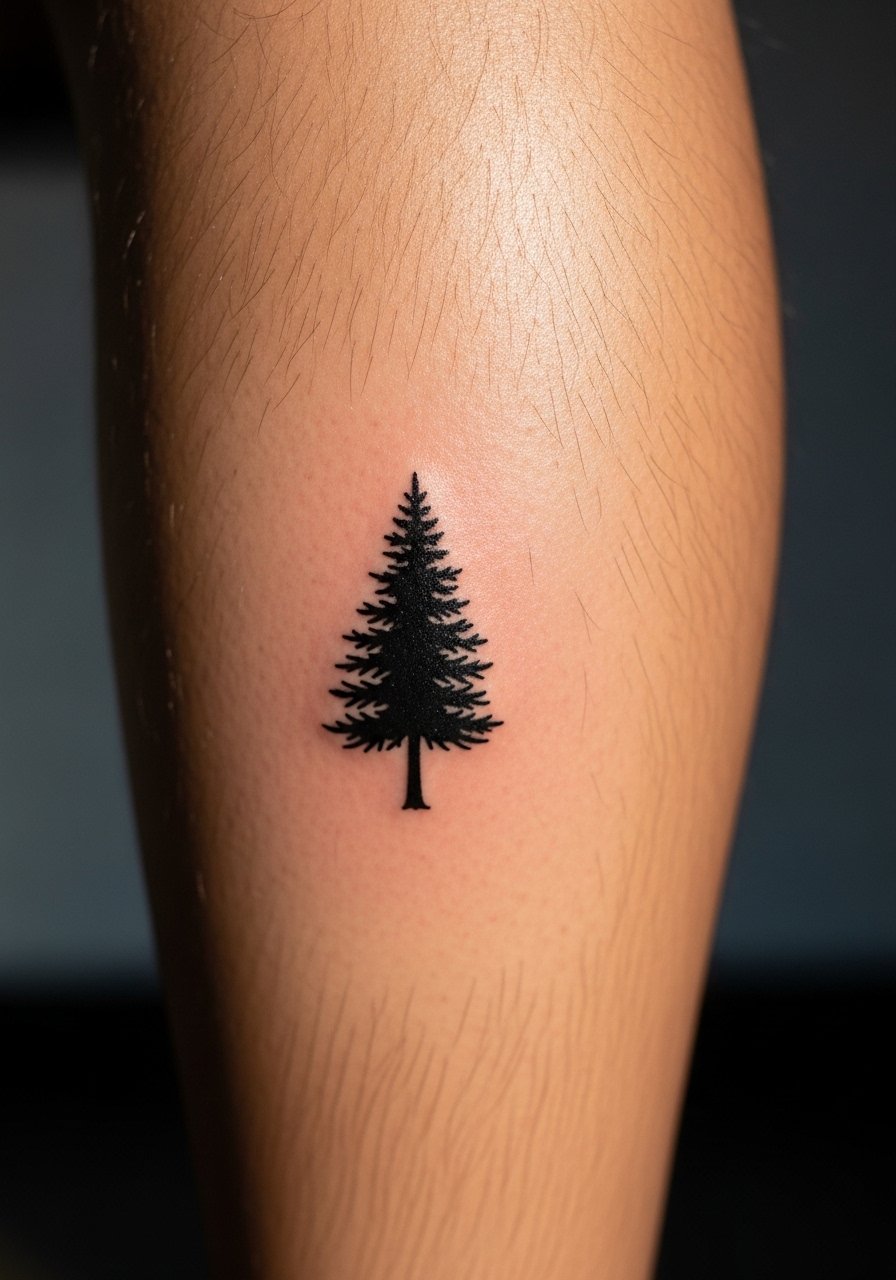
A single pine silhouette reads of resilience and enduring seasons. On the calf it follows the leg’s line and is low pain compared to ribs. The clean black outline tends to age well if lines are bold enough; ultra-fine silhouettes risk softening. I recommend asking for slightly thicker main lines and minimal detail so the tree keeps shape as it heals. Use tattoo aftercare that prevents scabbing and protect it from UV—I've seen pine silhouettes keep their presence for years when treated right.
3. Forest Scene Sleeve With Multiple Trees
Style/Technique: Black-and-Gray Realism / Landscape
Pain Level: High (7/10)
Session Time: Several long sessions
Best For: Sleeve collectors, large statement
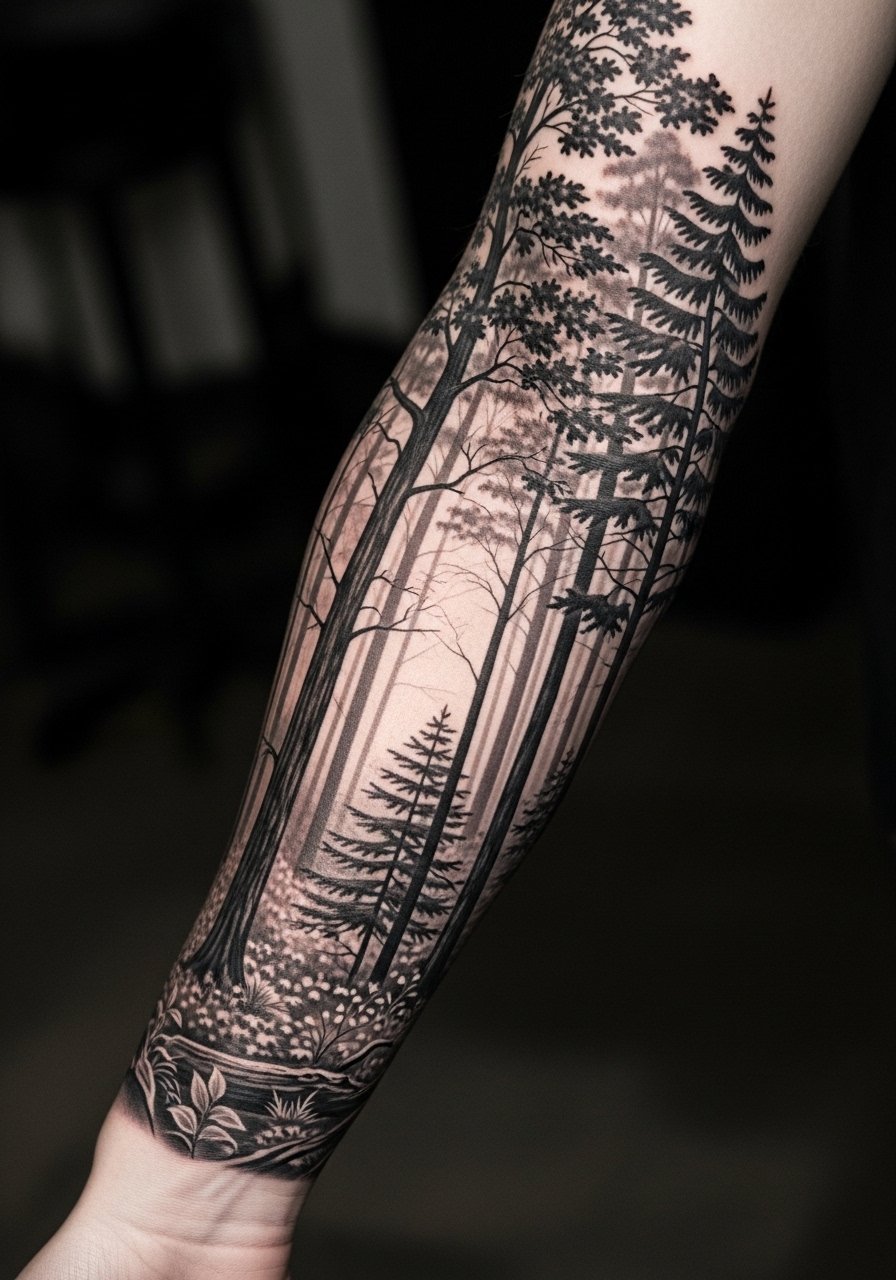
A forest sleeve is great for storytelling—each tree can represent a life chapter or growth phase. It requires an artist experienced in depth and bark texture so trunks don’t look flat. Expect longer sessions and more healing time between sittings; plan for layered shading and touch-ups. This style ages well in black-and-gray because contrast preserves form. A trap I’ve seen is trying to cram too many tiny details; opt for readable silhouettes at a distance and textured close-up detail. Ask to see healed sleeve photos from the artist.
4. Bare Winter Tree on Ribcage
Style/Technique: Minimalist / Blackwork
Pain Level: High (8/10)
Session Time: 1-2 sessions
Best For: Personal, symbolic pieces that can be hidden
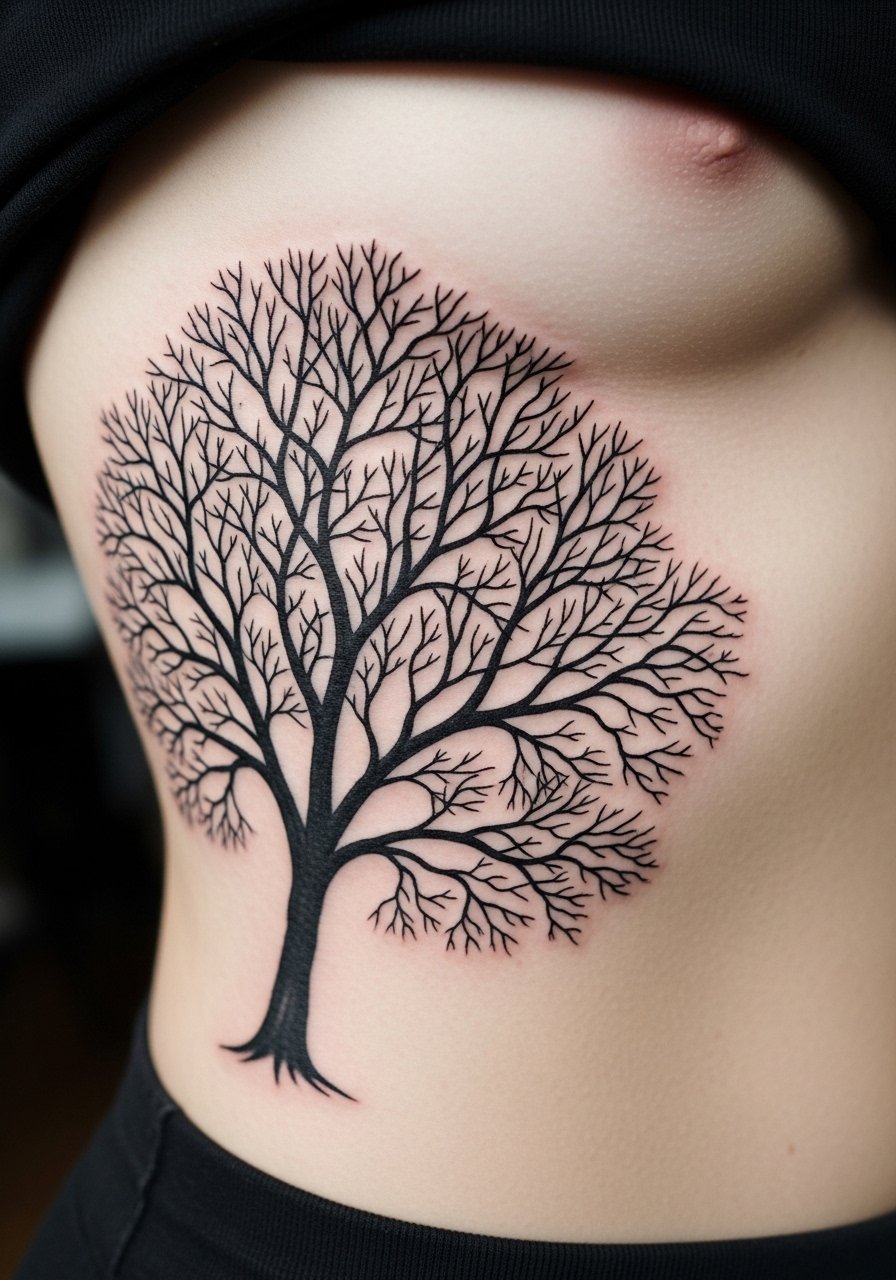
A leafless tree carries themes of resilience and endings leading to growth. The ribcage placement amplifies the emotional feel but is one of the more painful spots. Healing demands careful movement management and loose clothing to avoid rubbing. In my experience, bold branch lines and strategic negative space help the design stay crisp as it ages. Avoid overly fussy twigs that’ll blur; tell your artist you want readable branches in one to two directions so the silhouette remains strong.
5. Crescent Moon With Tree on Collarbone
Style/Technique: Neo-Traditional / Illustrative
Pain Level: Medium-High (6/10)
Session Time: 1-2 sessions
Best For: Feminine symbolism, cycle and intuition themes
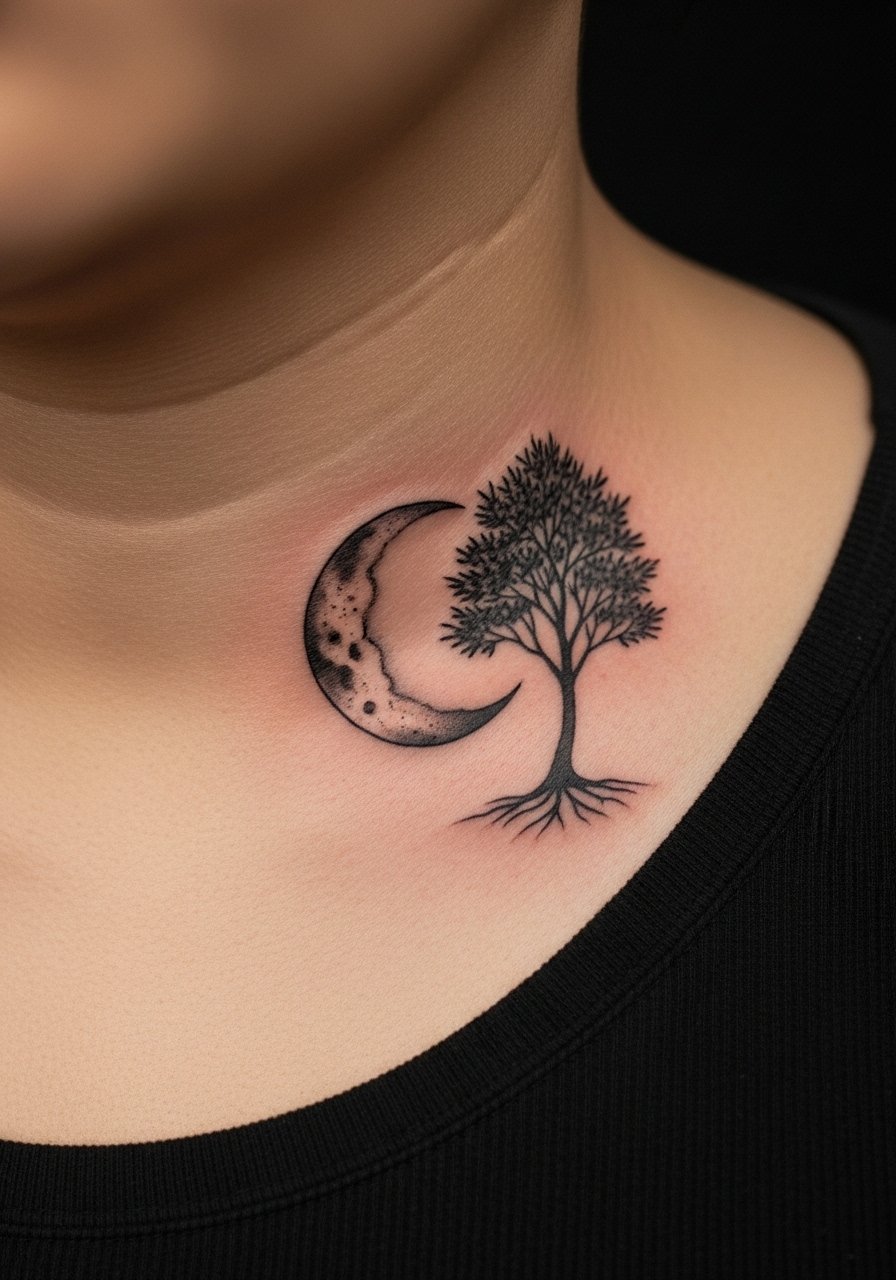
Moon-and-tree designs balance cycles and personal growth. The collarbone placement reads delicate but can sting more than the forearm. I like this for a symbolic piece you can show off or cover. Ask your artist for moon glow shading that won’t rely on pastel colors—those fade faster. From what I’ve seen, black ink moon outlines with soft gray shading age the best. A common mistake is putting the tree too low so the composition feels off on the collarbone—request a mock stencil before committing.
6. Oak Tree With Acorn On Bicep
Style/Technique: Traditional / Realistic
Pain Level: Medium (4/10)
Session Time: 1-2 sessions
Best For: Strength and wisdom motifs, bicep visibility
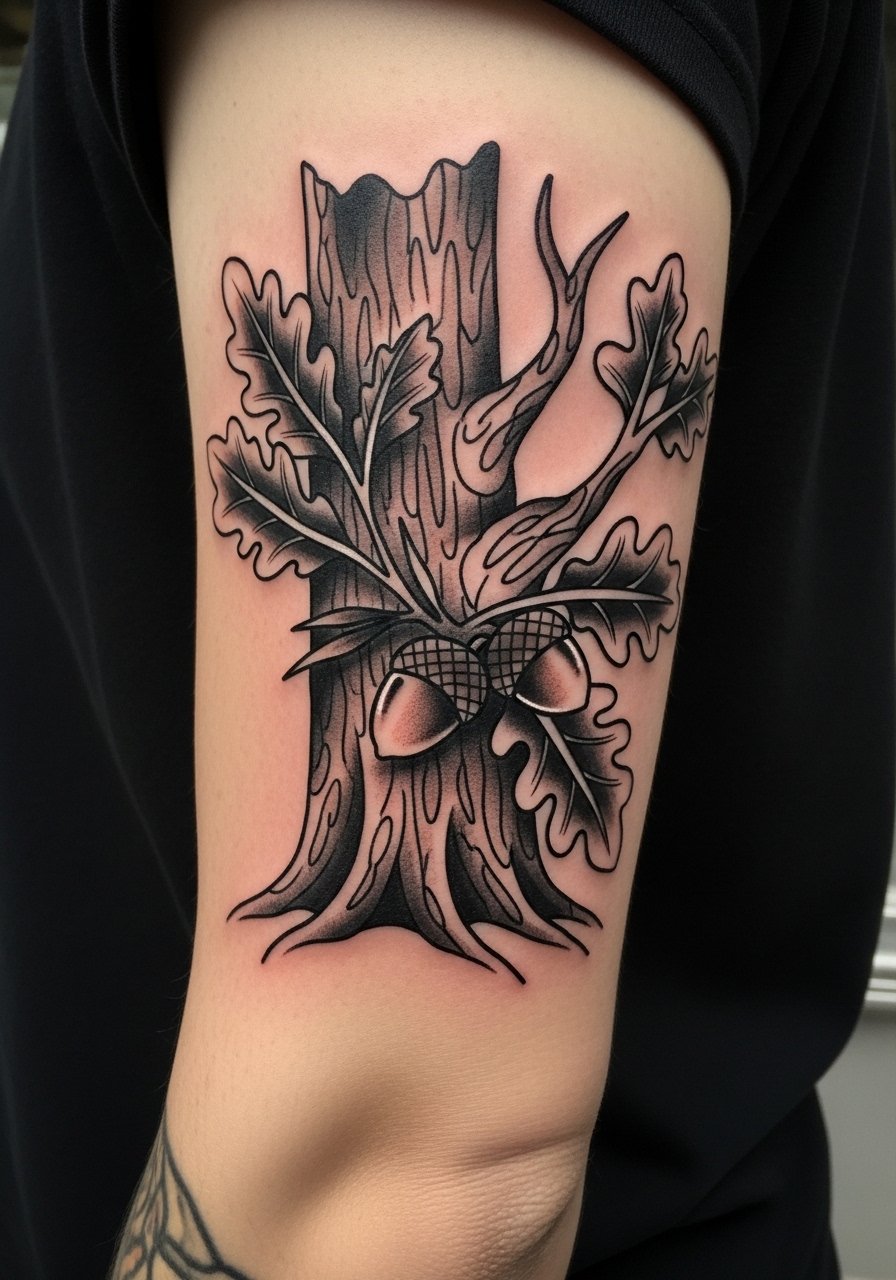
Oak symbolism is classic for strength and steady growth. On the bicep, it reads bold and can be expanded into a chest or sleeve piece later. Traditional linework with moderate color fills holds up well; however, bright yellows and pale greens fade quicker. I recommend strong black outlines and saturated leaf colors if you want color. Artists who do Norse or heritage-inspired pieces often nail oak motifs—bring references if you want Viking-style acorn details. Avoid tiny acorn decoration that won’t last; make primary shapes readable.
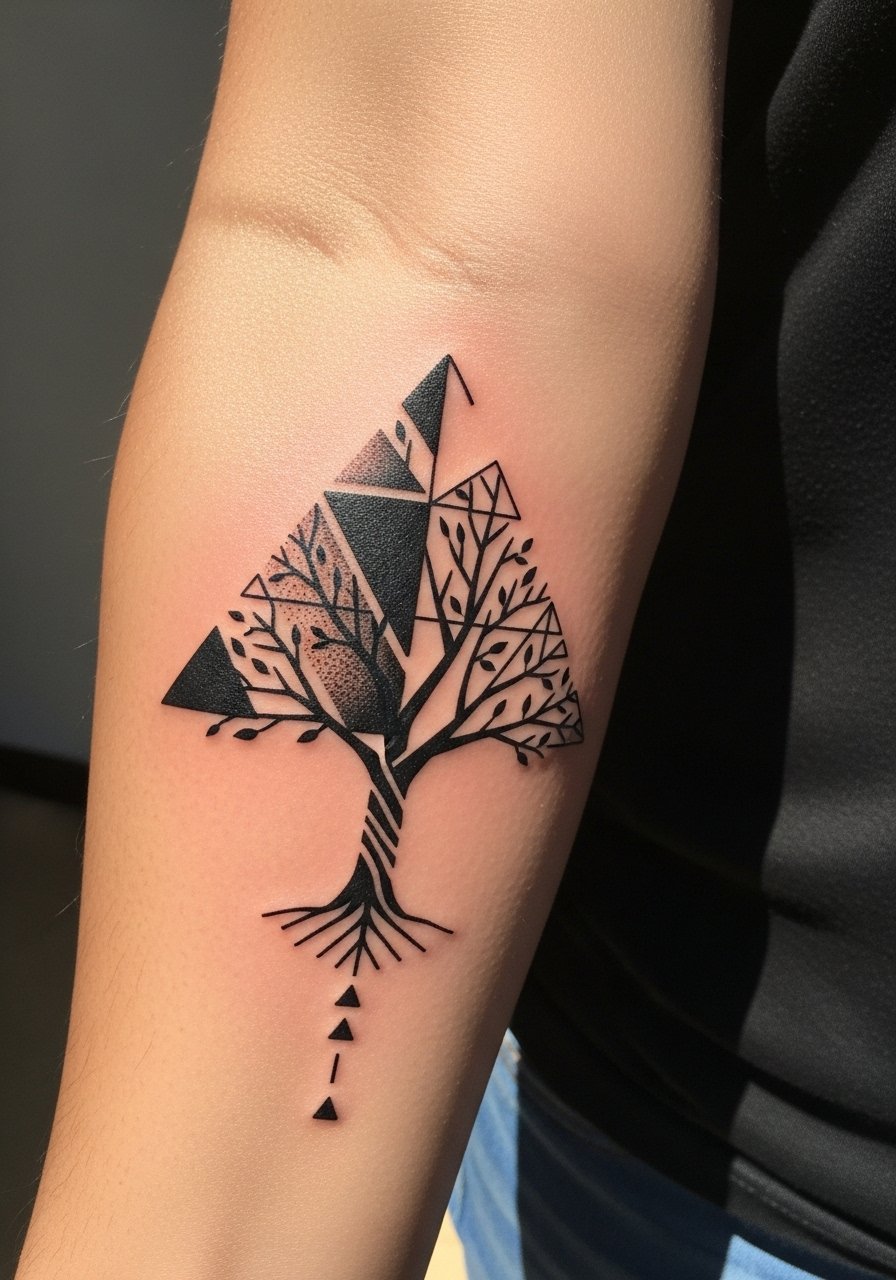
7. Geometric Tree Outline on Wrist
Style/Technique: Geometric / Minimalist
Pain Level: Low (2-3/10)
Session Time: 1 session, under 1.5 hours
Best For: Small tree tattoos, modern aesthetics
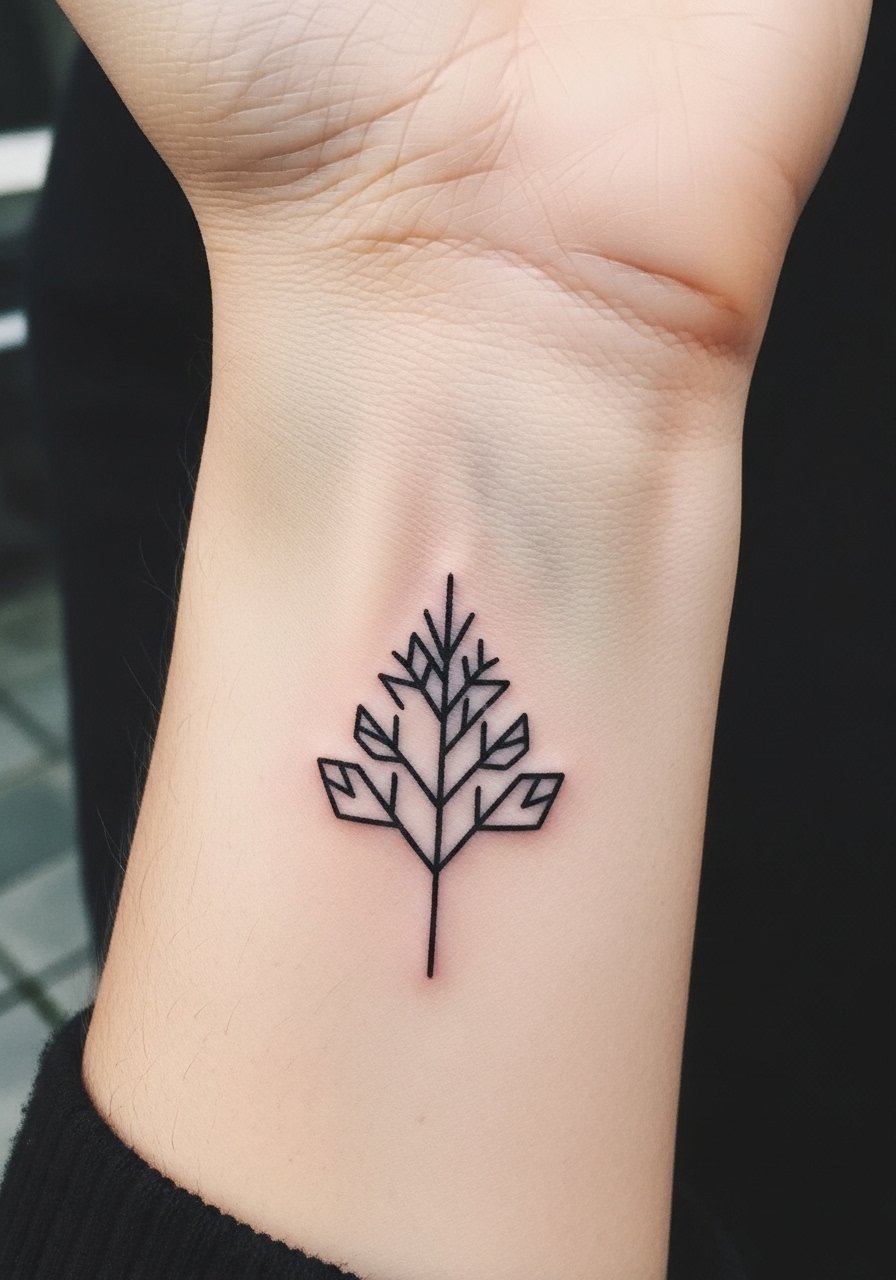
A geometric tree blends growth symbolism with modern lines. On the wrist it’s low-commitment and visible—good for small tree tattoos. Fine geometric elements need an artist with steady linework; I’ve seen triangles and root-hex patterns look sharp healed when lines aren’t too thin. Pain is manageable but expect touch-ups if lines are ultra-fine. Avoid overly dense dotwork in such a small area; ask for a healed mockup or stencil and portfolio examples of geometric work on wrists.
8. Realistic Tree Bark Texture on Upper Arm
Style/Technique: Realism / Textural Blackwork
Pain Level: Medium (5/10)
Session Time: Multiple sessions for texture
Best For: Nature lovers, tactile detail emphasis
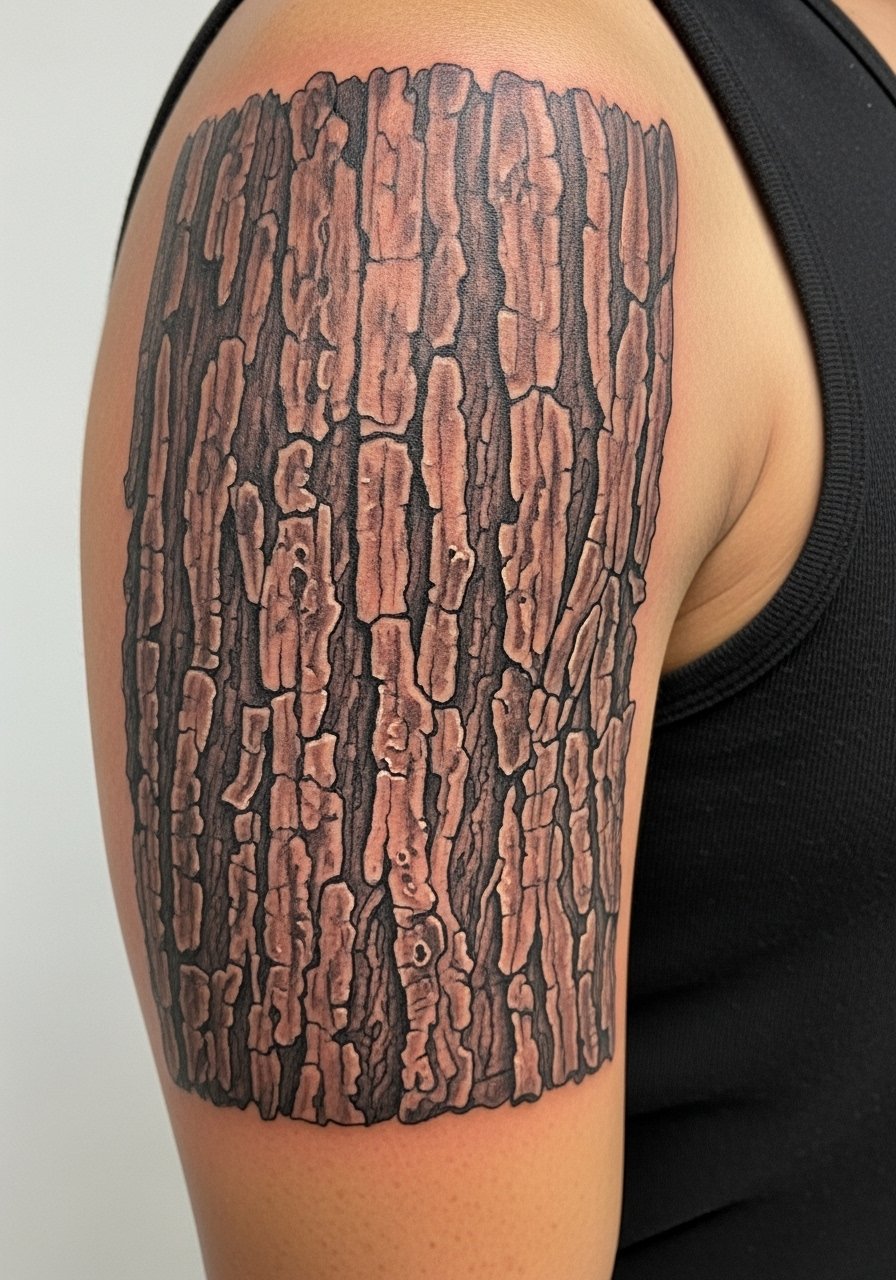
When you want the feel of a tree, bark texture does the heavy lifting. Upper arm has enough canvas for deep grooves and realistic shadows. Artists who specialize in realism and skin texture do this best—look for healed photos. Pain is moderate and sessions may be split to layer texture. From experience, black-and-gray bark holds its character longest; color distracts from texture unless expertly done. Common mistake: asking for hyper-detail in a tiny area—scale matters for long-term readability.
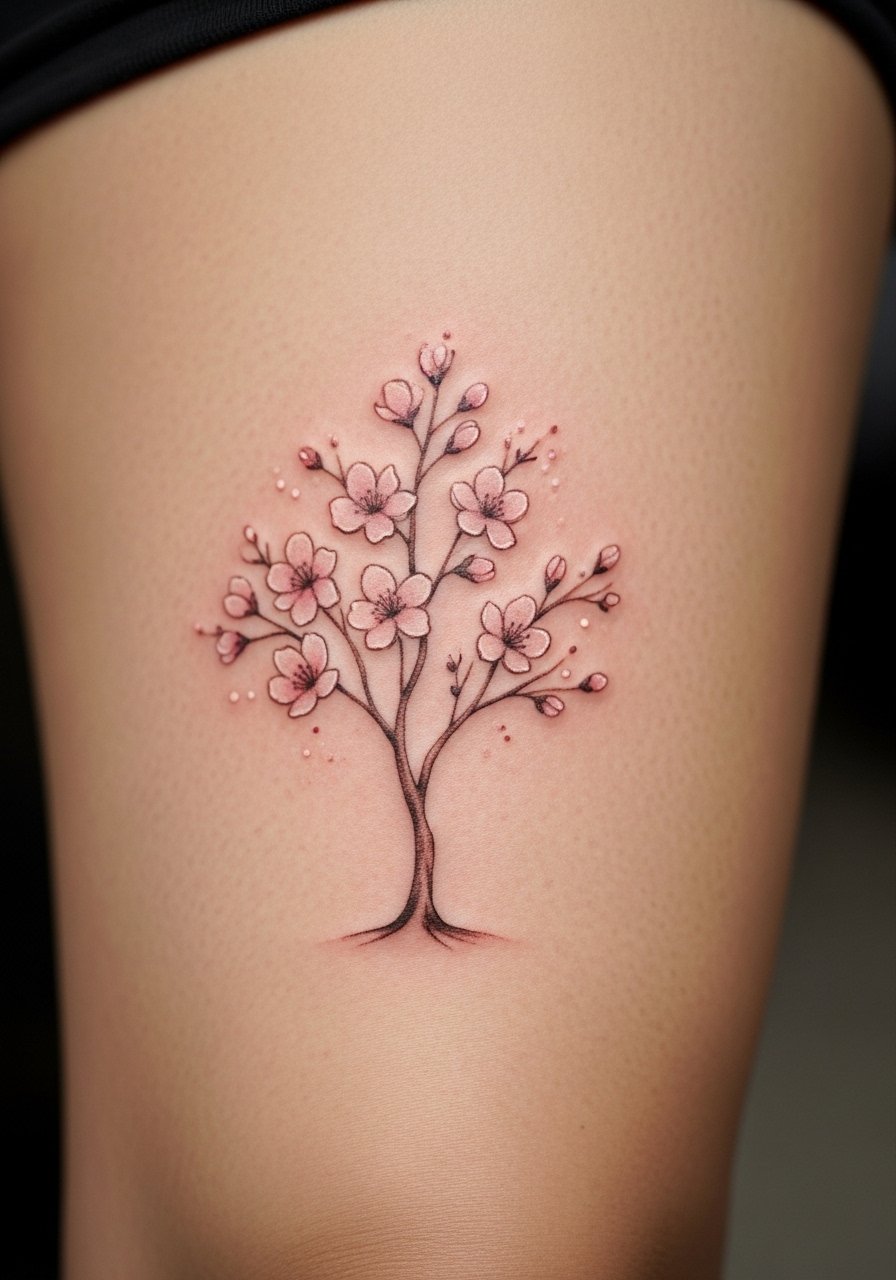
9. Blossoming Cherry Tree on Shoulder Blade
Style/Technique: Watercolor / Illustrative
Pain Level: Medium (4/10)
Session Time: 2-3 sessions
Best For: Feminine, transient beauty themes
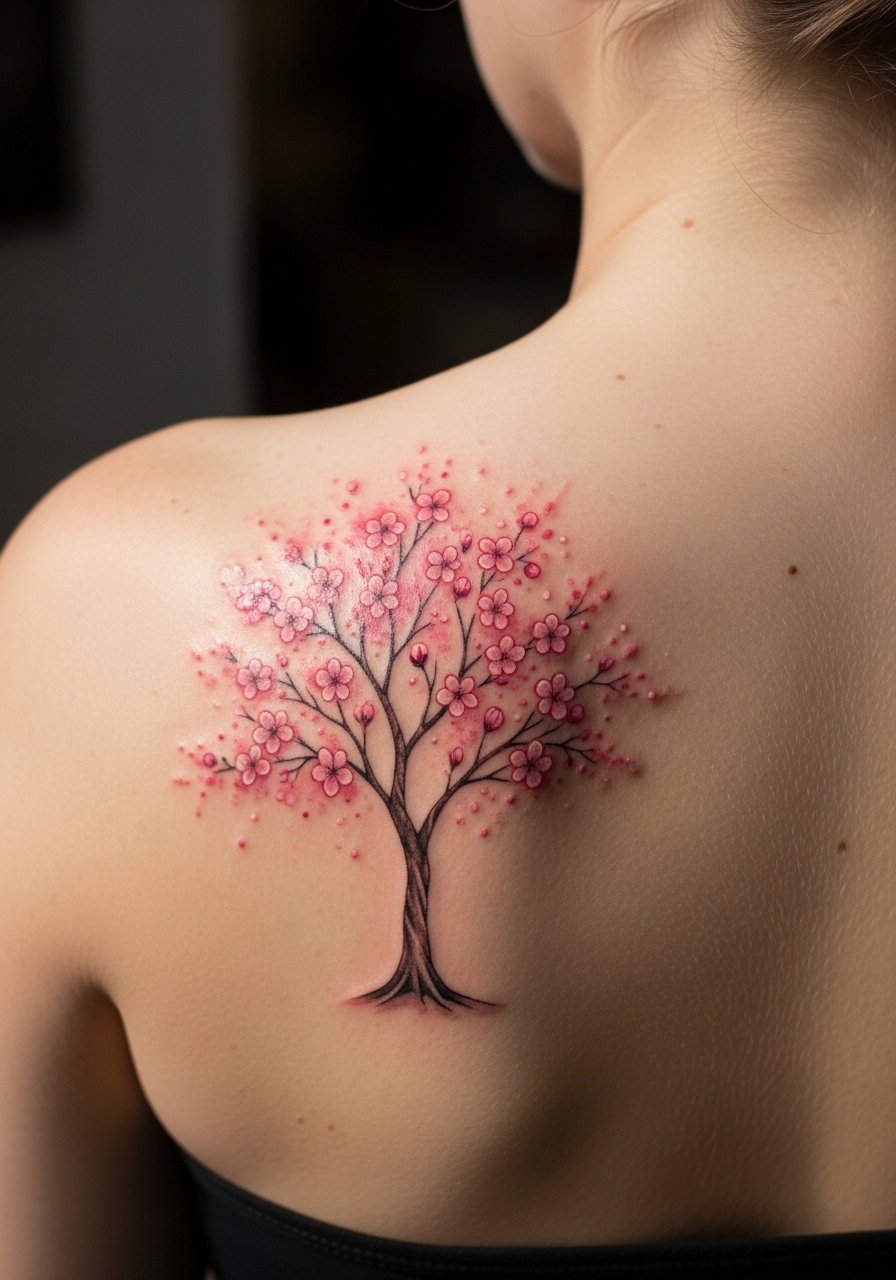
Cherry trees symbolize fleeting beauty and growth cycles. Shoulder blade placement lets the branches flow naturally with the body. Watercolor blossoms look soft and emotive but I’ve seen them fade faster—black outlines or dotwork centers help preserve shape. Expect moderate pain and careful sun protection during healing. Artists who post healed watercolor work are valuable to consult; ask to see color longevity examples. Avoid thin pastel washes alone—combine them with defined branch lines for staying power.
10. Small Bare Tree Finger Tattoo
Style/Technique: Fine Line / Minimalist
Pain Level: High (7/10)
Session Time: Short session, possible touch-up
Best For: Subtle symbolism, easy to hide with rings
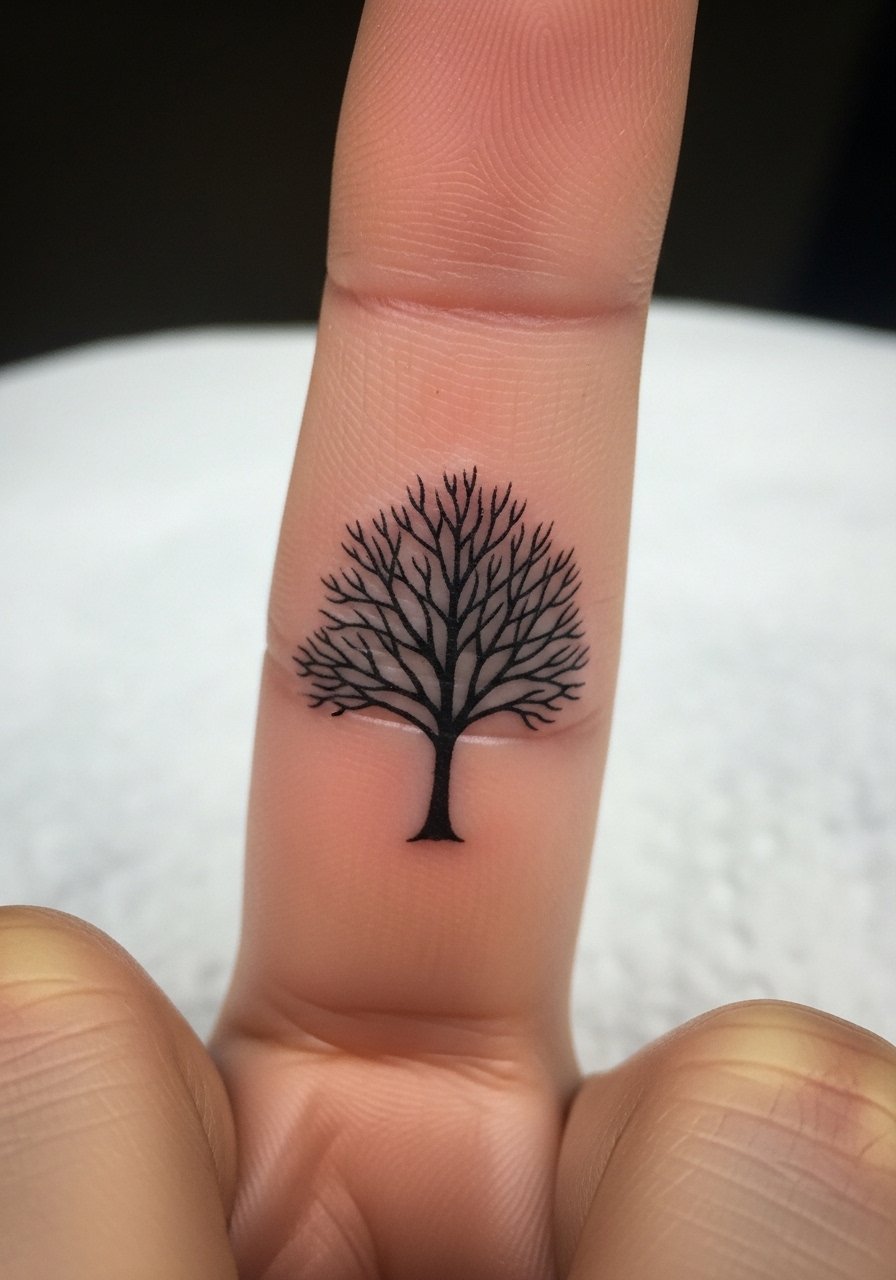
Fingers are intimate placements but notoriously high maintenance—ink fades faster there. A small bare tree can express personal change, but expect touch-ups. I took a friend’s advice and chose slightly bolder main lines for a finger piece; it held better. Keep hands moisturized but avoid over-washing during initial healing. A common mistake is choosing overly intricate finger designs; simpler silhouettes last longer. If you want longevity, consider a nearby placement like the wrist or ankle.
11. Tree Silhouette Behind Ear
Style/Technique: Silhouette / Fine Line
Pain Level: Low (3/10)
Session Time: 1 session under an hour
Best For: Micro tattoos, hidden growth symbols
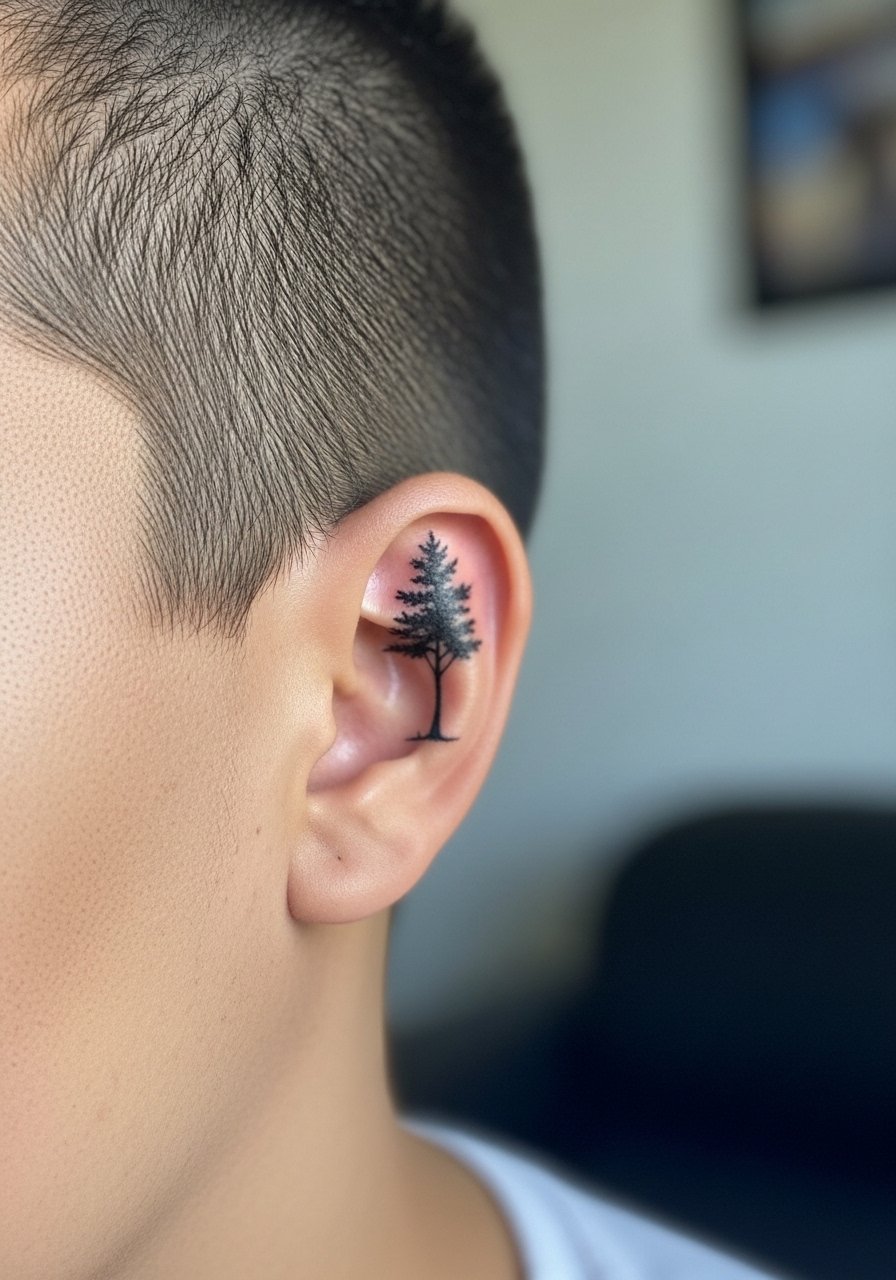
Behind-ear trees are discreet and personal. Pain is low and the piece heals quickly if you don’t irritate it with hair products. This location is ideal for small tree tattoos that symbolize private growth. I recommend solid black silhouettes rather than fine detail—detail blurs faster here. Ask your artist about stencil placement with hair pulled back so you can visualize it. Avoid placing it too close to the hairline where daily washing and oils can affect healing.
12. Interconnected Family Tree Roots on Forearm
Style/Technique: Illustrative / Blackwork
Pain Level: Medium (4/10)
Session Time: 2-3 sessions for root detail
Best For: Family symbolism, forearm visibility
A family-root piece is literal and beautiful when done with clarity. The forearm offers visibility and room to expand with names or small symbols. I like bold roots and negative space to keep the composition readable over time. Expect moderate pain and several sessions for dense rootwork. Avoid cramming too many tiny names into roots; for longevity, use initials or small symbols that won’t blur. Look for artists who show healed forearm blackwork.
13. Gothic Cathedral With Bright Tree Overlay on Full Back
Style/Technique: Neo-Traditional / Dramatic Back Piece
Pain Level: Very High (9/10)
Session Time: Many sessions across months/years
Best For: Large heritage pieces, dramatic storytelling
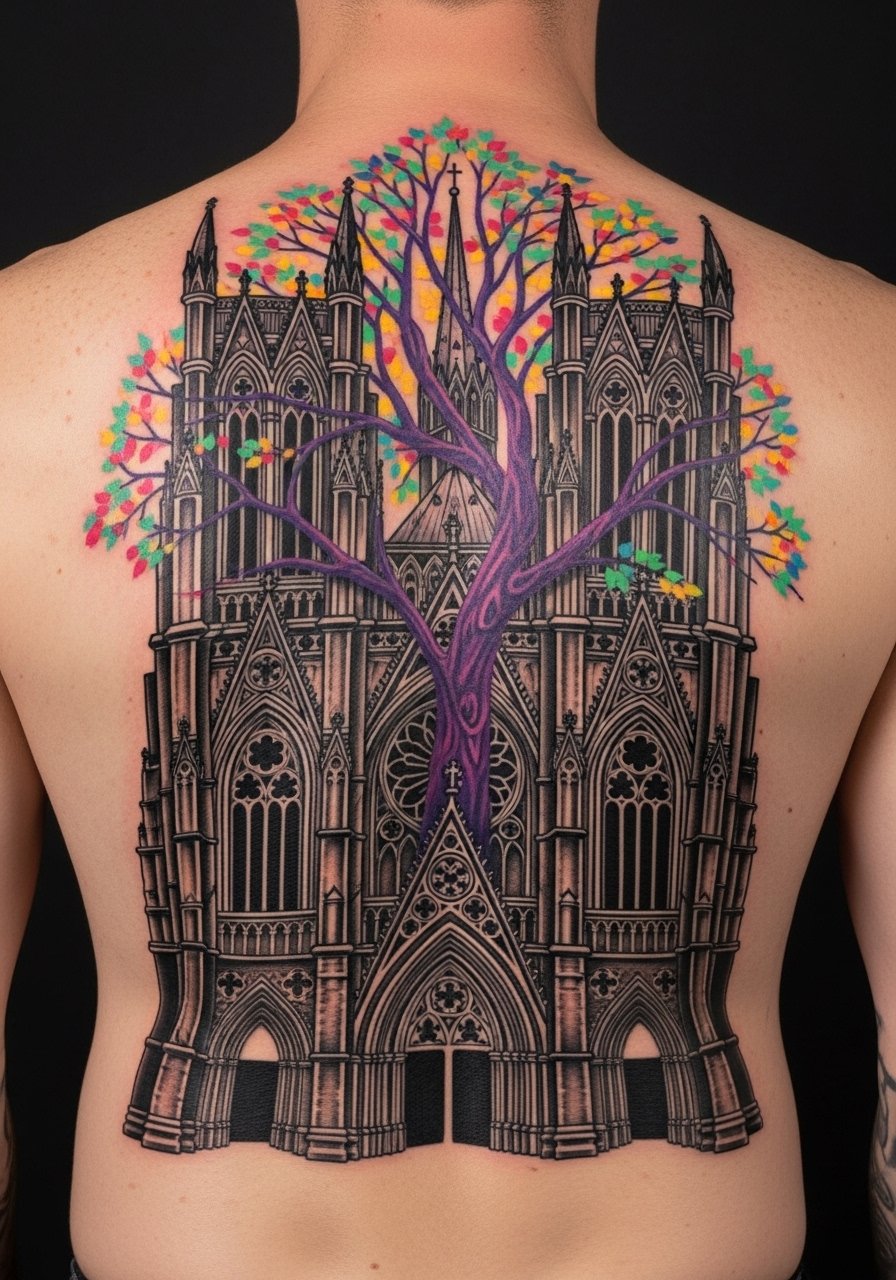
This under-covered idea mixes architecture and growth—heritage and rebirth in a single canvas. It’s a major commitment: long sessions, intense healing management, and progressive design planning. From what I’ve seen, the contrast between dark cathedral lines and a brighter tree overlay creates depth and a narrative feel. Artists who can balance architectural detail with color layers are rare; request healed progress photos. The common pitfall is overcrowding—plan your composition in stages and be patient.
14. Oak Leaf Minimalist Behind Ear or Wrist
Style/Technique: Minimalist / Micro
Pain Level: Low (2-3/10)
Session Time: Under 1 hour
Best For: Subtle wisdom symbol, first timers
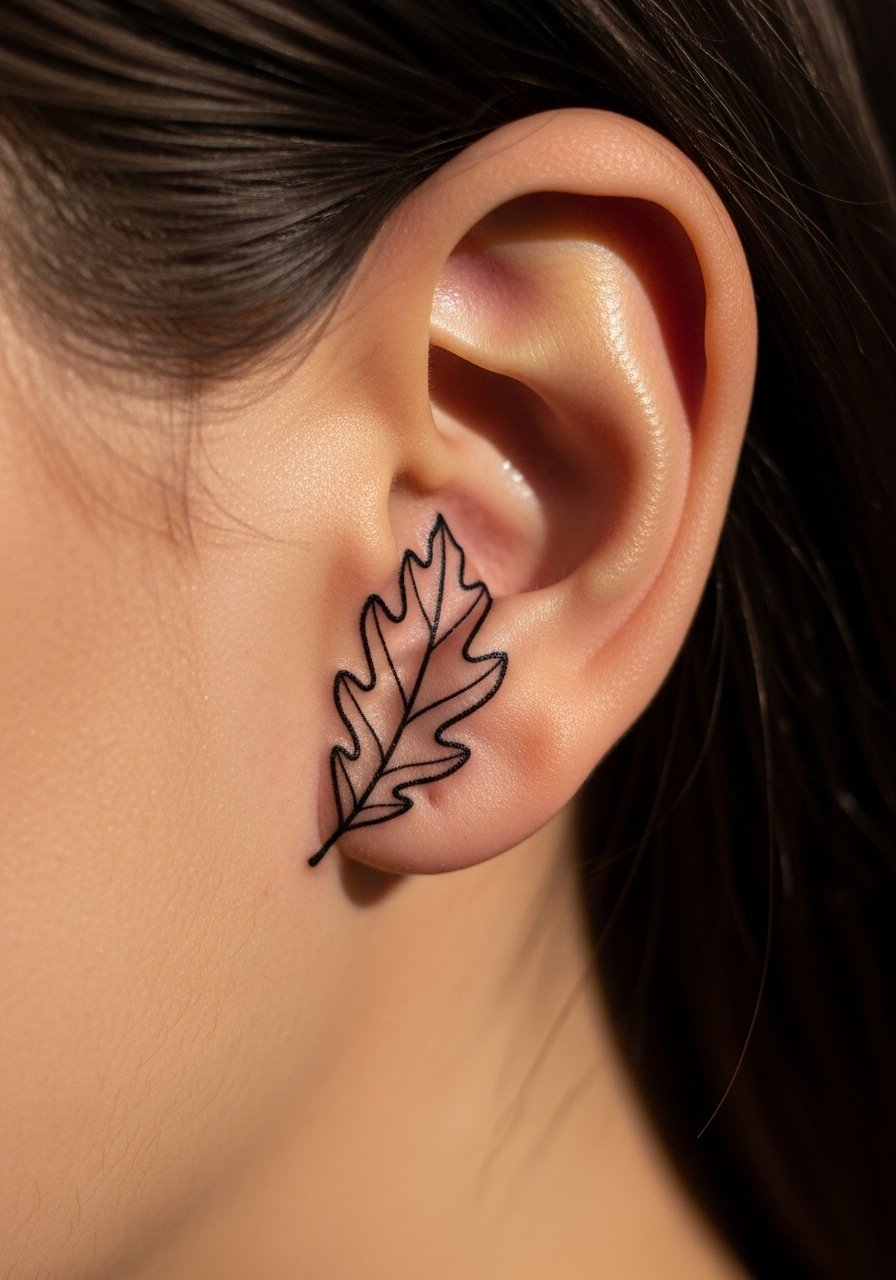
Tiny oak leaves are a low-commitment way to carry strength symbolism. I recommended this to nervous first-timers—placement behind the ear or on the wrist is discreet. Choose slightly thicker lines than you’d initially think; micro lines can blur within a year. For aftercare, be gentle and avoid friction. Artists who regularly do micro tattoos can show you healed examples on similar skin tones—ask for those before booking.
15. Geometric Family Tree On Inner Forearm
Style/Technique: Geometric / Minimalist-Illustrative
Pain Level: Medium (4/10)
Session Time: 1-2 sessions
Best For: Symbolic, modern family motifs
Geometric trees update the family-tree idea with clean lines and shapes. The inner forearm is easy to protect while healing and shows off the design. From my experience, symmetry and negative space are key—if the geometry is off, the whole piece looks awkward. Ask the artist to test the design as a stencil and check flow with your arm in motion. This style pairs well with small initials or birth-stone dotwork.
16. Pine Tree Line Work on Shoulder
Style/Technique: Fine Line / Silhouette
Pain Level: Low (3/10)
Session Time: 1 session
Best For: Timeless, outdoorsy vibe
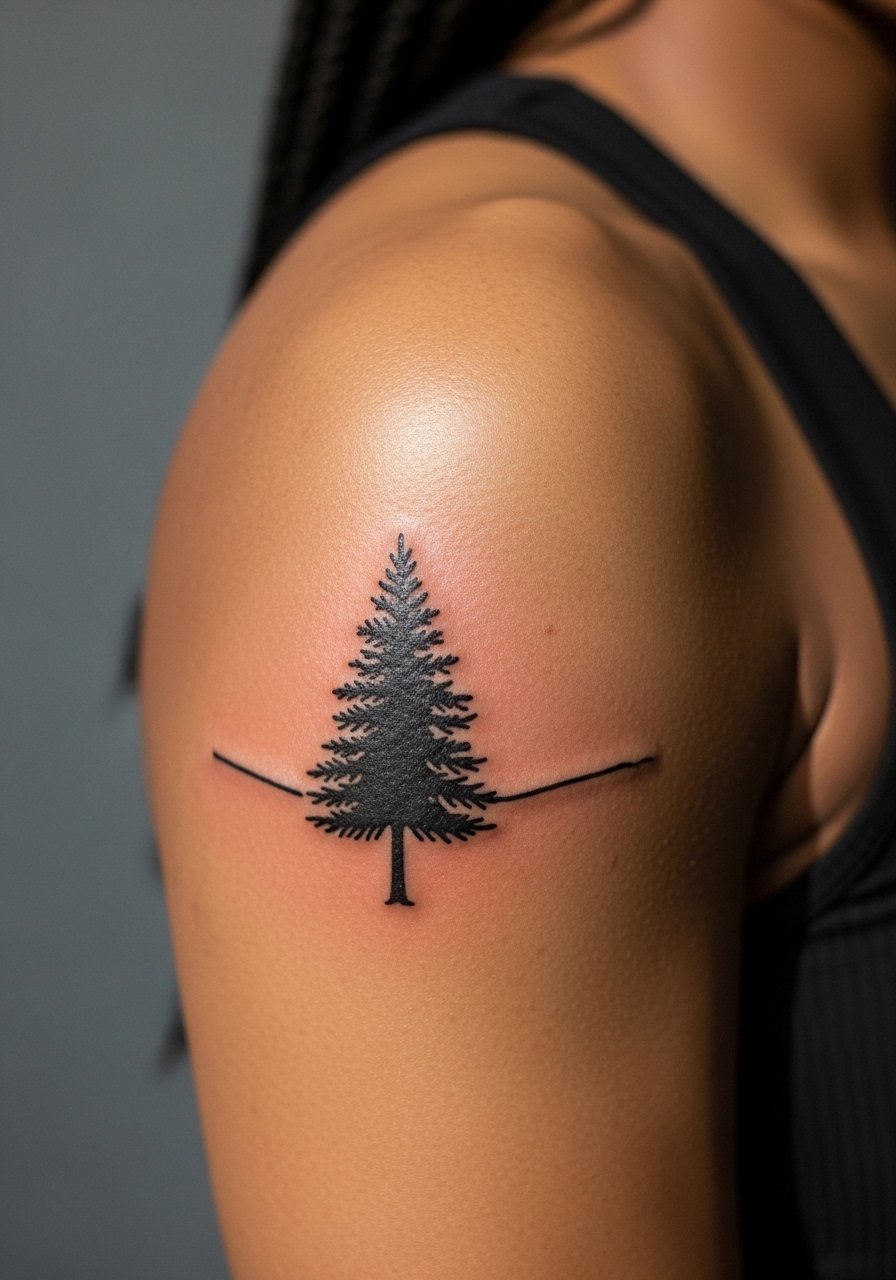
A shoulder pine is classic for endurance and steady growth. Shoulders are fleshy and tolerable in pain; the placement lets branches angle with your shoulder curve. I suggest slightly bolder silhouettes for better longevity. One mistake I see is overly delicate single strokes that fade into dots; request consistent line weight. This design is great if you want a nature-forward tree tattoo without huge commitment.
17. Blossoming Mini-Tree on Thigh
Style/Technique: Watercolor / Illustrative
Pain Level: Medium (4/10)
Session Time: 1-2 sessions
Best For: Larger small pieces, private placement
The thigh gives room for a blush of blossoms that feel intimate and personal. Watercolor choices look lovely but need strong underlying linework to survive fading. From what I’ve seen, thighs protect color well compared to hands or feet. Avoid super-thin color washes alone—pair them with defined branches or slightly darker centers in blooms. Plan for SPF protection when wearing shorts or swimsuits after healing.
18. Memorial Bare Tree With Dates on Ribcage
Style/Technique: Blackwork / Minimalist
Pain Level: Very High (8/10)
Session Time: 1-2 sessions
Best For: Memorial pieces, deeply personal symbolism
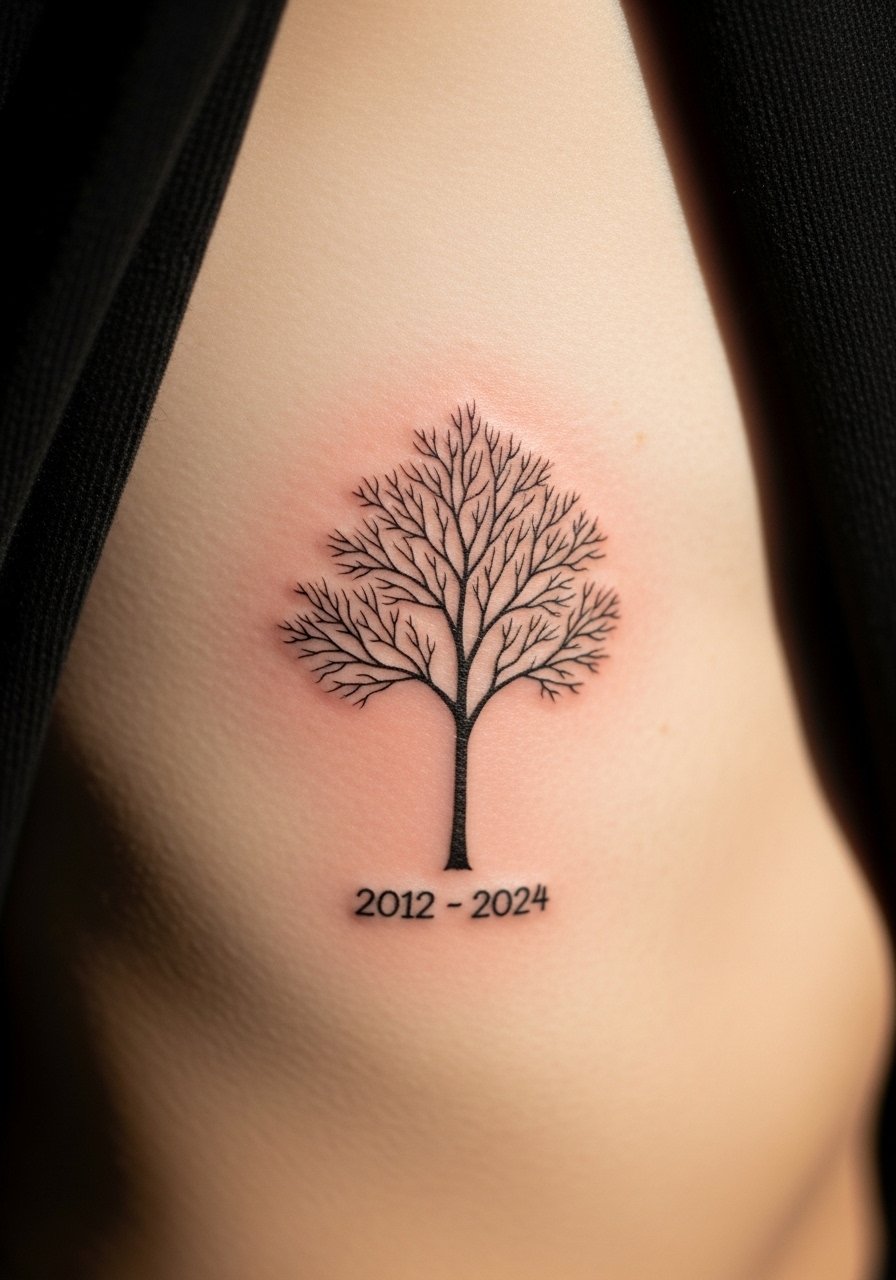
Memorial bare trees are poignant and intimate. Ribcage is a meaningful spot but expect significant pain. I’ve seen these designs act as quiet reminders of growth after loss. Keep linework bold enough to survive shifting skin and breathing movement during healing. A common error is tiny text that blurs; if you include dates, make sure the font is legible at healing photos. Use gentle aftercare and rest to avoid disrupted healing.
19. Tiny Seedling On Ankle
Style/Technique: Minimalist / Tiny Realism
Pain Level: Medium (4/10)
Session Time: Under 1 hour
Best For: Symbol of new beginnings, beginner-friendly

A seedling is literal growth—great as a first tattoo or a renewal symbol. Ankles can be stingy in pain but are easy to hide. Keep the design simple; delicate seedlings read nicely if lines aren’t too thin. Protect from shoes rubbing during healing. I advise slightly reinforced main lines and a clear stencil preview so the scale reads how you expect on the ankle.
20. Willow Tree On Throat Or Sternum (Feminine Growth)
Style/Technique: Neo-Traditional / Illustrative
Pain Level: High (8/10)
Session Time: 1-3 sessions depending on size
Best For: Statement of emotional growth, central placement
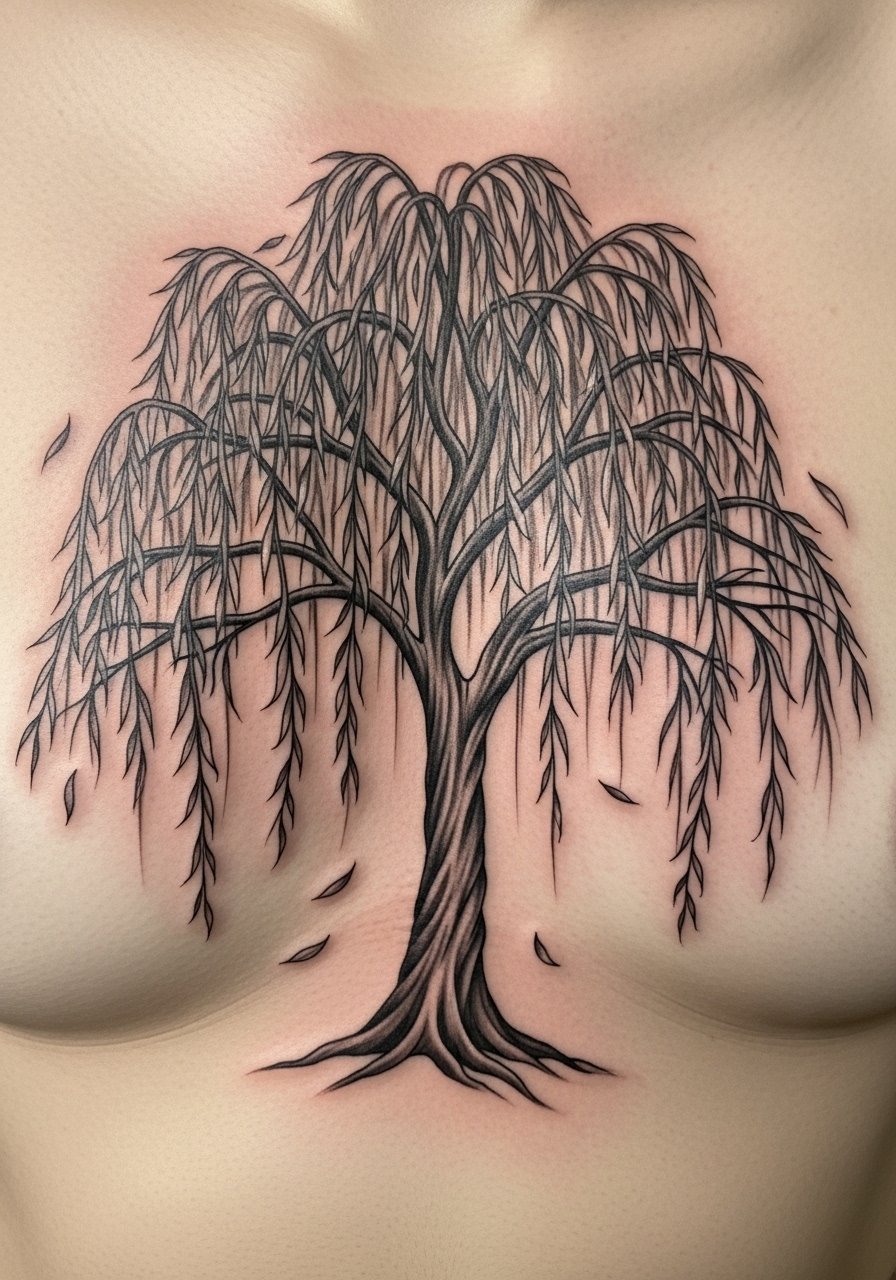
Willows have a gentle, flowing energy that feels protective and introspective. Sternum or throat placements are bold and painful but intimate. If you want a central growth symbol, this works—but be realistic about healing (movement, clothing). I recommend black-and-gray shading to keep contrast strong. Avoid overly busy branch tangles; a readable silhouette keeps the piece meaningful as it ages.
21. Tree Silhouette With Birds Flying Off On Clavicle
Style/Technique: Silhouette / Minimalist with Motion
Pain Level: Medium (4/10)
Session Time: 1 session
Best For: Growth and release symbolism, visible with neckline clothing
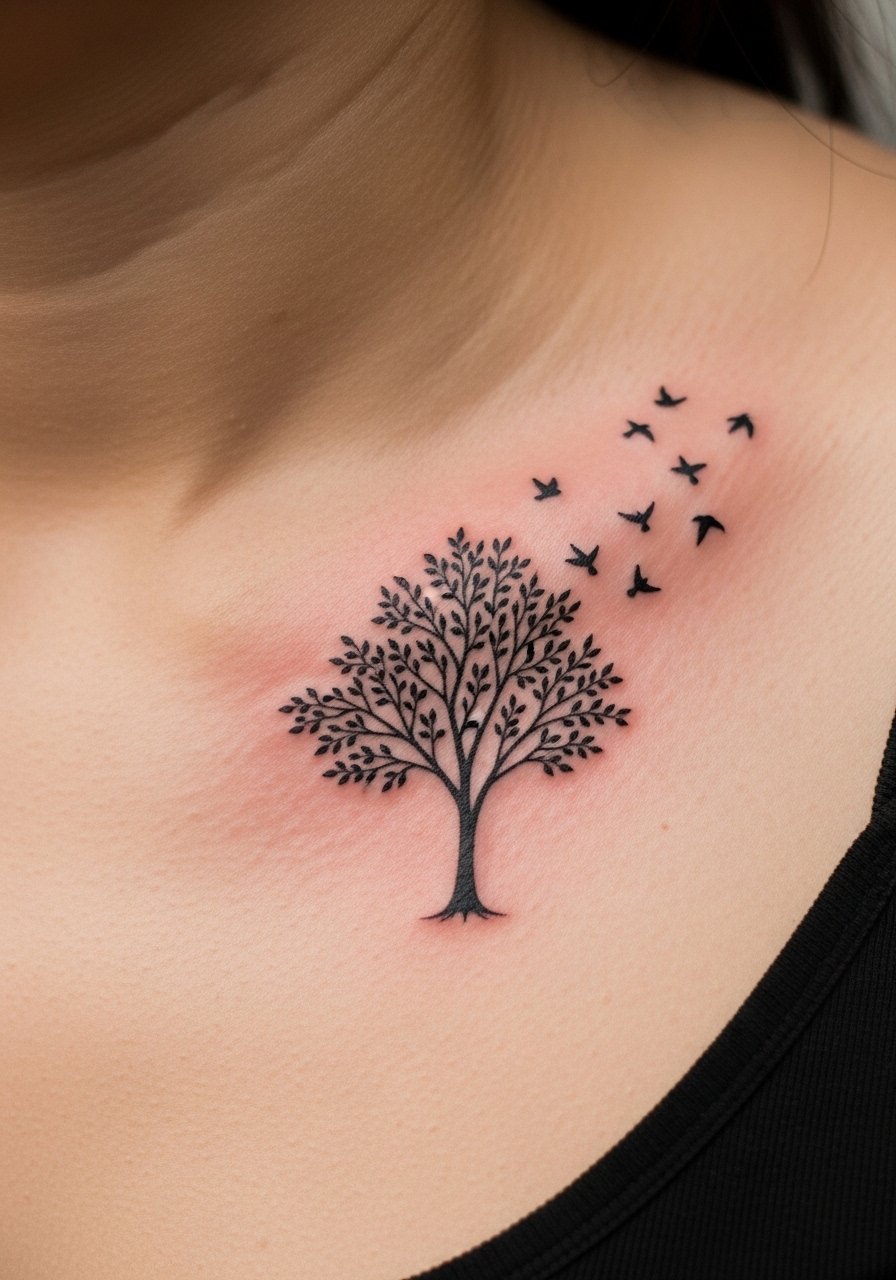
Adding birds symbolizes release and movement forward. The clavicle shows this composition elegantly and the pain is moderate. I like this when you want a narrative of growth: rooted tree plus outward motion. Keep birds small but bold enough; micro-dot birds can fade. Tell your artist the spacing you want—birds too close to branches look cramped in healed photos.
22. Stone-and-Tree Family Marker On Hip
Style/Technique: Illustrative / Small Realism
Pain Level: Medium (5/10)
Session Time: 1-2 sessions
Best For: Family symbolism with discreet placement
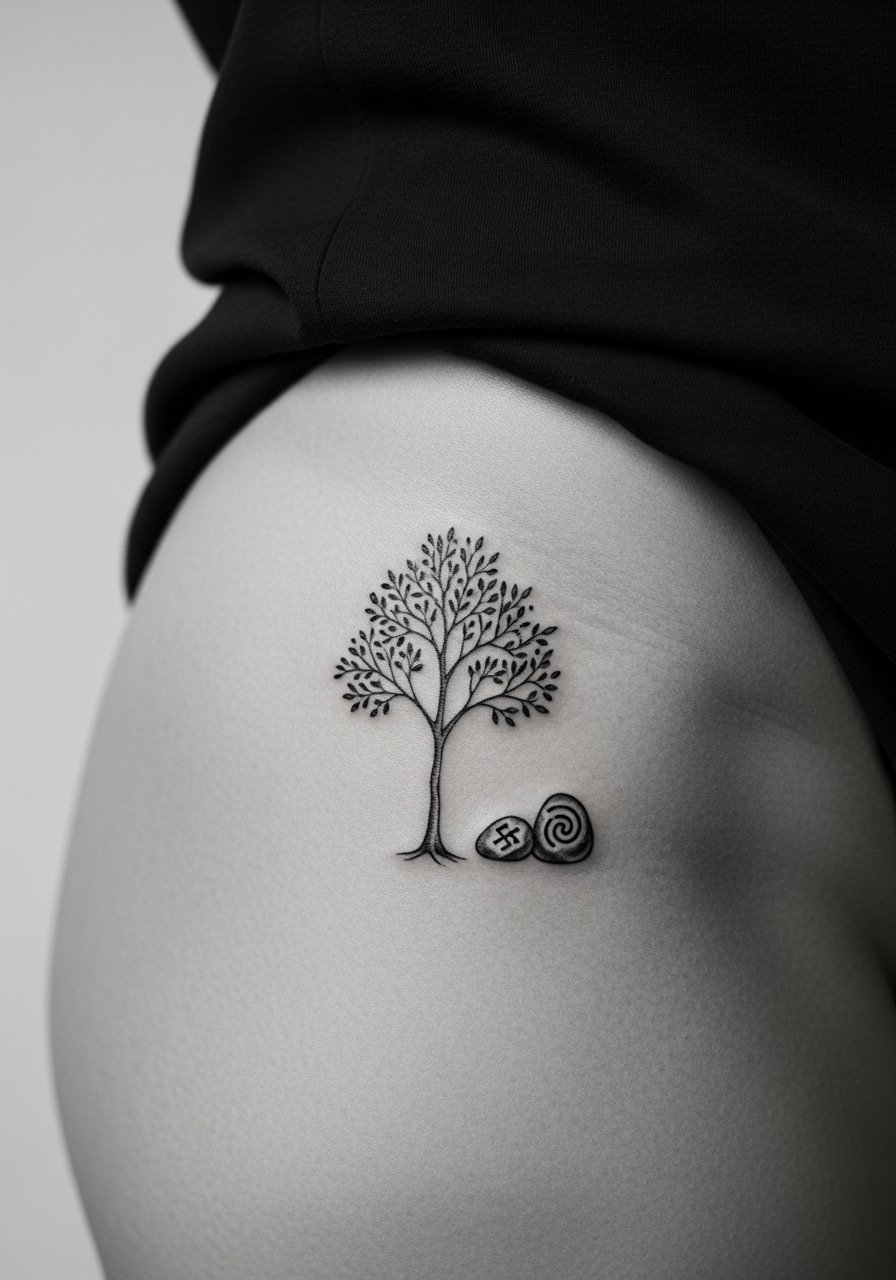
This unique idea uses stones or pebbles to represent children or family members beside a tree—personal and subtle. The hip is private and heals well under clothing if not too tight. I’ve seen clients add initials as small stone engravings; keep lettering bold enough to survive. Artists who've done tiny symbolic family work are best—bring reference photos and discuss long-term readability.
23. Geometric Roots Down the Spine
Style/Technique: Geometric / Blackwork
Pain Level: High (7-8/10)
Session Time: Multiple sessions for alignment and symmetry
Best For: Centered symbolism, long-line body flow
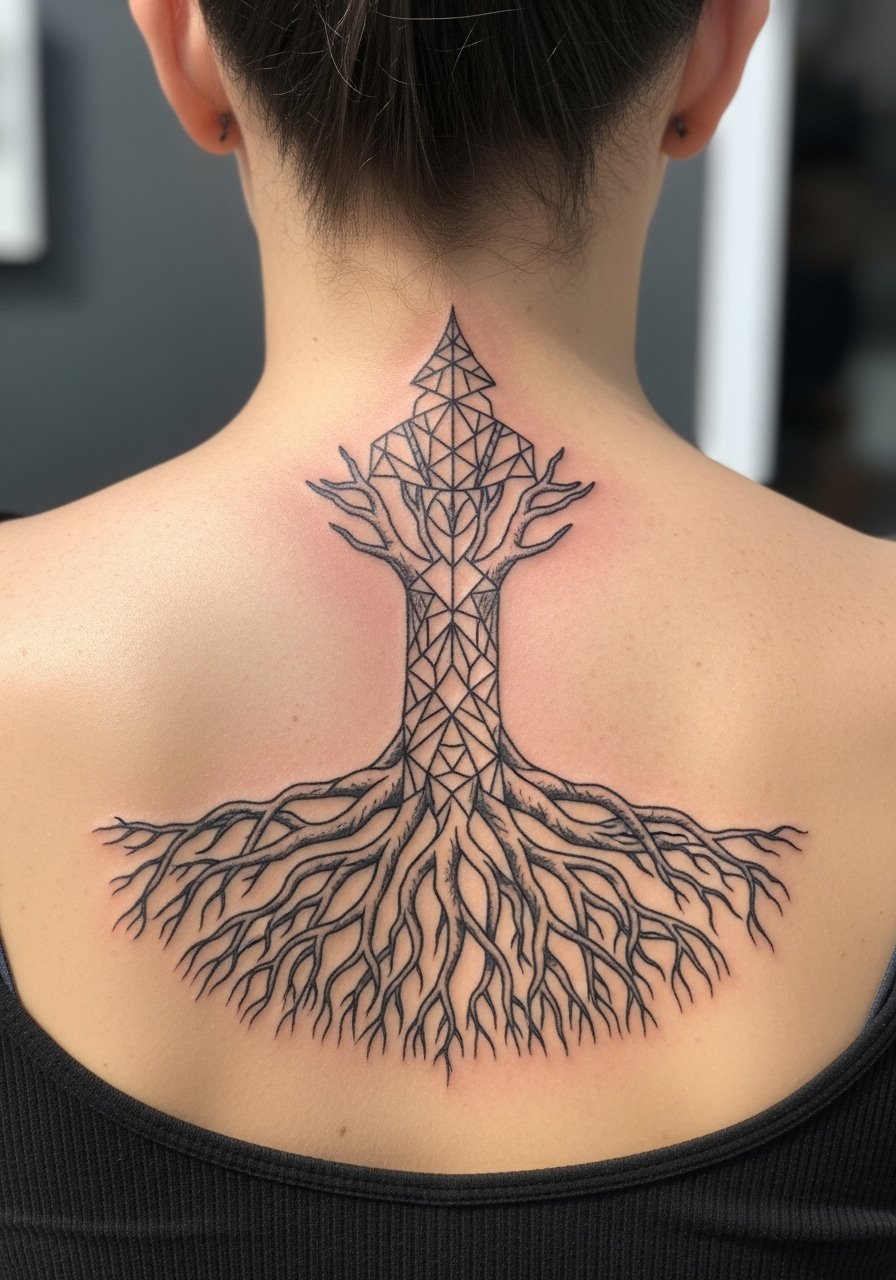
Spine pieces make a literal backbone of your growth story. Geometric roots emphasize structure and renewal. The spine is painful but the vertical flow looks stunning healed when symmetry is precise. I advise multiple sessions and precise stenciling. Avoid overly tiny geometric elements that can blur into a gray patch; seek an artist with experience in long vertical blackwork.
24. Micro-Realism Bonsai On Inner Wrist
Style/Technique: Micro-Realism / Fine Detail
Pain Level: Medium (4/10)
Session Time: 1 session with possible touch-up
Best For: Small symbolic control and growth motifs
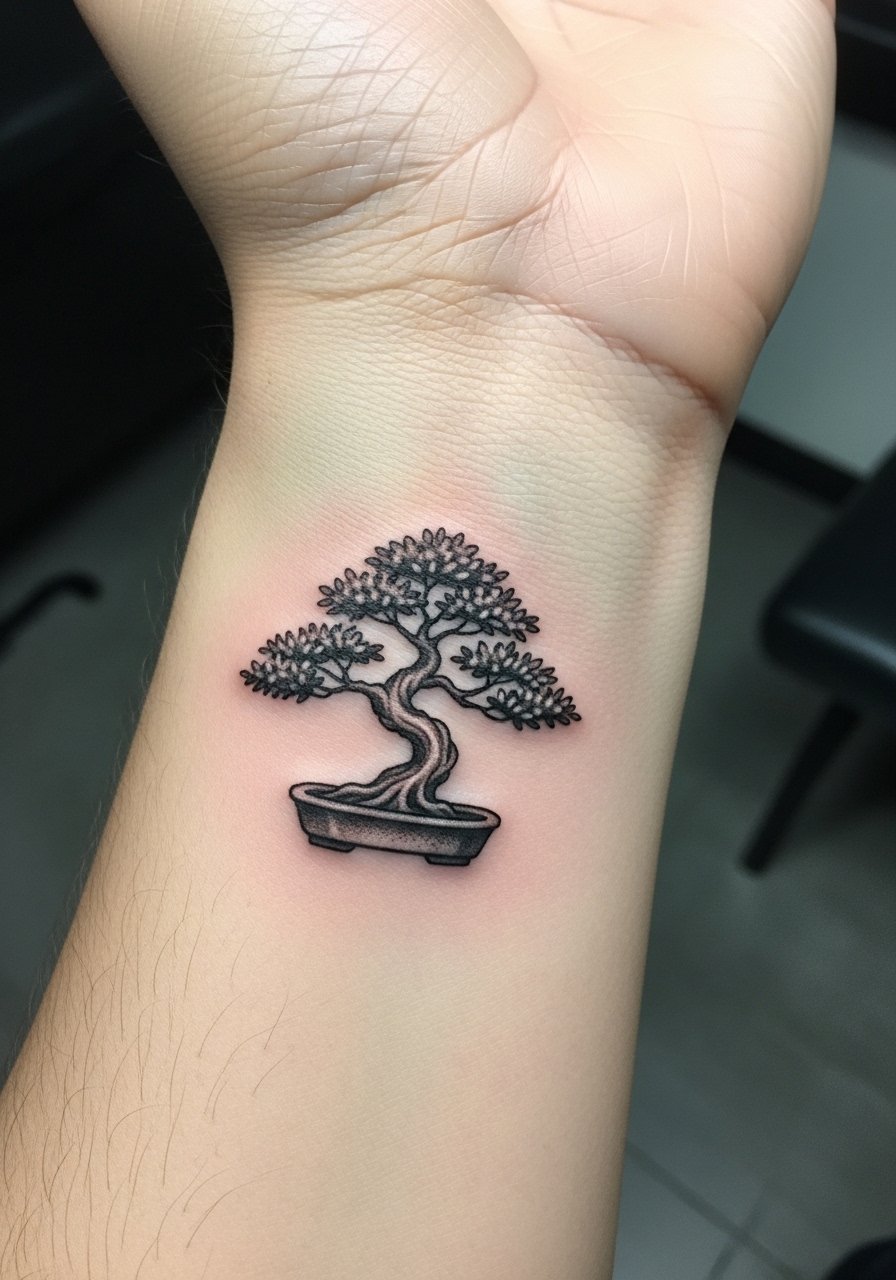
A bonsai captures curated growth and personal discipline. On the inner wrist it’s visible and intimate—great if you want a daily reminder. Micro-realism requires an artist with a steady hand; I always ask to see healed micro work before booking. Expect potential touch-ups; wrists are exposed to sun and washing. Choose clear contrast and avoid too many tiny leaves.
25. Moon-Tree Feminine Balance On Collarbone (Subtle Cycle Symbol)
Style/Technique: Neo-Traditional / Minimalist Illustrative
Pain Level: Medium (5/10)
Session Time: 1-2 sessions
Best For: Cycle, intuition, and feminine energy symbolism
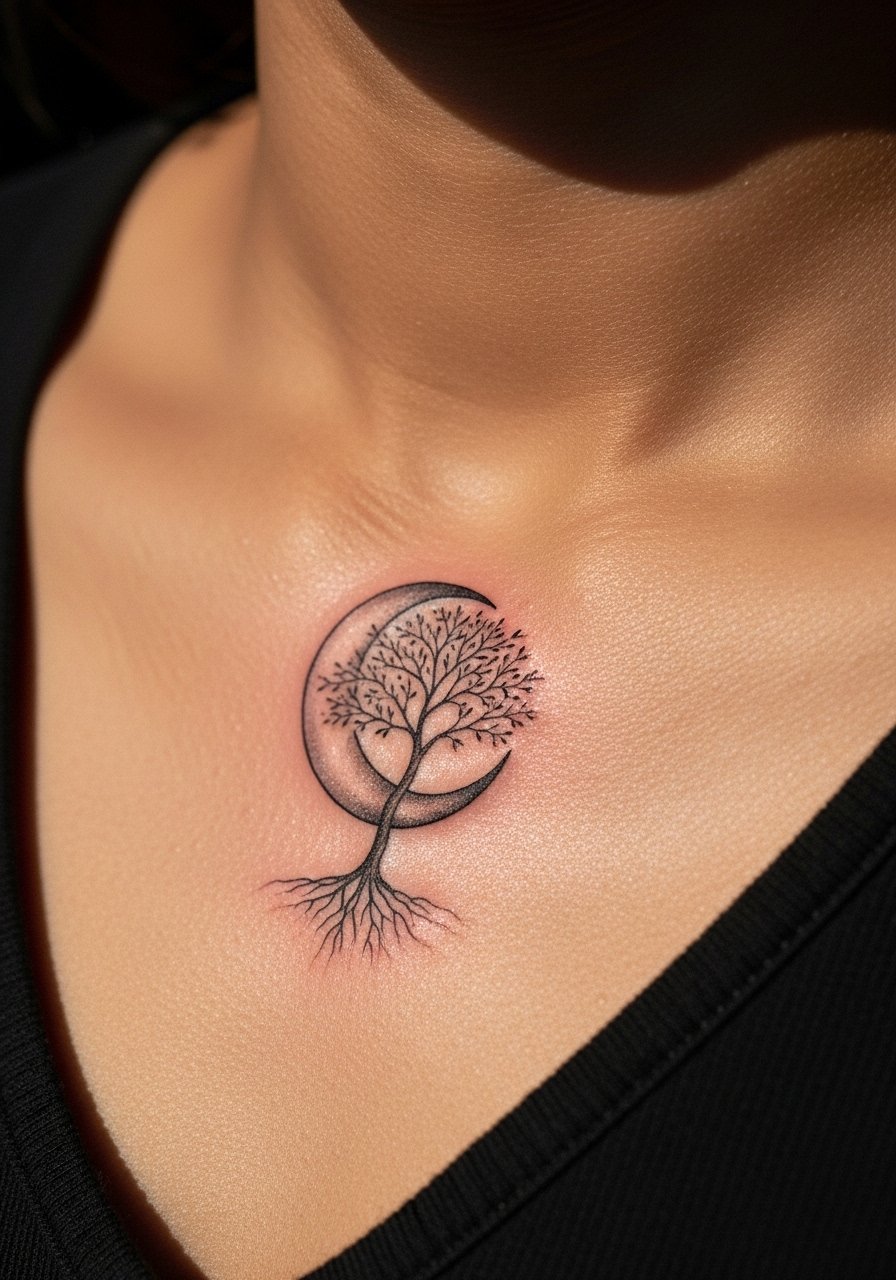
This is one of my favorite under-covered ideas: a moon cradling a tree that reads of cycles, fertility, and personal growth. Collarbone placement is visible and elegant; expect a bit more sting than the forearm but it heals beautifully with proper care. I recommend grayscale moon glow rather than pastel tones so it ages well. Ask your artist about healed examples of moon motifs and how they hold up on your skin tone.
Tattoo Prep and Aftercare Essentials
Aftercare Essentials:
- Aquaphor Healing Ointment, 14oz tube — Use first 3-5 days to prevent drying and scabbing
- Saniderm Transparent Adhesive Bandage, 6-inch roll — Second-skin option for the initial 24-48 hours
- CeraVe Fragrance-Free Moisturizing Lotion, 12 oz — Daily moisturizer during weeks 2-4
- Dr. Bronner's Unscented Castile Soap, 32oz — Gentle cleanser for the first week
Before Your Appointment:
- Tattoo Numbing Cream 5% Lidocaine — Apply only if your artist approves, 30–45 minutes before
- Tattoo Stencil Transfer Paper — Handy if you and your artist want to tweak at home
Long-Term Maintenance:
- SPF 50 Sunscreen Stick for Tattoos — Daily protection to slow fading
- Mad Rabbit Tattoo Balm, 2oz — Keeps healed tattoos vibrant and moisturized
- Hustle Butter Deluxe, 4oz — Vegan aftercare alternative many artists recommend
Optional Comfort Items:
- Tattoo Numbing Spray — For touch-ups or very sensitive areas (ask artist)
- Hydrocolloid Bandages (Large) — Useful for small tattoos or blister-like healing spots
Artists I talk with often name Aquaphor, Saniderm, and fragrance-free lotions as genuinely recommended; Hustle Butter or Mad Rabbit are popular alternative choices. I keep the SPF stick in my bag year-round.
Frequently Asked Questions
Q: How bad does a tattoo actually hurt?
A: Pain varies by placement and tolerance. Forearm and bicep are usually low-to-moderate for me; ribs, spine, and ankle feel much sharper. It’s more like a persistent scraping or burning than a single sharp jab. For sensitive spots, ask an artist about tattoo numbing cream 5% lidocaine—it helps reduce intensity but doesn’t remove sensation fully.
Q: How do I pick a tree design I won’t regret?
A: Sit with an idea for a few months and test placements with temporary tattoos. I recommend timeless symbols—Tree of Life, oak, or a simple silhouette—over flash trends. Bring reference photos and ask artists to show healed examples of similar tree tattoos so you can picture long-term wear.
Q: What’s the best tree tattoo placement for minimal pain?
A: Outer forearm, upper arm, and calf are usually the least painful. Inner ribs, spine, and ankle tend to be higher on the pain scale. If you want low pain and visibility, the forearm or bicep is a reliable pick.
Q: How do I keep my tree tattoo from fading?
A: Sunscreen is essential—use an SPF 50 sunscreen stick daily on exposed tattoos. From what I’ve seen, black-and-gray work holds up best; watercolor needs more maintenance. Keep skin moisturized with a fragrance-free lotion like CeraVe.
Q: Can I exercise right after getting inked?
A: Wait at least 48–72 hours before intense workouts. Sweat can irritate a fresh tattoo and raise infection risk. For joint or flex-area tattoos, wait longer. During the first week, prioritize light movement and keep the tattoo clean with a gentle soap like Dr. Bronner’s Unscented.
Q: Do tree tattoos look different on different skin tones?
A: Yes. Black and gray maintain contrast across tones; bright pastels can read differently on deeper skin. I always ask to see healed photos on similar skin tones. For color, discuss saturation and contrast with an artist experienced in your skin tone.
Q: What common aftercare mistakes should I avoid?
A: Don’t pick scabs, don’t over-apply ointment for weeks, and don’t expose fresh tattoos to direct sun or soaking (pools, baths). Many artists prefer starting with Aquaphor for the first few days, then switching to a light fragrance-free lotion.
Q: Is starting with a small tree a good idea for first-timers?
A: If you genuinely want a small tree, yes. It’s tempting to get a micro just to “test” pain—don’t get something you don’t love just for experimentation. If nervous, pick a meaningful tiny oak leaf or seedling on a low-pain spot and consult about long-term line weight so it ages well.
