
I spent months stalking tattoo feeds before I booked my first star piece. The hard part wasn’t finding pretty designs — it was picking a style that actually holds up, reads well on my skin, and means something I won’t tire of. These 26 minimal star tattoos are styles I kept seeing in portfolios and on friends in 2026, plus the placement and aftercare tips I learned the hard way.
This list focuses on small star tattoos — fine line, geometric, micro-realism, and a few colorful pieces. They work well on hands, wrists, collarbones, and ankles. I’ve noticed fine line star tattoos and celestial tattoo ideas dominate feeds, but I also include under-covered options like red-ink stars and handpoke alternatives.
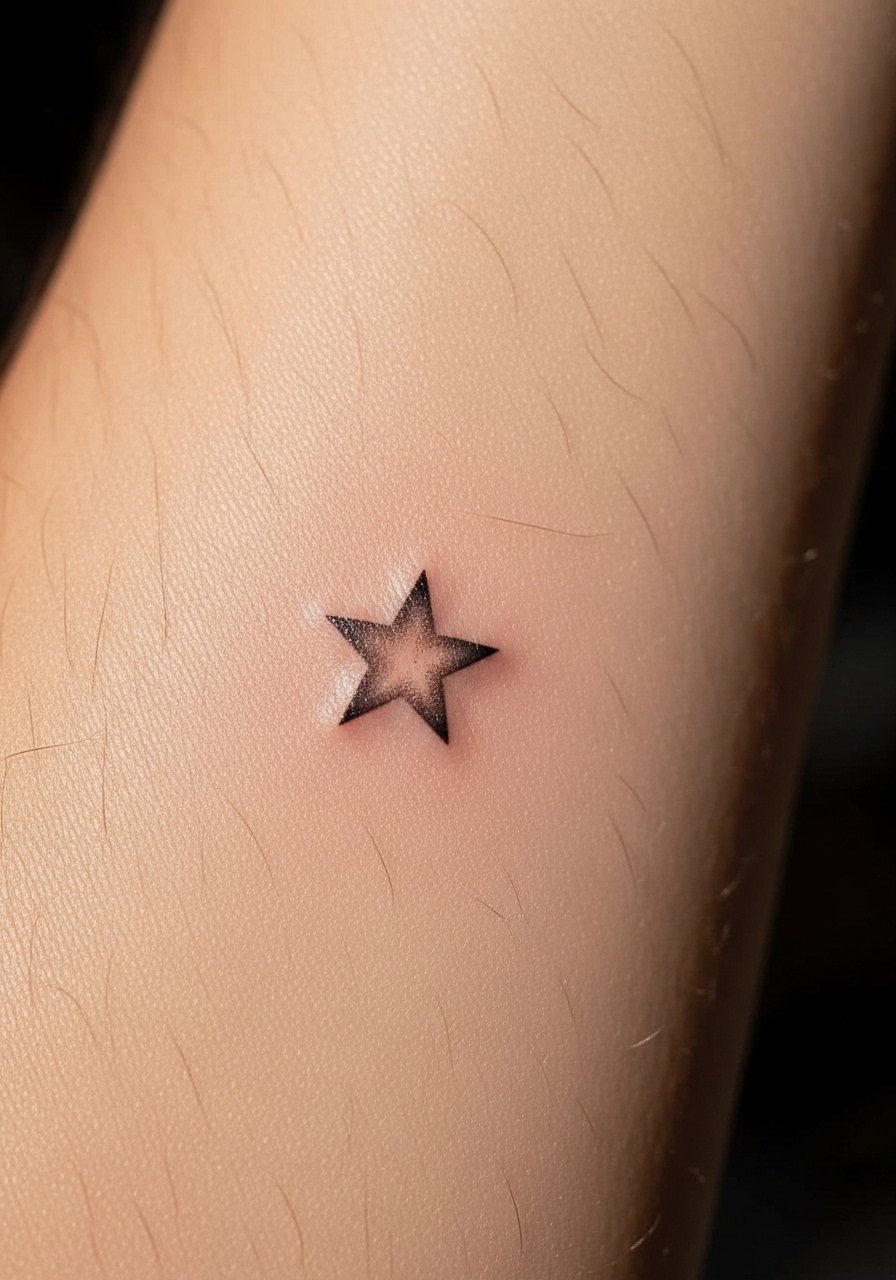
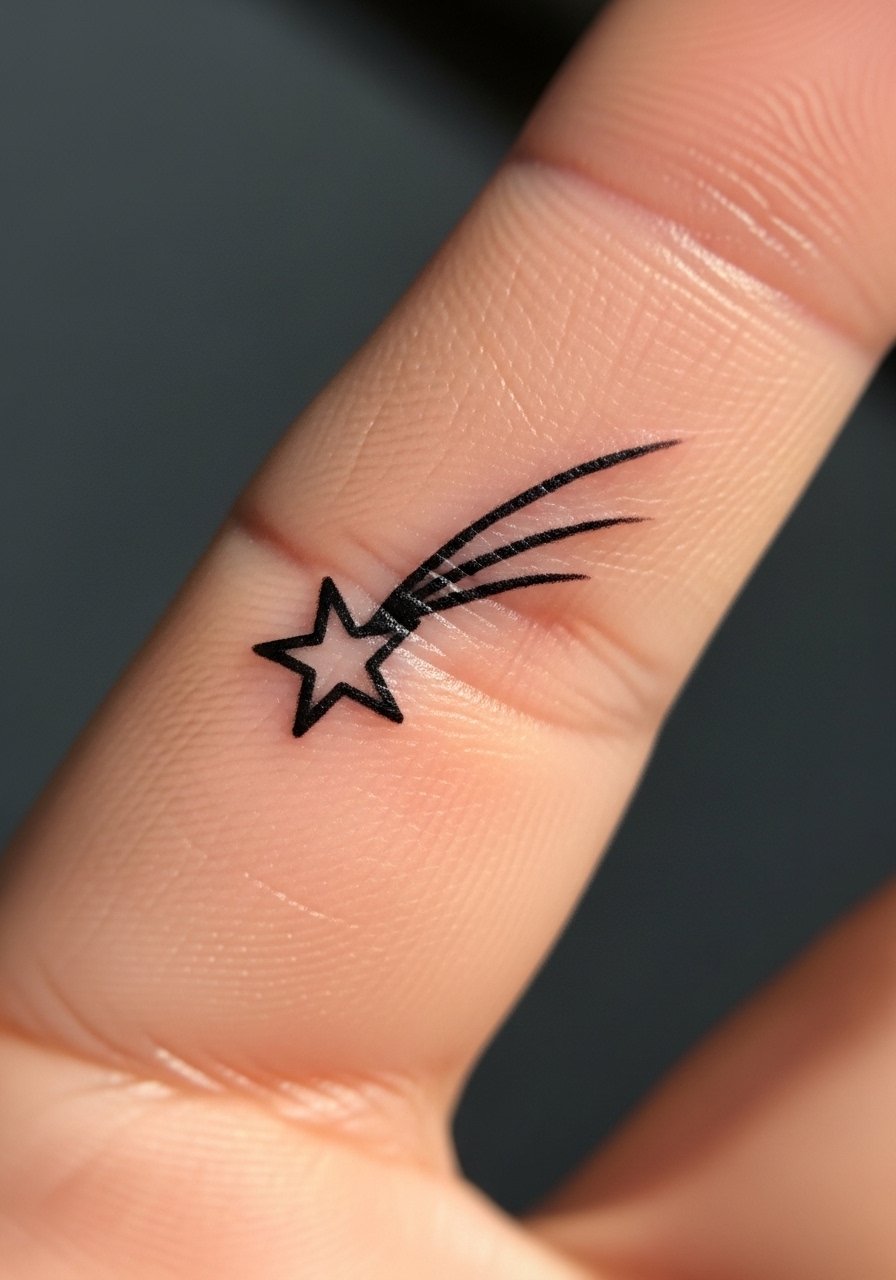
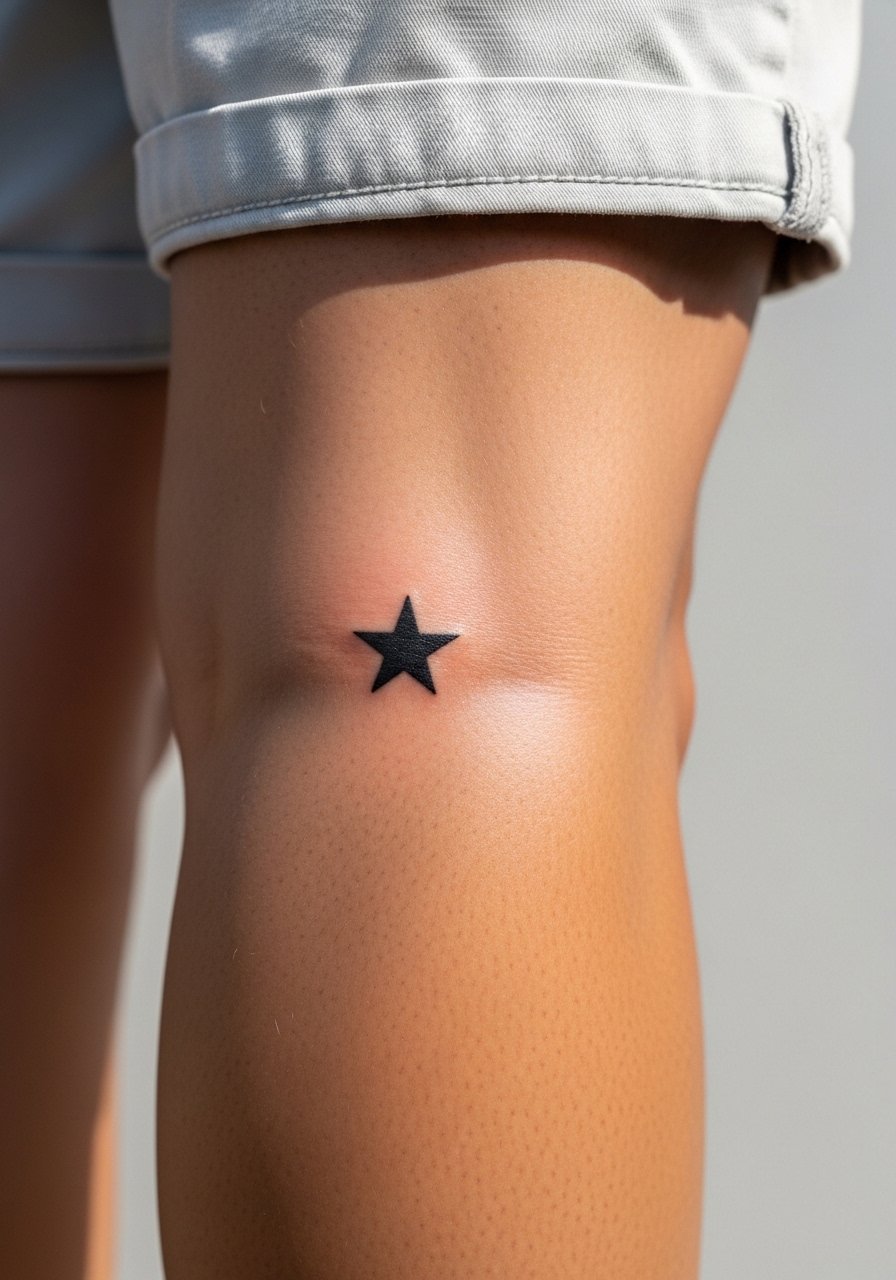
1. Fine Line Single Star on Inner Wrist
Style/Technique: Fine Line / Minimalist
Pain Level: Low (2-3/10)
Session Time: 1 session (short)
Best For: First star tattoo, highly visible subtle ink
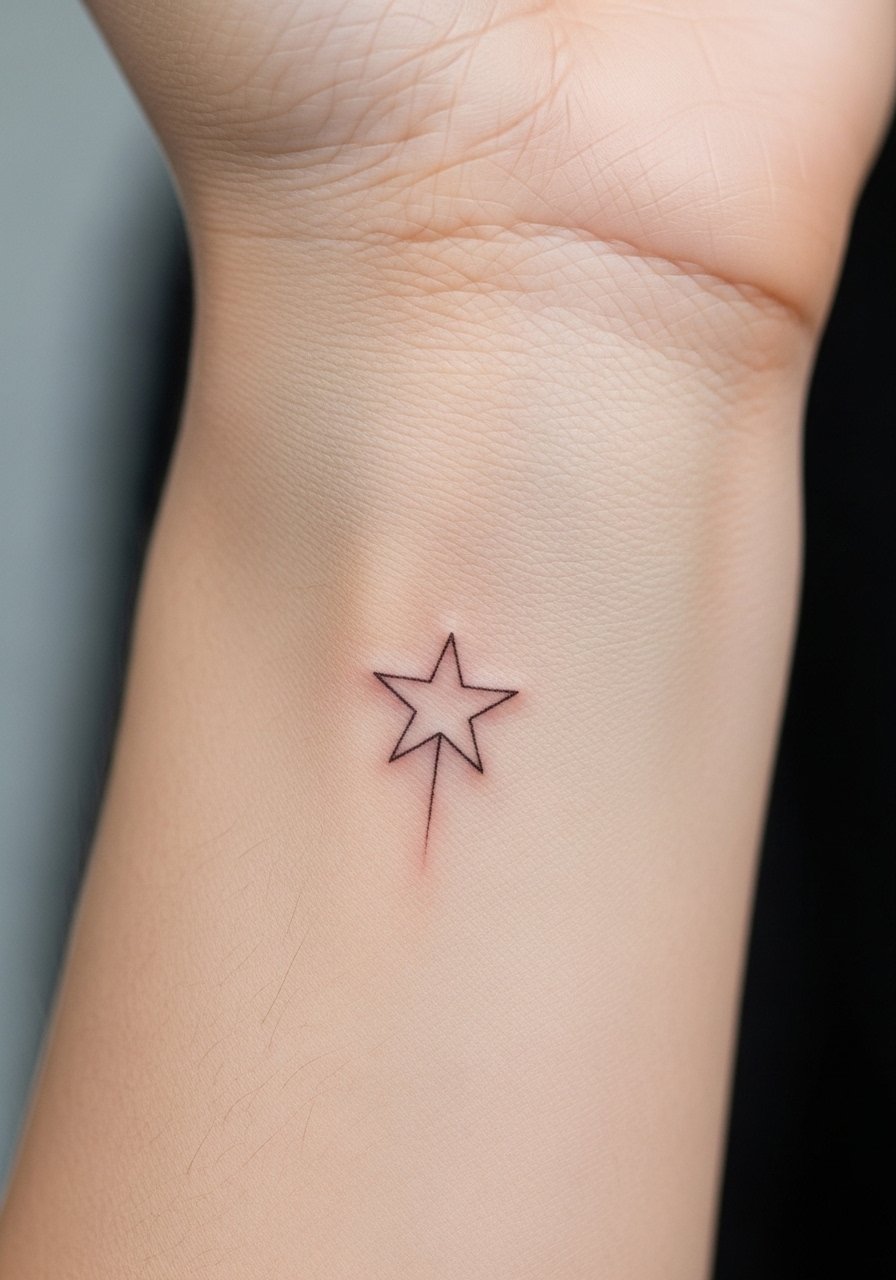
I got a tiny wrist star first and still love how understated it reads. Fine line star tattoos look crisp fresh and age gracefully if the artist uses a single needle and knows how to space the ink. The inner wrist is low-pain but gets sun, so expect to use sunscreen. Common mistake: asking for lines too thin — they can blur. Ask for healed examples and for an artist experienced with micro work.
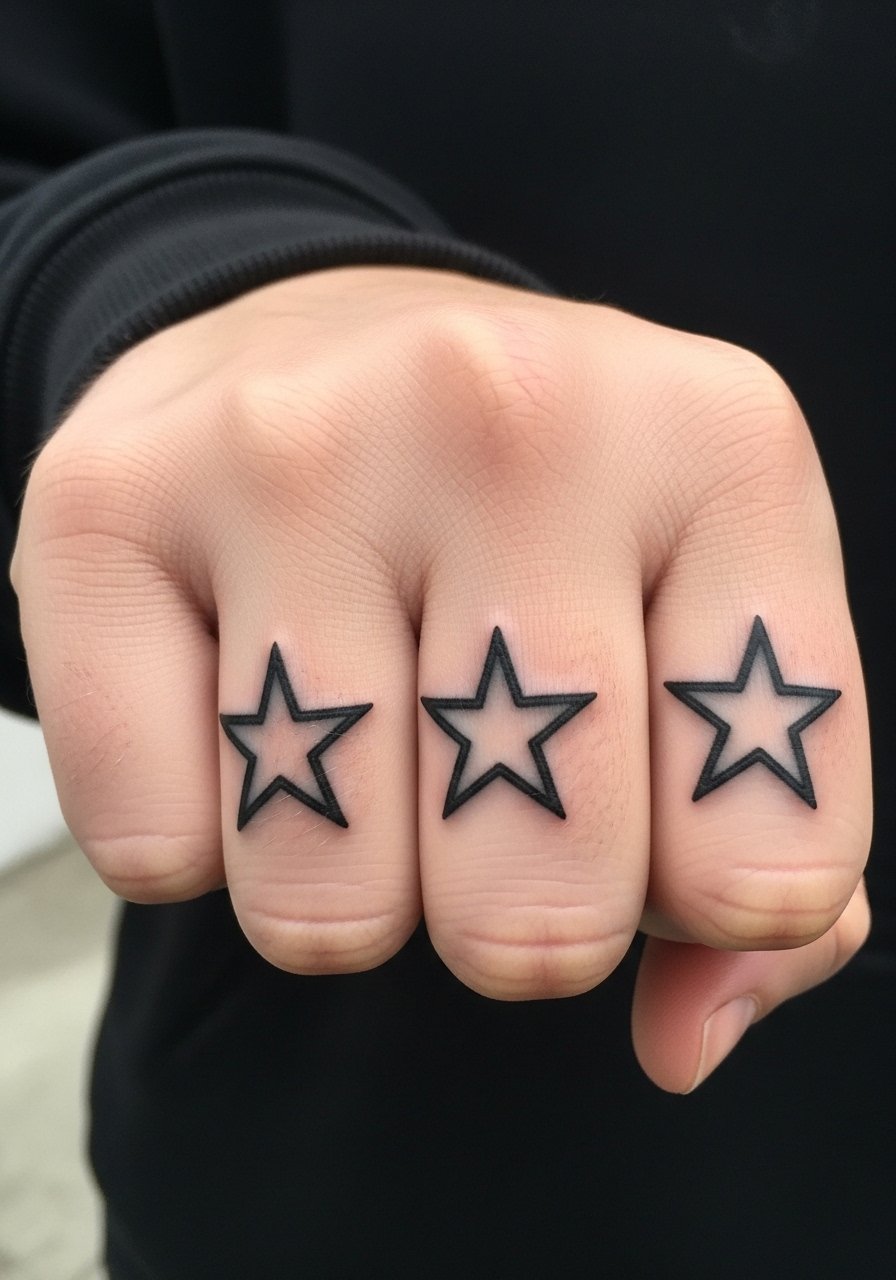
2. Three Micro Stars Along Finger Side
Style/Technique: Micro / Minimalist
Pain Level: Medium (4-5/10)
Session Time: 1 session per finger area
Best For: Hand star tattoo, starter patchwork
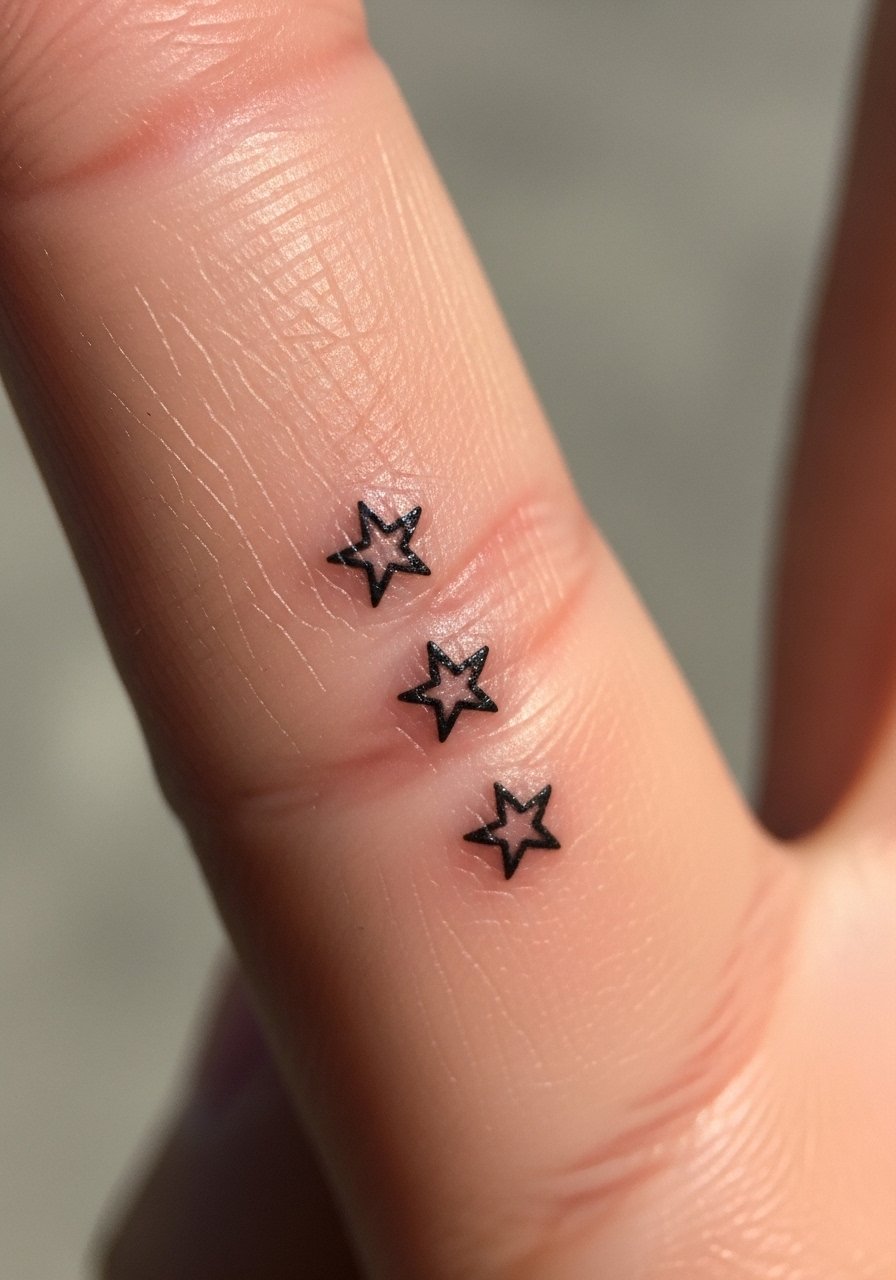
Small star tattoos on fingers are popular because they’re discreet and playful. Fingers are bony, so they hurt more than wrist pieces and their ink fades faster. From what I’ve seen, keeping the stars simple and slightly spaced helps them age cleaner. Avoid overly detailed shading here — fine dots and tiny outlines read better. If you want a collection feel, plan placement with your artist so future additions flow.
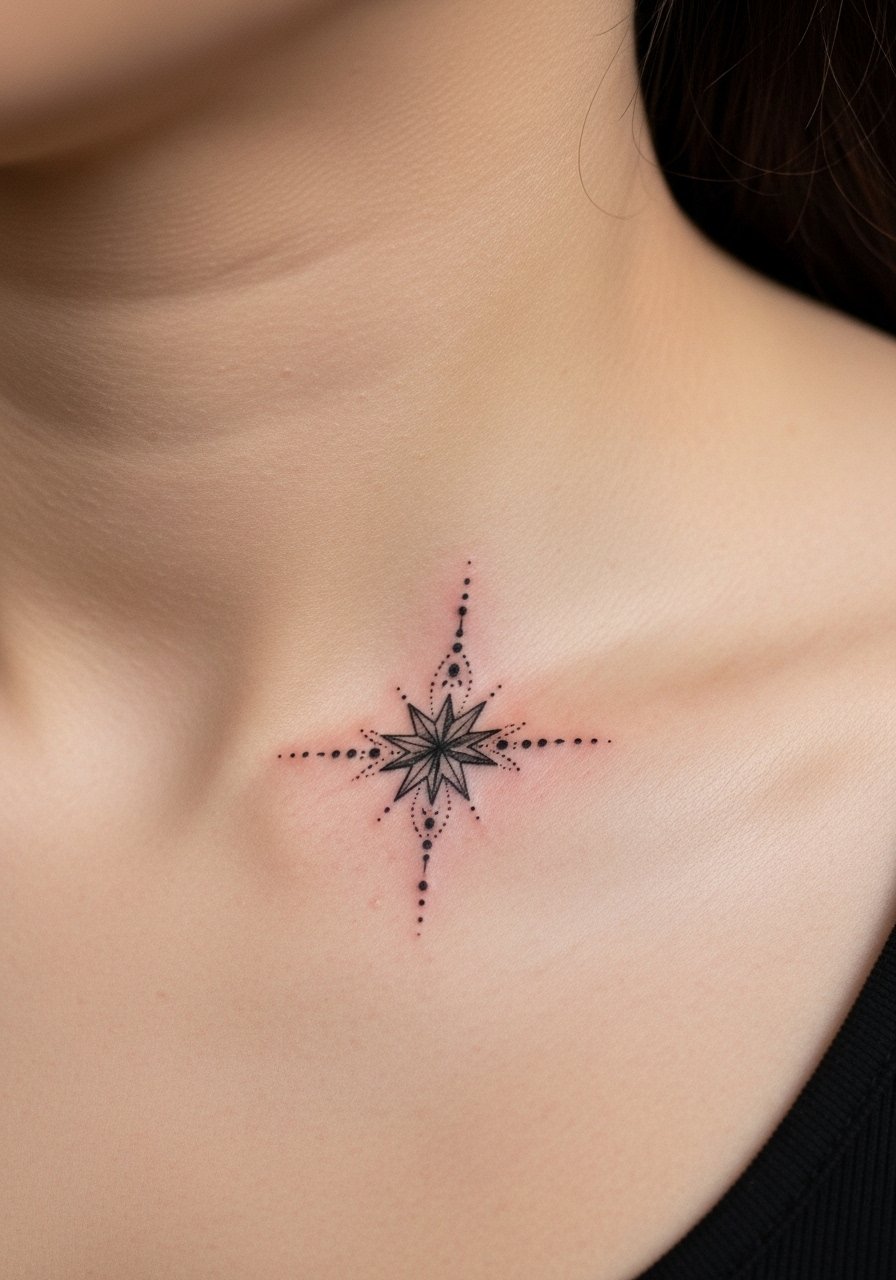
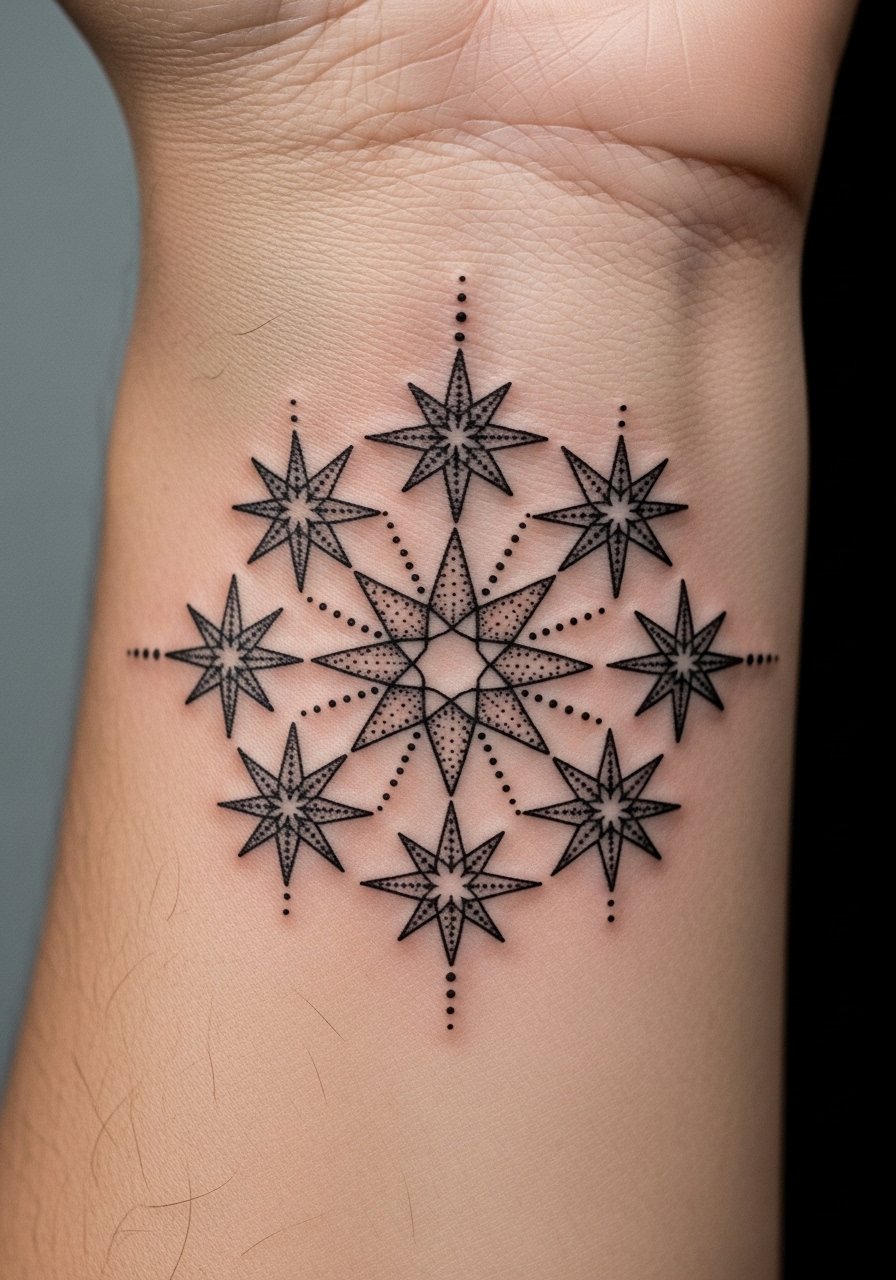
3. Celestial Constellation Along Collarbone
Style/Technique: Fine Line / Celestial
Pain Level: Low-Medium (3-4/10)
Session Time: 1–2 short sessions
Best For: Meaningful star tattoo, photo-friendly placement
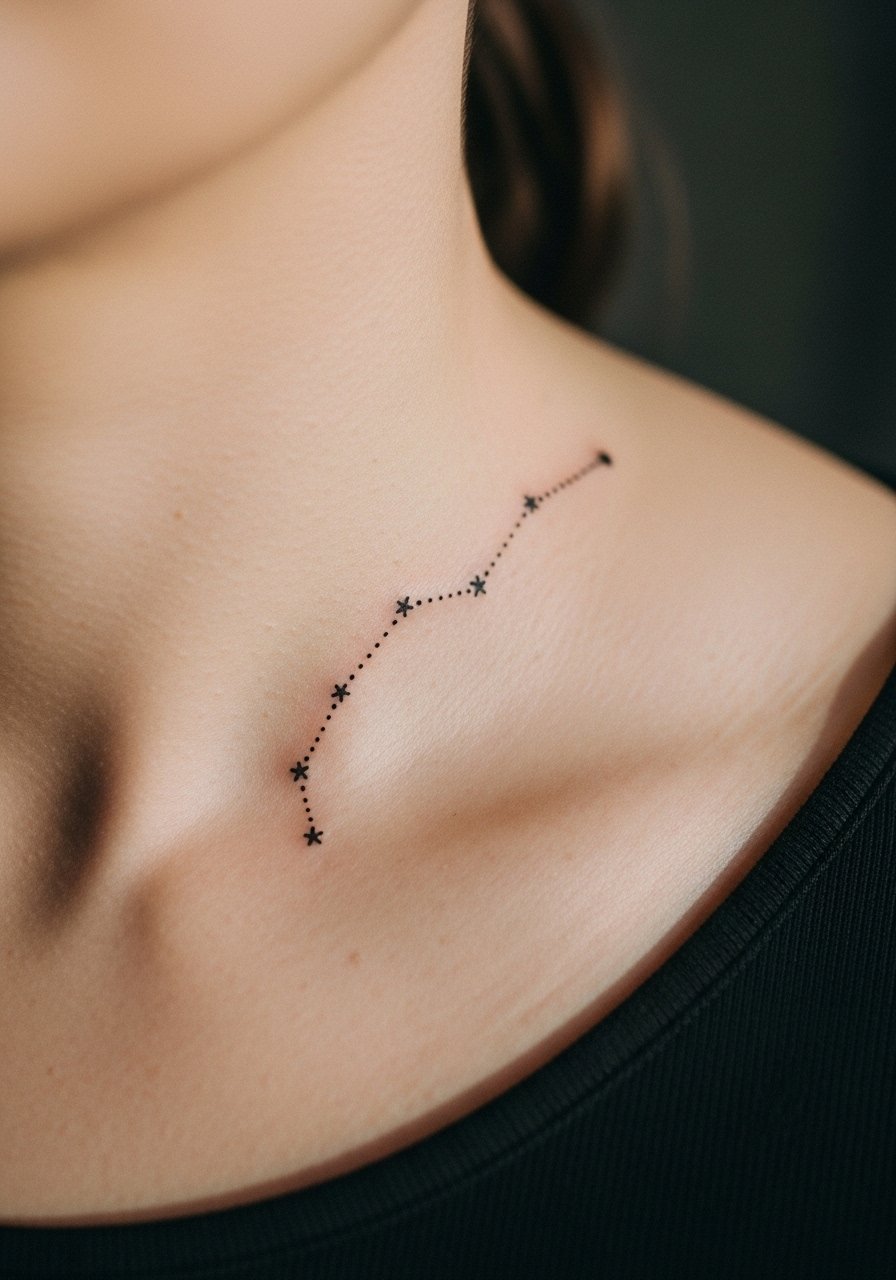
Mapping a constellation is one of my favorite star tattoo ideas for storytelling — you can pick a birthdate, milestone, or relationship. The collarbone gives the design room to breathe and photographs well. Pain is manageable but the bone can feel sharp for short bursts. Keep linework minimal and ask for spacing so dots don’t merge over time. Sunscreen and gentle moisturization keep the tiny dots distinct as they heal.
4. Geometric Star Cluster on Back of Hand
Style/Technique: Geometric / Minimalist
Pain Level: High (6-7/10)
Session Time: 1–2 sessions
Best For: Statement hand star tattoo, structured aesthetic
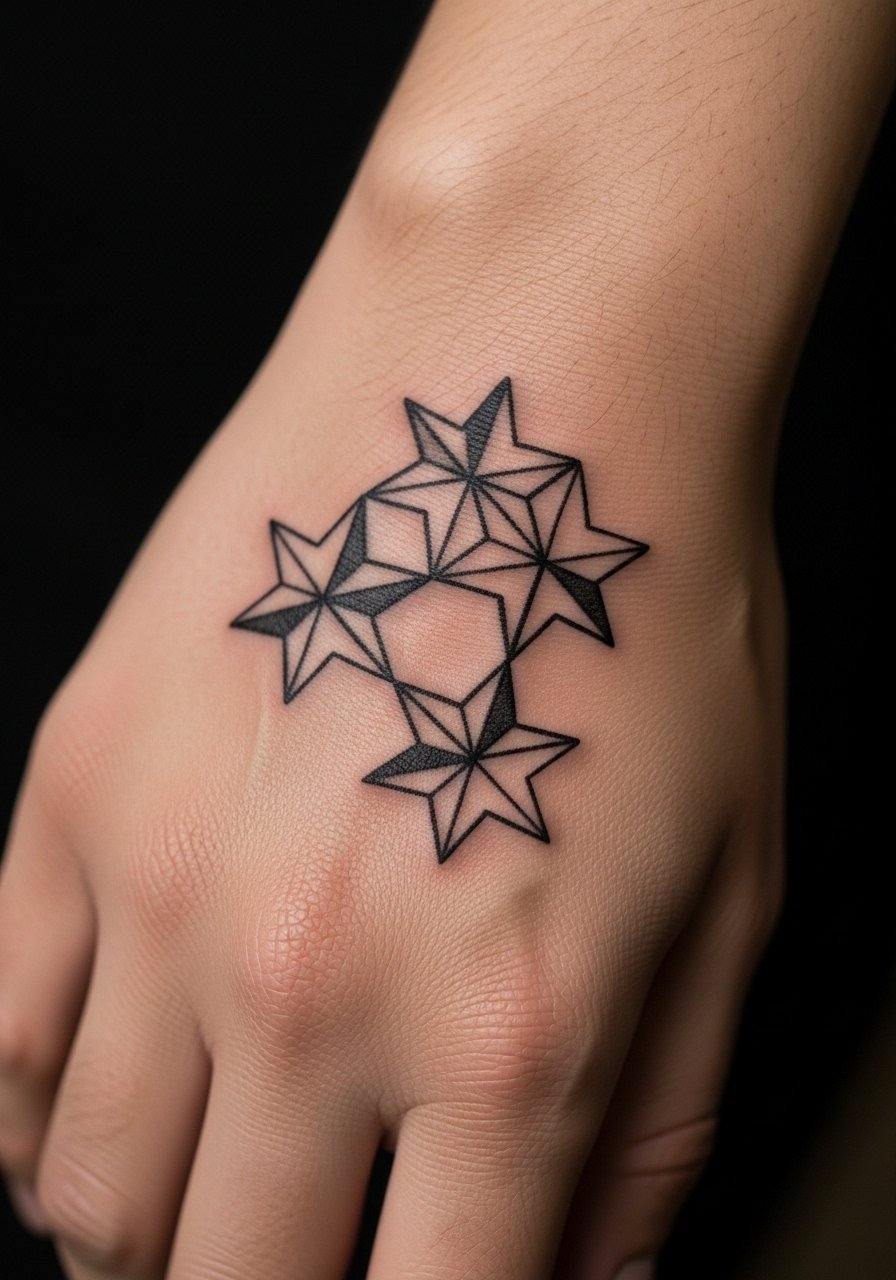
Geometric star tattoos give a modern edge to classic star shapes. The back of the hand is bold and visible — expect more fading and touch-ups over the years. I recommend sharp, confident lines and symmetrical spacing to keep the techy vibe. Artists who specialize in geometric work can prevent line blowout. If you’re nervous about visibility, test with a temporary sticker first.
5. Micro-Realism Single Star on Inner Forearm
Style/Technique: Micro-Realism / Fine Line
Pain Level: Low (2-3/10)
Session Time: 1–2 hours
Best For: Tiny personal milestone tattoo
Micro-realism turns a tiny star into something dimensional. On the inner forearm, you get a balance of visibility and protection from constant sun. This look requires an artist who does micro work; otherwise details can blur. From my experience, healed micro stars look like delicate dots of light rather than flat shapes. Keep moisturized and out of heavy sun while healing.
6. Three-Star Knuckle Set, Bold Outline
Style/Technique: Bold Traditional / Blackwork
Pain Level: High (7-8/10)
Session Time: 1 session
Best For: Edgy hand star tattoo, celeb-inspired look
Knuckle stars are a classic, celebrity-backed choice if you want something outspoken. Knuckles hurt more and fade faster, but bold outlines hold up better than fine lines in this area. I’ve seen people regret overly intricate designs here — keep it simple. Ask the artist about touch-up plans and hand-care routines; regular moisturizing helps, and expect eventual softening of lines.
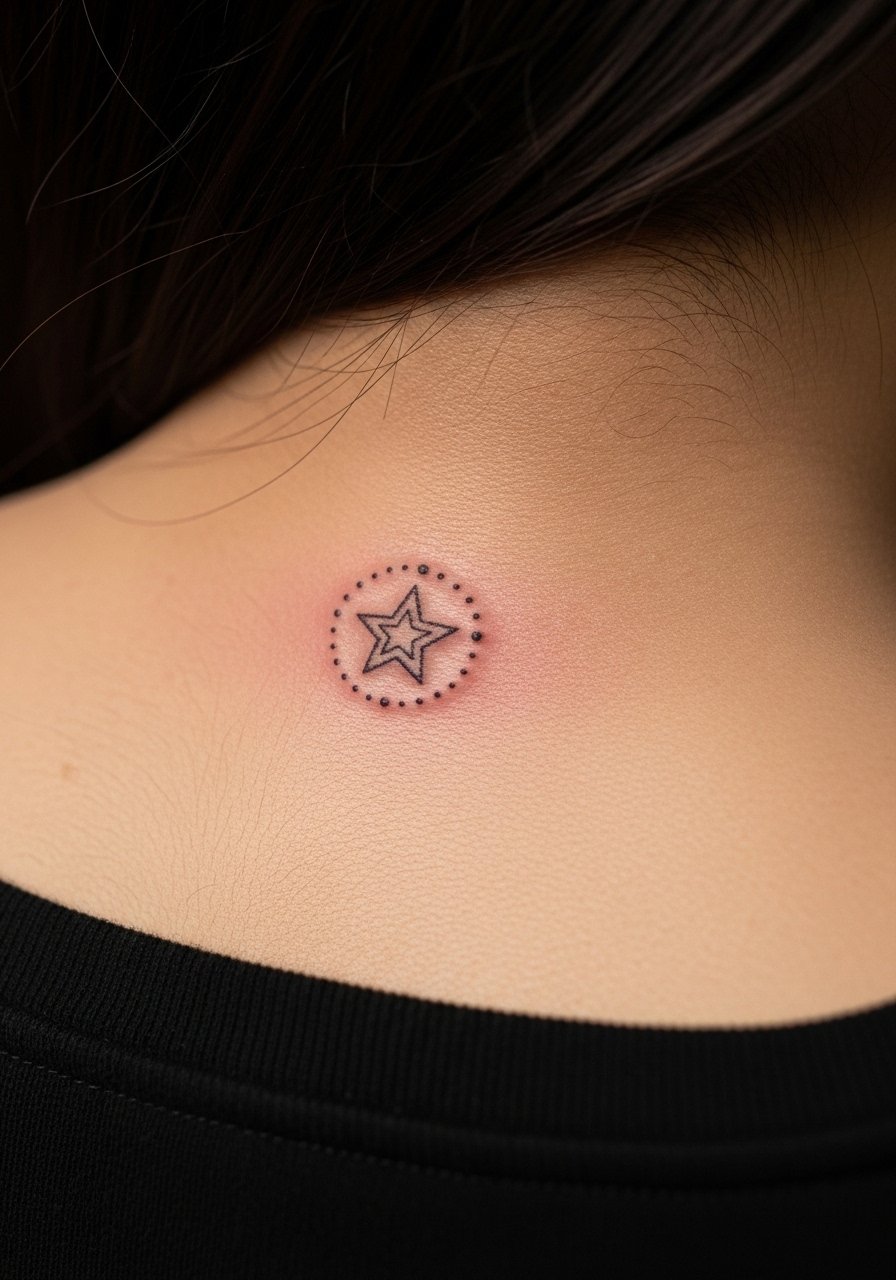
7. Tiny Star Behind Ear
Style/Technique: Minimalist / Single Needle
Pain Level: Low (2-3/10)
Session Time: Under 1 hour
Best For: Hidden-first-star, subtle placement
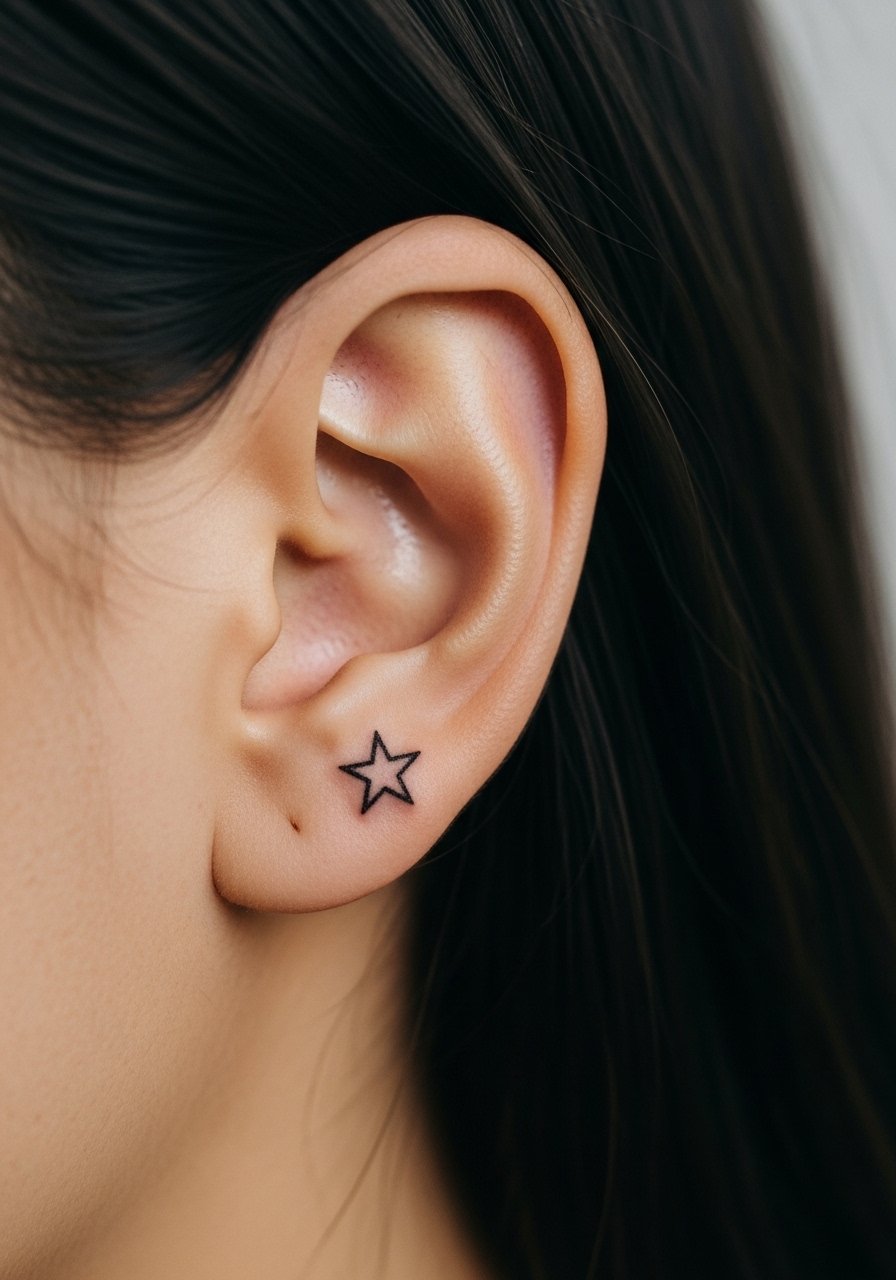
A behind-ear star is discreet and feels like a personal secret. Pain is low but the skin is thin so expect a quick sharp sensation. Heals fast if you avoid sleeping on it or heavy hair products. It’s a great “first star tattoo” if you want something small and meaningful without constant visibility. Ask for minimal ink saturation so it doesn’t blur into a dot over years.
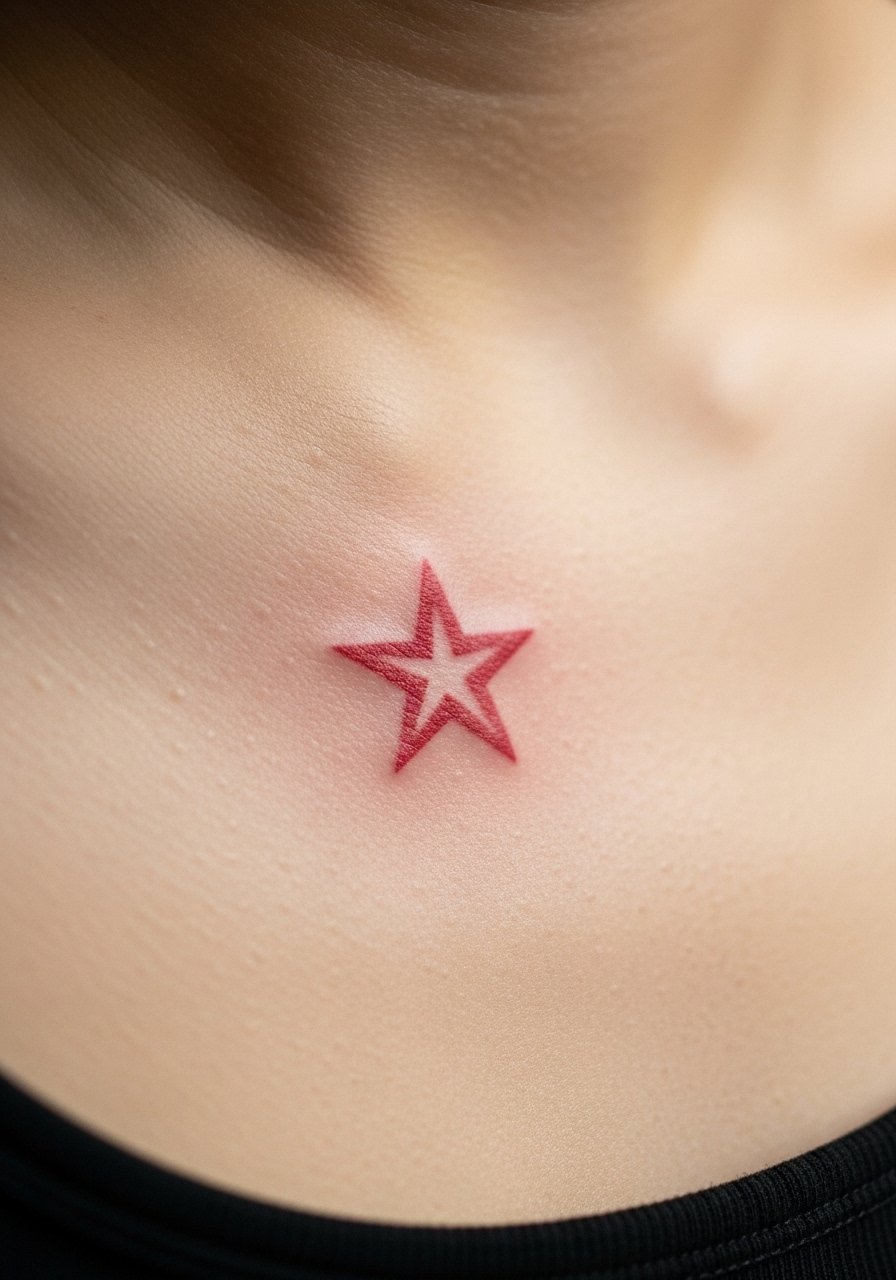
8. Red Ink Single Star on Ankle
Style/Technique: Fine Line / Color (Red)
Pain Level: Medium (4/10)
Session Time: 1 session
Best For: Passionate symbolism, color-forward minimalism
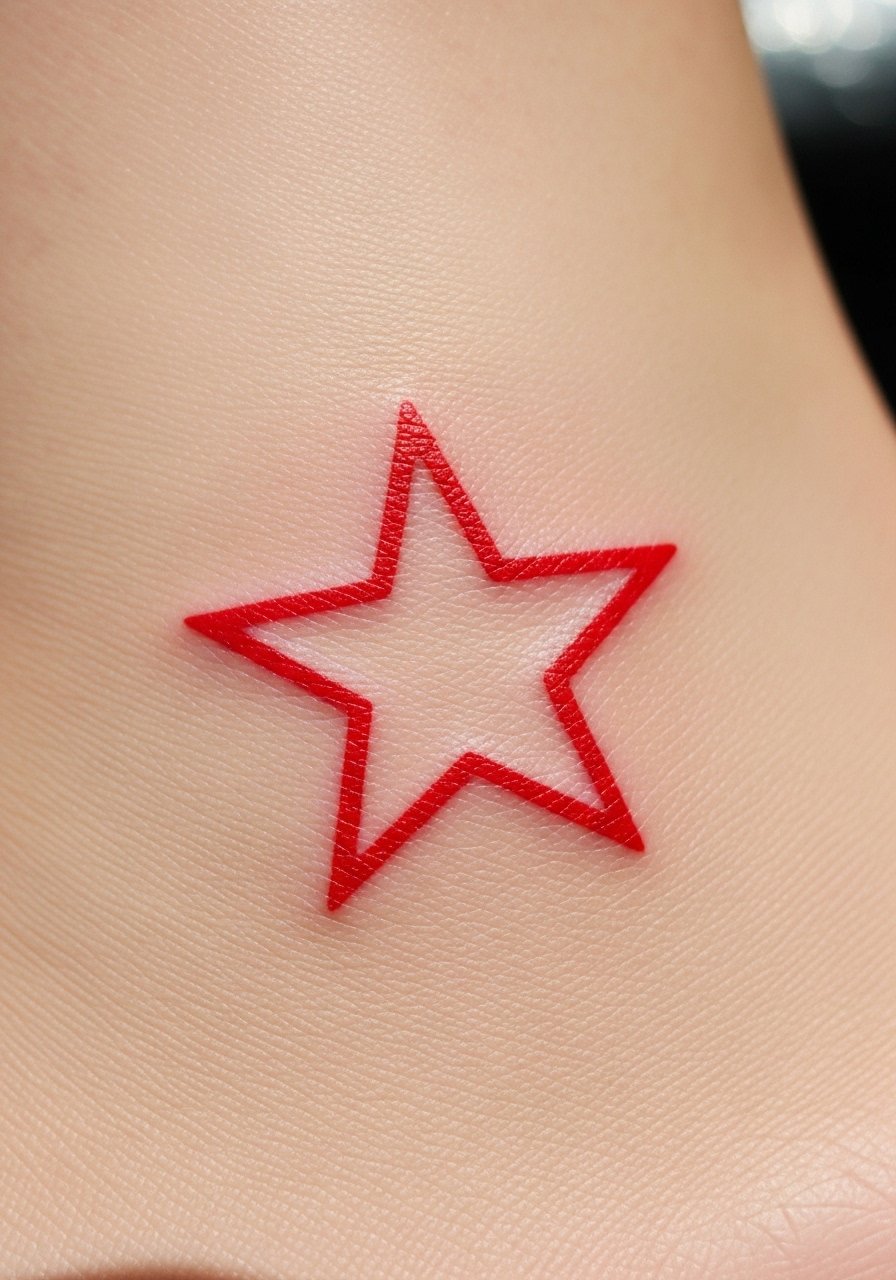
Red ink stars can symbolize passion or ideas like the "Red Thread of Fate." Red ages differently than black — it can fade or shift tone. I recommend fade-resistant ink and discussing color placement with your artist. Ankles are a good spot for color because you can shield them sometimes. Artists often advise heavier saturation initially so color survives the first year and then touch up if needed.
9. Star and Moon Phase Wrist Band
Style/Technique: Fine Line / Celestial
Pain Level: Low (3/10)
Session Time: 1–2 hours
Best For: Symbolic daily reminder, visible wrist art
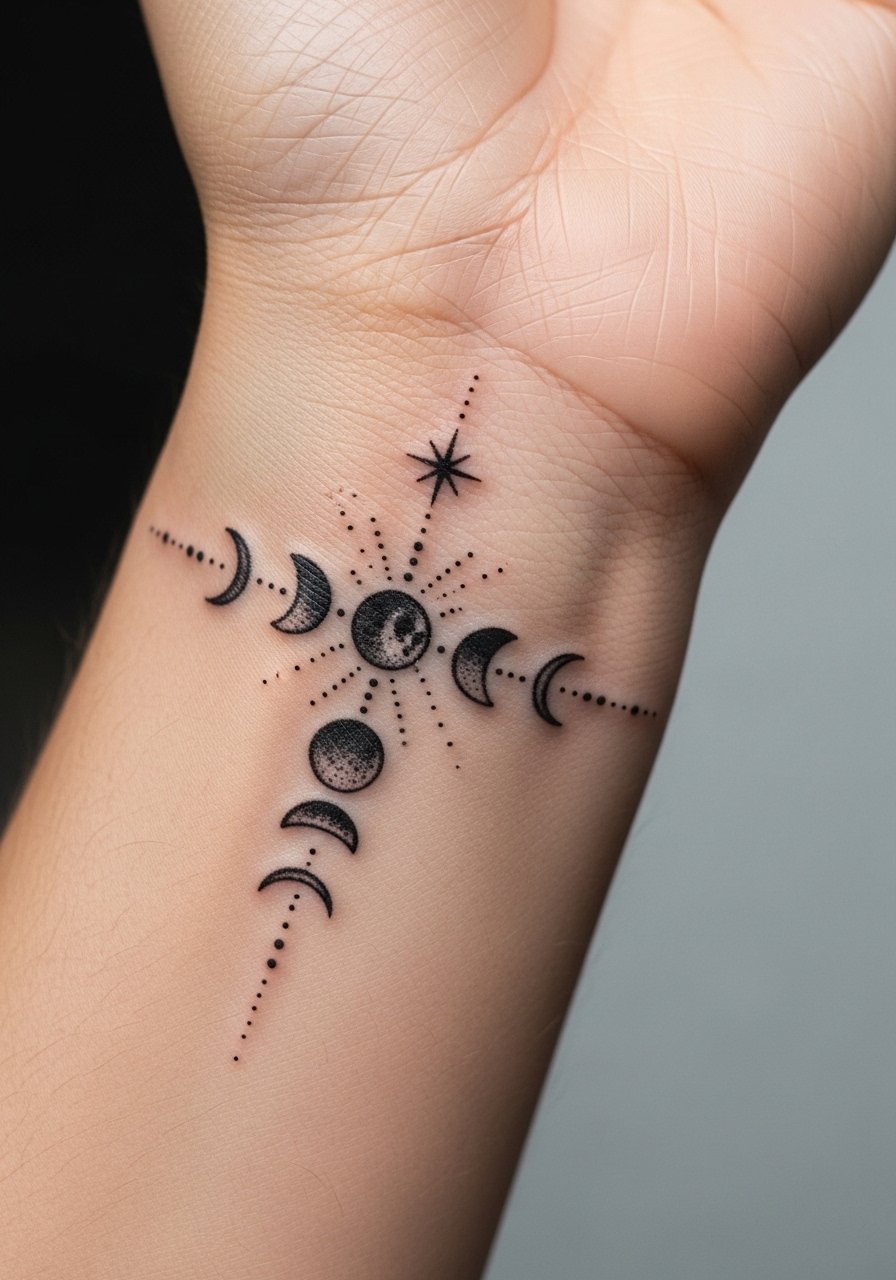
Combining a star with moon phases makes for a small narrative about cycles and growth. A wrist band is a placement that reads like jewelry and works for daily visibility. Fine line pieces here can blur if lines are too thin, so ask for slightly bolder strokes than you think you need. Keep sun off while healing and use gentle soap to avoid scabbing issues that hide detail.
10. Constellation Behind Shoulder
Style/Technique: Fine Line / Celestial
Pain Level: Low (2-3/10)
Session Time: 1–2 sessions
Best For: Larger placement, easily hidden or revealed
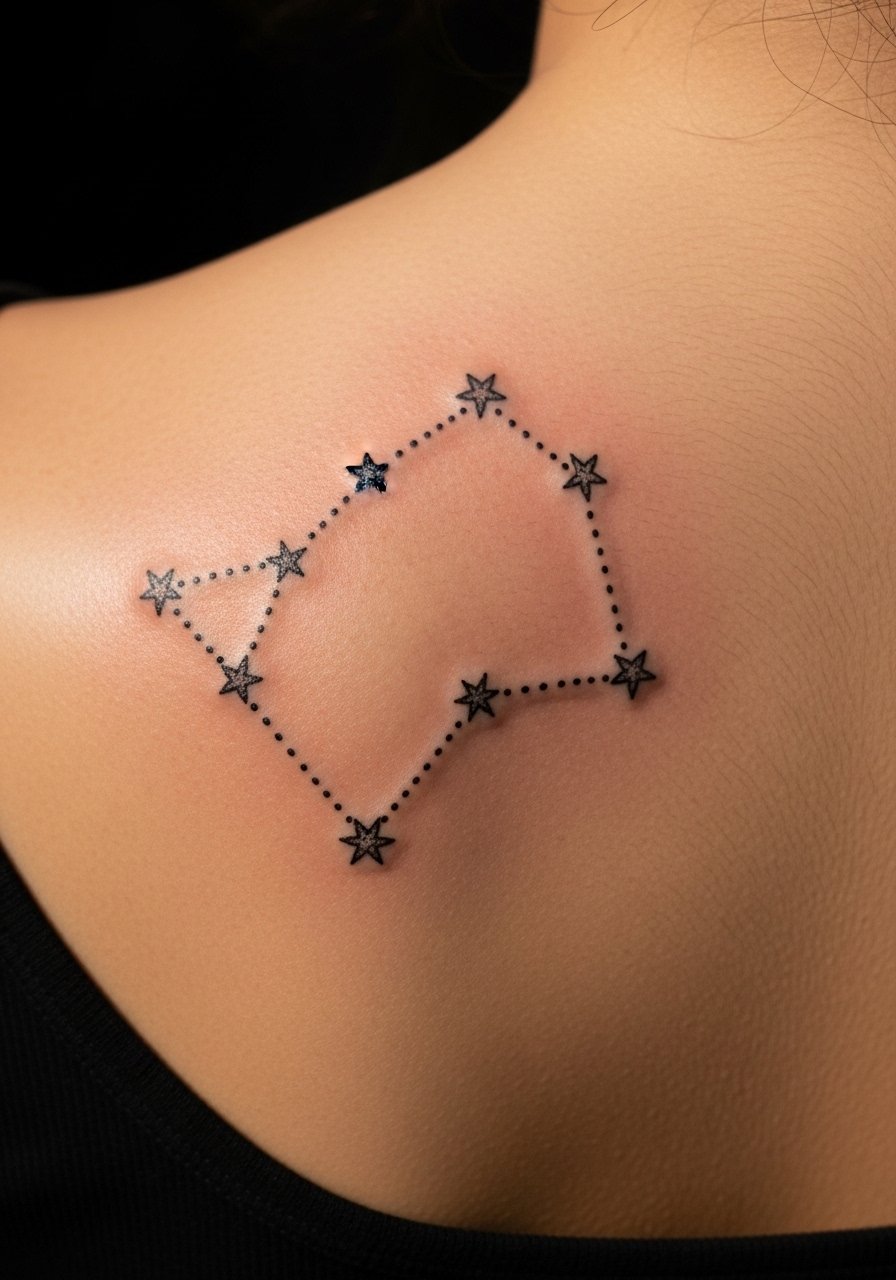
The behind-shoulder area gives a constellation space to breathe. It’s less exposed to sun, so stars hold up nicely. Pain is minimal and healing is easy because clothing rarely rubs directly. I like this for a meaningful "map your story" approach. Make sure dots aren’t too close together — spacing prevents merging. Ask your artist for healed examples on similar skin tones.
11. Tiny Ornamental Star on Collarbone Accent
Style/Technique: Micro / Ornamental
Pain Level: Low (3/10)
Session Time: Under 1 hour
Best For: Photo-friendly accent, subtle jewelry-like placement
Ornamental micro stars can act like natural jewelry along the collarbone. They photograph well and are easy to hide with clothing. Collarbones are shallow, so expect brief discomfort. Keep the lines delicate but not paper-thin, and avoid too much white ink. I’ve found healed ornamental accents look intentional and elegant when an experienced micro artist spaces everything properly.
12. Star Mandala on Shoulder Cap (Minimal Color)
Style/Technique: Neo-Traditional / Watercolor Accent
Pain Level: Medium (4/10)
Session Time: 2 sessions
Best For: Colorful but minimal statement piece
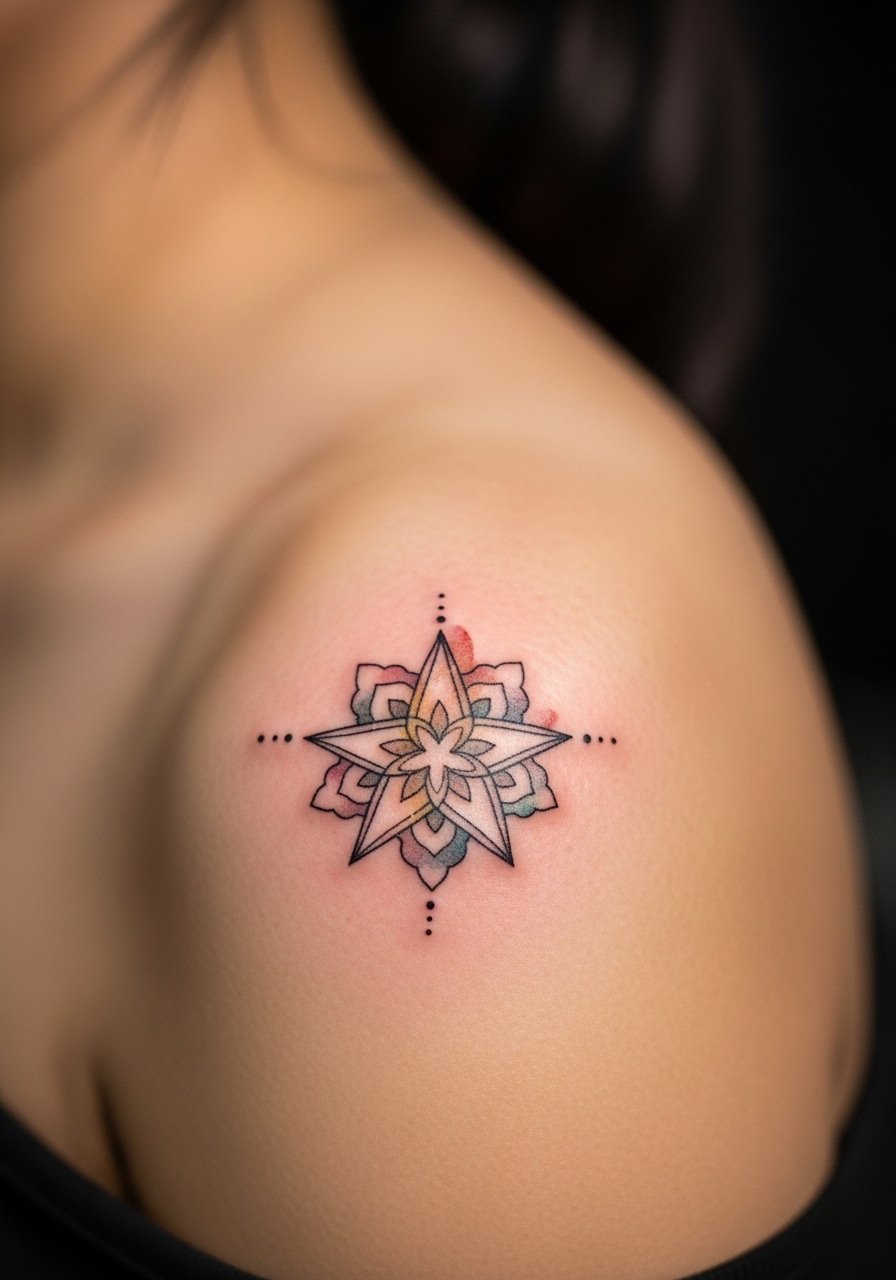
A star-centered mandala blends celestial symbolism with decorative flow. I prefer muted watercolor accents over loud neons for long-term wearability. The shoulder cap is forgiving and photographs well. Expect a bit more session time for color layering. Aftercare and sunscreen will be critical to preserve the pigments. Ask for fade-resistant inks and healed photos on similar skin tones.
13. Three-Star Patchwork on Side of Hand
Style/Technique: Patchwork / Bold Outline
Pain Level: High (6-7/10)
Session Time: Multiple single-session additions
Best For: Collectible hand star tattoo set
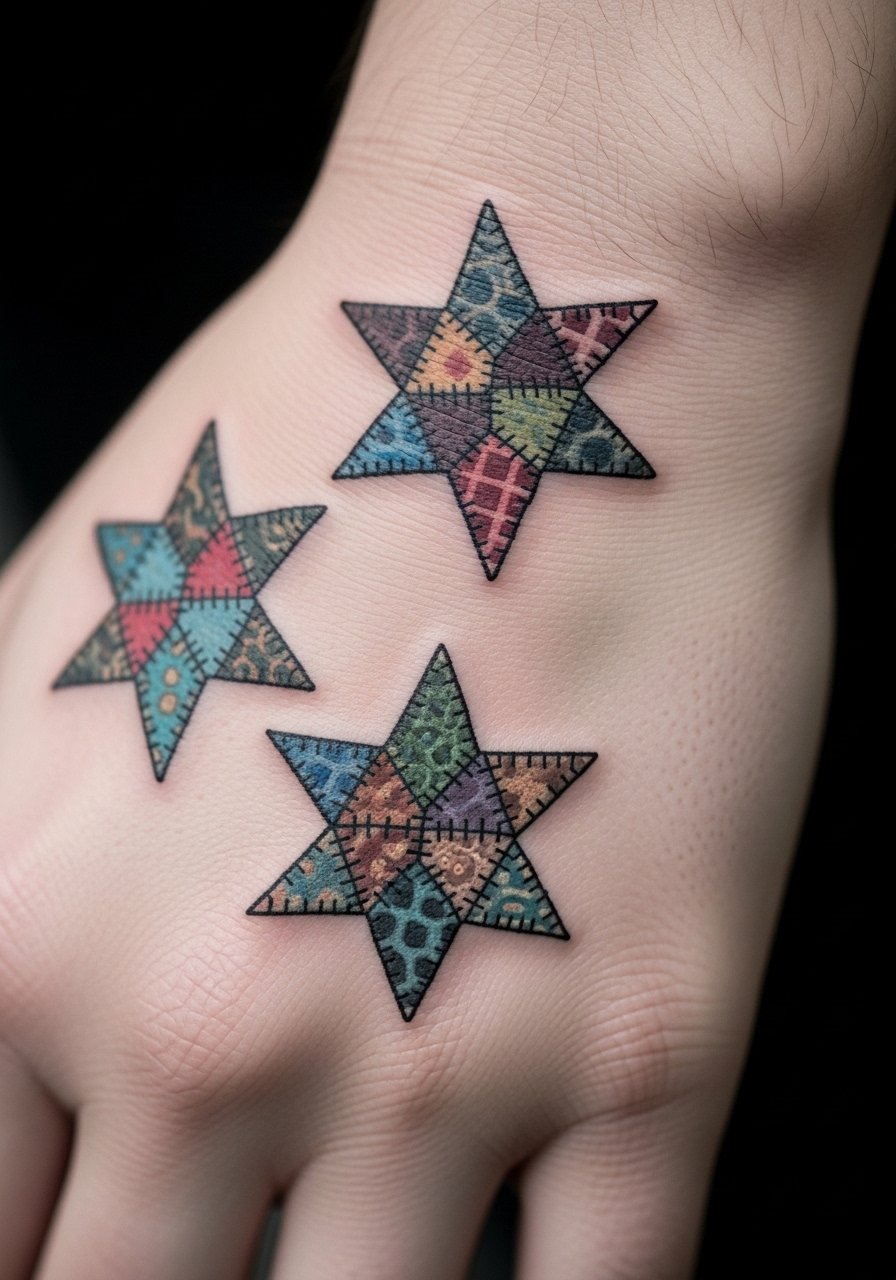
Patchwork star collections let you build a story over time. Hands are high-visibility and high-maintenance; lines will soften faster than arm pieces. I like adding one star at a time so the set grows organically. Artists who know hand work can advise spacing and outline thickness to slow fading. Plan for touch-ups and be diligent about moisturizing.
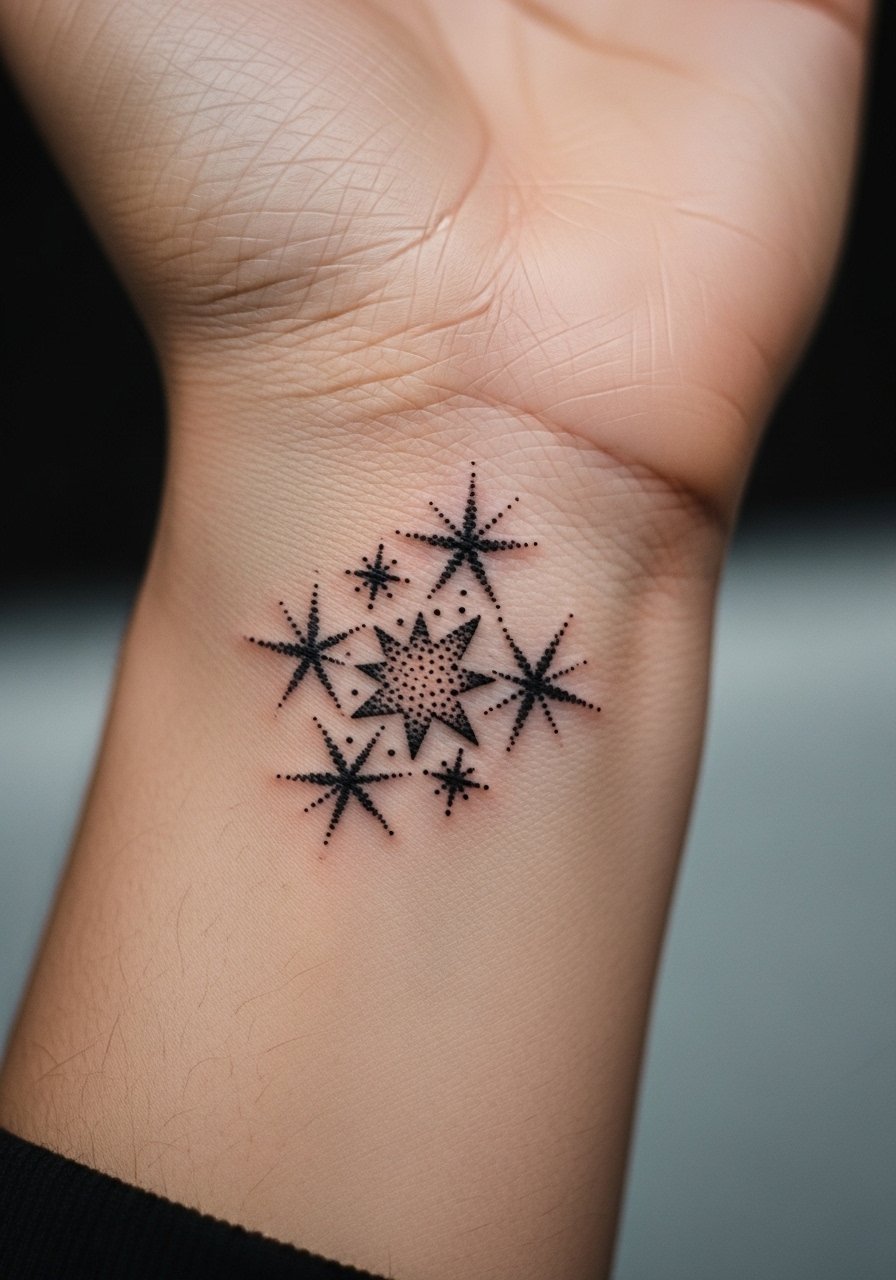
14. Geometric Symmetry Wrist Cluster
Style/Technique: Geometric / Fine Line
Pain Level: Low (3/10)
Session Time: 1 session
Best For: Techy aesthetic, balanced wrist art
Geometric star clusters feel modern and structured. On the wrist they look like a deliberate charm. Pain is light and healing is straightforward if you avoid heavy wrist straps while it scabs. The key is proportional spacing so shapes stay readable as lines settle. Ask for artists who specialize in geometric and fine line star tattoos to avoid blowout.
15. Tiny Star Above Ankle Bone
Style/Technique: Minimalist / Single Needle
Pain Level: Medium (4/10)
Session Time: Under 1 hour
Best For: Seasonal visibility, delicate anklet alternative
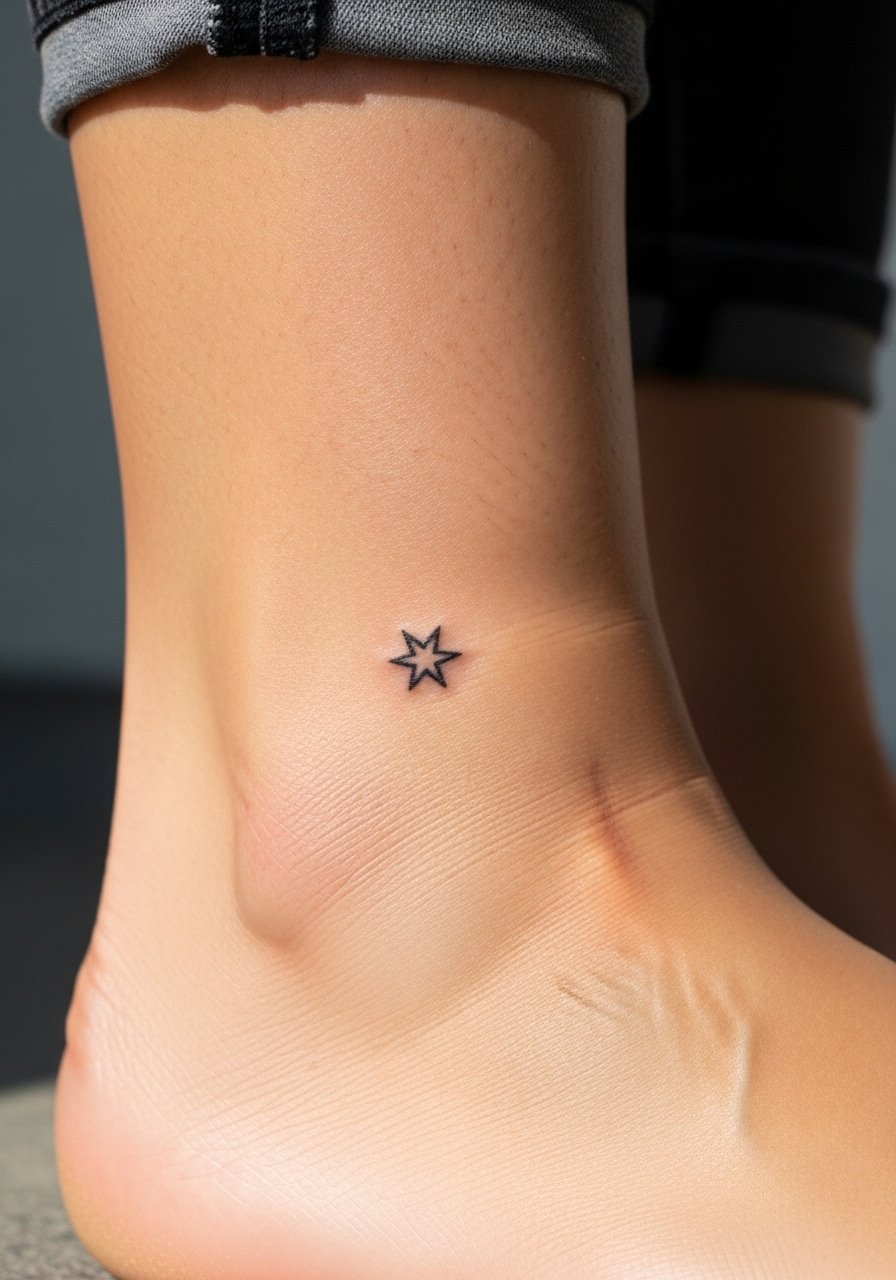
A tiny ankle star is a low-commitment way to show off small star tattoos. The ankle is bony and can sting, but healing is quick. It’s easily shown with sandals or hidden with socks. For longevity, avoid friction from shoes during the first two weeks. Simple shapes work best here — avoid heavy shading.
16. Star with Arrow on Forearm
Style/Technique: Illustrative / Fine Line
Pain Level: Low (3/10)
Session Time: 1–2 hours
Best For: Directional meaning (goals, guidance), visible forearm piece
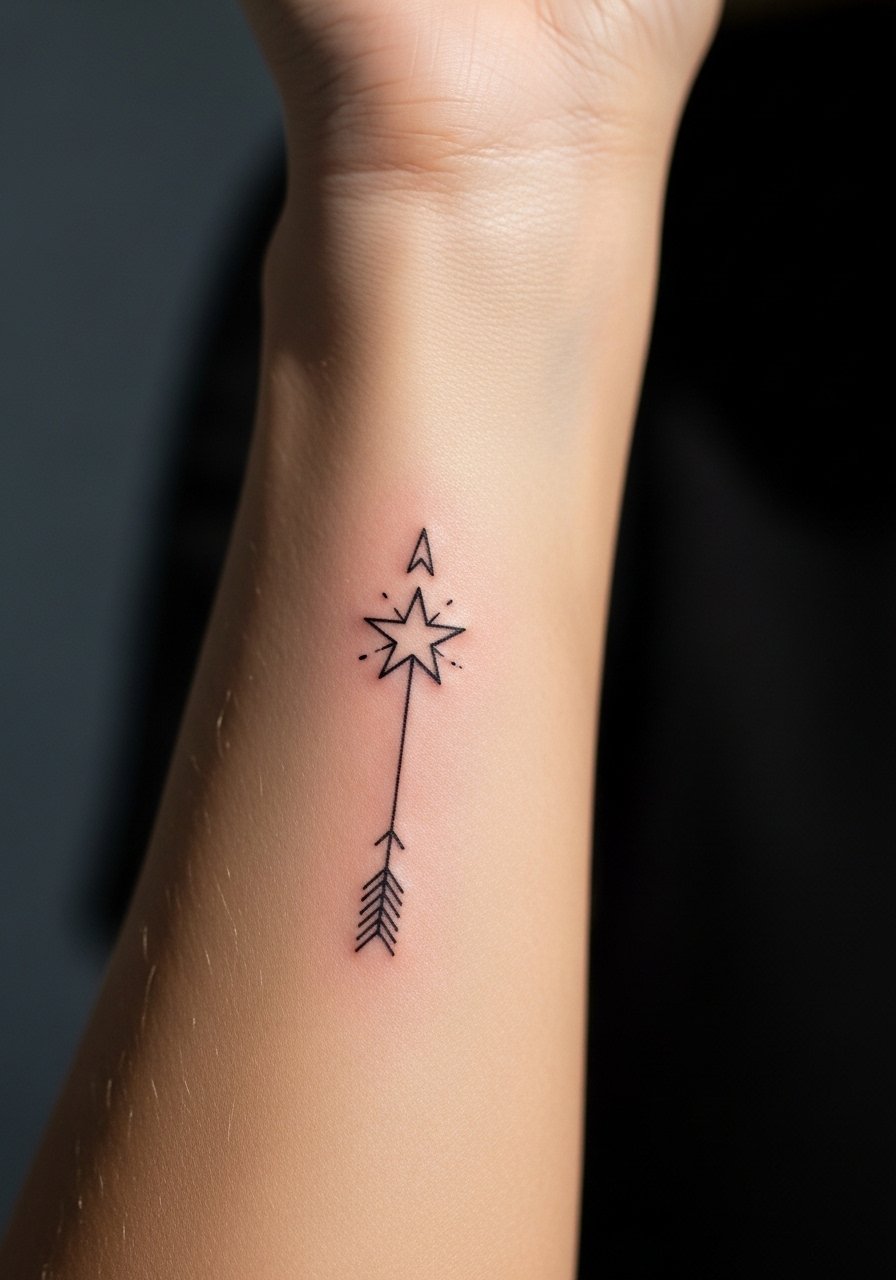
Pairing a star with an arrow creates a narrative of direction and ambition. Forearms are ideal for visibility and relatively low pain. I like this as a reminder piece. Keep the arrow simple and proportional to the star so both elements age well. Artists who do illustrative fine line work will show you healed examples.
17. Red Ink Tiny Star Near Heart (Sternum Edge)
Style/Technique: Fine Line / Color (Red)
Pain Level: Medium-High (5-6/10)
Session Time: 1–2 sessions
Best For: Emotional symbolism, intimate placement
A red star near the heart can symbolize deep connections or the "red thread" concept. The area is closer to bone and can sting more than the forearm. Red needs careful saturation; I've seen the best results when artists use fade-resistant pigments. Expect touch-ups might be recommended to keep the red vivid.
18. Clustered Micro Stars Across Collar
Style/Technique: Micro / Dotwork
Pain Level: Low (3/10)
Session Time: 1–2 hours
Best For: Delicate, photo-friendly placement across collarbones
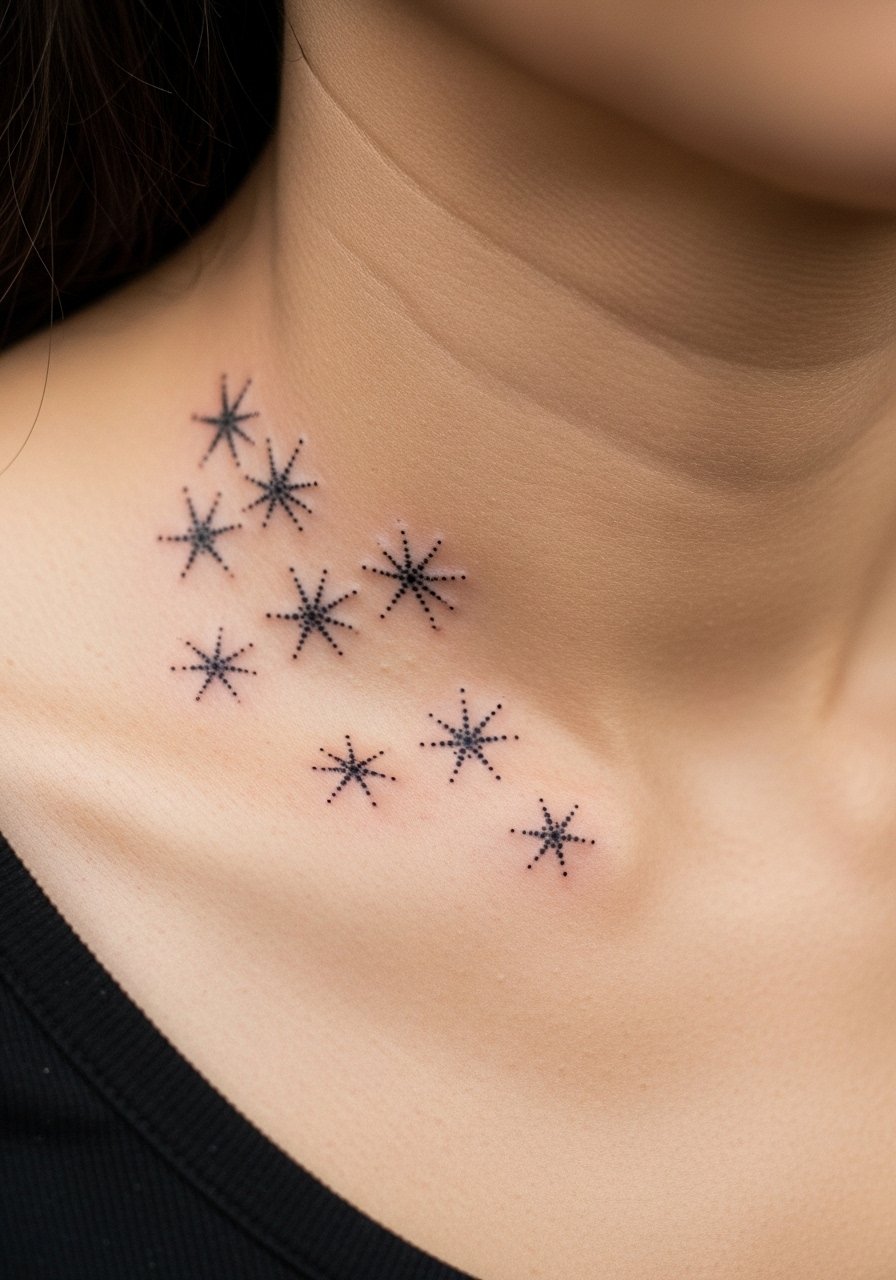
A sprinkle of micro stars across the collarbone looks like constellations or freckles. It’s a gentle way to personalize a meaningful pattern. Pain is mild and healing is straightforward as long as you avoid tight straps that rub. Dotwork artists can show you how spacing impacts long-term readability. Protect with sunscreen once healed.
19. Blackwork Star with Negative Space on Thigh
Style/Technique: Blackwork / Minimal Negative Space
Pain Level: Low-Medium (3-4/10)
Session Time: 1–2 sessions
Best For: Bold but hidden option, longevity
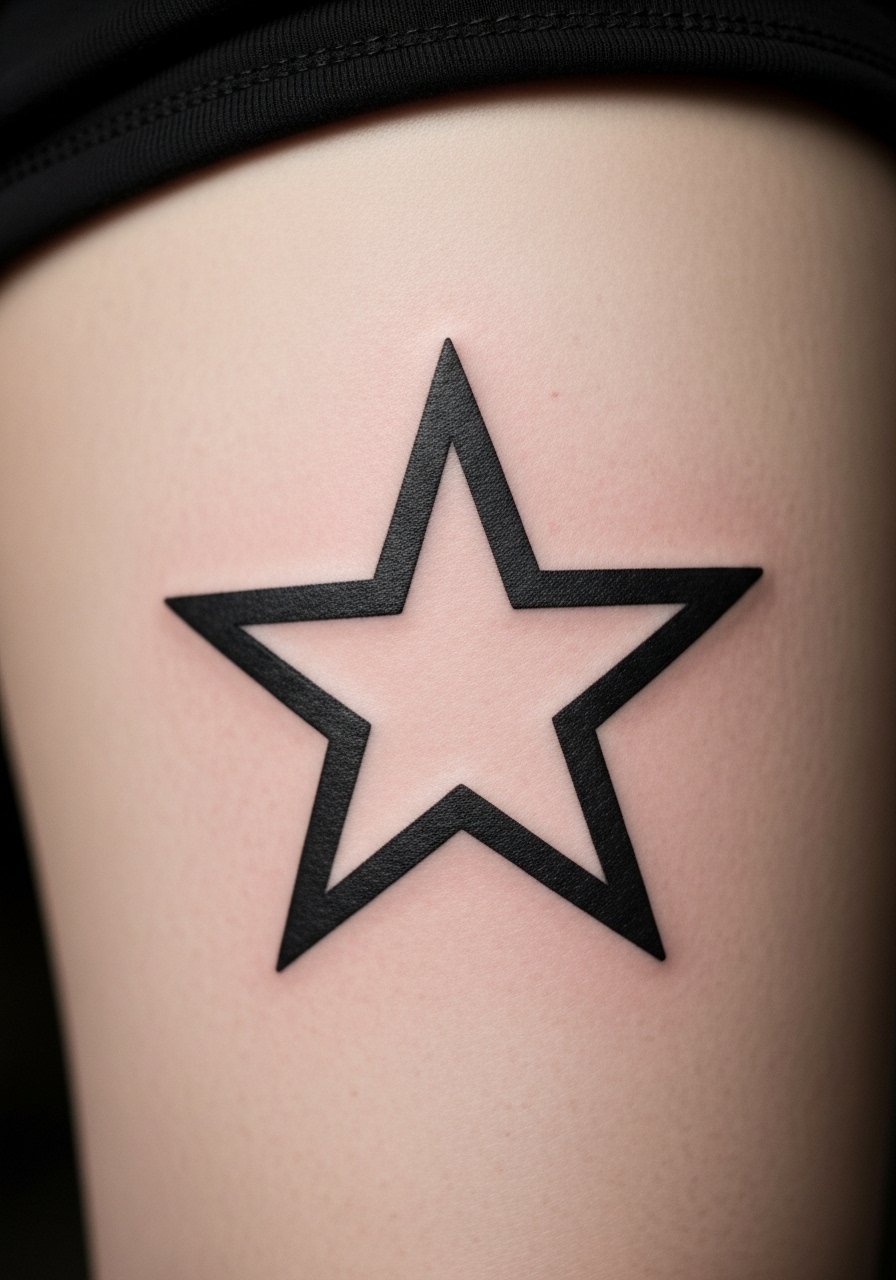
A negative-space star within blackwork reads bold but can be hidden easily. Thigh skin holds ink well and is less prone to sun exposure. This approach ages nicely since black holds up. Expect slightly longer sessions for solid fills. Choose an artist experienced in clean blackwork to avoid patchy fills.
20. Celestial Line of Stars Along Ribcage
Style/Technique: Fine Line / Celestial
Pain Level: High (7-8/10)
Session Time: 1–2 sessions
Best For: Large flowy placement, private symbolism
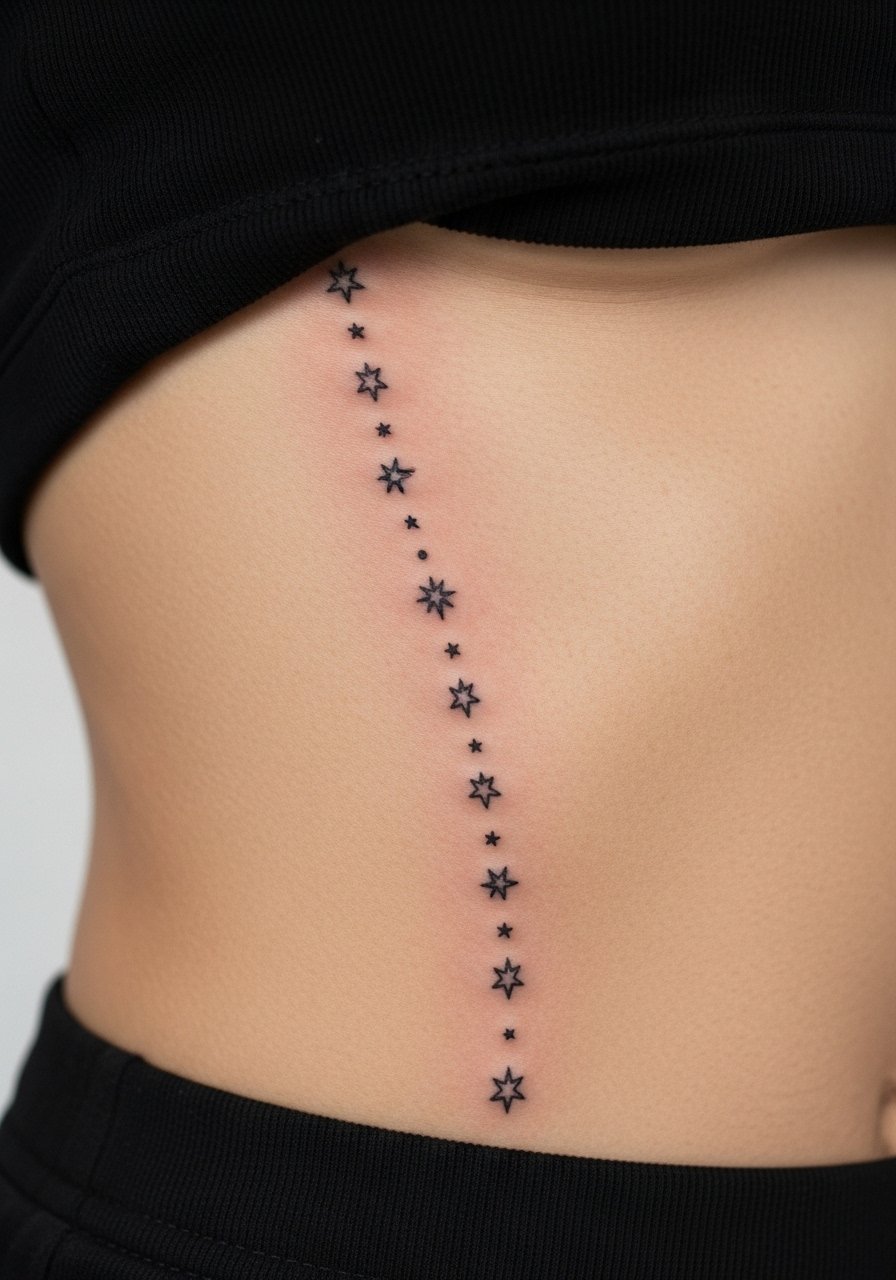
Ribcage star lines are beautiful but painful — ribs rank among the higher pain zones. The placement flatters body movement and can be very private or sensual. Keep lines spaced to prevent merging as skin stretches. I recommend planning the flow with your artist so stars sit naturally with your anatomy.
21. Tiny Shooting Star on Finger Top
Style/Technique: Minimalist / Single Needle
Pain Level: High (5-6/10)
Session Time: Under 1 hour
Best For: Playful, visible finger detail
Shooting-star finger tattoos are charming but hands get heavy wear. The top of the finger takes ink but fades faster. Keep the shape simple and accept that touch-ups are common. Avoid dense shading; crisp outlines last longer. If you want to test hand tolerance, try a similarly placed temporary first.
22. Star and Crescent Minimal Chest Accent
Style/Technique: Fine Line / Celestial
Pain Level: Low-Medium (3-4/10)
Session Time: 1 session
Best For: Chest accent, balanced symbolism

A star plus crescent is classic celestial symbolism about guidance and cycles. Upper chest placement sits well for symmetry and is easy to conceal. The skin there is forgiving and heals cleanly. For longevity, avoid white ink highlights; they tend to fade. Artists who do fine line celestial work can show how small spacing preserves detail.
23. Star Outline with Tiny Dot Halo on Nape
Style/Technique: Micro / Minimalist
Pain Level: Low (2-3/10)
Session Time: Under 1 hour
Best For: Subtle nape placement, hidden charm
The nape is a personal spot that reveals itself when your hair is up. Micro dot halos make the piece feel delicate and unique. Pain is light, and healing is easy if you avoid hair products during the first week. Ask your artist for healed photos on similar hair and skin types to set realistic expectations.
24. Geometric Star and Line Sleeve Accent
Style/Technique: Geometric / Fine Line
Pain Level: Medium (4-5/10)
Session Time: Multiple sessions
Best For: Sleeve integration, modern aesthetic
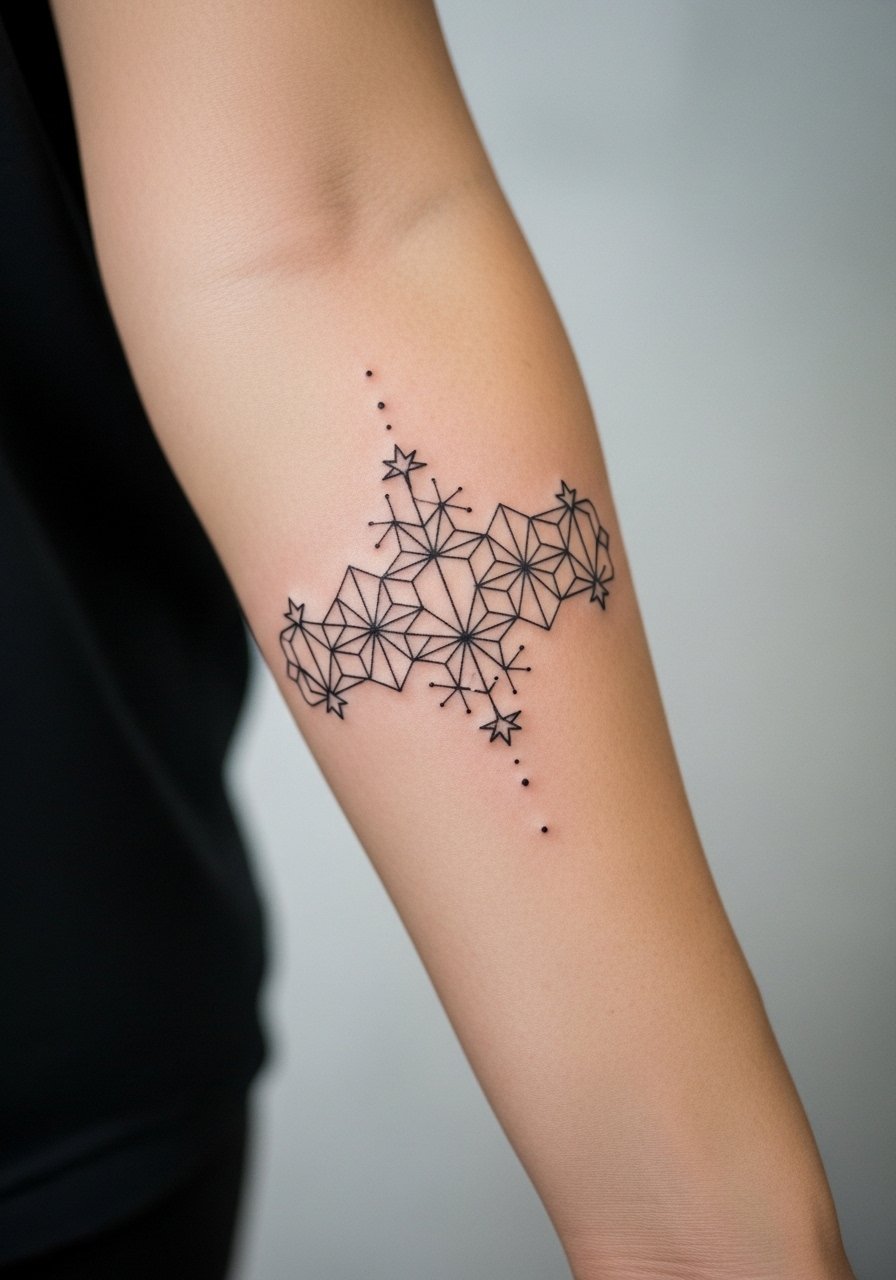
If you’re building a sleeve, small geometric stars can knit larger pieces together. They add structure and techy balance. Forearm placement tolerates detail well. Work with an artist who plans negative space so stars don’t get lost among other elements. Keep line weights consistent for a cohesive look.
25. Handpoke Honeycomb Star Cluster on Wrist
Style/Technique: Handpoke / Organic Dotwork
Pain Level: Low-Medium (3-4/10)
Session Time: 1–2 sessions (slower technique)
Best For: Natural, slightly imperfect aesthetic
Handpoke stars have an organic, slightly raw look I’ve come to love. The technique can feel different from machine work — more gradual — and heals with a softer texture. Choose a practitioner who does handpoke safely and has healed examples. Expect slower sessions and a style that embraces imperfections.
26. Minimal Star Tattoo Behind Calf
Style/Technique: Minimalist / Single Needle
Pain Level: Low (2-3/10)
Session Time: Under 1 hour
Best For: Hidden-but-handsome placement, athletic visibility
Behind-the-calf stars are easy to hide with pants and show off in summer. The skin there is forgiving and pain is low. I like this for people who want a small symbol without constant visibility. Keep the design simple so it reads at a distance and ages predictably.
Tattoo Prep and Aftercare Essentials
Aftercare Essentials:
- Aquaphor Healing Ointment, 14 oz tube — Recommended first 3–5 days for scabs and dryness
- Saniderm Transparent Adhesive Bandage, 6-inch roll — Artists often recommend for early protection
- CeraVe Fragrance-Free Moisturizing Lotion, 12 oz — Daily moisturizer after initial healing phase
- Dr. Bronner's Unscented Castile Soap, 32 oz — Gentle daily clean during first 2 weeks
Before Your Appointment:
- Tattoo Numbing Cream with 5% Lidocaine — Use only if your artist approves; apply as directed
- Stencil Transfer Paper (Pack) — For testing custom layouts at home
Long-Term Maintenance:
- SPF 50 Sunscreen Stick for Tattoos — Non-negotiable for preventing fading
- Mad Rabbit Tattoo Balm, 1.7 oz — Good for keeping healed ink vibrant
- Hustle Butter Deluxe, 3.5 oz — Vegan aftercare option many artists mention
Optional Comfort & Extras:
- Tattoo Numbing Spray — For touch-ups on sensitive spots (ask your artist)
- Hydrocolloid Bandages, Large (Pack) — Alternative to Saniderm for small areas
I list what artists actually recommend versus hype: Saniderm and Aquaphor are commonly suggested for the early days. Hustle Butter and Mad Rabbit are popular for long-term moisture. Fragrance-free lotions and SPF sticks are non-negotiable for preserved color.
Frequently Asked Questions
Q: How bad does a star tattoo actually hurt?
A: Pain depends on placement and your tolerance. Outer forearm, thigh, and shoulder are on the low end (2–4/10). Knuckles, ribs, and fingers hit higher (6–8/10). From what I’ve experienced, small star tattoos feel more like scratching than deep burning. If you’re nervous, consider a low-pain area or ask about a numbing cream with lidocaine — many artists will advise whether it’s appropriate.
Q: What if I regret my star tattoo later?
A: Sit with designs for several months and test visibility with temporary tattoos. If you still regret it years later, removal exists but is a long process. That’s why I favor small, meaningful pieces or hidden placements for first-star tattoos.
Q: How do I keep small star tattoos from fading?
A: Sunscreen is your best defense — apply an SPF 50 stick every day once healed. Also keep skin moisturized with a fragrance-free lotion like CeraVe. From what I’ve seen, black ink fades slowest; reds and neons need more attention.
Q: Can I work out after getting a wrist or hand star?
A: Wait 48–72 hours minimum, longer for high-friction areas. Sweating and tight gear can irritate fresh ink. I skipped gym classes for a week after hand pieces and it helped my healing.
Q: Should I get a tiny star first to test my pain tolerance?
A: Only if you actually want that tiny star. Pain varies by placement more than size. If you’re anxious, pick a less sensitive spot like the outer forearm or thigh for your first piece.
Q: How long does a small star tattoo take to heal?
A: Surface healing: 2–3 weeks. Full settling: up to 2–3 months. The first week is critical — keep it clean with gentle soap (I use Dr. Bronner's Unscented Castile Soap) and moisturized with Aquaphor or your artist’s recommended balm. Expect peeling around day 3–7; don’t pick.
Q: Do star tattoos look different on different skin tones?
A: Yes. Black and gray stars read well across tones. Bright colors may appear differently — talk to your artist about saturation and healed examples on similar skin. I always ask for healed photos from artists working on my skin tone before committing.
