
Someone I know spent eight months saving reference photos and still felt unsure at the consult. Part of the problem was knowing which tiny bird style would actually age well. I spent time in five shops across Brooklyn and chatted with an artist at a Brooklyn shop who specializes in fine line and stipple shading. Artists are split on fine line longevity. One camp says it blurs faster on thin skin. The other camp says correct depth and spacing keep it crisp. Read on for designs that balance longevity, placement, and personality.
1. Fine Line Hummingbird on the Inner Wrist

Someone I know first saw this on a friend and loved how delicate the flight looked on the wrist. Fair warning, the inner wrist is sensitive but quick to tattoo so most sessions run under an hour. Ask your artist to keep spacing between feathers and to avoid ultra-thin single hairlines. One common mistake is making the bird too small, which causes the lines to blur together over two to five years. This version uses light stipple shading to preserve detail. Expect touch-up possibility around year three depending on sun exposure and daily wear.
2. Micro Swallow on the Collarbone
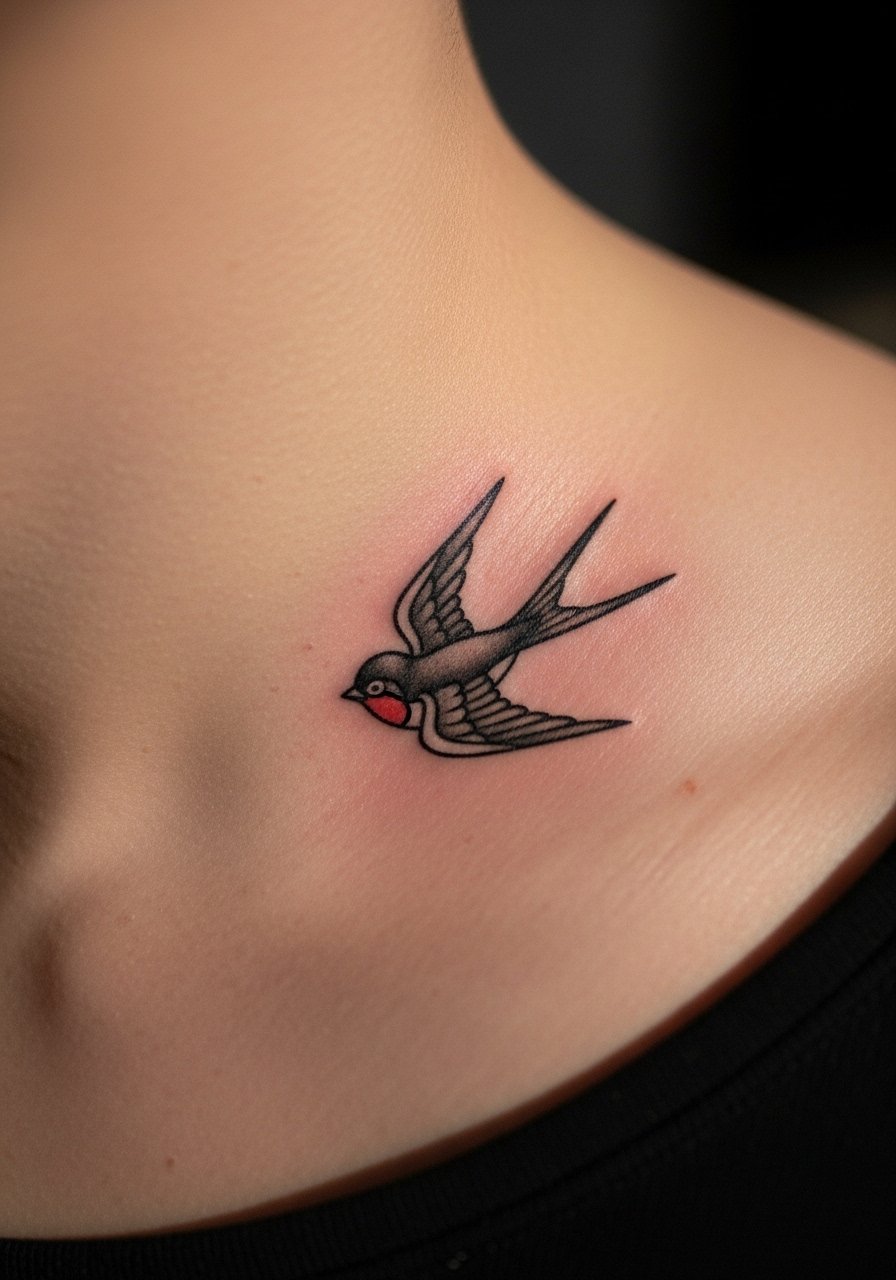
When placed along the collarbone the swallow reads like a secret. Pain level sits moderate because the bone is close to the skin yet the session usually stays under 45 minutes. Tell your artist you want slightly thicker contour lines and low saturation inside to avoid early fade. The mistake I see often is asking for feather detail that is too tight for the size. On medium to long term healed skin the swallow benefits from placement where clothing does not rub constantly. It suits someone who wants a small piece that still reads across a neckline.
3. Micro Bluebird Behind the Ear

Fair warning about behind-the-ear pieces. The area is bony and vibrates when you laugh, which can make the session feel sharp. Most micro bluebirds here fit in a 30 to 45 minute session. For long-term clarity, avoid dense color fill. Ask for a version that uses open negative space in the wing and light whip shading for tone. A common error is picking heavy watercolor washes for this placement. Those washes tend to ghost faster because the area gets regular sun and shampoo exposure. If you work in an environment where visible ink matters, consider how collar length and hair will cover it.
4. Minimalist Flying Dove on the Ankle

There is something about an ankle dove that reads delicate while still being visible when you want it to be. The ankle is moderate on pain and usually a quick session. During consult mention that you want slightly bolder outline than ultra-micro to reduce blowout risk. People often make the mistake of asking for the smallest possible scale for intricate wing lines. That invites blurring and may need a touch-up sooner. This placement ages well if you avoid tight anklets that constantly rub new ink.
5. Stipple-Shaded Sparrow on the Upper Arm

When you sit with your artist for this one bring references showing the exact stipple texture you like. The upper arm is one of the friendliest spots for small detail and the session runs 45 to 75 minutes. One advantage is lower blowout risk because the skin is thicker. A common mistake is asking for solid black fill in a tiny sparrow. That tends to age into a blob. This stipple approach spreads tones with dot work so the piece keeps its shape over years. Ideal for someone who wants detail but wants it tucked away under short sleeves when needed.
6. Blackwork Raven Silhouette on the Outer Wrist

Visual impact lead. Bold black silhouettes read clearly at small sizes and they photograph well. The outer wrist is exposed so plan for sun protection. This style is a quick session, often under an hour, and it holds saturation longer than fine line fills. A frequent mistake is over-detailing the silhouette in a tiny footprint. Keep the shape simple. For those nervous about visibility note that darker pieces on the wrist tend to require fewer touch-ups than ultra-fine designs.
7. Tiny Cardinal on the Side of a Finger

Fair warning about finger tattoos. They live on a high-wear surface and often need touch-ups every one to three years. Sessions can be quick but expect a higher chance of migration and fading. When you talk to your artist ask for slightly bolder color blocks and hold off on ultra-fine feather detail. The biggest mistake is making the design too intricate for the canvas. If you want longevity, plan to accept periodic touch-ups or pick a placement with less friction.
8. Watercolor Mini Hummingbird on the Shoulder Blade

Most watercolor tattoos from years ago faded into murky patches. This version avoids that by pairing restrained color with defined contour lines. The shoulder blade is low on pain and sessions usually fall in the 45 to 90 minute range depending on color. Tell your artist you want anchored outlines where the color sits inside clear boundaries. A common error is asking for an unbounded wash with no linework. That style can blur faster on high-movement areas. Watercolor can be beautiful if it is balanced with structural linework beneath.
9. Four-Bird Migratory Line across the Collarbone

Personal observation lead. The four-bird motif reads like a narrative across the collarbone. This placement gives each bird room to breathe and keeps the composition elegant. Sessions vary but many artists break it into one longer sitting around 60 to 90 minutes. A common mistake is compressing all four birds into too small a band which makes detail vanish. If you want distinct silhouettes ask for varied spacing and subtle size changes to suggest depth. This works well for people who want a piece that moves with the collar line when they turn.
10. Micro-Realism Kingfisher on the Ribcage

Fair warning. The ribcage is a seven to nine on pain for many people. Micro-realism here can be stunning but it requires an artist experienced in tiny tonal transitions. Expect a longer session, sometimes split into two shorter sittings. The mistake I see is asking for maximal photorealism at a scale too small to hold. Instead request simplified real-feel textures and slightly larger scale for key features. Also be explicit about touch-up expectations because the ribcage flexes with breathing and can shift healed linework.
11. Geometric Bird with Dot Work on the Back of the Neck

Consultation lead. When you sit with your artist, bring both geometric references and examples of the exact dot density. The back of the neck is sensitive but often well hidden with hair. Sessions tend to be 45 minutes to an hour. A real mistake is crowding the negative space with too many intersecting lines at a tiny scale. The geometric frame should provide breathing room so the dot work creates texture without looking muddy over time. This style suits someone who likes structure and a subtle reveal.
12. Tiny Origami Crane on the Top of the Foot

Pain warning. The top of the foot often ranks high on pain, and swelling can make the session feel longer. Expect a compact session under an hour for a tiny crane. Tell your artist you want simple folds represented as clean strokes rather than tiny hatch fill. People often try to force texture into this small plane which accelerates blur. If you wear sandals think about shoe straps and how they might rub the area while healing. Consider scheduling around lighter footwear.
13. Tiny Albatross at the Upper Sternum

Controversy lead. Sternum pieces split opinion because of movement and skin stretch. One camp says central chest gives beautiful symmetry that lasts. The other camp warns that heavy movement and low collagen areas can soften lines faster. The session for a tiny albatross is short yet the area requires careful aftercare. A common mistake is asking for tightly detailed wings at this location. A simplified silhouette with slight spacing in linework will hold up better. If you have a job where low necklines are part of the dress code consider how visible this will be.
14. Minimal Phoenix Outline Wrapping the Ankle

Visual impact lead. A wraparound ankle piece reads like motion when you walk. The ankle offers a small canvas and sessions stay near 45 minutes. For longevity avoid ultra-thin continuous lines that circle the joint. The mistake people make is choosing continuous ultra-micro lines that fracture when the skin flexes. Ask for slight breaks in the outline and small dots of saturation at key points. This reduces the chance of a faded continuous seam after years of movement.
15. Tiny Finch Perched on a Thumb

Pain warning. Knuckle and thumb areas are high friction and often need regular touch-ups. Sessions are typically short but expect a higher fade rate. When booking, ask for a slightly bolder contour to help the piece resist wear. A common mistake is expecting fine feather detail on such a mobile surface. For better longevity choose a graphic perch pose and accept occasional refreshes. This piece is great for someone who wants a personal talisman on a frequently visible hand.
16. Micro Swallow with the Word "Breathe" on the Inner Forearm
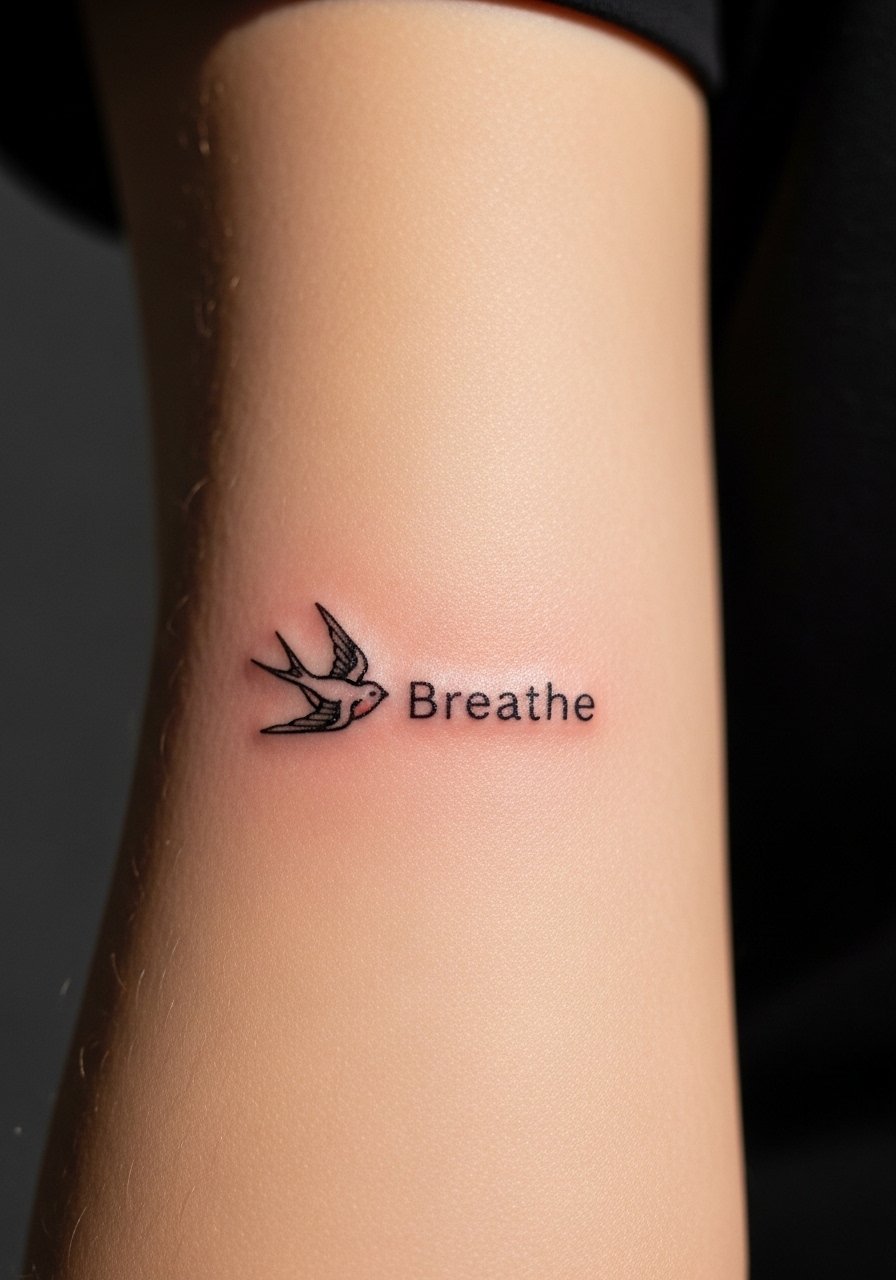
Consultation lead. Bring the exact script you want because text generates badly for script made up on the fly. The inner forearm is one of the least painful spots and sessions are usually 30 to 60 minutes. One mistake is requesting tiny script that the artist then shrinks to fit. Ask for clear letter spacing and a slightly larger swallow to balance the word. This placement gives a calm, conversational feeling and aging is friendly if you protect it from sun.
17. Tiny Parrot Head in Color Behind the Ear

When you want a pop of color without a big commitment behind the ear is a playful location. Expect a short session but higher fade risk because shampoo and sun hit this area. Tell your artist you want saturated color spots rather than full blends. The common error is asking for micro-gradients that ghost quickly. Color retains best with defined shapes and occasional touch-ups. If you need a discrete piece, plan hair length to cover it when desired.
18. Black-and-Gray Dove on the Ribcage

Controversy lead. Fine line on the ribs divides artists. One camp says thin lines blur there within two years because of skin stretch. The other camp says a slightly deeper hand and proper spacing will keep lines crisp. For a small black-and-gray dove choose a version with modest line weight and stipple shading to protect the main contours. Expect a longer session and honest talk about touch-ups. The ribs can give dramatic placement but require clear expectations about aging.
19. Micro Wing Cluster near the Collarbone

Mistake lead. The biggest error with clusters is overpacking wings into a tiny area. When you consult ask for spacing and negative zones to keep each feather readable over time. Collarbone placement gives graceful movement and sessions run 30 to 60 minutes. For durability request slightly stronger main strokes with soft interior shading. If you prefer subtlety this cluster reads like jewelry when worn with open necklines and it usually requires lower-touch upkeep than high-friction spots.
20. Tiny Sparrow on the Side Thigh

Personal observation lead. The thigh is a forgiving canvas for detail and tends to be lower on touch-up frequency. Sessions are comfortable and often done in one sitting of 45 to 90 minutes depending on shading. A common mistake is crowding the piece with background elements at a small scale. Keep the sparrow simple and let the surrounding skin provide negative space. For people who want a private piece that can be shown selectively this is a reliable choice.
Tattoo Prep and Aftercare Essentials
After Inked Tattoo Moisturizer & Aftercare Lotion. A lightweight balm designed specifically for healed and healing tattoos. Use for short-term moisture after the initial scab phase to keep saturation steady and avoid fragrances that irritate fresh work.
Tattoo Goo Aftercare Spray. Gentle spray option for cleaning the area in the first few days when hands might contaminate the tattoo. Good for quick, controlled cleansing during travel or after light activity.
H2Ocean Tattoo Aftercare Moisturizer. A product many people use to hydrate ink without greasy residue. Apply in a thin layer to avoid clogging pores while skin heals.
Tegaderm Transparent Film Dressing. Medical-grade occlusive bandage for those who prefer a protective first layer over fresh ink. Useful for short-term waterproof protection during the initial 24 to 48 hours.
Bepanthen Nappy Care Ointment. A gentle ointment some people use in small amounts early in healing to prevent excessive dryness. Not every artist recommends ointment beyond the first day, so check with your artist.
Saniderm Transparent Wound Dressing. A single mainstream option for those who want a clear second-skin film. Use only if your artist approves it as their one recommended covering. Saniderm can reduce scabbing but requires correct application.
Fragrance-free gentle foaming cleanser. Generic descriptor for a mild soap. Use twice daily for the first week then follow your artist's specific schedule. Avoid exfoliating formulas during healing.
Lightweight fragrance-free balm for long-term maintenance. Generic descriptor for a daily moisturizer that protects color and helps prevent flaking. Apply sparingly for long-term hydration and UV defense.
Every tattoo is different. Always follow your artist's specific aftercare instructions. Consult a dermatologist if you have skin concerns or unusual healing issues.
Frequently Asked Questions
Q: Will a fine line hummingbird on the inner wrist need more touch-ups than a blackwork silhouette on the outer wrist?
A: It depends on daily wear and sun exposure, but from what I have seen fine line pieces on thin skin often need earlier touch-ups than bold black silhouettes. The blackwork silhouette resists fading better because of saturation. If you want minimal upkeep ask for slightly bolder primary lines on delicate placements.
Q: Do watercolor-style mini hummingbirds require different aftercare than a small blackwork bird?
A: Yes. Watercolor pieces tend to rely on soft color transitions which can ghost if scabbed heavily or rubbed. Keep color pieces out of direct sunlight and avoid aggressive exfoliation during healing. Cleaning and light moisturizing are the same, but be extra gentle with color saturation areas.
Q: Are ribcage bird tattoos more likely to blur because of movement?
A: The ribs move with breathing and skin can stretch there so some artists expect more settling. One camp says fine line blurs faster on ribs. The other camp says correct needle depth and spacing prevent that. Have a clear conversation about line weight and touch-up plans at your consult.
Q: How do I find the right artist without using handles or names?
A: Use discovery pathways like searching local shop galleries, browsing convention portfolios, and targeting hashtags like #tinytattoos and #microrealism. Look for healed photos in portfolios, not just fresh shots, and check for examples on skin tones similar to yours.
Q: Is Saniderm the best protective covering for new tattoos?
A: Saniderm can work well if your artist recommends it and you apply it exactly as directed. It is the one mainstream product some people use for initial protection. Many artists prefer open-air healing, so follow the specific guidance you get at your appointment.
Q: For a tiny bird on a finger or thumb how often should I expect touch-ups?
A: Expect touch-ups more frequently for hands. From what I have observed many people plan for a refresh every one to three years depending on sun and work exposure. Choosing slightly bolder outlines helps extend the time between touch-ups.
