
Someone I know spent months pinning ocean designs and then realized the real problem was picking a style that fits their life and skin tone. The right ocean tattoo can look purposeful at six months and still read well at five years if you choose placement, scale, and technique carefully. Below are ten ocean theme tattoos that stay readable, work for different budgets, and include what to tell your artist to get the result you actually want.
1. Realistic Humpback Whale Portrait on Outer Forearm

Someone I know first saw a humpback portrait and booked it because the scale read like a small sleeve without the commitment. Tell your artist you want micro-realism with emphasis on eye detail and subtle navy accents so the whale keeps presence from a distance. Common mistake is forcing too much color into a small forearm piece which blurs at two years. Expect a 4 to 6 hour session and moderate pain on the forearm. Healed at six months you will still see contrast, at two years expect slight softening, and a touch-up at year three is normal for crisp highlights. Ask about needle spacing to avoid blowout near the wrist.
2. Traditional Nautical Anchor with Rope on Inner Forearm

Fair warning: inner forearm ink sits where shirts rub and light hits it often. Go with classic bold outlines and moderate saturation so the anchor reads for years. When you consult, say you want clean traditional linework with tight rope detail and ask for slightly wider spacing on the rope to prevent early fading. The typical session is single session under three hours and pain is low to medium. A common error is asking to shrink a classic anchor down too small which destroys the rope detail. For long-term clarity plan for a light touch-up in two to four years.
3. Fine Line Jellyfish Tentacles on Wrist or Ankle

Artists split on whether single-needle fine line holds up on wrists and ankles. One camp says tiny single-needle work blurs faster on flexible skin. The other camp claims correct depth and spacing keeps lines crisp for years. My advice is to ask which camp your artist belongs to and request slightly bolder linework if you want longer life. This piece typically takes two to three hours and feels sharp on the ankle bone. People often ask for ultra-thin lines and then need touch-ups sooner. For a longer lived option, keep tentacles flowing and avoid micro-detail at the very tips.
4. Neo-Traditional Octopus Wrapping the Upper Arm
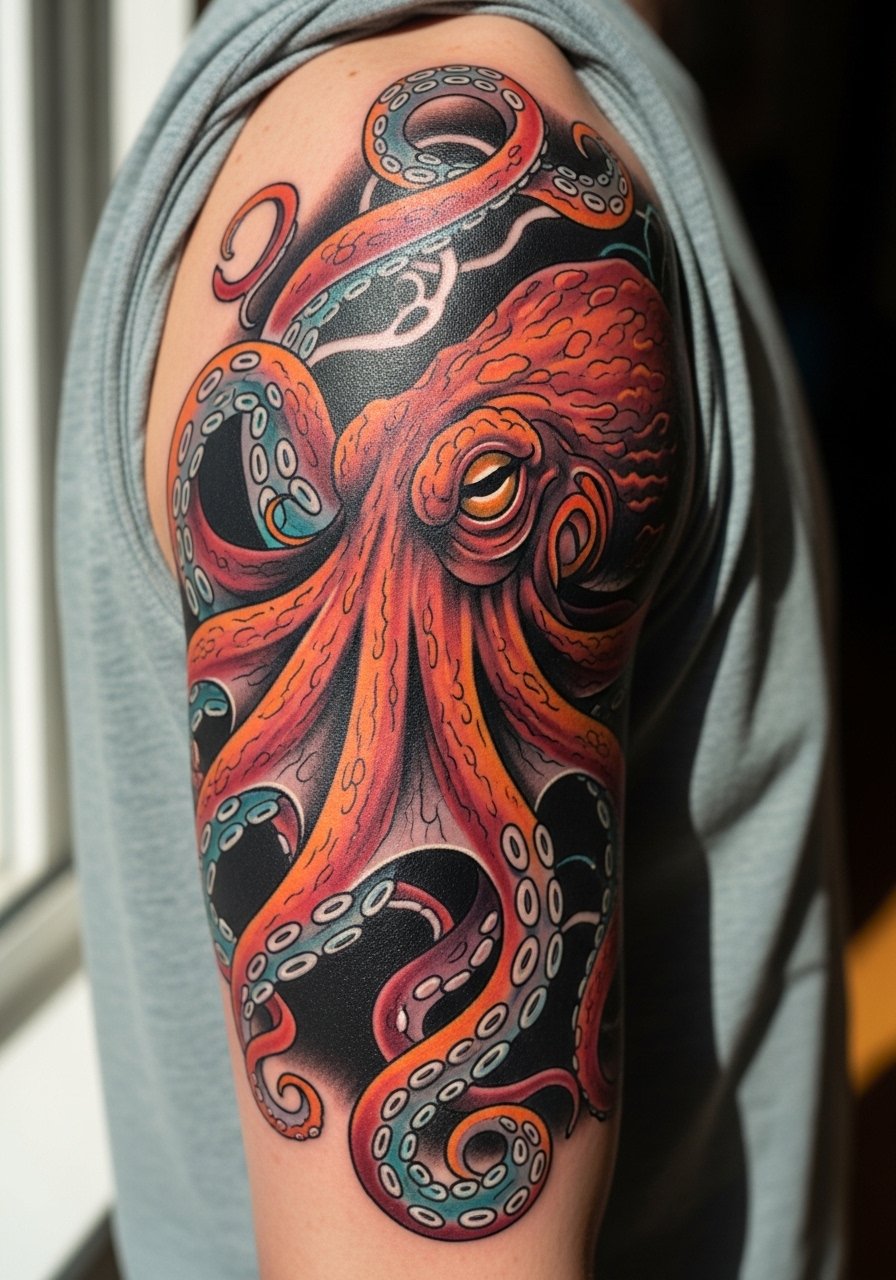
There is something about tentacles that solves awkward curves on the upper arm. Ask for tentacles that follow your muscle flow and for color gradients that sit on a black base so the piece retains contrast. Expect two to three sessions for a half-sleeve starter and moderate to high pain on inner curves. A common mistake is trying to compress too many tentacles into a small patch which muddies the silhouette. Over time the colors can soften, so plan touch-ups at year three if you want the original punch back. Mention wrap direction at consultation so it reads the way you want from your usual viewpoint.
5. Minimalist Wave Band on Biceps
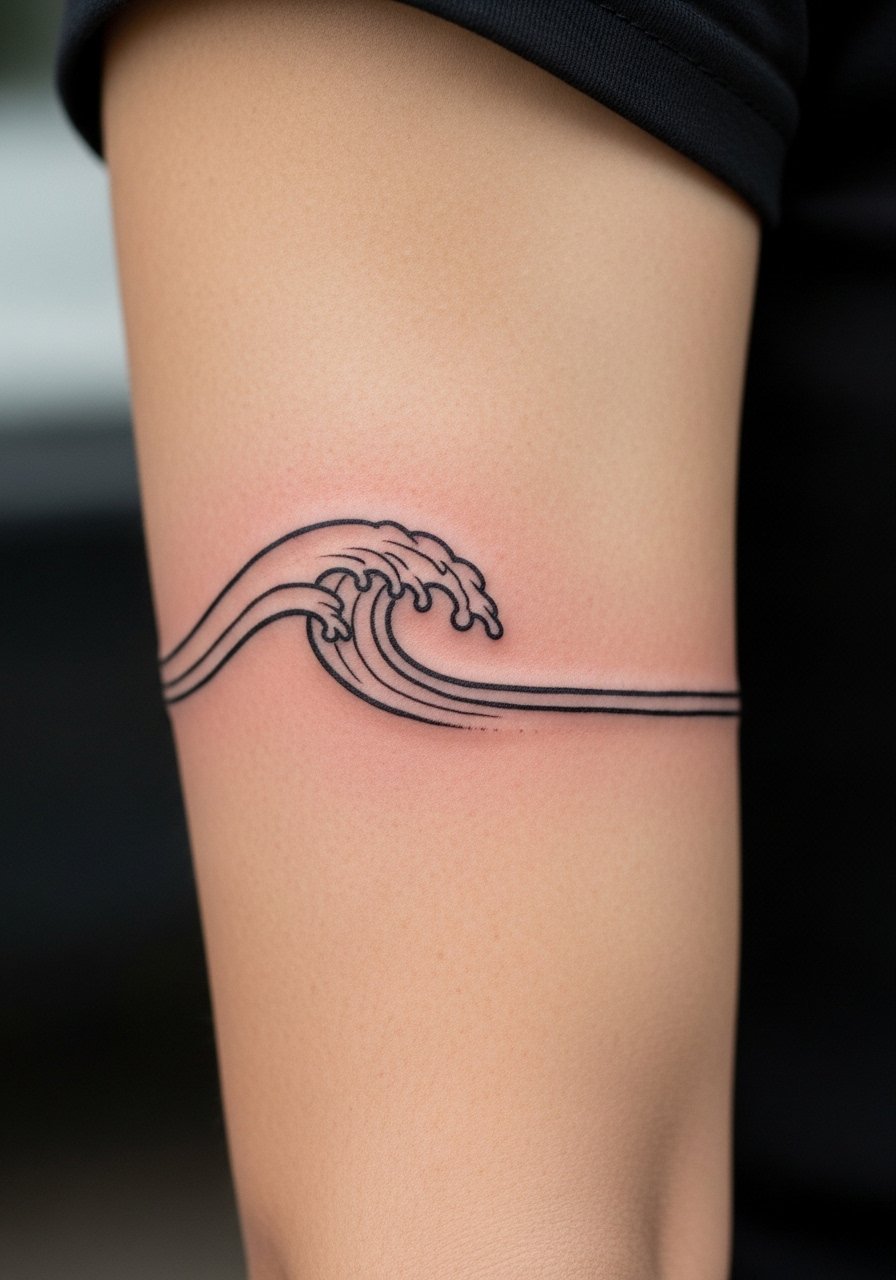
Most watercolor pieces from a few years back faded into bruiselike washes. Minimalist wave bands avoid that because they use simple, slightly thicker linework and spacing that ages predictably. Say to your artist you want a bicep band with two to three millimeter line weight and a small gap between waves so the design keeps its shape. This is a quick session under two hours and the bicep tends to be low to medium pain. A mistake is going ultra-thin for a band that gets stretched by muscle change. If you plan significant weight fluctuation, pick a slightly larger scale to preserve the wave rhythm.
6. Watercolor Coral Reef Scene on Thigh

Most people who choose watercolor want painterly color but do not realize how much sun and friction a thigh gets. One camp prefers bold outlines under the watercolor to protect saturation. The other camp keeps it purely soft and accepts faster fade. Ask your artist which route they take and whether they will add subtle line anchors under the paint. Expect two sessions with moderate pain on the outer thigh. A frequent error is cramming reef detail into too small an area which becomes an indistinct color patch. For longer life, plan SPF protection and a touch-up in two to four years.
7. Blackwork Ornamental Seashell on Collarbone

There's a reason blackwork reads so clearly on high-motion spots like the collarbone. Tell your artist you want strong solid fills with negative-space patterns so the shell keeps visual weight. Sessions are usually one sitting under three hours and collarbone pain ranks medium to high. A common mistake is requesting extremely tight dot work too close to the bone which can blur into a gray patch. Healed at six months the geometry remains legible, and many people return for a scheduled touch-up at year three to restore edge crispness.
8. Ignorant Style Shark Outline on Calf
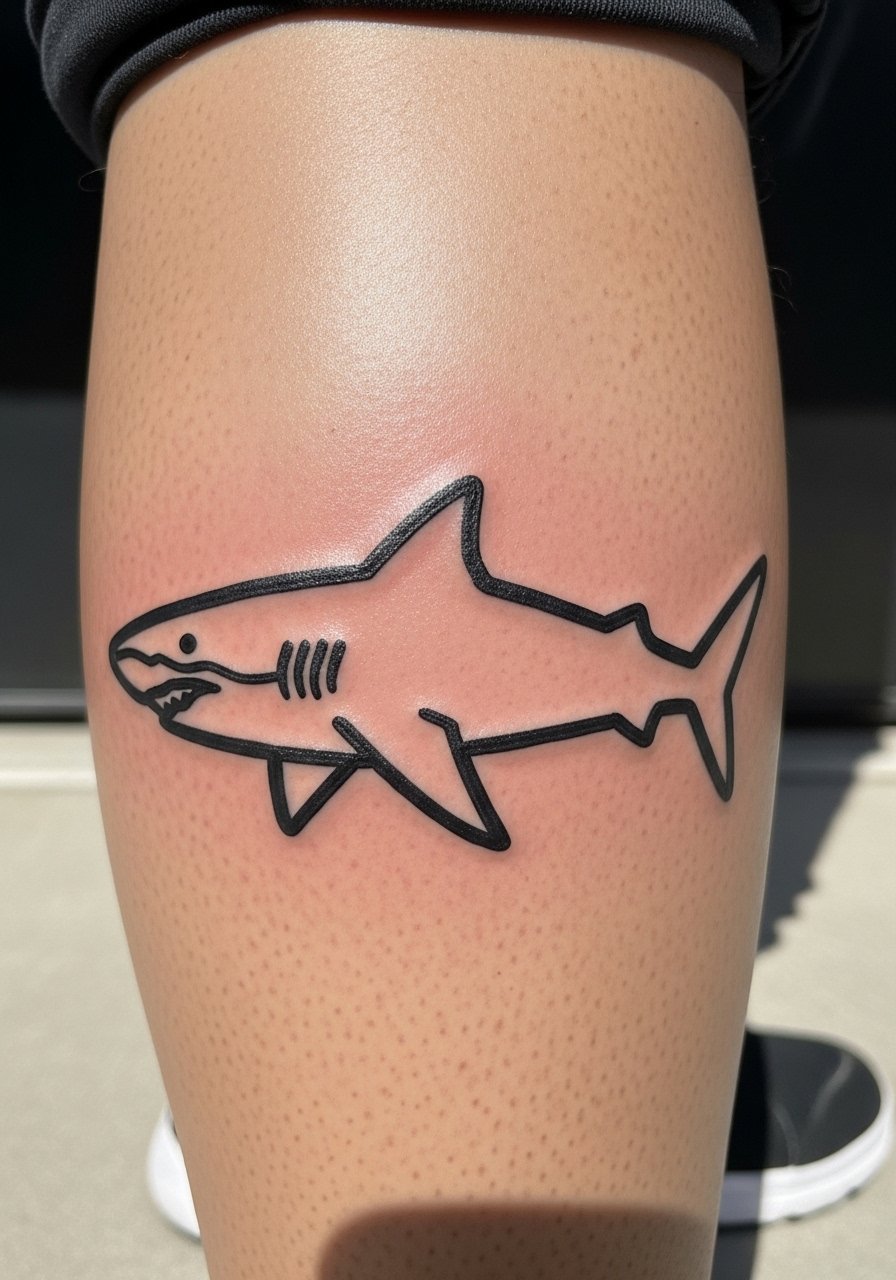
If you want an aggressive silhouette that reads from across a room, ignorant style fills that role with thick confident strokes. In consultation say you want bold, naive line weight and clear negative space around the shark so the shape stays striking. Calf sessions are quick and pain is low to medium depending on proximity to bone. A common mistake is adding internal detail which spoils the naive look. Over time the single thick outline holds better than tiny details, and touch-ups are mostly about restoring black saturation rather than reworking form.
9. Fine Line Sea Turtle Silhouette on Ankle or Spine

Most divers pick turtle silhouettes to mark a specific encounter. If you want a clean fine line turtle, bring a photo of the shell pattern you like and tell the artist which parts to simplify. The ankle is higher risk for blowout because the skin is thin and mobile. One camp says single-needle is fine on ankles with careful depth control. The other camp suggests slightly bolder lines to prevent early blurring. Sessions are under two hours and pain near the ankle can be sharp. Expect a touch-up window around two to three years for crispness.
10. Traditional Kraken Tentacles on Forearm

There is drama in a kraken that wraps the forearm and reads well at a distance. Ask for bold anchors in the tentacle suckers and for color placed under black outlines so the piece keeps the traditional punch. This is a multi-session project and forearm placement ranges low to moderate on pain. A frequent mistake is trying to make every tentacle hyper-detailed which creates muddiness as the skin ages. Traditional work tends to hold better than ultra-fine styles, and touch-ups at year three are common if you want to refresh the blue shading.
Tattoo Prep and Aftercare Essentials
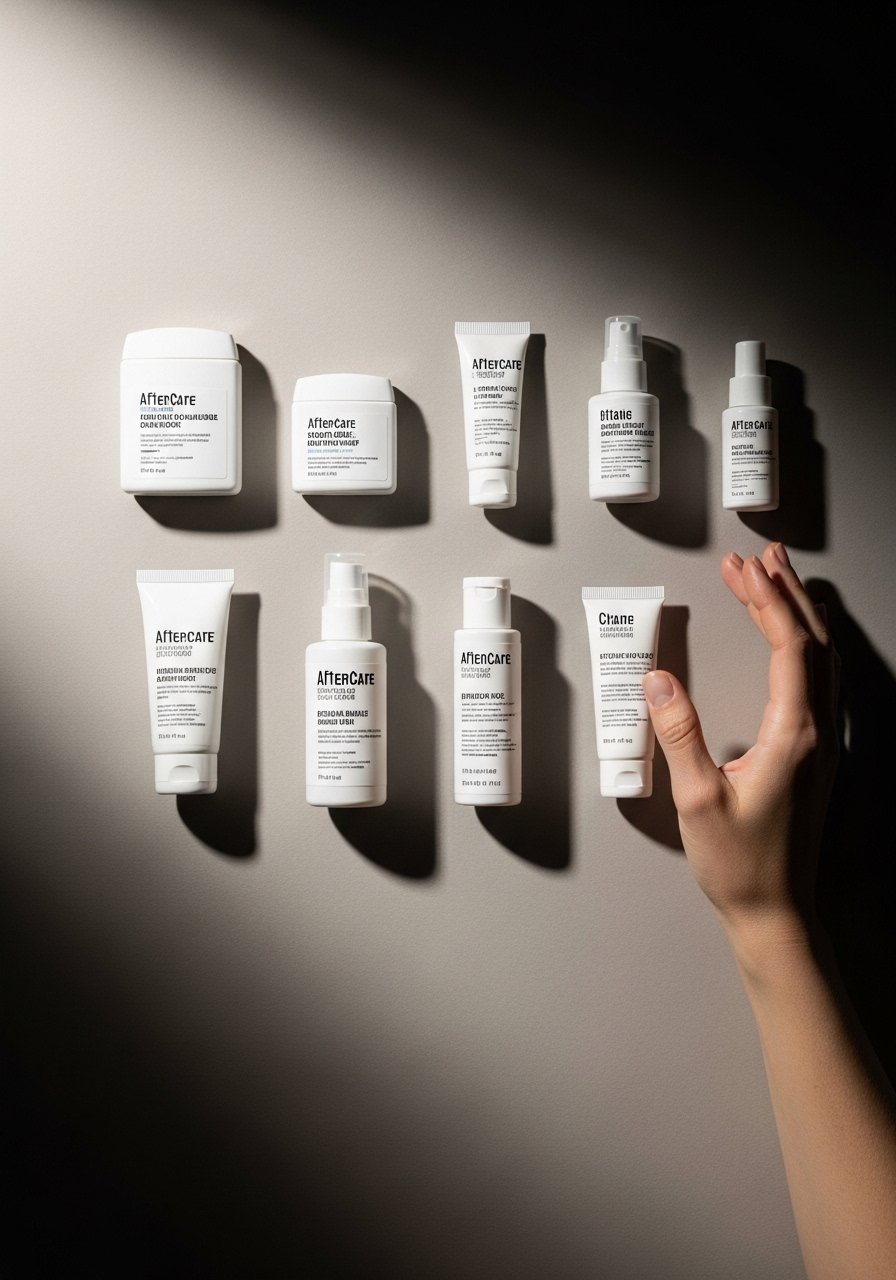
When you plan ocean-themed ink, a few practical items help healing and long-term tone. Below are curated choices that cover cleaning, occlusion, and maintenance. I include mostly lesser-known or generic descriptors because small indie finds often avoid heavy fragrance and unnecessary additives. One mainstream product appears here as the single widely known option for occlusion.
Fragrance-free gentle foaming cleanser for tattoos. Use this during initial showers to remove surface plasma without stripping ink. Clean twice daily for the first week.
Lightweight fragrance-free balm in travel-friendly tin. Apply thin layers for the first five to seven days to keep skin supple and avoid clogging pores.
Medical-grade second skin bandage, 6-inch roll. Useful for larger pieces during the first 24 to 48 hours if your artist recommends occlusion.
Silicone-based long-term scar and pigment stabilizer. Use after full healing to keep edges soft and pigmentation even.
Breathable tattoo-specific SPF 30+ sun stick. Apply after the full healing period whenever the design meets sun to slow fading.
Hydrating unscented body lotion. Keep the skin moisturized long term to preserve saturation and prevent dryness lines.
Silicone scar sheet patches, small pack. For raised areas after healing these help flatten and even tone over months.
Aquaphor Healing Ointment. This counts as the single mainstream occlusive in the list. Use sparingly for very dry spots if recommended by the artist.
Every tattoo is different. Always follow your artist's specific aftercare instructions. Consult a dermatologist if you have skin concerns or unusual healing issues.
Frequently Asked Questions
Q: Will fine line tattoos blur into each other if I get a full sleeve of ocean creatures?
A: It depends on spacing and needle depth. From what I have seen, dense fine line sleeves need intentional negative space and occasional bolder anchor lines to avoid gradual blurring. Talk to an artist who has photographed healed fine line sleeves so you can inspect real-world results.
Q: Do watercolor-style coral reef tattoos need different aftercare than traditional ones?
A: Yes, watercolor pieces often benefit from gentler cleansing and avoiding heavy ointments that can pool pigment. Keep the area protected from sun once healed and consider a targeted SPF stick to slow fading.
Q: Are kraken tentacles a better choice than an octopus for wrapping limbs?
A: Kraken designs usually emphasize drama and scale with larger, simpler suckers and bold contrast. Octopus work often calls for more realistic suction detail. If you want clearer long-term read, choose fewer, bolder tentacles and tell your artist you prefer silhouette legibility over micro-detail.
Q: Will a minimalist wave band distort if I gain or lose muscle on my biceps?
A: Slight shifts happen with body change. Bands with a bit more scale and breathing room in the gaps tolerate muscle change better than ultra-thin single lines. If you expect major changes, opt for a slightly larger band.
Q: How often should micro-realism pieces like a pearl in an oyster need touch-ups?
A: Micro-realism typically shows softening by year two to three. Expect a light touch-up in that window to restore highlights and contrast. Darker skin tones sometimes keep midtones well while highlights need renewing sooner.
Q: Can I search for ocean tattoo references online without contacting specific artists?
A: Yes. Use style-specific hashtags like #marinelifetattoo or #finelineocean, and check location tags for coastal studios. Tattoo directories and community forums also let you filter by style and healed photos so you can see age-tested examples.
