
I spent months collecting tattoo references from conventions, artist portfolios, and fan groups. The hard part for me was not picking a character. It was picking a style that would still look good five years from now. These 29 anime tattoos reflect what I see collectors asking for in 2026, and the versions I recommend when I talk to artists.
This list leans into fine line, traditional anime, and micro-realism, with a few modern angles like UV highlights and negative space. I focused on placements that suit each design, from forearms to ribs. From what I've gathered, artists are pushing clean, timeless lines and restrained color palettes. Expect notes on pain, healing, and what to ask your artist.
1. Fine Line Naruto Silhouette on Inner Forearm
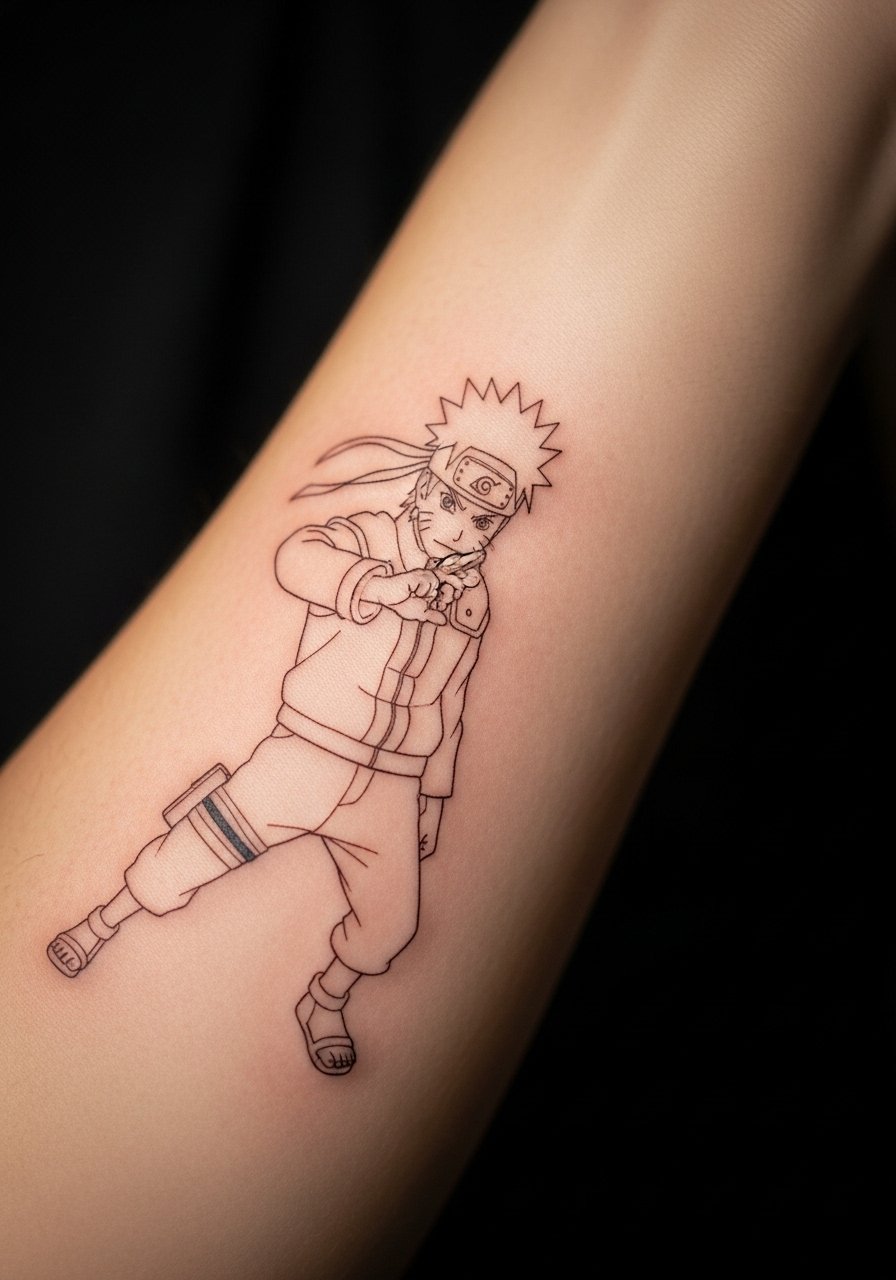
I first saw this as a sleeve filler on a friend and loved how readable it stayed after a year. Fine line works on the inner forearm because the skin is flat and the artist can keep lines crisp. Expect low to moderate pain for this placement. A single 60 to 90 minute session usually does it. Ask for slightly bolder primary outlines so the silhouette does not disappear after two years. The common mistake is making the lines too thin. At six months the edges will soften. At two years you want the silhouette still legible. Use a conservative color fill, or none, to avoid early blur. For healing I recommend Saniderm for the first few days, especially on forearm work.
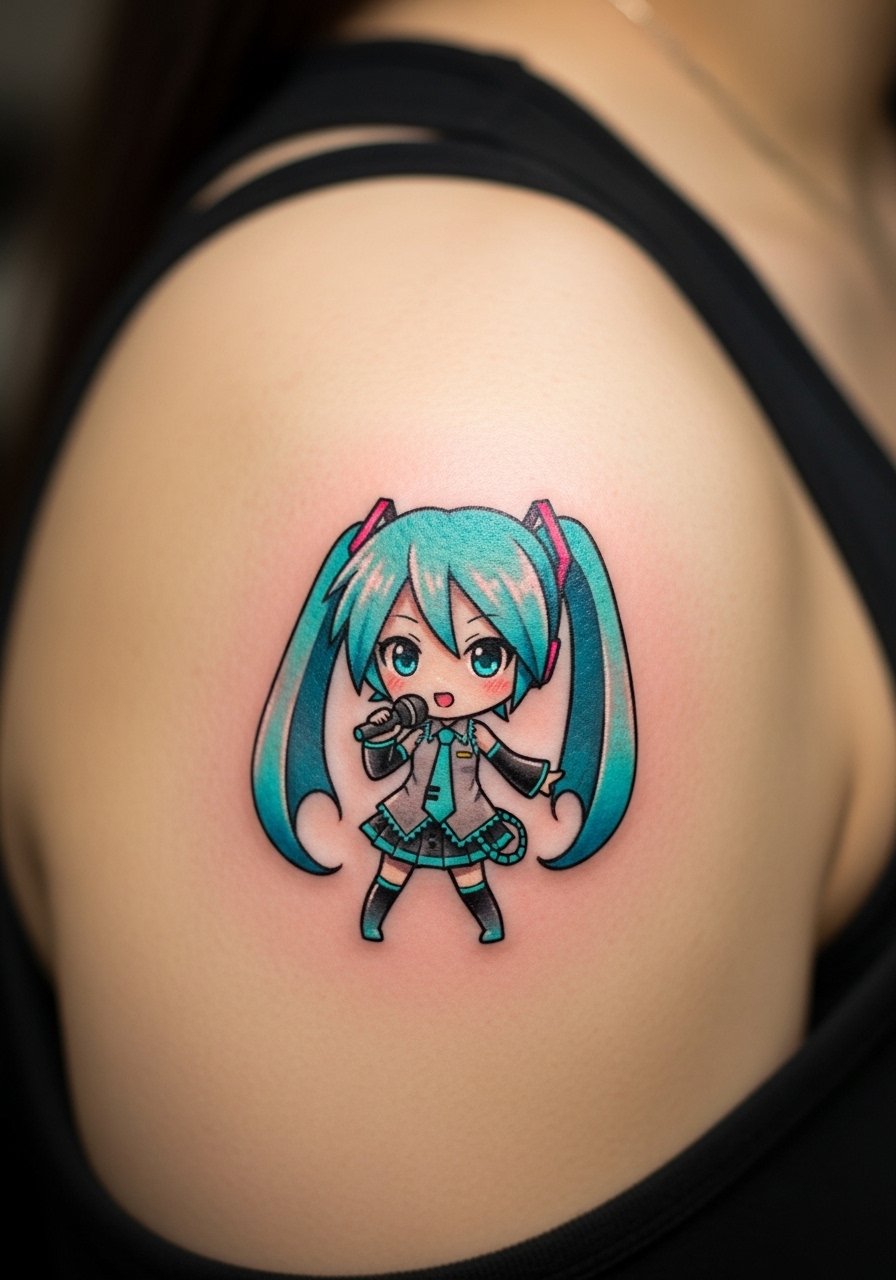
2. Micro-Realism Ghibli Portrait on Upper Arm

Fair warning, micro-realism on soft tissue like the upper arm needs a steady hand. I saw this style at a convention and I knew it needed a high-skill artist. Pain is moderate. Sessions run two to four hours depending on size. Tell your artist you want high-contrast values and tiny dot shading, not washed watercolor. A mistake I see is asking for too much tiny detail in a small area. At six months tiny dots will have spread slightly. At two years the portrait should still read if line weight was planned to age. Upper arm keeps it protected and makes future expansion easy. For aftercare use a fragrance-free lotion for weeks two and three to avoid dryness.
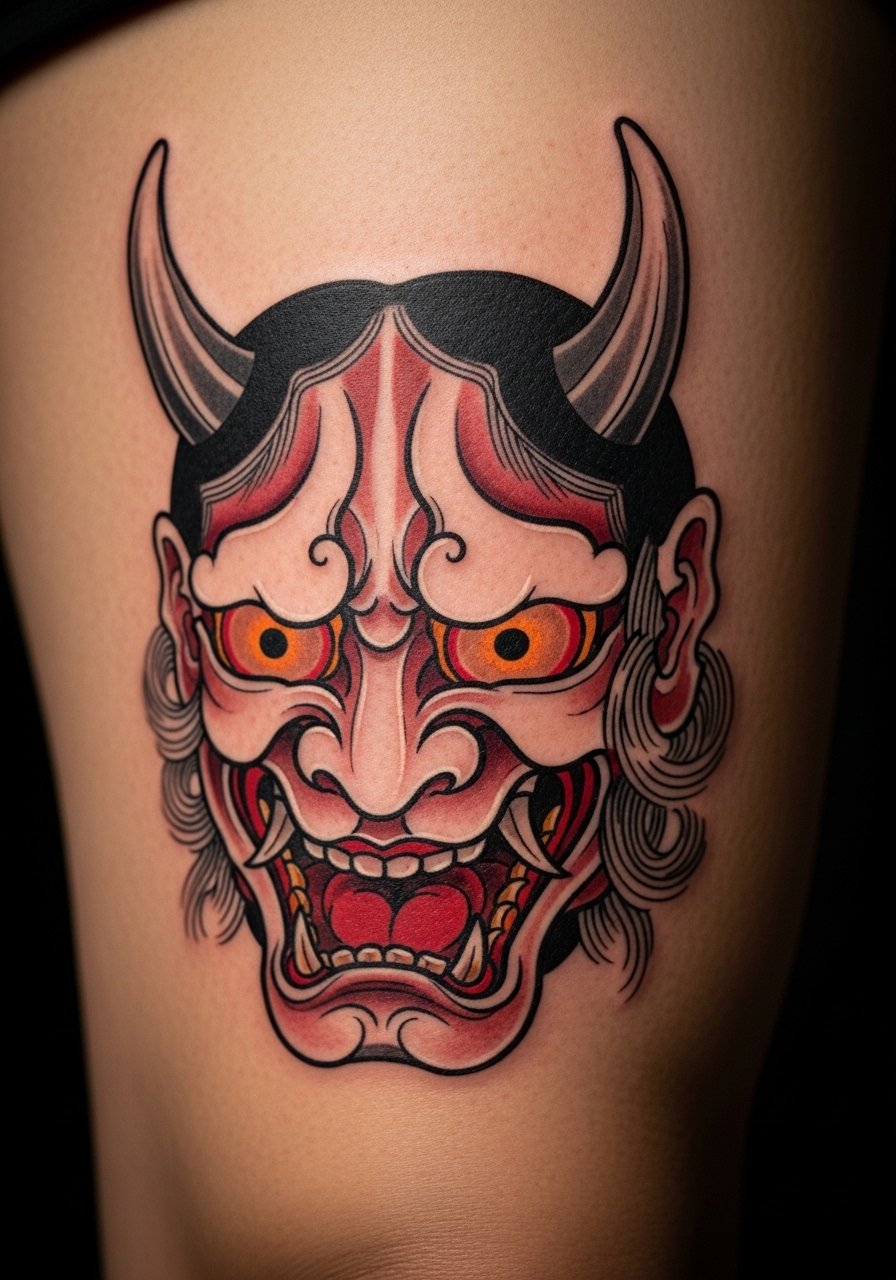
3. Traditional Sailor Moon Emblem on Chest
There's something about bold black outlines with saturated color that still reads from across a room. Chest work is painful around the sternum. Expect a 90 minute session for a medium emblem. I recommend classic solid blacks and muted reds, not neon pastels that fade fast. Ask your artist for clean line caps because chest movements can stress lines while healing. The common error is placing this too small near the clavicle. At two years, if color packing was weak, reds will dull. I have friends who used Hustle Butter during healing and liked the softness it left.
4. Minimalist One Piece Straw Hat on Ankle
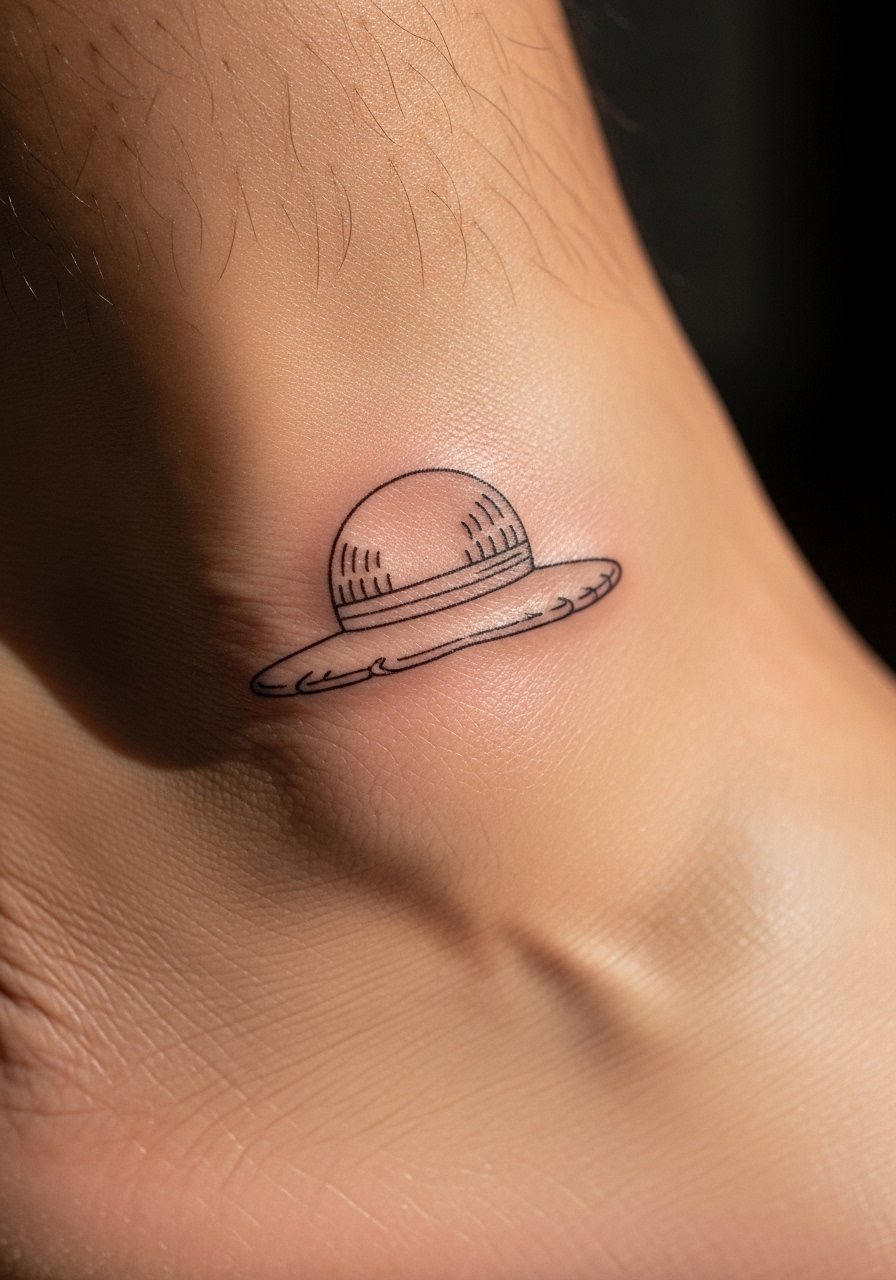
I noticed a trend of anime fans choosing tiny ankle tattoos as travel-friendly pieces. Ankles are bony and sharp pain is real. That makes sessions quick, usually 20 to 40 minutes. Minimalist designs age well if the line weight is set slightly thicker than "ultra fine." The common mistake is asking for 0.5 mm lines that disappear by year two. Tell your artist you want a hairline look but with a touch more ink depth. Healed at six months this looks delicate. At five years it will blur if too delicate. For protection during workouts I use a hydrocolloid bandage the first few days.
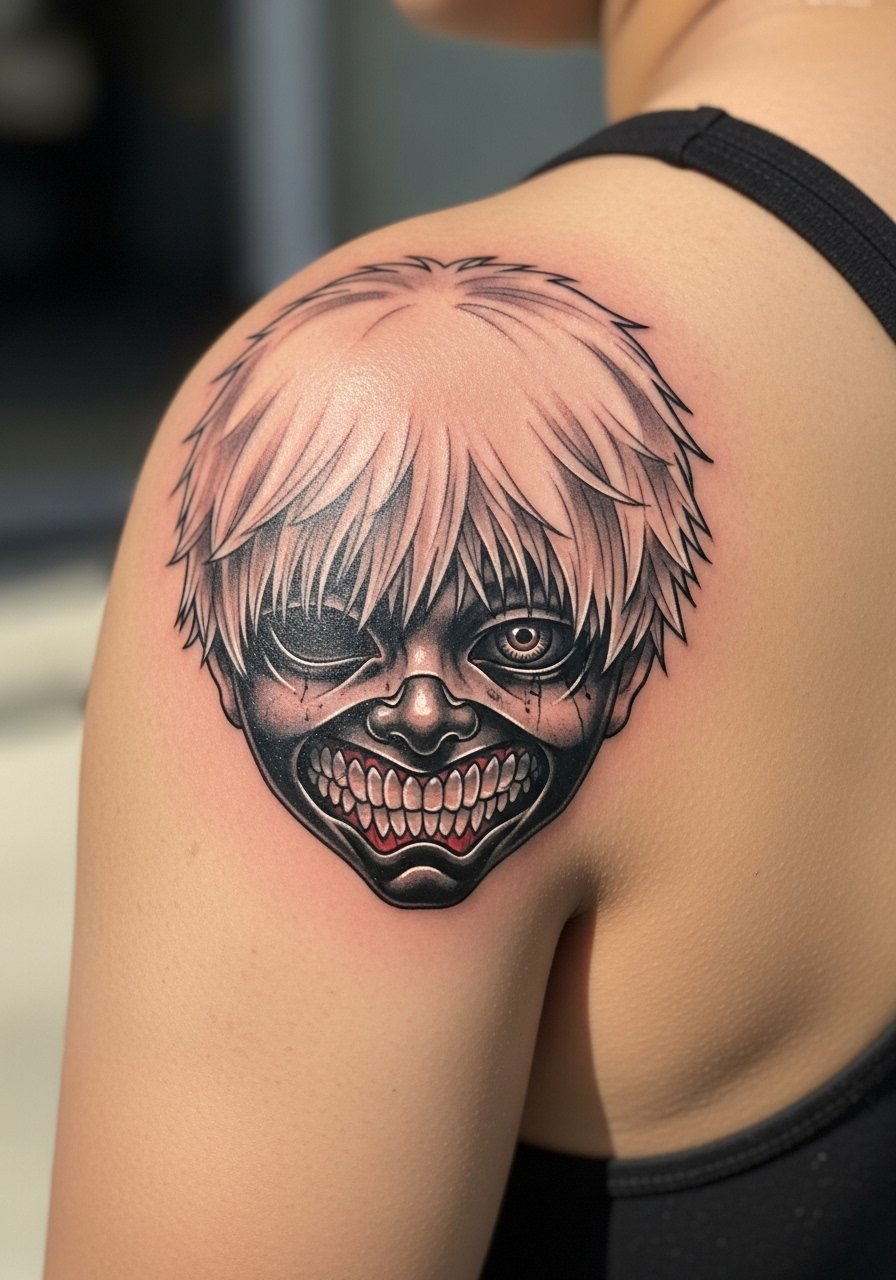
5. Blackwork Levi Ackerman Silhouette on Ribcage
Fair warning, the ribcage ranks high on the pain chart. Most clients I know say it is worth the tradeoff for dramatic placement. Blackwork here must be packed with consistent saturation to avoid patchiness. Sessions are longer, expect two to three hours. A common mistake is trying to do large black blocks in a single short appointment. At six months bold blacks look velvety. At two years small gaps begin to show if the artist rushed shading. Ask your artist about layering sessions for deep, even black. Use Aquaphor for the first three days to help scab control.
6. Watercolor Demon Slayer Splash on Shoulder Blade
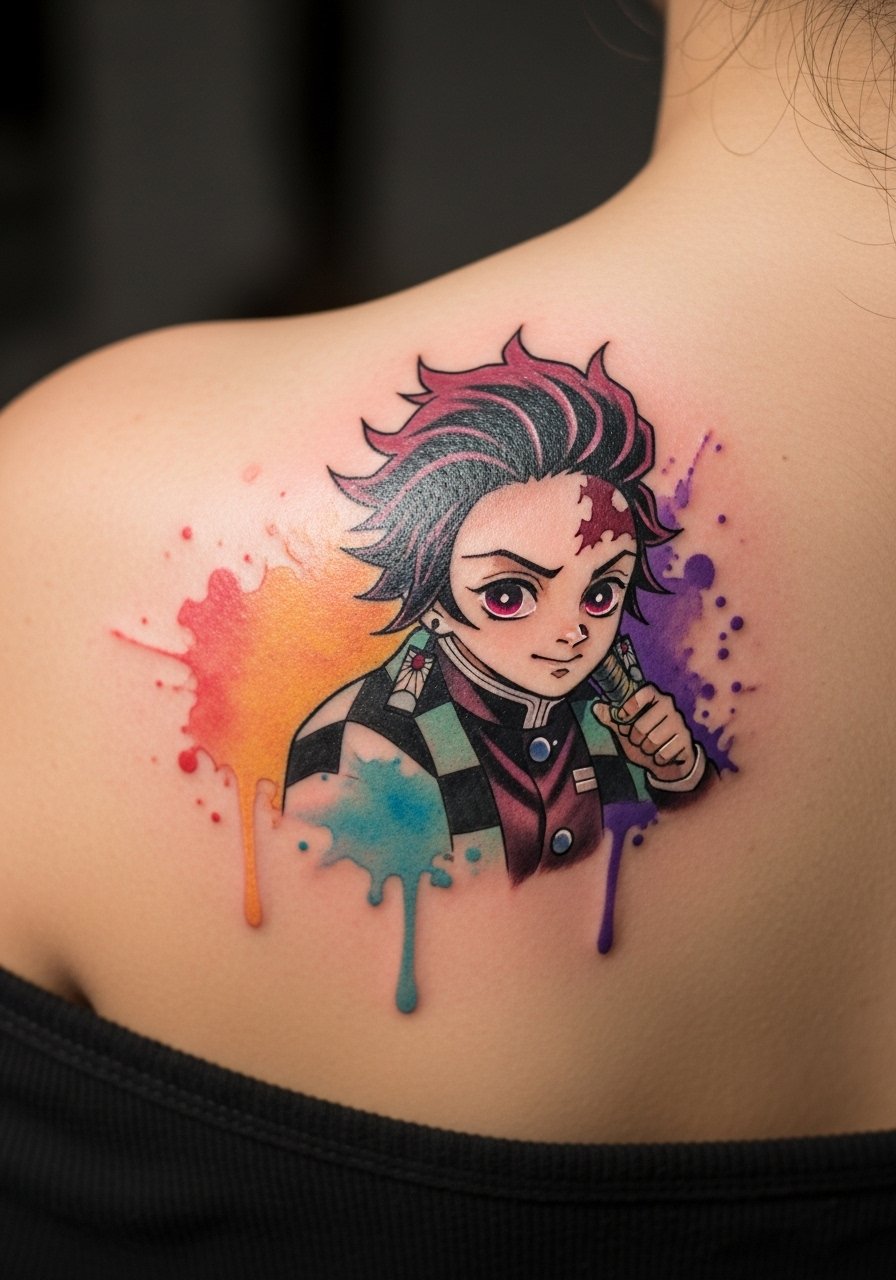
Most watercolor anime pieces I see start to fade unevenly if the artist relies only on surface pigment. I recommend a hybrid approach, with line anchors and watercolor fills. Shoulder blades are forgiving and hurt moderately. Sessions are usually 90 to 150 minutes. Tell your artist you want pigment placed slightly deeper for key colors, and expect touch-ups at year one. A mistake is asking for pastel gradients without a line structure. At six months the color should be soft. At two years expect to need a refresh of the brightest tones. For daily care I used CeraVe lotion after the initial ointment phase.
7. Monochrome Cardcaptor Sakura Bouquet on Thigh
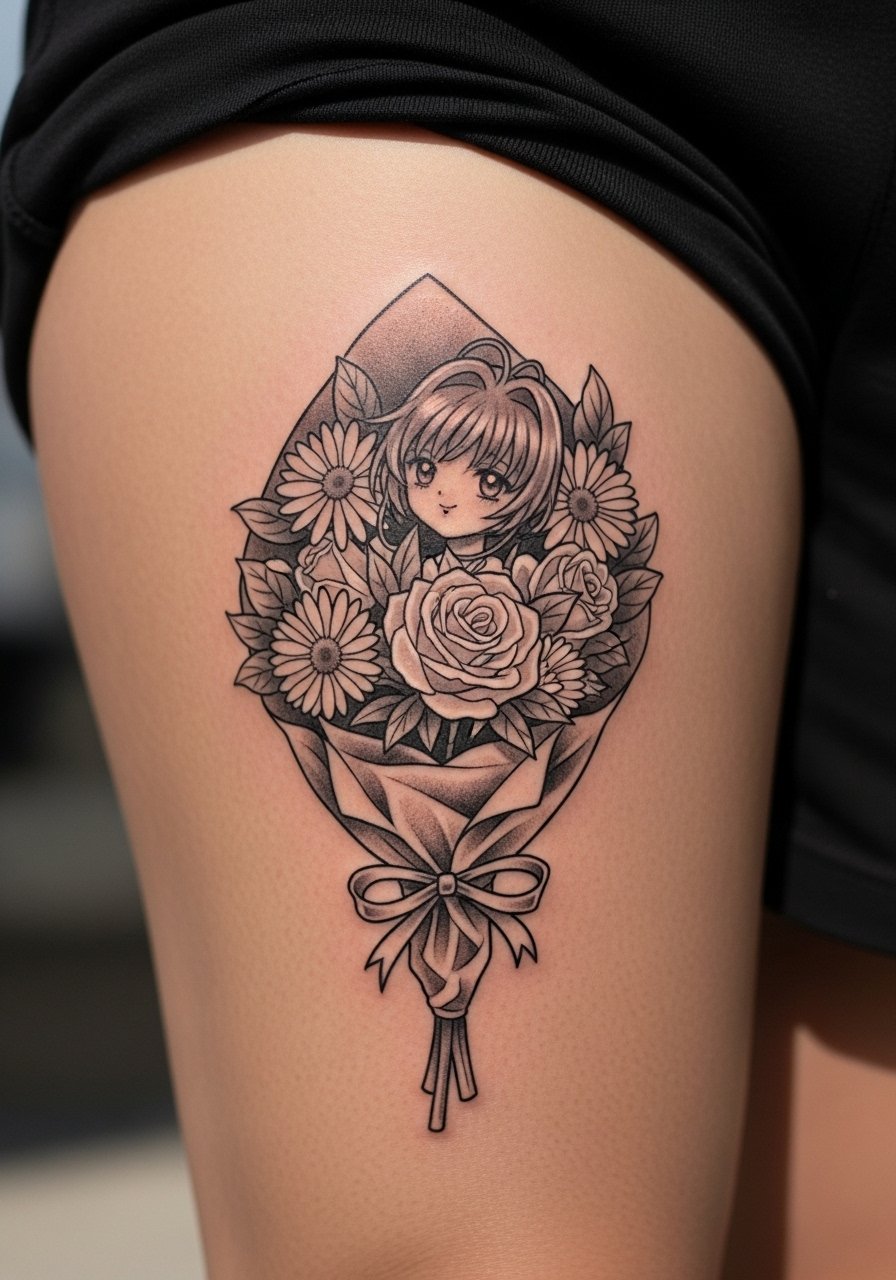
I first bookmarked this look on a collector's profile. Thighs tolerate medium to large pieces well and pain is low. Monochrome gives a timeless feel, and it ages cleaner than small color details. Sessions can be one to three hours depending on composition. Ask for a range of grey washes, not just flat grey. A common mistake is overcrowding small floral elements. At six months grey washes will soften. At five years the piece will keep its integrity if line contrast was preserved. For long-term brightness consider a sunscreen stick for exposed areas.
8. Chibi Micro Tattoo of Pikachu Behind Ear
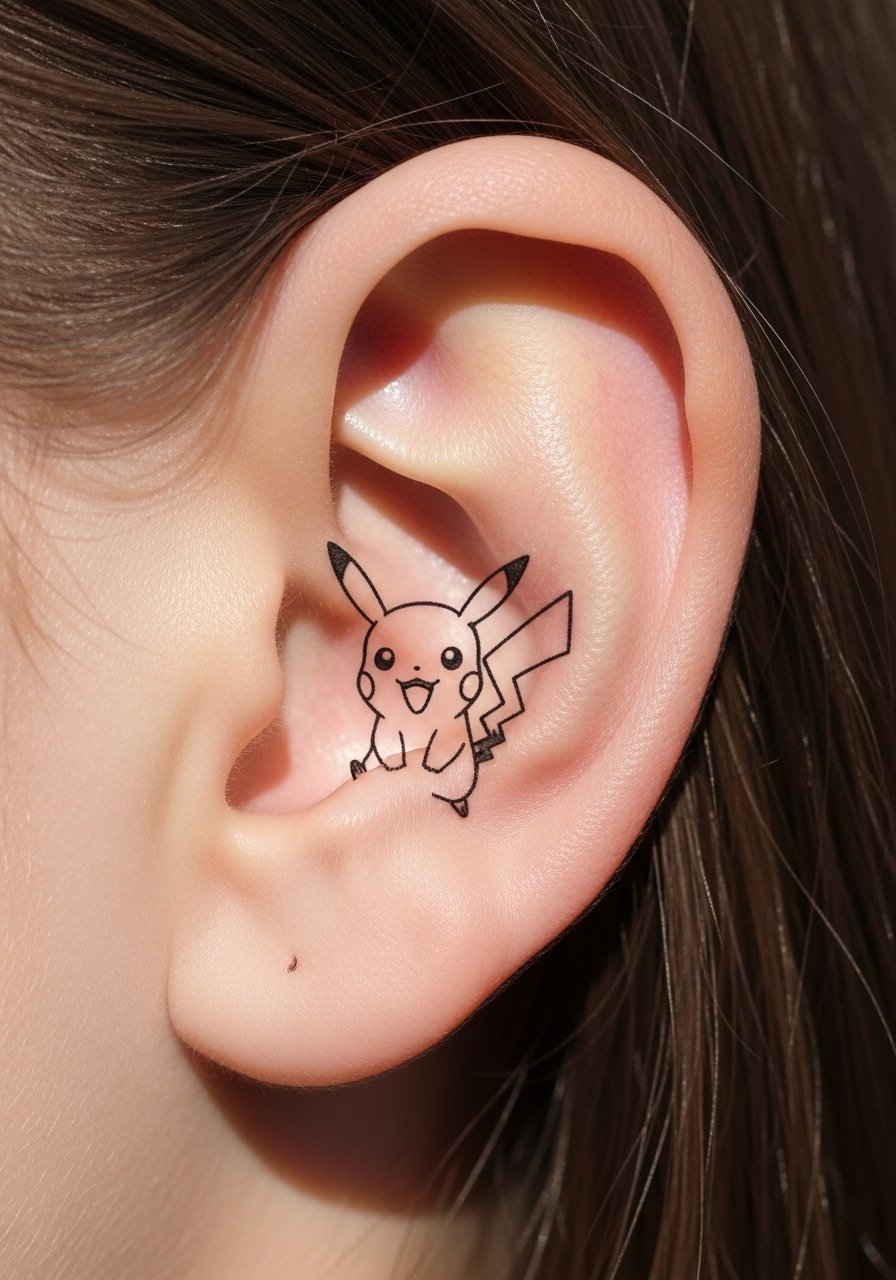
I love micro chibi tattoos behind the ear for their playful quietness. Pain is sharp but short. Sessions are under 30 minutes. The behind-ear spot is prone to rapid fading if lines are too thin. I've seen the mistake of asking for extreme miniaturization without reinforcement. Ask your artist to thicken key contour lines. At six months it should still be crisp. At two years, expect some softening and possible touch-ups. For touch-up planning, agree on a follow-up within 12 to 18 months. Keep it covered in strong sun to reduce blur.
9. Neo-Traditional Goku Portrait on Calf
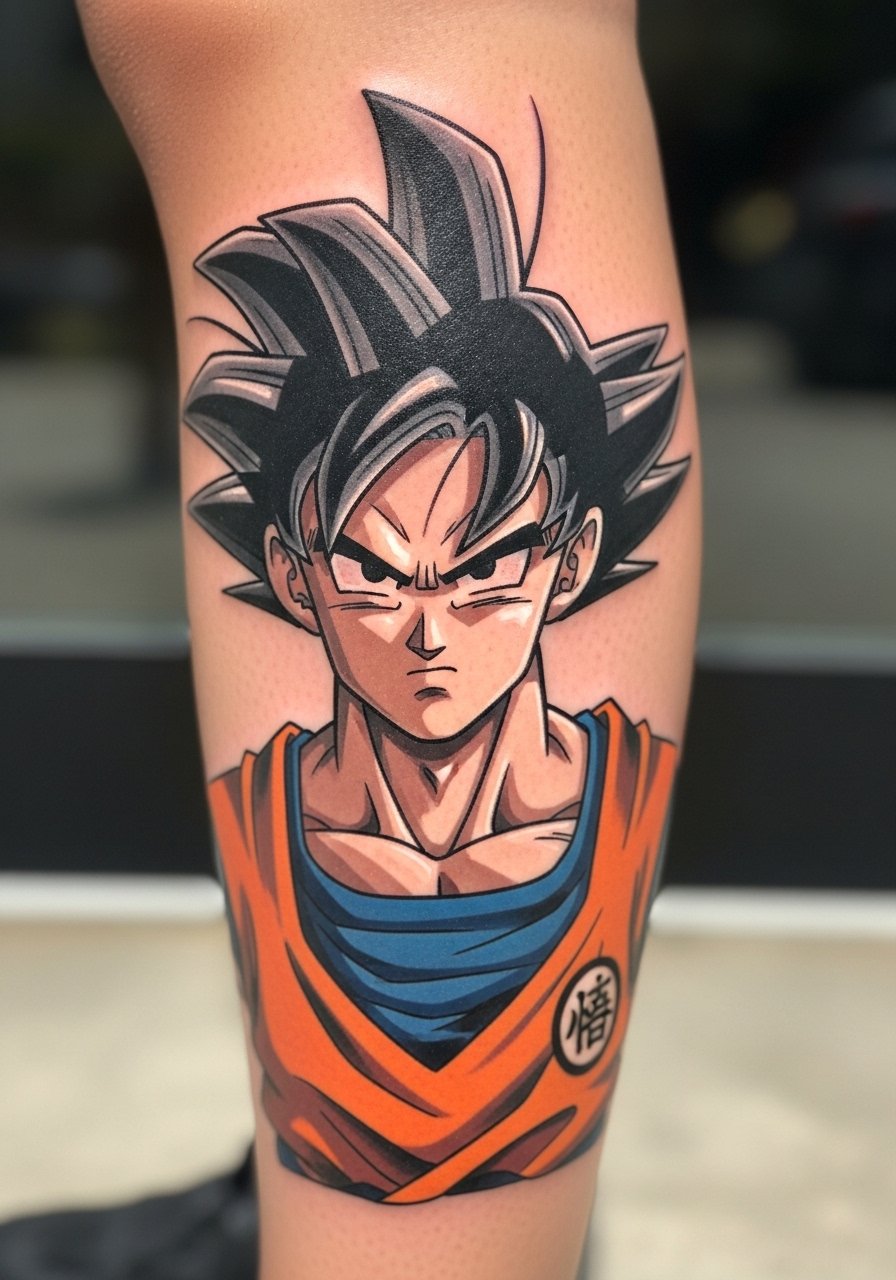
Calf pieces handle color and line well because of thick tissue. Neo-traditional allows bold outlines with stylized shading and is forgiving as it heals. Pain is moderate. Sessions can be two to three hours. I usually advise clients to avoid too many tiny color gradients. The mistake is overcrowding small areas with micro gradients, which can mud over time. At six months crisp lines remain. At five years sustained saturation depends on sun protection. Ask for heavy outline anchors and consider a sunscreen habit for long-term vibrancy.
10. Brushstroke Blackwork Evangelion Eye on Neck

Neck tattoos are risky for work but visually striking. Pain is high and sessions are short. Brushstroke blackwork reads well on neck because the strokes follow muscle movement. I tell people to expect visible texture changes when healing. The mistake I see is requesting ultra-fine brushwork in tight areas. At six months the strokes settle and skin texture shows. At two years, if ink depth was correct, the design stays readable. Plan a conversation with your artist about workplace considerations and aftercare like Saniderm for early days.
11. Minimalist Spirited Away No-Face on Wrist
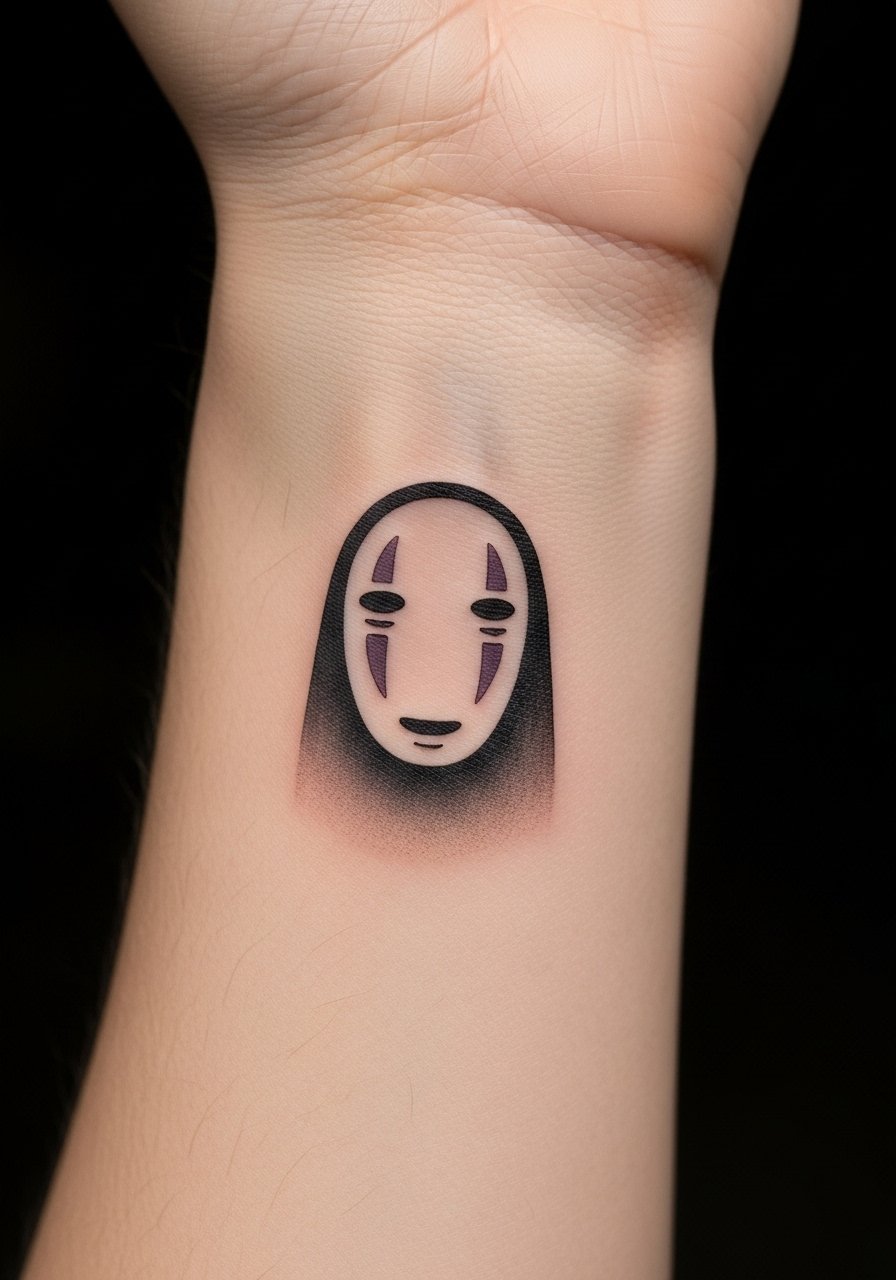
I picked this up from a gallery wall and liked how subtle the wrist placement is. Wrists are high-motion and show wear quickly. Pain is low to moderate. A 30 to 60 minute session usually suffices. Ask your artist for slightly reinforced outlines around joints so the design does not blur into a smudge. A common mistake is making it too small to withstand wrist movement. At six months the black should look even. At two years slight thickening is normal. Keep moisturizer handy during weeks two through four.
12. Micro-Realism Sailor Scout Eye on Finger

Finger tattoos are notorious for fading. I tell clients upfront that finger micro-realism often needs touch-ups. Pain is high and session time is short. The usual mistake is underestimating how fast the skin rebuilds. Ask for a slightly bolder value plan and accept a possible retouch at year one. At six months detail will soften. At two years, only a very bold interpretation will remain. For daily care I recommend avoiding heavy soaps and using a thin layer of tattoo balm after the initial healing phase.
13. Linework Death Note Quote on Ribcage
Fair warning, ribcage script demands precision. I saw a version where the letters blurred because the script was too thin. Pain is high. Sessions vary with quote length, often 1 to 2 hours. Tell your artist you want medium-thin strokes with slightly larger spacing. Common mistakes include using calligraphy scripts that compress over time. At six months the script reads clean if spacing was planned. At two years expect minor softening. For a risky spot like the ribs, plan on an extra session for crisping lines after six to twelve months.
14. Illustrative Jujutsu Kaisen Ink Splash on Forearm

I saw this one on Instagram and the artist used controlled splatter to simulate energy. Forearms are forgiving and easy to protect. Pain is low to moderate. Sessions will be around 90 minutes for a medium piece. The common mistake is doing uncontrolled splatter that heals into indistinct blobs. Ask your artist for negative space planning so the splatter reads clearly as it settles. At six months the edges will soften. At two years the composition stays readable if anchor lines were included. Use a sunscreen stick when the forearm is exposed.
15. Blackout Anime Kana Script on Side Shoulder
I have seen blackout script used to make dramatic statements. Shoulder is less painful and good for bold coverage. Sessions can be long. A mistake is expecting consistent saturation in one pass for large black areas. Every artist I've talked to suggests layering sessions for even black. At six months black looks dense. At two years telltale touch-ups may be needed where skin texture changed. Ask your artist about staged sessions and check healed photos of their blackout work. Aquaphor during initial days helps control scabbing.
16. Delicate Chihiro Lantern on Back of Hand
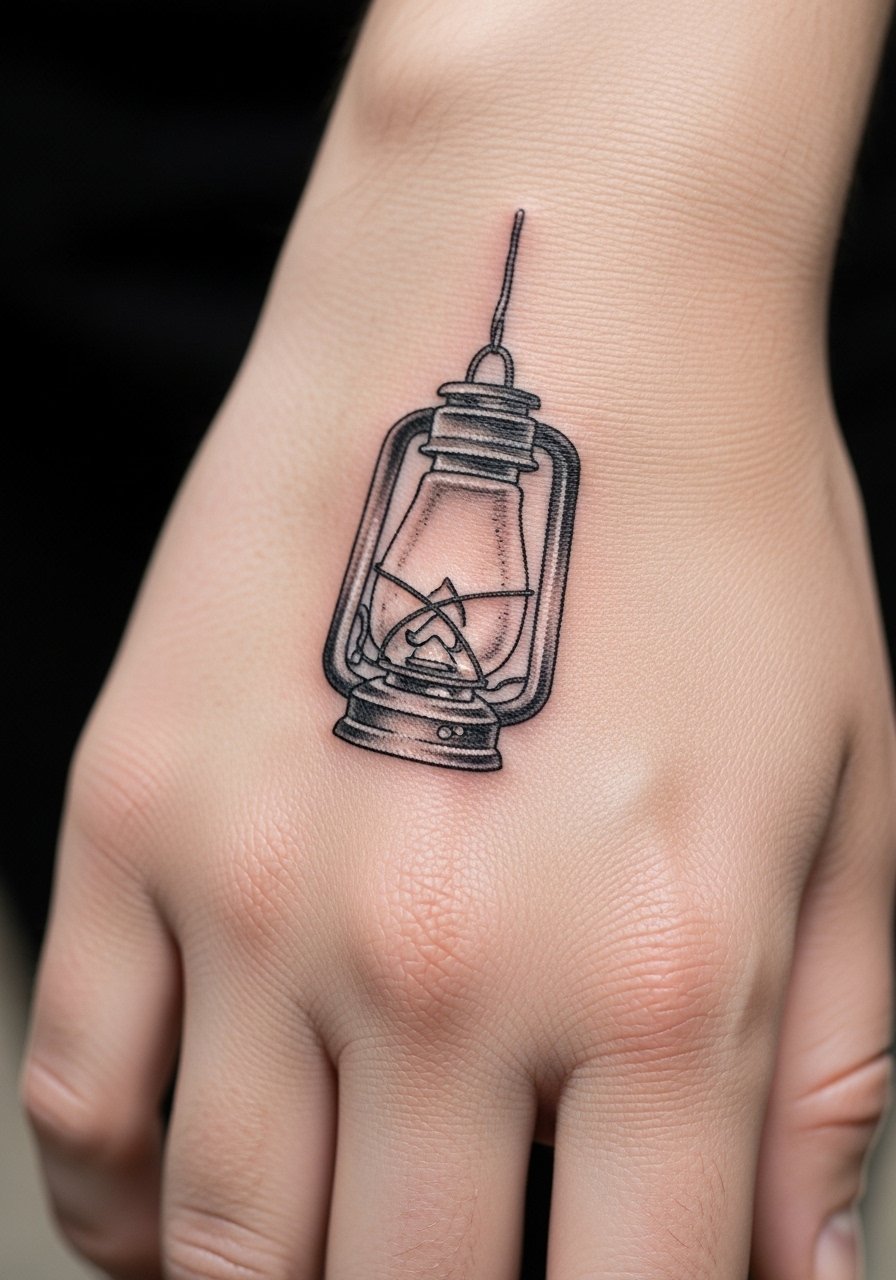
Hands are high-fade areas. I tell people upfront hands often need a refresh. Pain is sharp but quick. Sessions are usually under an hour. The usual error is asking for ultra-detailed art without plan for yearly retouch. Ask for bolder outlines around key shapes and accept periodic maintenance. At six months the lantern should show slight softening. At two years lines will need crisping. Use a small tube of fragrance-free lotion daily. If you want minimal upkeep, consider moving the piece to the wrist or forearm.
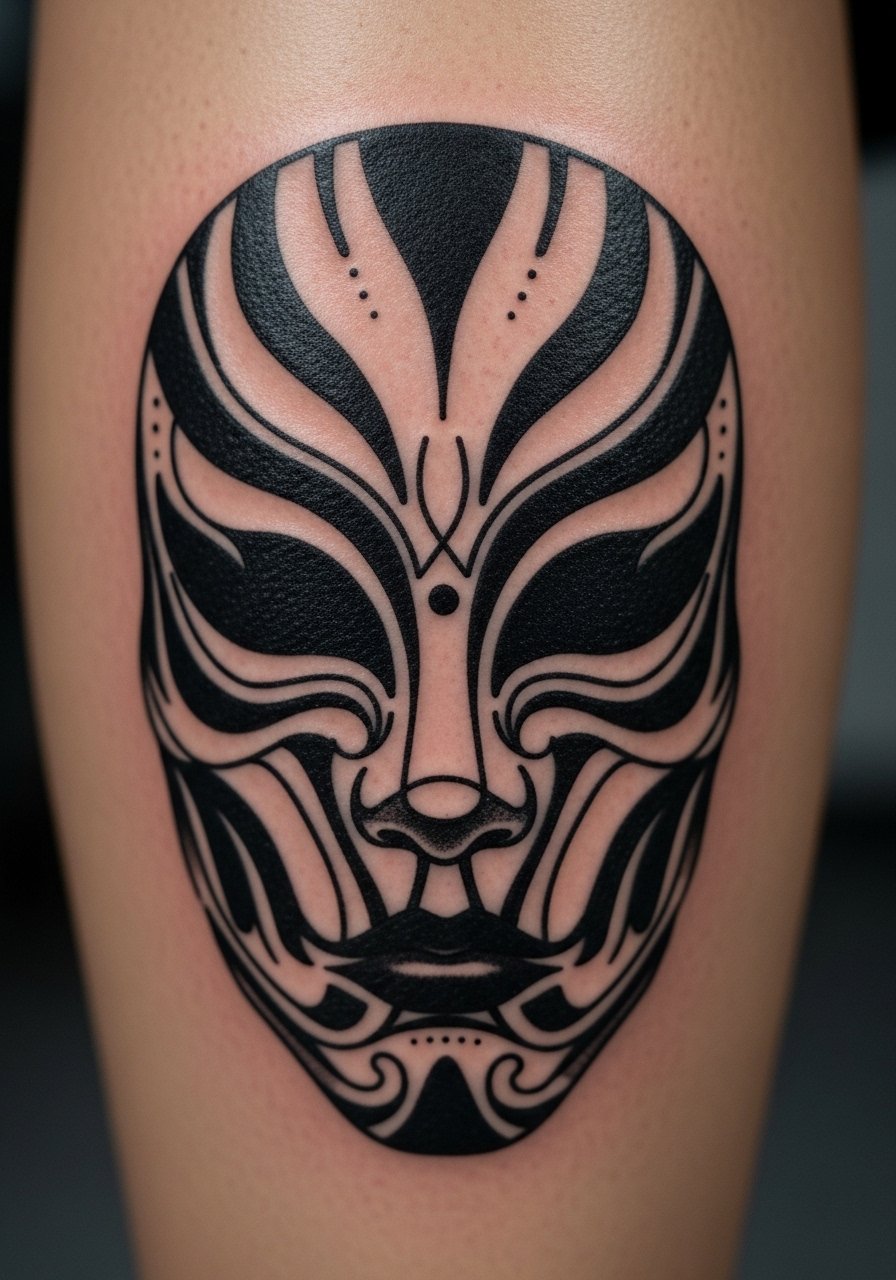
17. Neo-Japanese Demon Mask on Upper Thigh
Thighs are ideal for large, colorful neo-Japanese work. Pain is lower and sessions can cover more area at once. I recommend deeper color packing for red tones. The mistake is using overly pale inks that fade to mud. At six months the reds will be vibrant. At three to five years repeated sun exposure will lower saturation. Tell your artist you plan to wear sun protection and ask for high-contrast shading that ages into character. For aftercare I used Mad Rabbit Tattoo Balm during the weeks following the initial ointment phase.
18. UV Reactive Neon Akira Bike on Lower Back
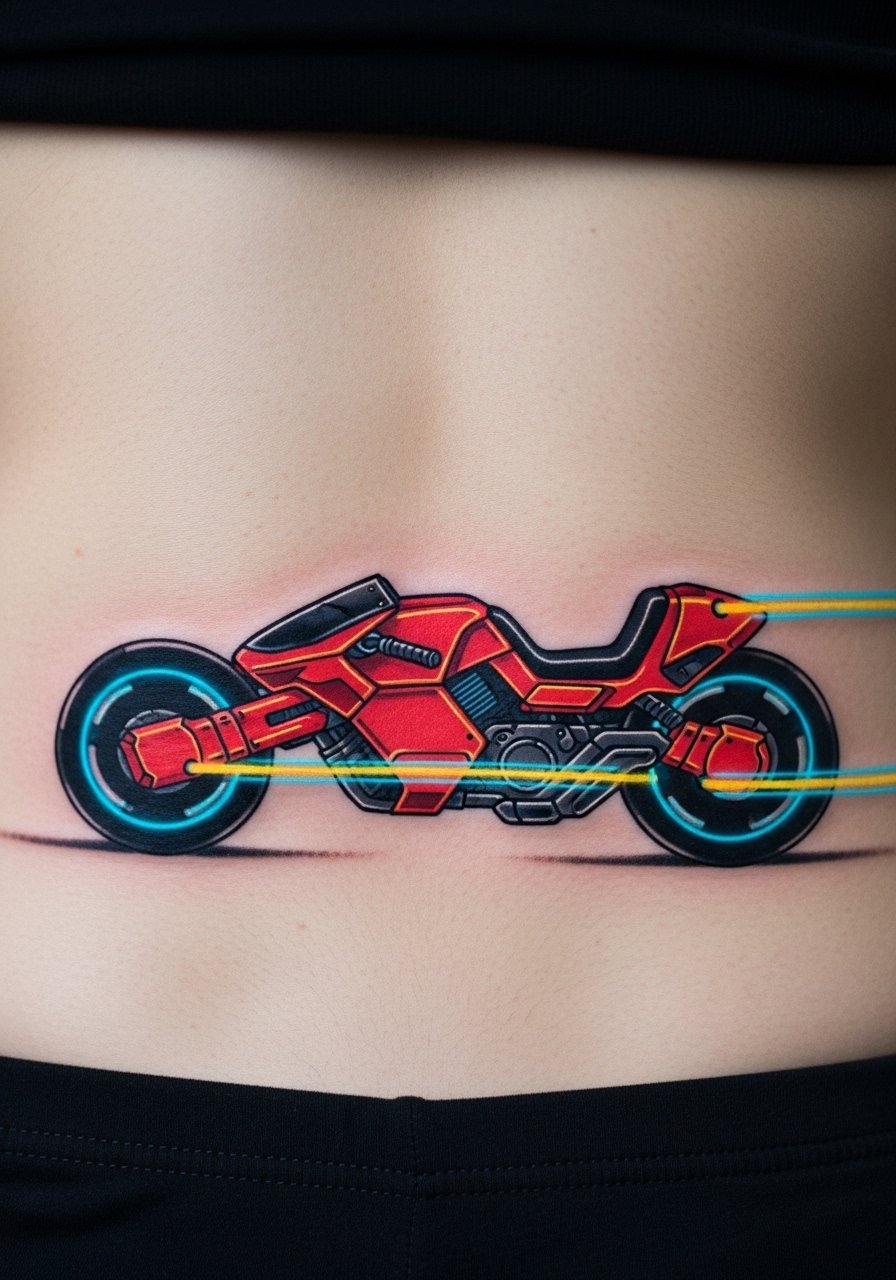
UV reactive inks are an under-covered angle I have seen gain momentum. Lower back hides well and is moderately painful. Sessions can be two to three hours. A key mistake is expecting UV ink to show strongly in daylight. It shows under blacklight and as subtle sheen in daylight. Ask your artist about pigment safety and their experience with glow inks. At six months the fluorescent effect will remain under UV. At two years the visible daylight sheen may fade faster than traditional inks. Plan touch-ups specifically for the UV elements.
19. Line Art Killua Zoldyck on Inner Bicep
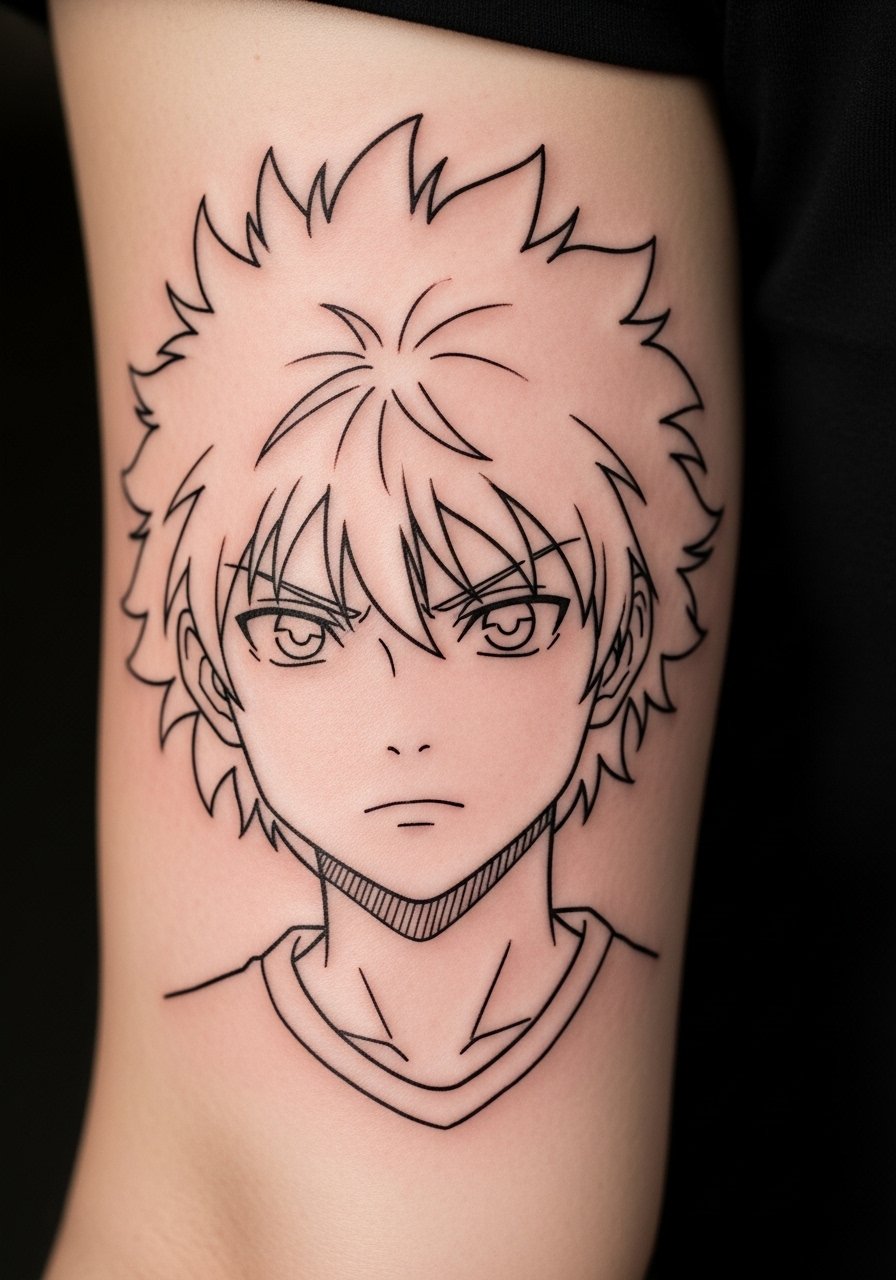
I like inner biceps for intimate anime portraits. The rolling muscle movement demands a flexible composition. Pain is moderate. Sessions run one to two hours. Tell your artist to account for muscle expansion and to avoid placing critical tiny lines across fold zones. A common mistake is centering micro details where the arm flexes. At six months the portrait should be recognizable. At two years you may notice softening along stress lines. For heavyweight care during workouts wait 48 hours before heavy lifting, from what I've seen most artists recommend that.
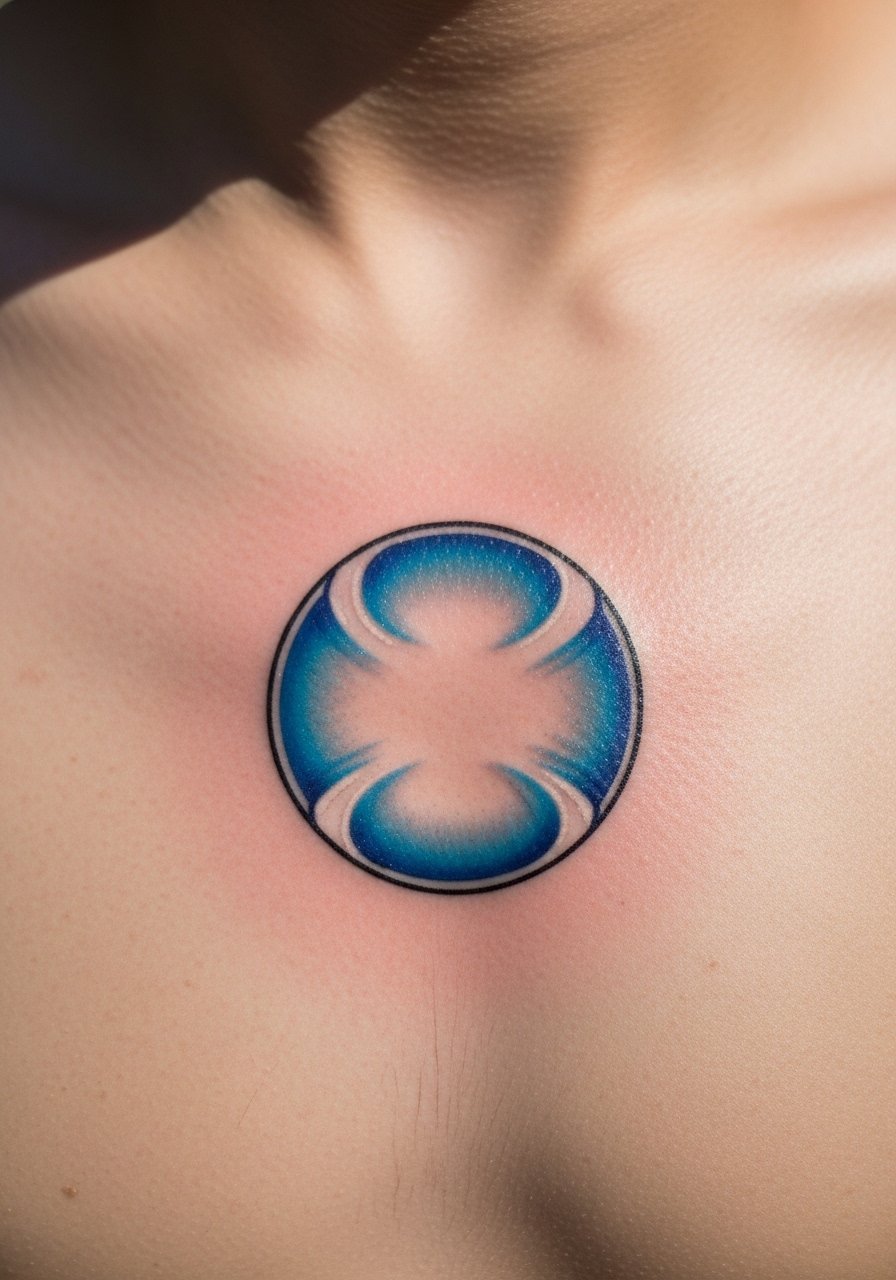
20. Minimalist Pokémon Pokéball on Collarbone
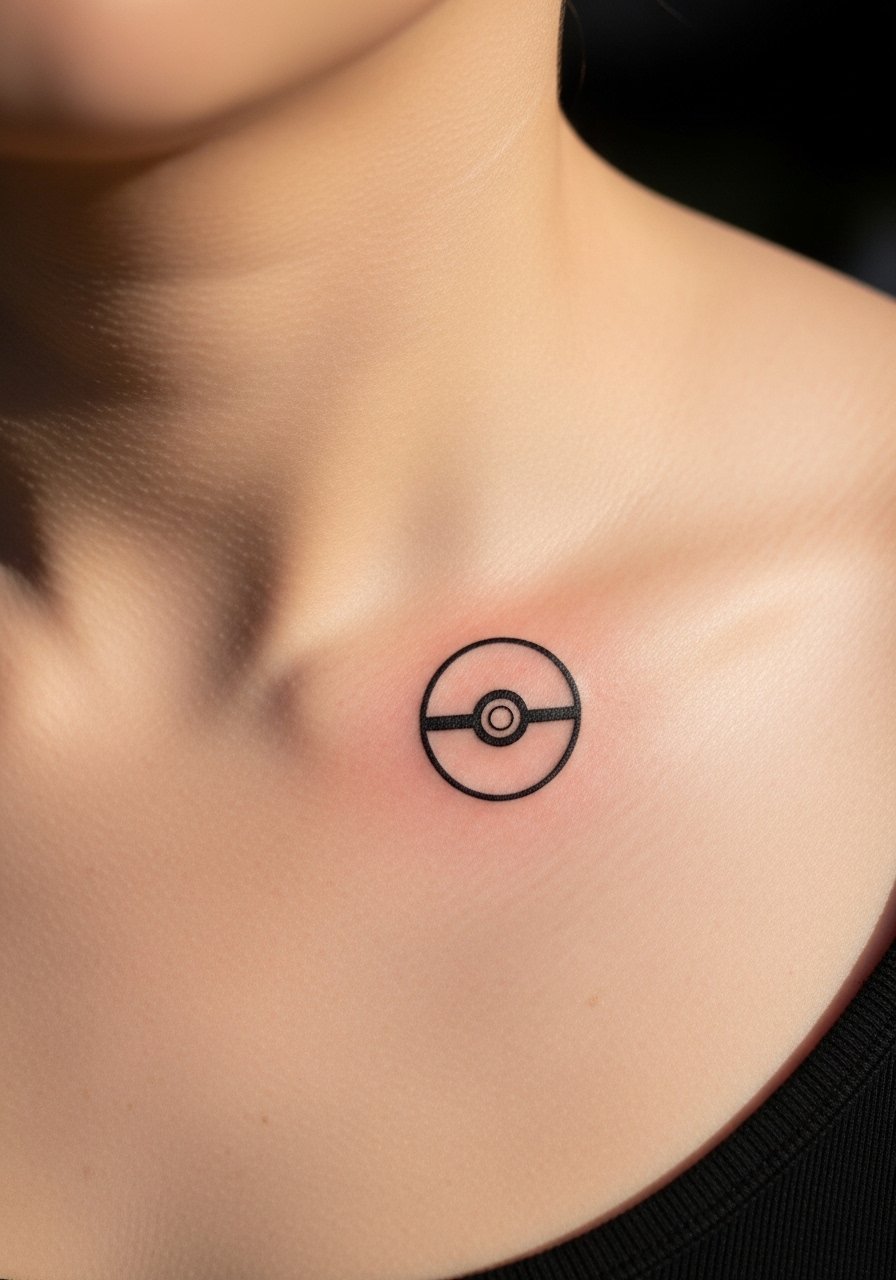
Collarbones look great with small geometric forms. Pain is moderate to high near the bone. A quick 20 to 40 minute session usually works. The typical mistake is making circular details too small, which leads to wobble as it heals. Ask for a slightly thicker ring to keep the circle readable. At six months edges should be smooth. At two years expect some softening but the shape will remain if outline strength was planned. Aftercare note, avoid sleeping pressure on the collarbone while it scabs.
21. Micro-Color Chibi Miku on Shoulder Cap
I love how micro-color can add personality without dominating your look. Shoulder cap takes color nicely and pain is low. Sessions are short, 30 to 60 minutes. The mistake is loading too many tiny colors close together, which can mix as they heal. Ask for spaced color dots and bold anchor lines. At six months the aqua should remain bright. At two years pale colors like aqua may dull faster, so plan a refresh. For bright areas I use Mad Rabbit Tattoo Balm after scab phase to bring softness.
22. Blackwork Hollow Mask on Calf
I once saw a calf piece that used negative space to form a face, and it read perfectly from a distance. Calf is a forgiving canvas. Pain is moderate. Sessions are one to two hours. Common mistakes include uneven black packing that reveals patchiness when healed. All the artists I talk to recommend staged black fills for consistency. At six months the negative space will be crisp. At two years regular sun protection helps maintain the density. For early healing I applied Aquaphor then switched to fragrance-free lotion.
23. Minimalist Kiki Broomstick on Side Rib
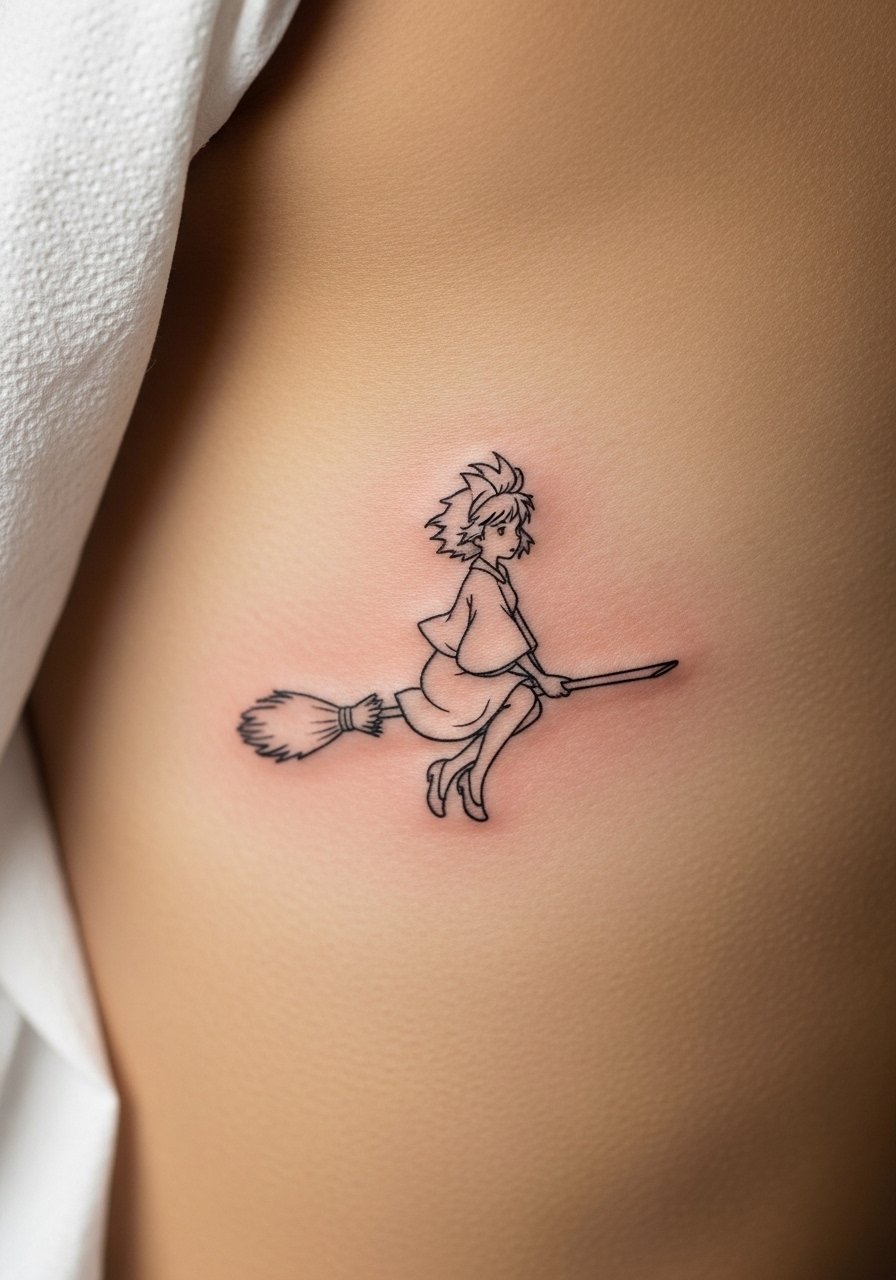
Ribs are painful but flattering for vertical minimal designs. I recommend accepting pain for a clean result. Sessions here tend to be 30 to 60 minutes depending on size. A frequent mistake is placing designs with too much fine detail across ribs. At six months the line will settle. At two years, if you wanted longevity without touch-ups, ask for a slightly bolder baseline. For initial days use Saniderm if your artist agrees, it helps keep movement from opening scabs.
24. Stylized Dragon Ball Energy Orb on Sternum
Sternum pieces hurt. I tell friends to plan for breaks and to hydrate. Sessions can be longer due to sensitivity. Symmetry is the main challenge, so ask your artist to use precise placement stencils. The mistake is expecting mirror-perfect symmetry without multiple stencil checks. At six months the orb should look cohesive. At two years shading may need refresh if initial packing was light. Aftercare during the first week is crucial because rubbing from clothing can distort scabs.
25. Illustrative Tokyo Ghoul Mask on Back Shoulder
Upper back allows bold illustrative work that ages well under clothing. Pain is low to moderate. Sessions are often two to three hours. The common error is over-detailing the mask in small scales, which can muddle when healed. Ask your artist for clean panels of dark and light to maintain the mask's expression. At six months the contrasts will settle. At two years high-contrast pieces tend to age best. I recommend discussing touch-up timing during the consultation.
26. Anime Minimalist Eyes on Behind Knee
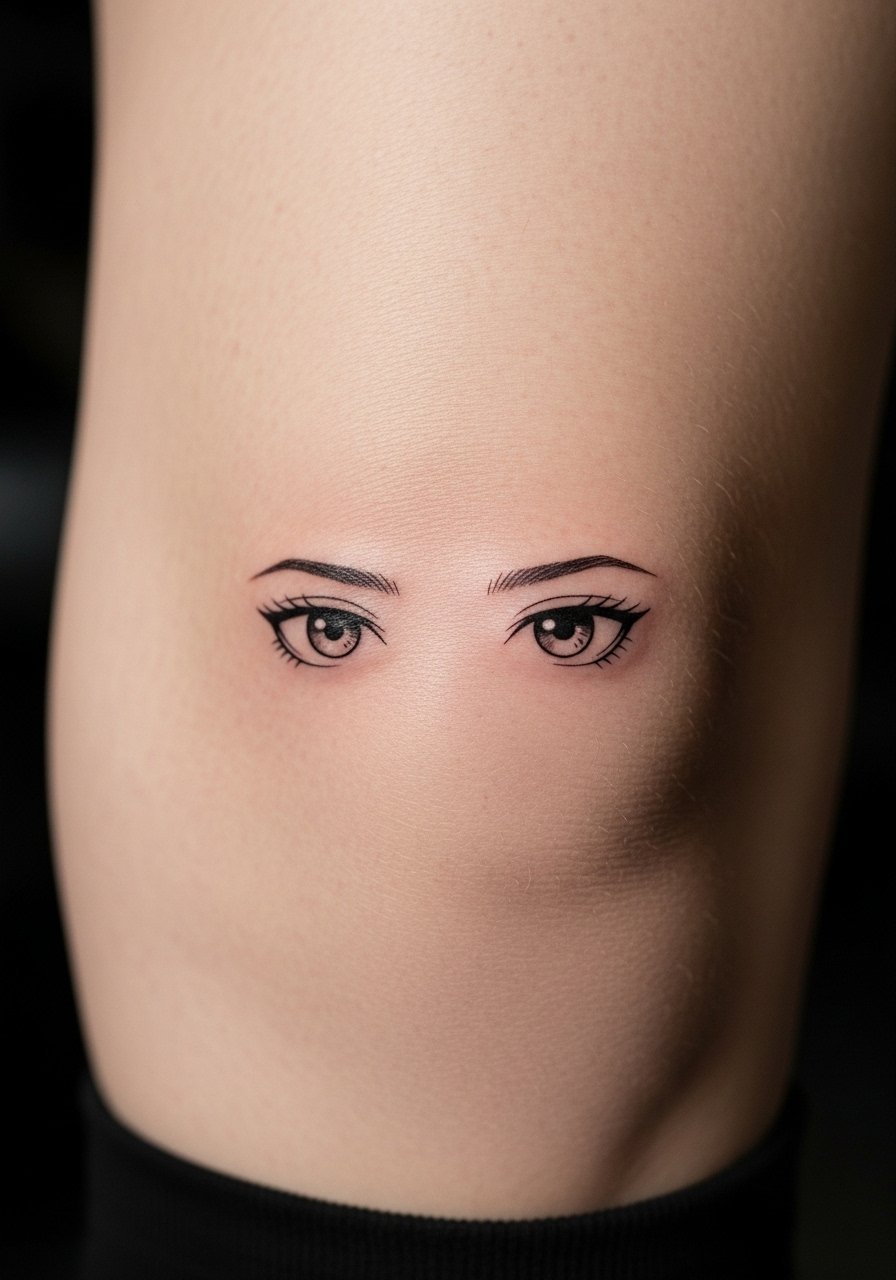
Behind the knee is a playful, unexpected spot. Pain is unusual and can spike as the needle crosses joints. Sessions are short. The main mistake is placing complex designs on moving tissue. Keep the design simple with anchored lines. At six months you may notice some blurring as the skin moves. At two years, minimalist forms survive best if outlines were slightly bold. Avoid tight clothing during healing to reduce friction.
27. Watercolor Bleach Zanpakuto Slice on Thigh Groove
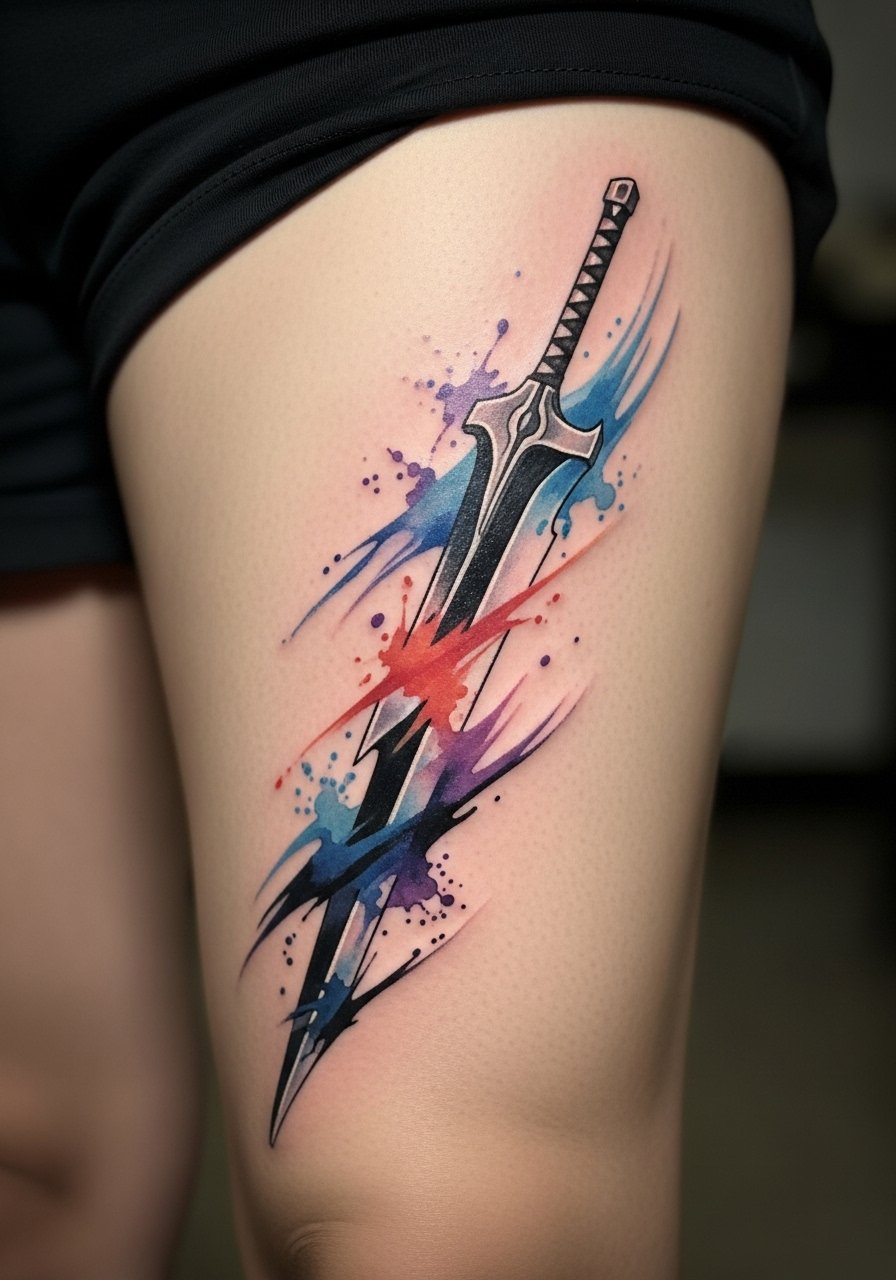
Thigh groove works for elongated compositions. Watercolor needs anchor lines to avoid washing out. I often tell clients to plan a color top-up at year two. Pain is moderate. Sessions range from 90 minutes to three hours. The mistake is trusting pure watercolor without line anchors. At six months color will look airy. At two years expect some dulling, especially in pale tones. I used Mad Rabbit Balm in the weeks after the initial bandage phase, it kept the skin supple.
28. Retro Cowboy Bebop Silhouette on Upper Arm
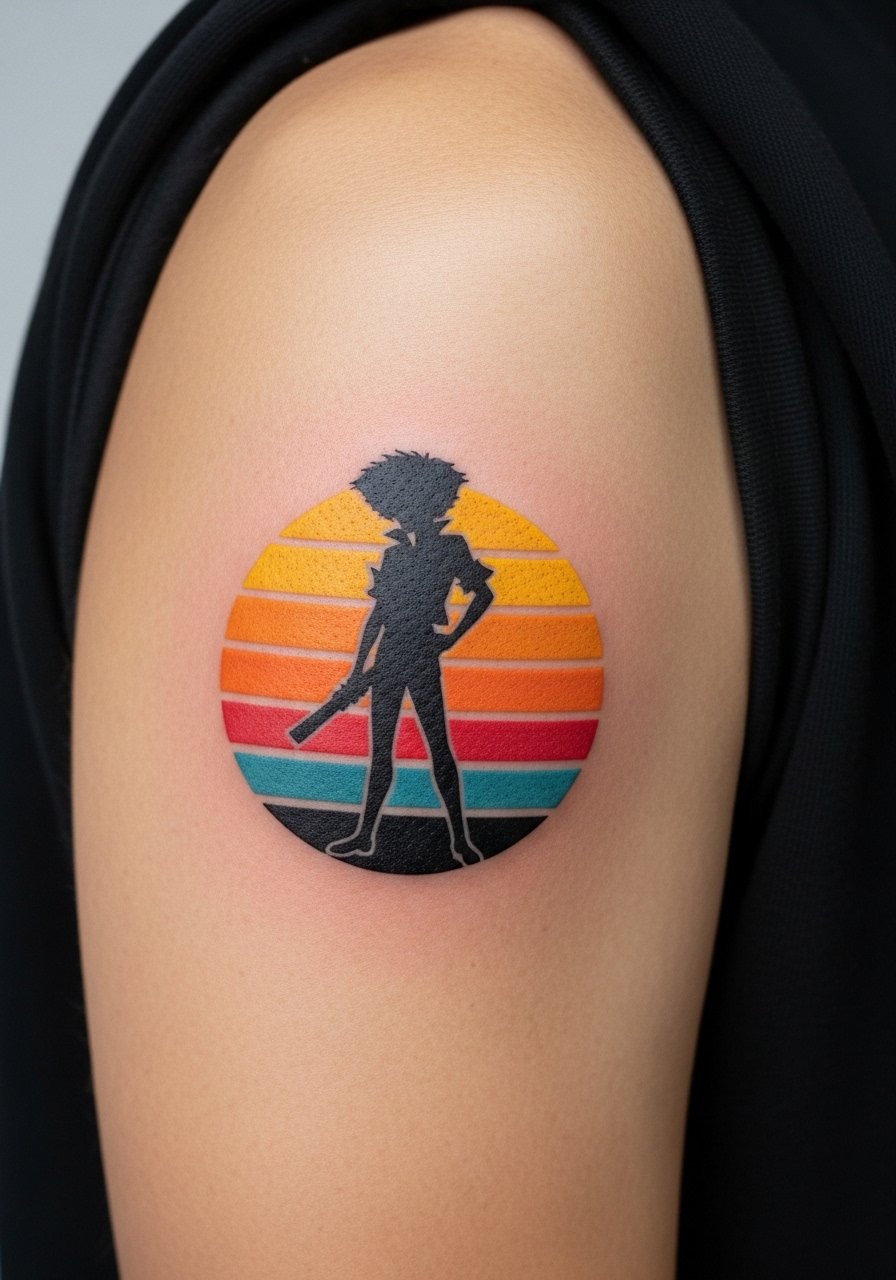
Upper arm silhouettes read great at casual distances. Pain is low and sessions are comfortable. The error I see is cramming too many tiny visual elements into a silhouette. Ask for a clear, simplified shape that communicates the character at a glance. At six months the silhouette should stay bold. At five years silhouettes age well compared to tiny detailed portraits. For aftercare I switched from ointment to a fragrance-free lotion after day three and that helped maintain texture.
29. UV Accent Evangelion Mecha Panel on Forearm
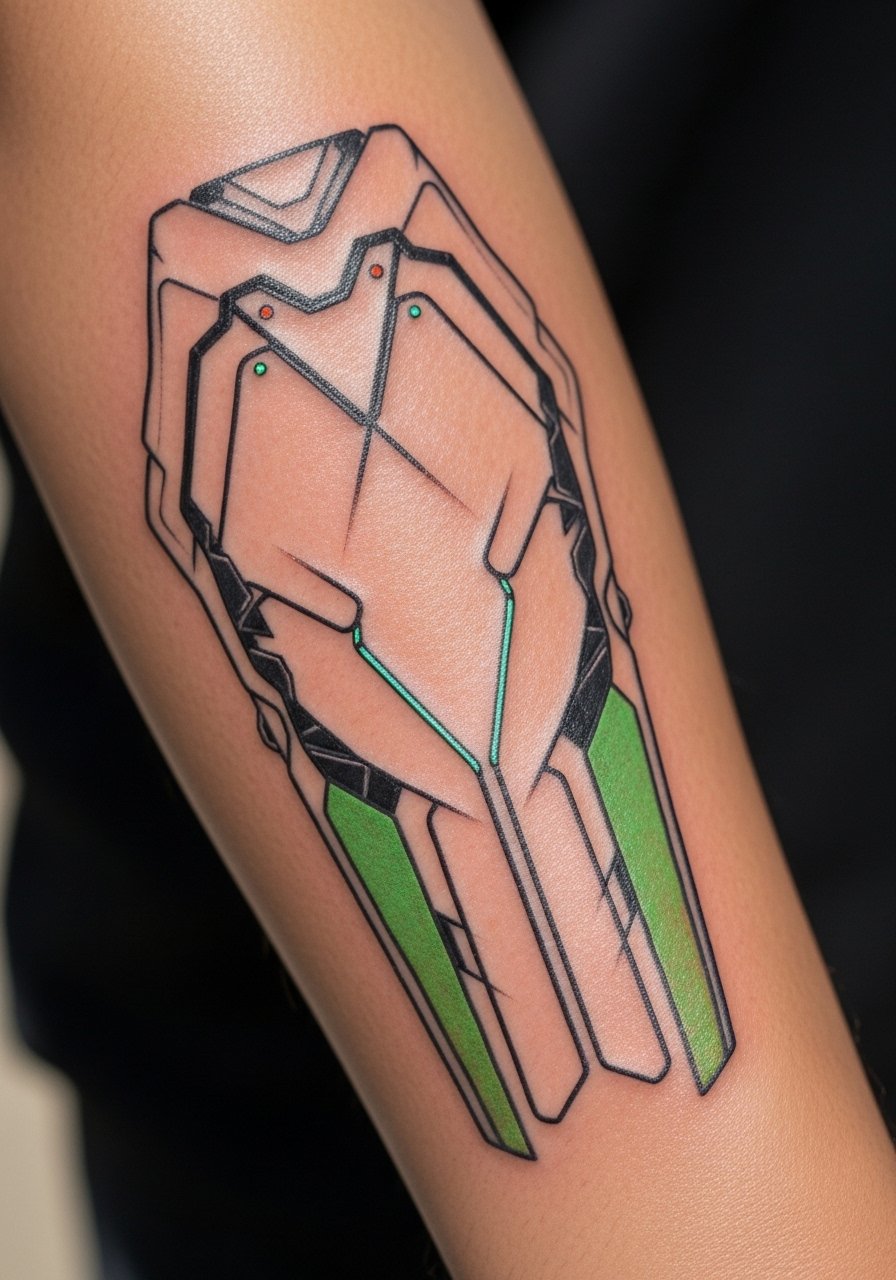
I wanted a final idea that blends tech and fandom, and UV accents give panels a sci-fi edge. Forearm is ideal for showing off mechanical detail. Pain is low to moderate. Sessions depend on how much UV you add, often two sessions for layered work. Mistakes include relying on UV alone for visibility in daylight. Plan anchors in traditional ink and use UV as a highlight. At six months the UV shows under blacklight. At two years touch-ups may be needed to retain glow intensity. Discuss pigment safety with your artist and plan staged sessions for consistent ink depth.
Tattoo Prep and Aftercare Essentials
Aftercare list from my real experience and what most artists I spoke with recommend. Links use common product names and sizes so you can find them quickly.
Aftercare Essentials:
- Aquaphor Healing Ointment, 14oz tube — Use first 3 to 5 days for scab control.
- Saniderm Transparent Adhesive Bandage, 6-inch roll — Second skin method for first 48 to 72 hours.
- CeraVe Fragrance-Free Moisturizing Lotion — For days 4 to 14 to maintain skin hydration.
- Dr. Bronner's Unscented Castile Soap — Gentle cleaning during the first week.
Before Your Appointment:
- Numbing Cream 5% Lidocaine, 30g tube — Apply 30 to 45 minutes before if your artist allows.
- Tattoo Stencil Transfer Paper, A4 Pack — Handy if you sketch at home for placement planning.
Long-Term Maintenance:
- SPF 50 Sunscreen Stick for Tattoos, 0.5oz — Use daily on exposed tattoos to prevent fading.
- Mad Rabbit Tattoo Balm, 2oz — For weeks two to four of healing and long-term skin health.
- Hustle Butter Deluxe, 2oz — Vegan aftercare alternative artists often recommend.
Optional Comfort Items:
- Tattoo Numbing Spray, 50ml — Useful for touch-ups or sensitive sessions.
- Hydrocolloid Bandages, Large Pack — Alternative to Saniderm for small spots or travel.
Most artists I talked to recommend Aquaphor and Saniderm for early healing. Mad Rabbit and Hustle Butter are artist favorites for weeks two to four. SPF sticks are essential for long-term vibrancy. I personally use fragrance-free lotion after the initial ointment days.
Frequently Asked Questions
Q: Will fine line Naruto silhouettes blur if I place a sleeve next to them?
A: From what I've seen, small fine line pieces can blur into sleeve backgrounds if you crowd them too close. Ask your artist to leave breathing room around the silhouette and to use slightly heavier outer lines. If you plan a sleeve, talk about transition panels to protect the silhouette. For early healing I used Saniderm on forearm pieces, it kept edges clean.
Q: Do watercolor Demon Slayer pieces need different aftercare than traditional ones?
A: Yes, in my experience watercolor fills often rely on lighter pigment and need more careful sun protection. Follow the same first-week routine, then switch sooner to a gentle lotion and use an SPF stick when exposed. Plan a touch-up at year one for bright tones. I like Mad Rabbit balm for the post-ointment phase.
Q: How often will UV reactive inks need touch-ups compared to regular color?
A: UV accents tend to fade faster in daylight because their visibility depends on fluorescence. From what I've gathered, expect touch-ups every two to three years for the UV portions, while base colors may last longer. Always discuss pigment safety and UV experience with your artist beforehand.
Q: Will a micro-realism Ghibli portrait on the upper arm need retouching?
A: Most micro-realism portraits I see benefit from a planned retouch at 12 to 18 months. Tiny dots and very small gradients spread as the skin heals. Ask your artist to reserve a short follow-up slot when you book the first session. Using a fragrance-free lotion long term helps skin texture.
Q: Are ribcage scripts worth the pain for long-term clarity?
A: I think yes if you plan the script with slightly bolder strokes and greater letter spacing. Ribs move and stretch, so narrow scripts can fuse into thinner lines. Ask for spacing adjustments and a possible follow-up for crisping. After a year you will appreciate the legibility.
Q: What should I tell my artist if I want UV accents and traditional pigment?
A: Tell them you want anchor lines and core pigment packed with standard inks, and UV accents applied as highlights only. That way the piece reads in daylight and under blacklight. Also ask about the specific UV pigments they use and to see healed examples.
Q: How do I minimize fading for a thigh neo-Japanese demon mask?
A: From what I've seen, deep color packing and asking for high-contrast shading helps. Keep the area out of prolonged sun while healing and use an SPF stick for long-term protection. Plan staged sessions for large color blocks so the artist can layer saturation properly.
