
I spent months narrowing down music tattoo ideas, because the real problem was choosing a style that still looks good two years later. I wanted pieces that read in a crowd, heal predictably, and keep their meaning after fading. These 29 music tattoos are the ones I’ve come back to again and again, styles artists are doing in 2026, plus a few under-covered twists I kept seeing in studios.
This list leans into fine line, micro-realism, blackwork, and neo-traditional takes on music motifs. I recommend placements that work for both first-timers and full collectors. From what I’ve seen, subtle waveform and lyric tattoos are trending, but classic vinyl and instrument pieces still hold color and detail best when done by a specialist.
1. Fine Line Treble Clef On Inner Wrist
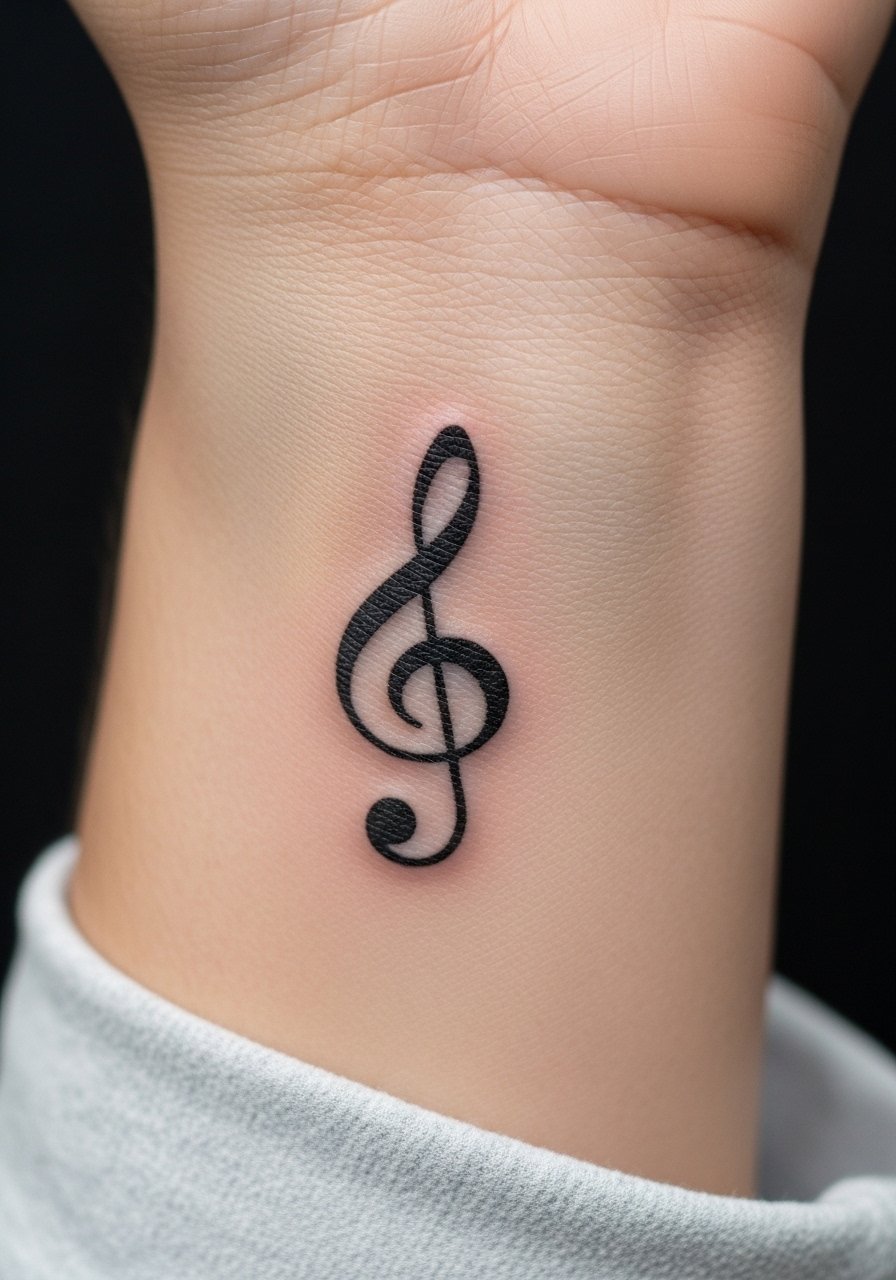
I first saw this on a friend who wanted something discreet and meaningful. The inner wrist has low to moderate pain for most people. Expect a 30-45 minute session. Ask your artist for a slightly bolder main stroke so the loop doesn’t blur together in a year. Fine line clefs look delicate fresh, but from what I’ve noticed they can disappear into the skin after two years if the lines are too hairline. Tell your artist you want a slightly heavier primary line and minimal hairlines. Avoid getting multiple tiny flourishes around it. Those fill in first. This is great for someone who wants an everyday reminder without full commitment.
2. Micro-Realism Guitar Neck On Forearm
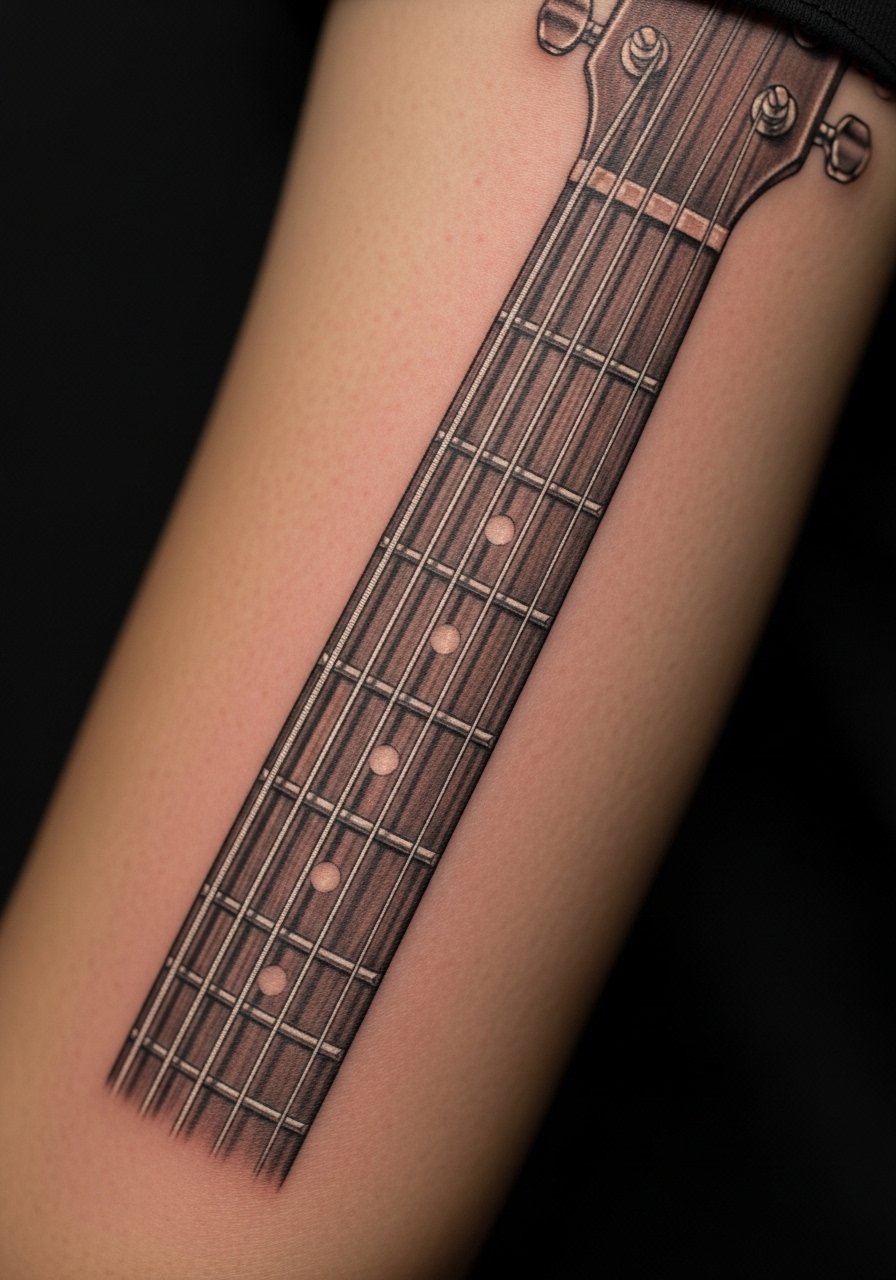
I saw this style at a shop that specialized in instrument portraits. The forearm gives enough real estate for fine fret detail and inlay work. Pain is mild to moderate. Sessions usually run 2 to 3 hours. Tell the artist you want contrast between the fretboard and frets so the frets stay visible as the tattoo ages. A common mistake is asking for ultra-fine frets, which blur into a dark band later. Up the contrast and choose an artist experienced in micro-realism. Over time the wood grain softens but stays readable if the initial shading is punchy. This suits collectors who want a realistic nod to their instrument.
3. Minimalist Waveform Behind Ear
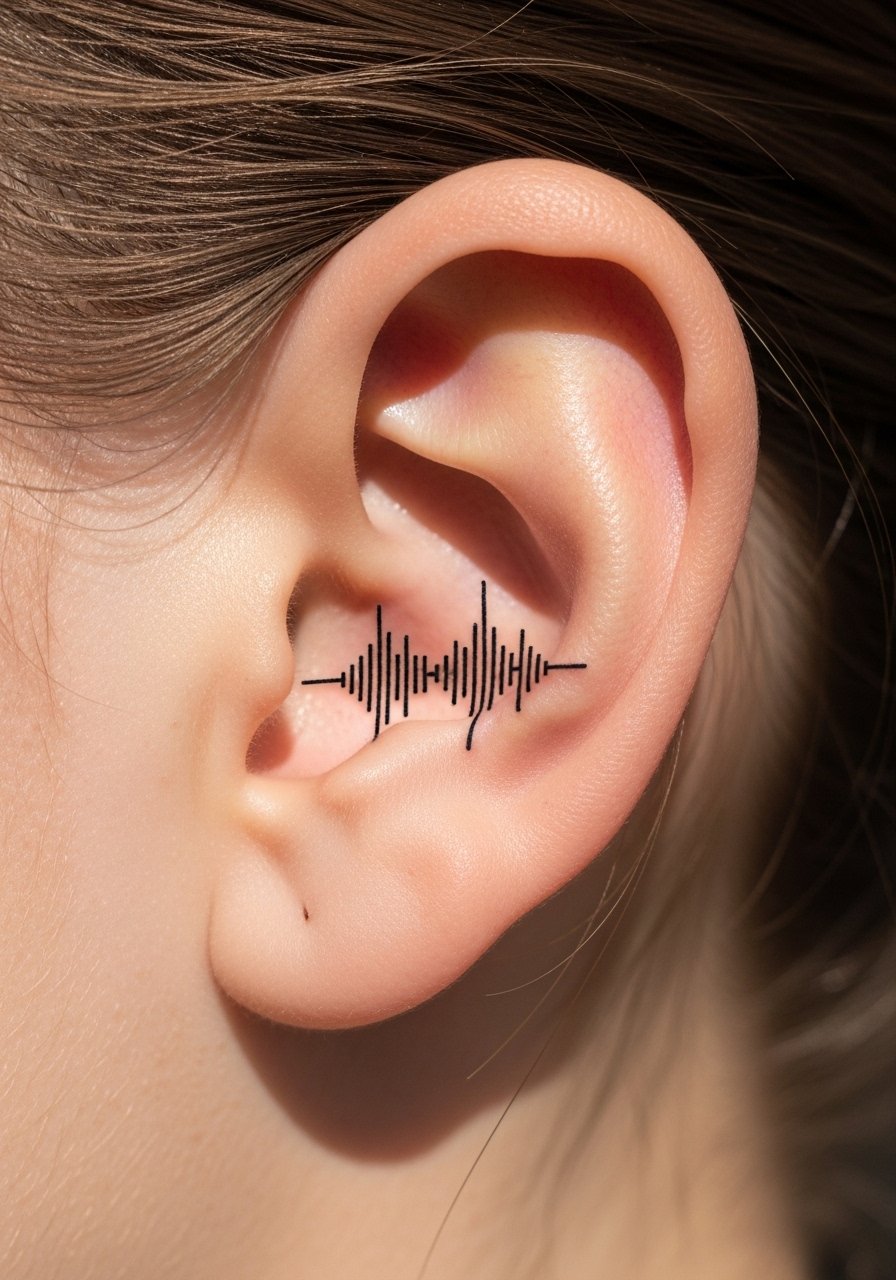
Fair warning, behind the ear stings more than the wrist for most people. I got one and felt sharp, brief zings. This takes 15 to 30 minutes. I recommend using your voice or a favorite song snippet to generate the waveform. Ask your artist to keep the peaks and troughs spaced slightly wider than digital output. If you copy a raw waveform exactly, tiny lines will blur together in a year. The appeal is subtle expression, especially if you want something private. It heals fast because skin is thin, but avoid earrings and heavy shampoo for the first week to prevent scabbing.
4. Neo-Traditional Vinyl Record On Upper Arm
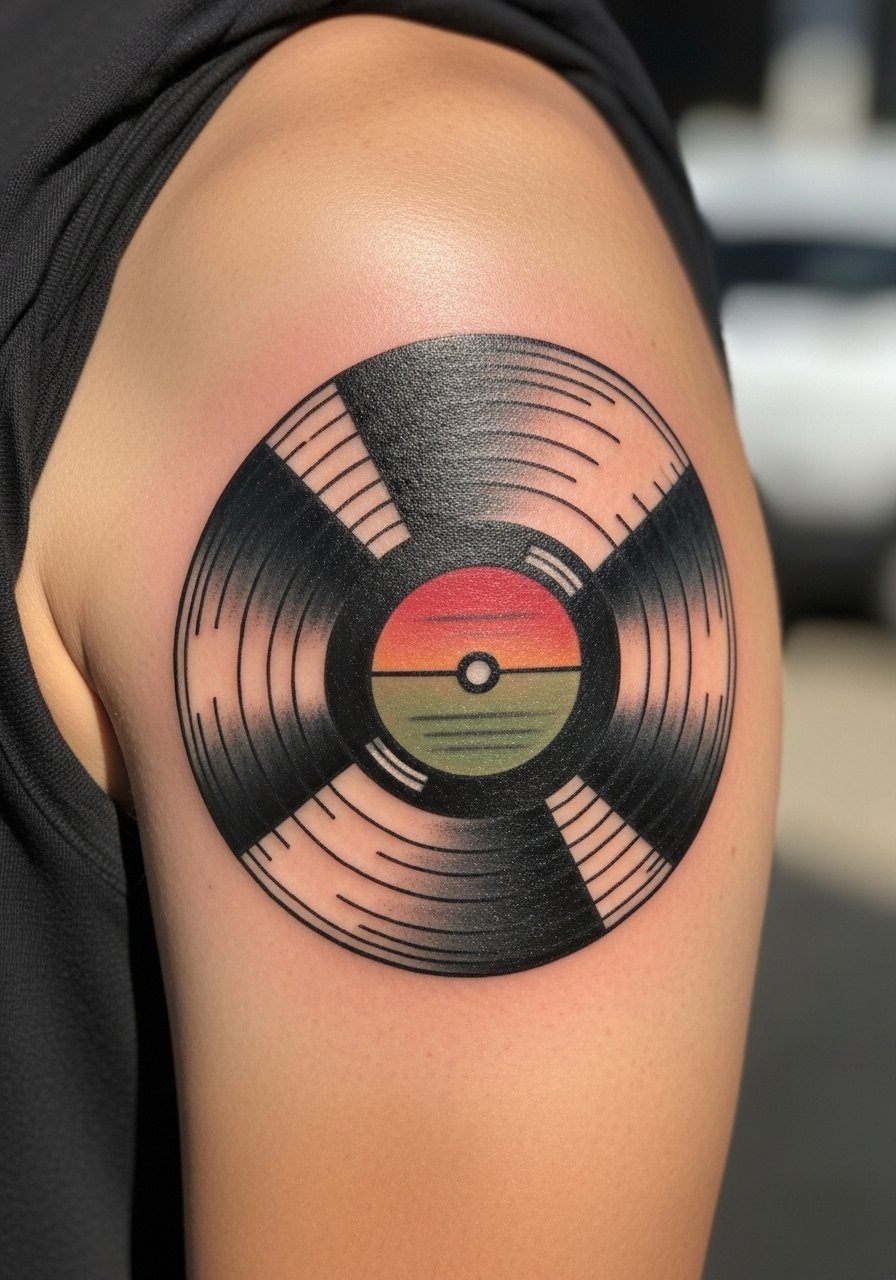
There is a presence to bold black outlines filled with muted color that reads across a room. The upper arm is forgiving for color saturation and sits well under sleeves. Pain is low. Sessions vary from one to three hours depending on size. Tell your artist to prioritize strong black rings and saturated midtones so the grooves stay visible years in. A common mistake is tiny lettering on the label. That text blurs. If you want a label, pick a short word or initials. This piece ages well because of the heavy blacks and classic palette.
5. Watercolor Headphone Splash On Shoulder
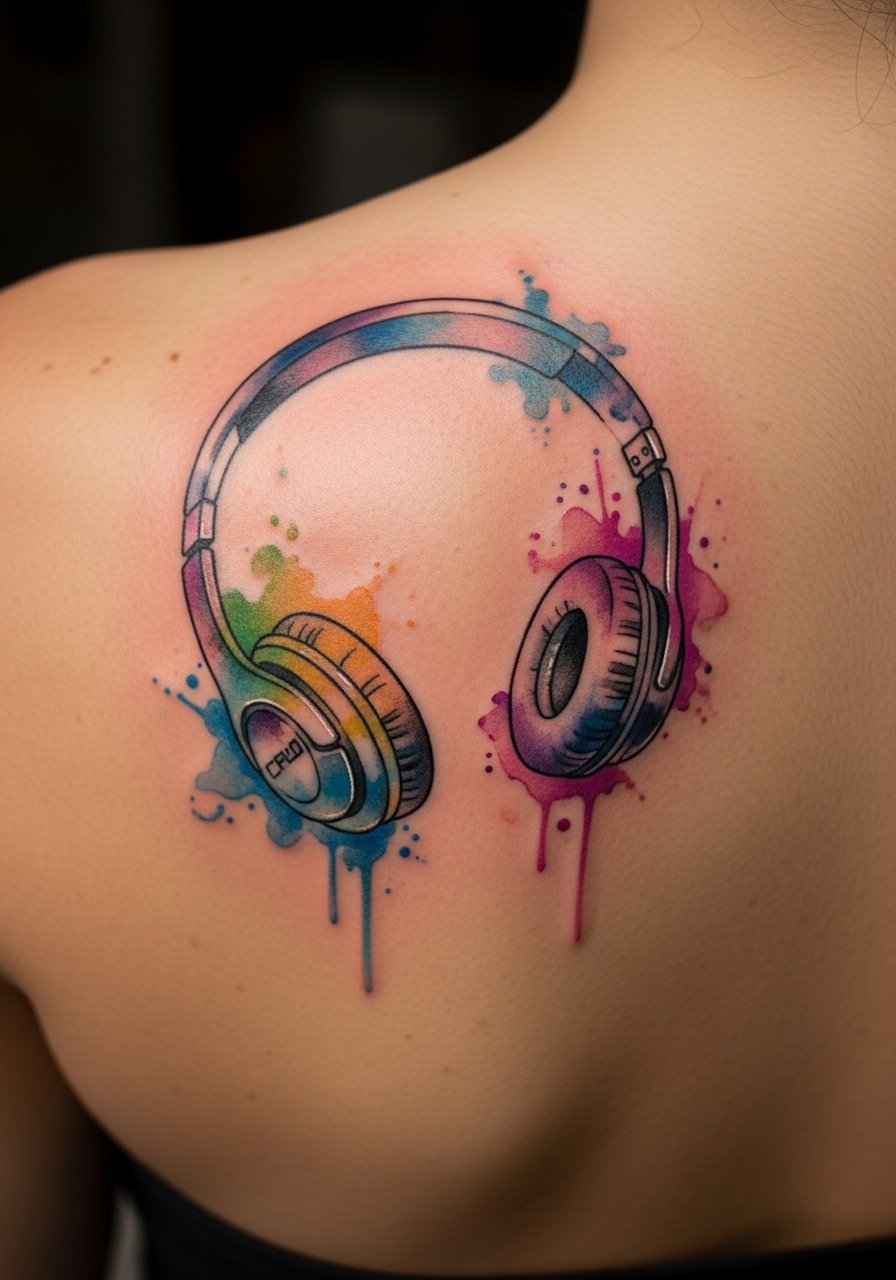
Most watercolor tattoos I’ve seen fade unevenly over time. The shoulder is a decent spot for color dispersion. Expect moderate pain and a session of 1.5 to 3 hours. Ask your artist for saturated anchors in the design, like a fine line headphone outline. That keeps the image readable as the washes soften. I’ve watched pure wash pieces turn into blotches after a few years. A hybrid approach, with selective linework, holds up better. Avoid asking for neon that isn’t properly saturated. You want pigments layered, not just one coat.
6. Blackwork Speaker On Shoulder Blade
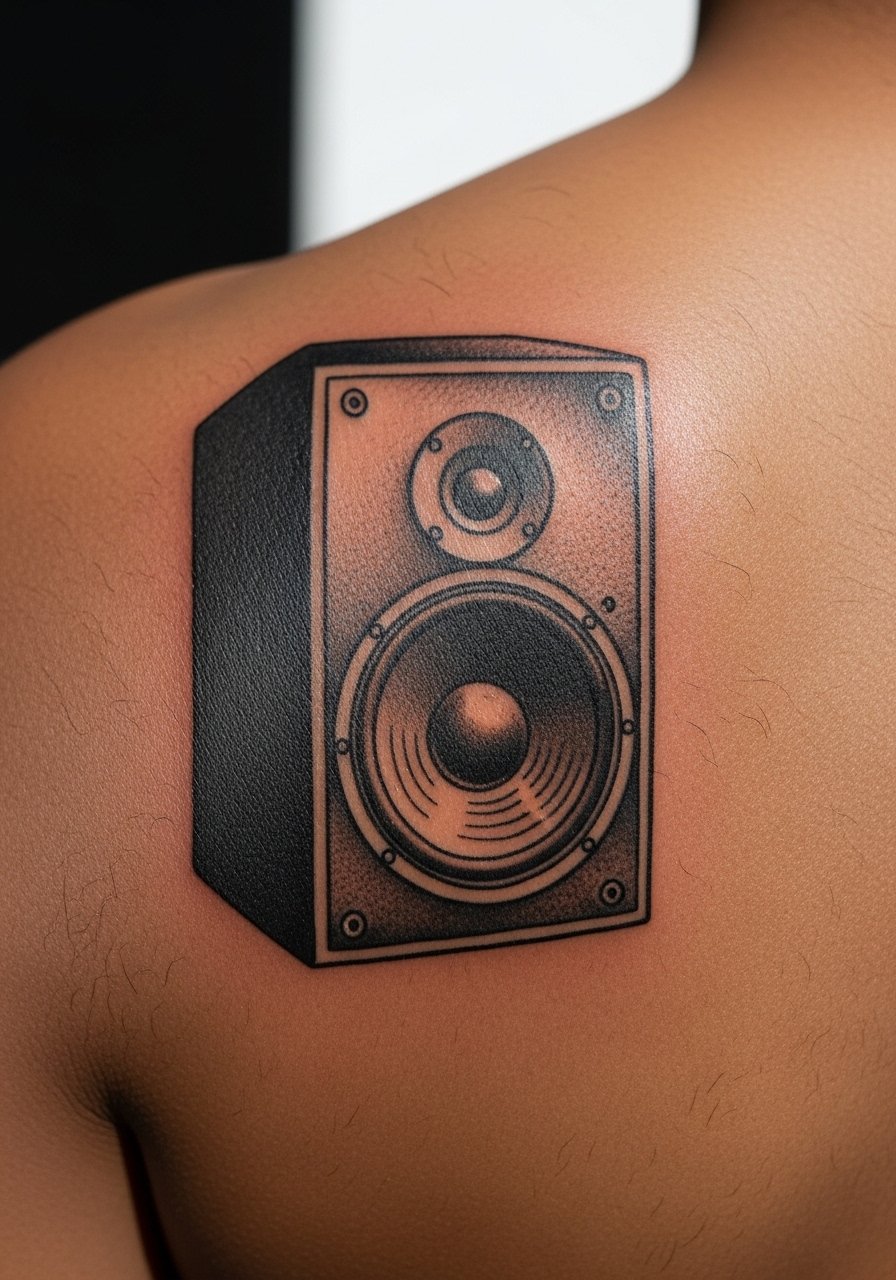
There is something about heavy black fills that endures. The shoulder blade tolerates solid black well, pain is moderate. Expect a 2-hour session. Tell your artist you want even fills with clear stop points, because patchy black fills heal poorly. The common mistake is too-small blackwork on thin skin. On the shoulder blade you can push contrast and negative space to create a graphic look that stays bold after five years. If you later want color, it layers nicely over black anchors.
7. Sheet Music Wrap Around Ribcage
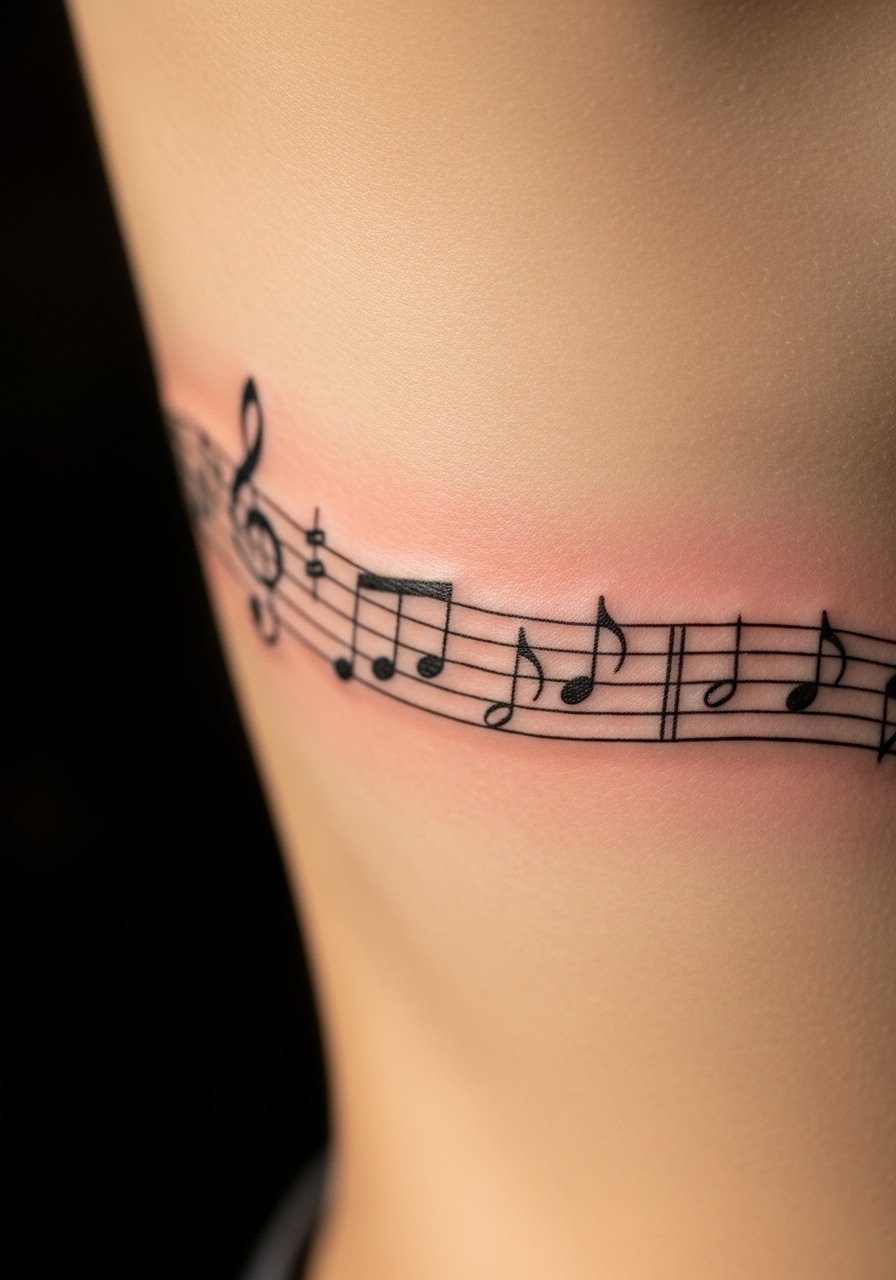
Fair warning, ribs are painful. I learned that firsthand. This kind of piece takes multiple short sessions. The rib placement gives a flowing, wraparound effect that reads like a personal score. Tell your artist you want slightly thicker bar lines and spacing between notes. People often ask for perfectly printed staff lines, which tend to blur and look muddy. With wider spacing the melody remains readable at six months and two years. Healing is slower because of movement and clothing friction. Plan for restricted stretching and avoid tight waistbands for two weeks.
8. Minimal Lyric Script Along Collarbone
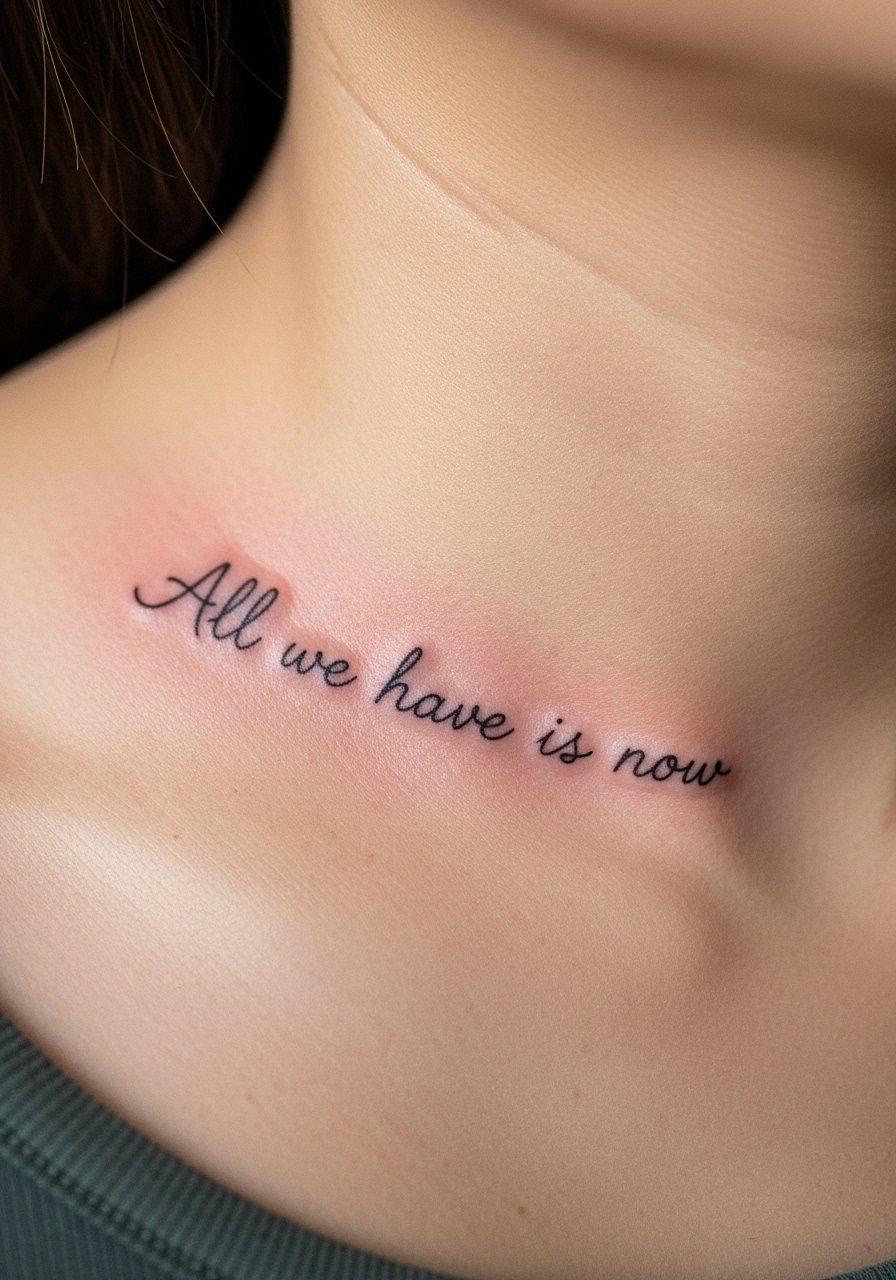
I found this idea when a friend asked to keep a single line of lyrics visible. Collarbone pieces show well in photos and with open shirts. Pain ranges from moderate to high depending on how close to bone you go. Sessions are usually under an hour. Ask for a bit of extra weight on the downstrokes. Thin continuous script often breaks up after a year. A frequent mistake is choosing a font too ornate for the placement. Simpler, spaced lettering holds its shape and still looks elegant as it settles.
9. Micro-Realism Album Cover On Upper Arm
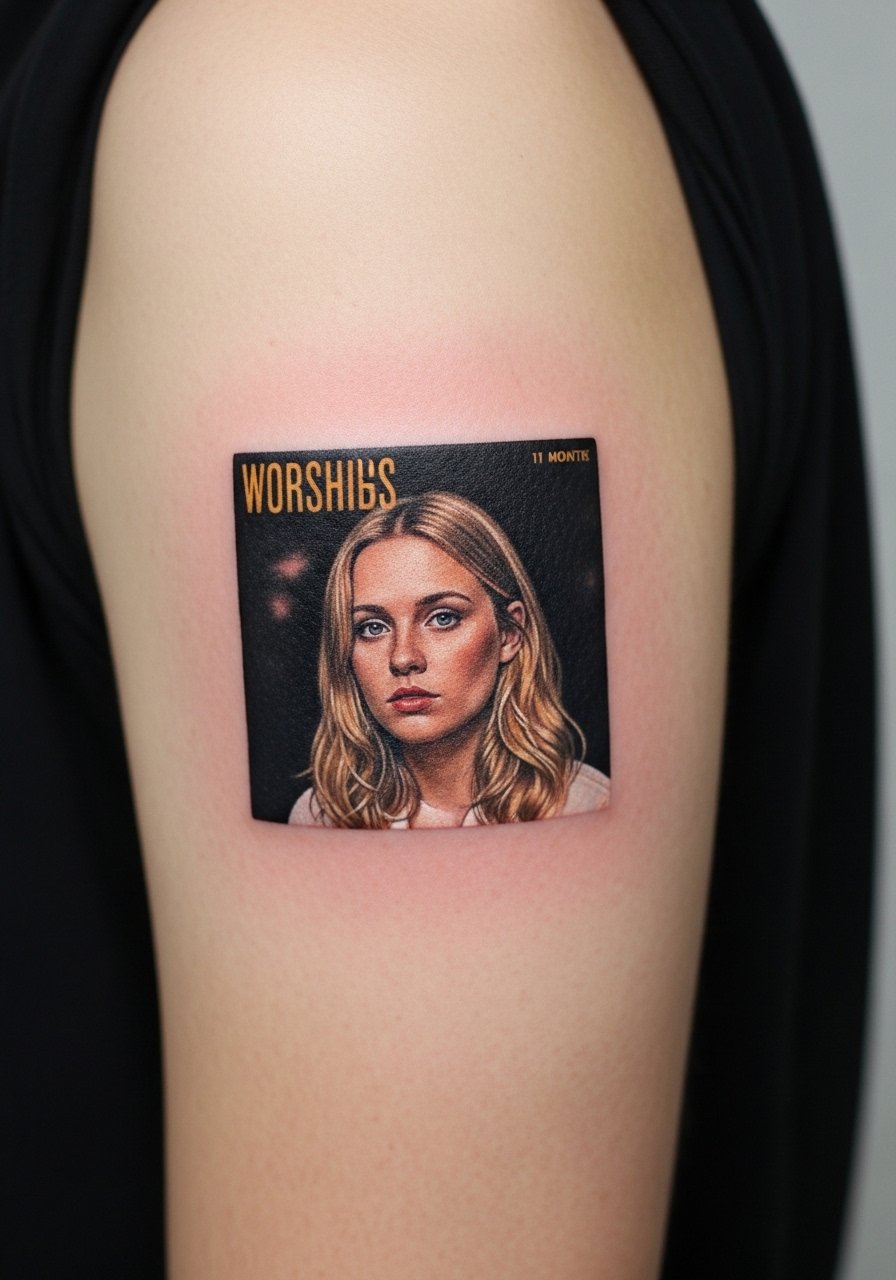
I saw a collector with a tiny, perfectly detailed album cover and it read clearly even from a few feet away. Upper arm offers space for color depth. Sessions vary from one to four hours. Tell your artist you need crisp edges and limited tiny text. Small text in album art is often the first thing to blur. A realistic approach with selective detail keeps key elements readable for years. This is best for fans who want wearable artwork rather than logos. Expect some softening at two years, but strong contrast keeps recognizability.
10. Single-Needle Conductor Baton On Clavicle
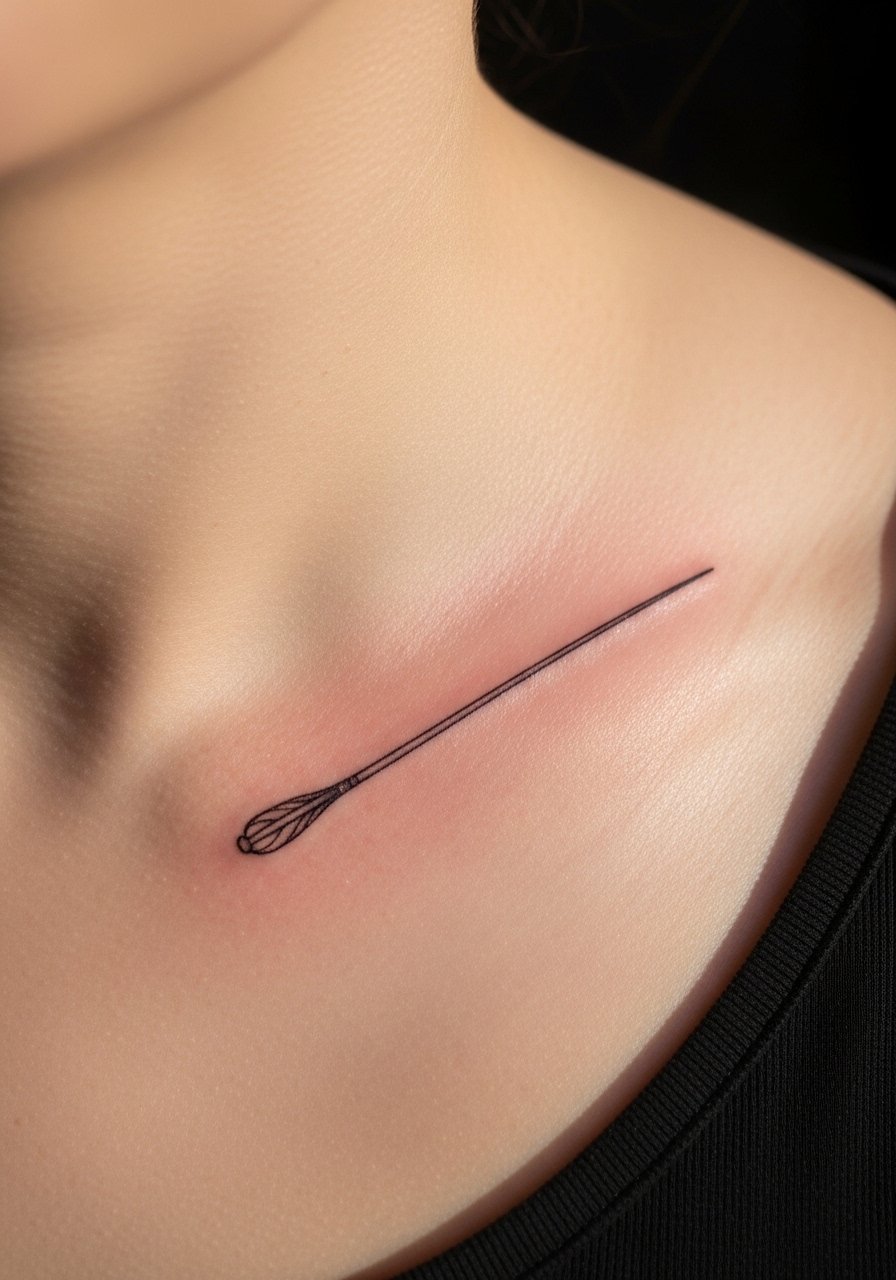
When I watched an orchestra conductor friend get this, the clavicle placement looked elegant and intentional. Pain is moderate because of shallow bone. Session time is short, often under 45 minutes. Ask for a single-needle look but request slightly heavier endpoints. Ultra-fine single-needle lines fade fastest along the clavicle. A common mistake is making the baton too thin. A subtle taper with a clear end point reads better as it ages. This is great for classical musicians who want something subtle and symbolic.
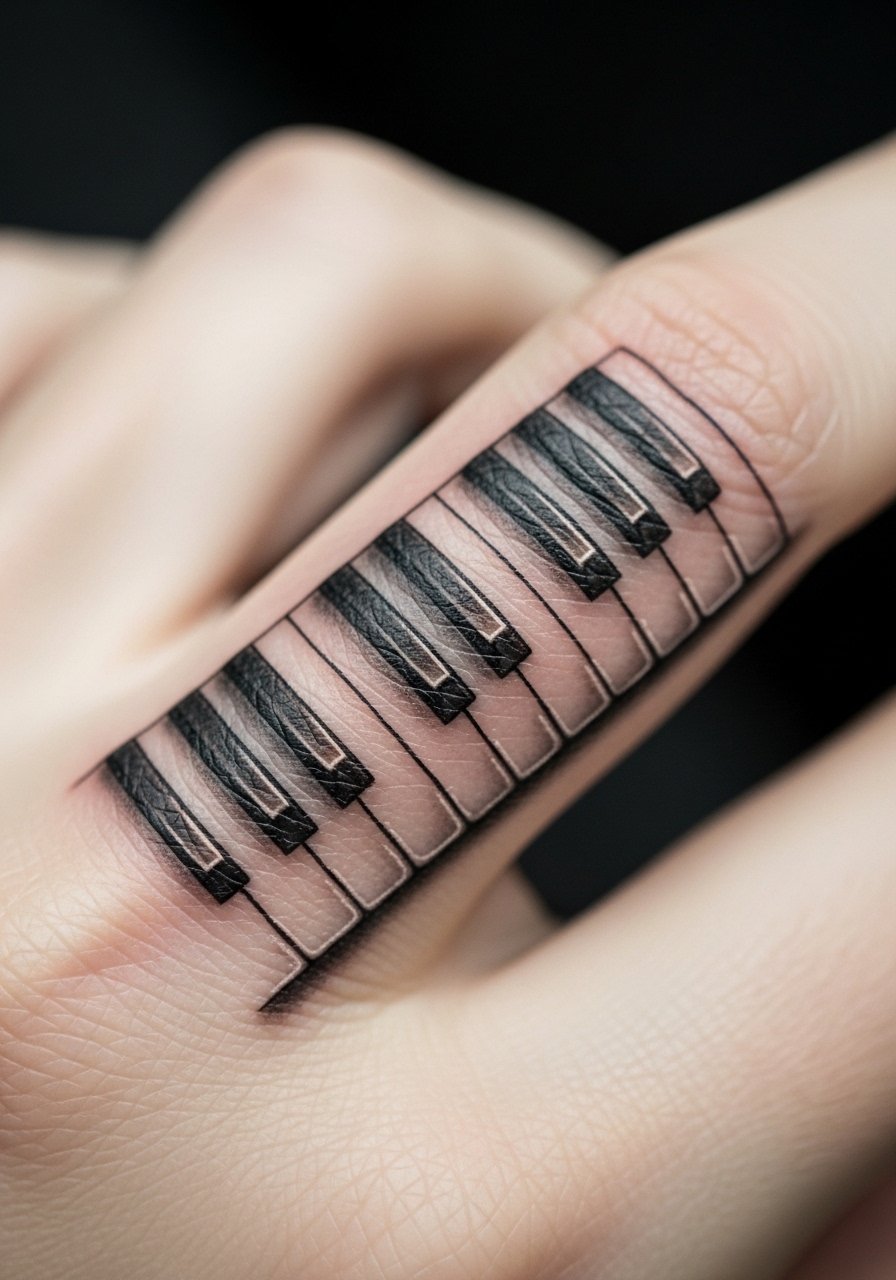
11. Blackwork Piano Keys Around Ankle
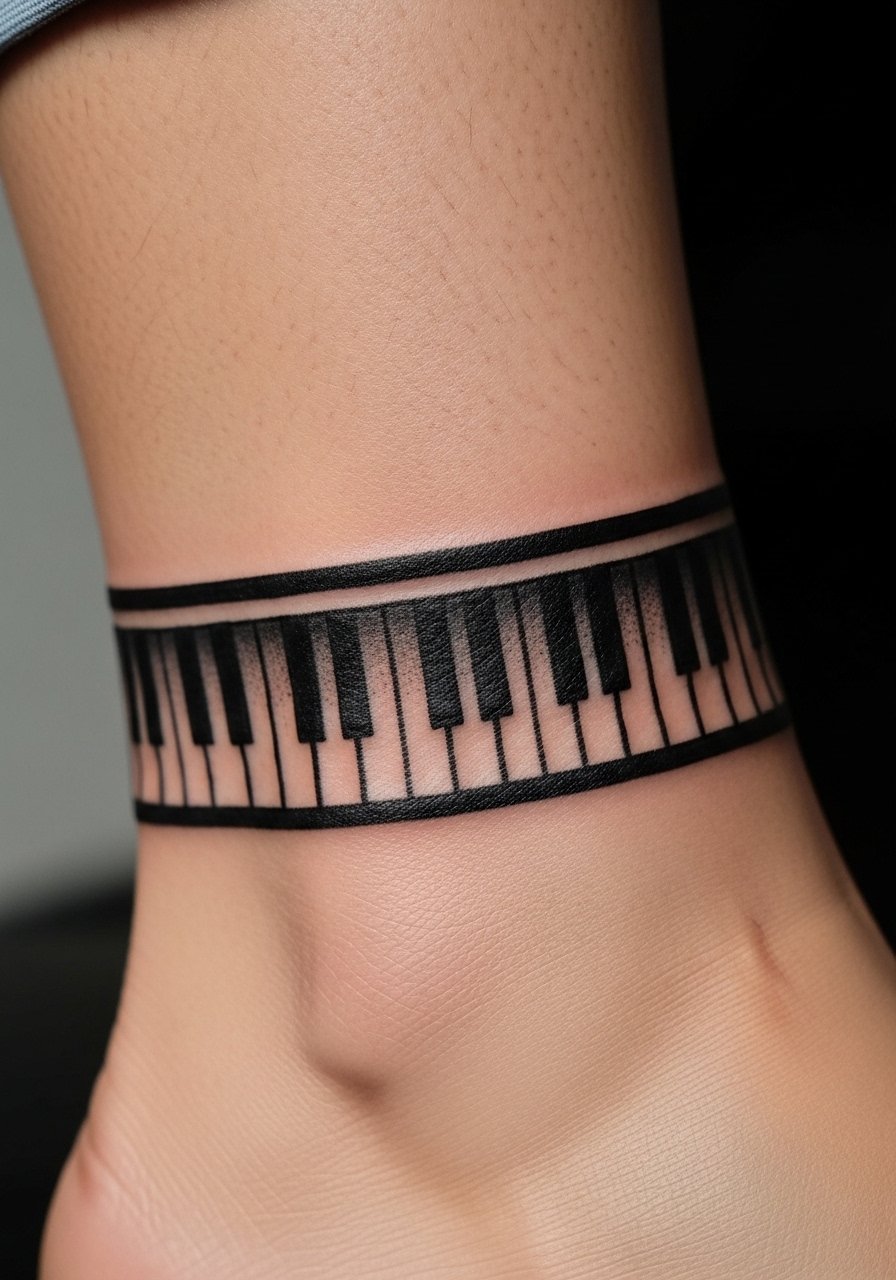
The ankle gets a lot of movement and friction, so I avoid ultra-fine detail there. A solid black key band holds up well. Pain is high in that spot. Sessions are short to medium. Tell your artist you want negative space between keys to prevent bleeding. People often ask for very thin separators, which vanish after a year. This band works for dancers and pianists who want a visible nod when wearing shoes that reveal the ankle. Expect touch-ups in a couple of years if you want crisp edges.
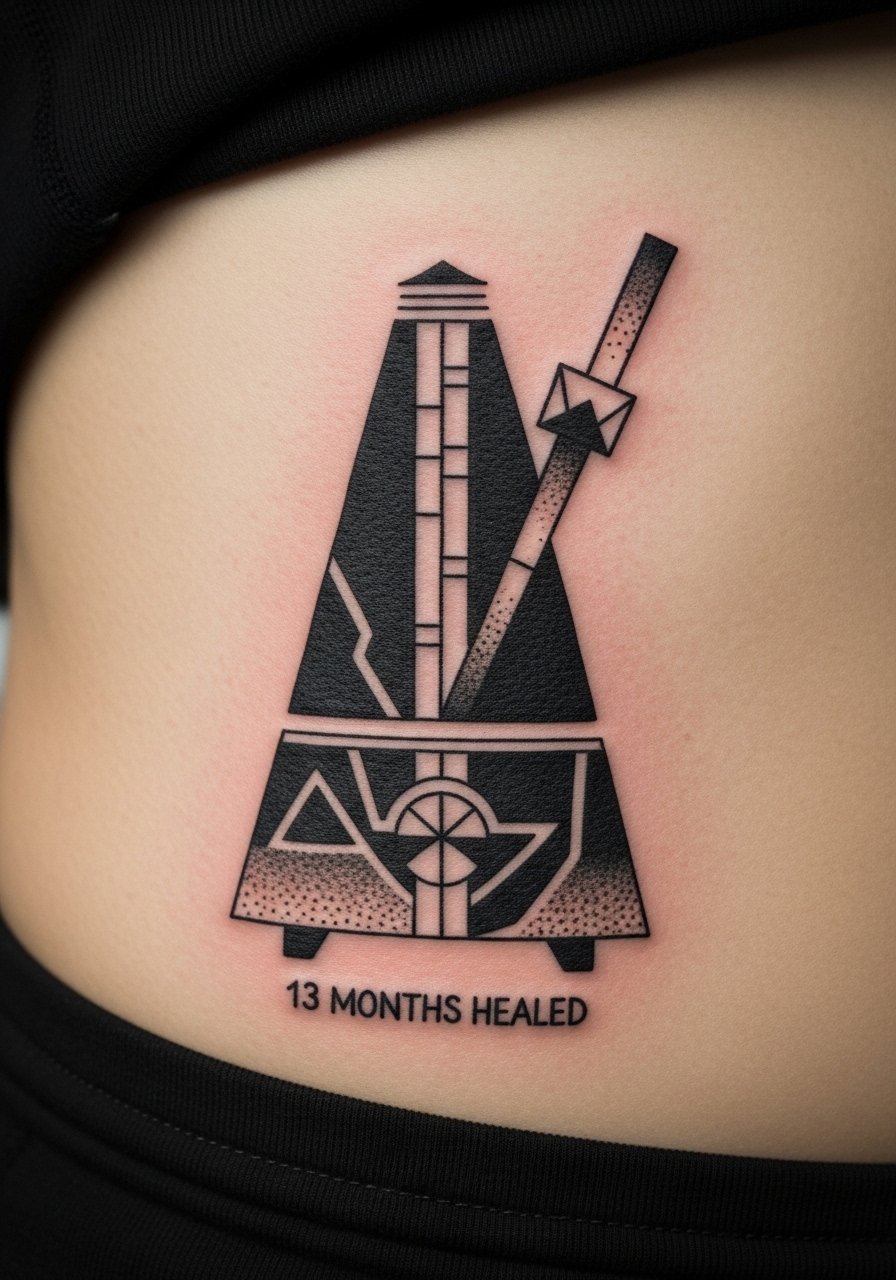
12. Minimalist Metronome On Sternum
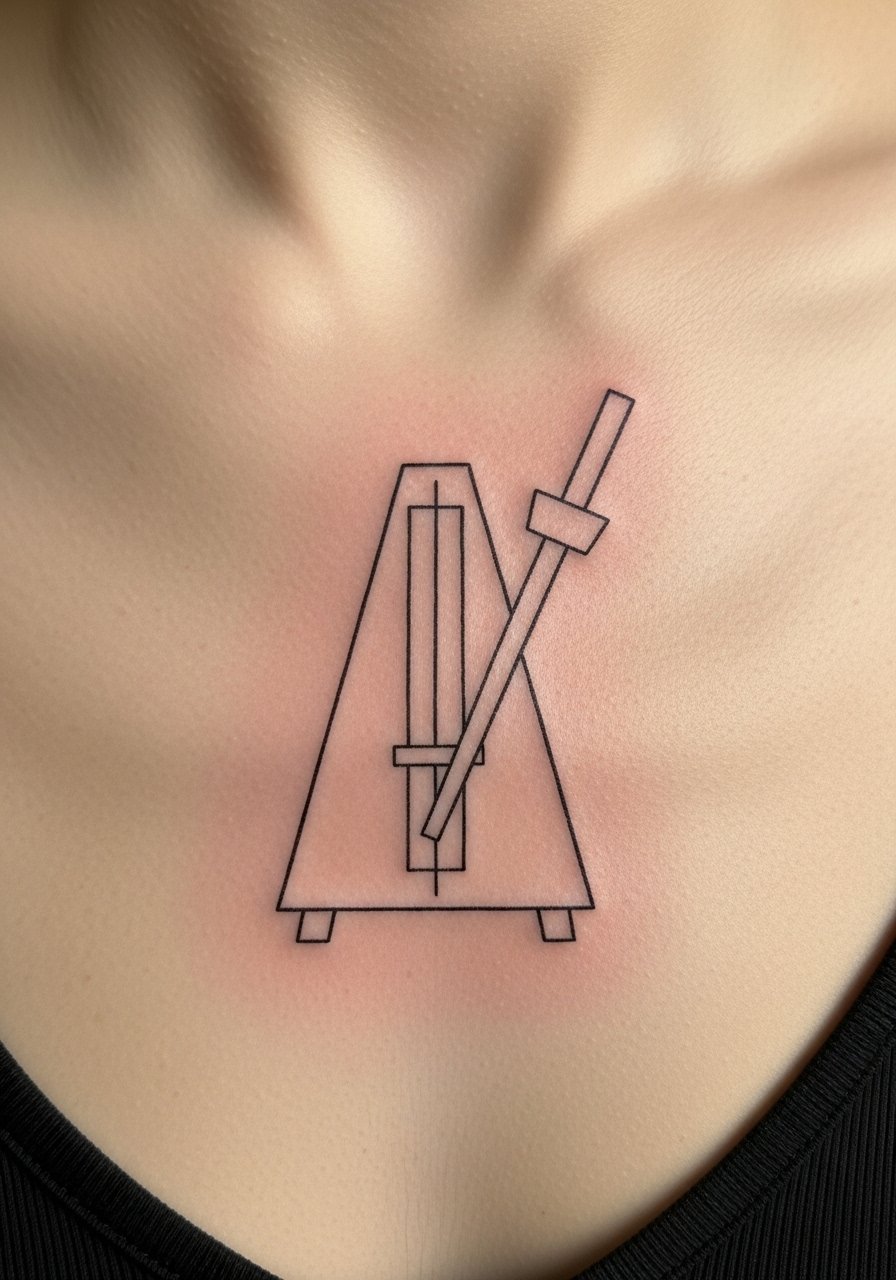
I noticed metronome tattoos communicate discipline. The sternum is a more intense spot for pain. Sessions are short but may feel sharper. Ask your artist to anchor the design with a thicker base line so the silhouette stays intact. A mistake I see is too many inner markings that blur. Kept geometric and bold, a sternum metronome ages consistently. Wear loose tops while it heals to reduce rubbing against bras or shirts.
13. Watercolor Soundwave Across Ribcage

Most watercolor on the ribs loses saturation faster because of movement. This placement makes an artistic statement when paired with a line anchor. Expect high pain and multi-session work. Ask for a defined black or dark line under the color wash so the waveform remains readable. People pick raw audio waveforms that are too dense. Spacing the peaks and integrating a line keeps the rhythm visible at six months and beyond. This is for someone who wants expressive color and is ready for the maintenance it needs.
14. Tiny Cassette Tape On Inner Arm
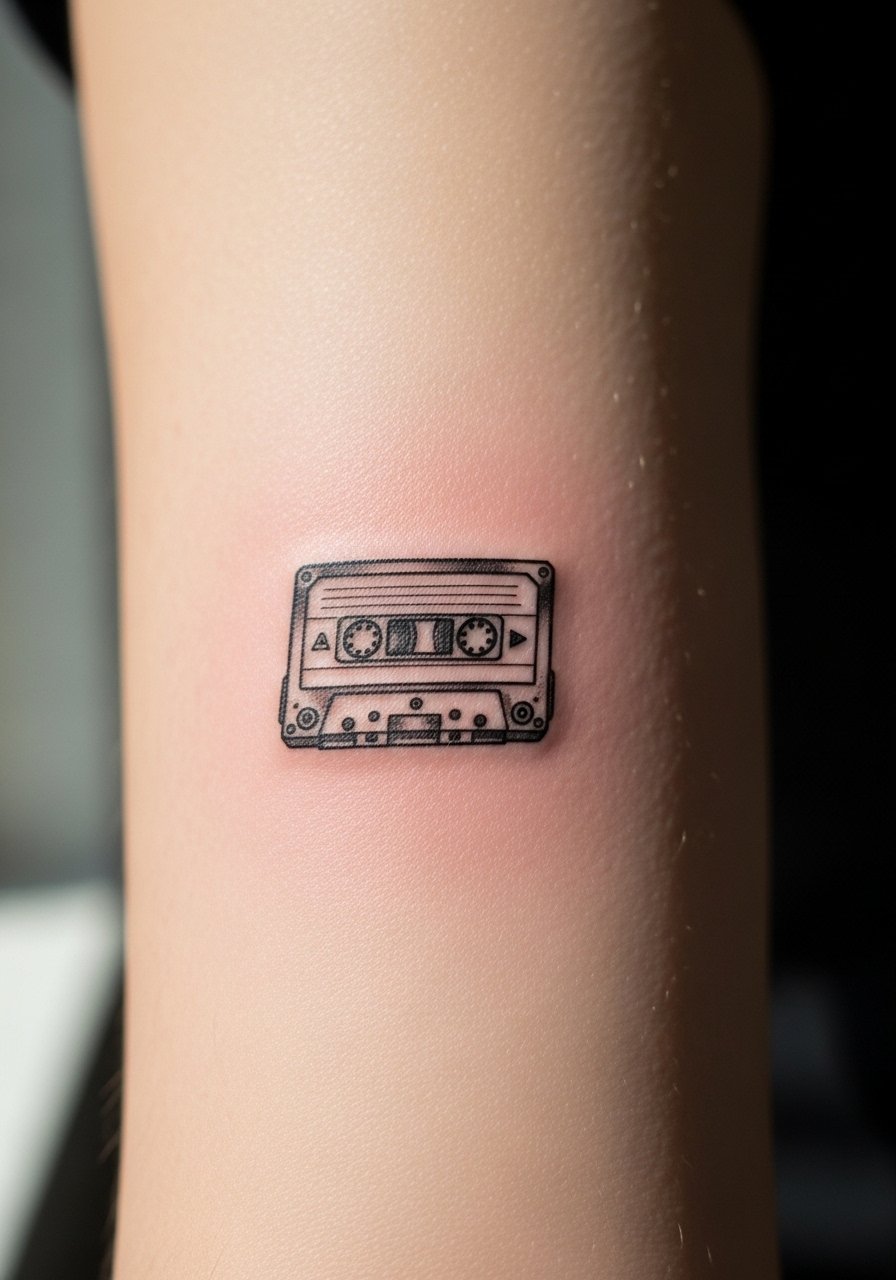
I love the nostalgia this one brings. Inner arm pain is mild and healing is straightforward. Sessions are short, often 20 to 40 minutes. Tell your artist to keep magnetic window highlights as small negative spaces instead of tiny dot highlights. Small dots vanish first. A common mistake is overcrowding the tape with micro-label text. Keep the label graphic, not small words. It ages well if line weight is balanced and contrast is prioritized.
15. Baroque Music Note Neck Line On Nape
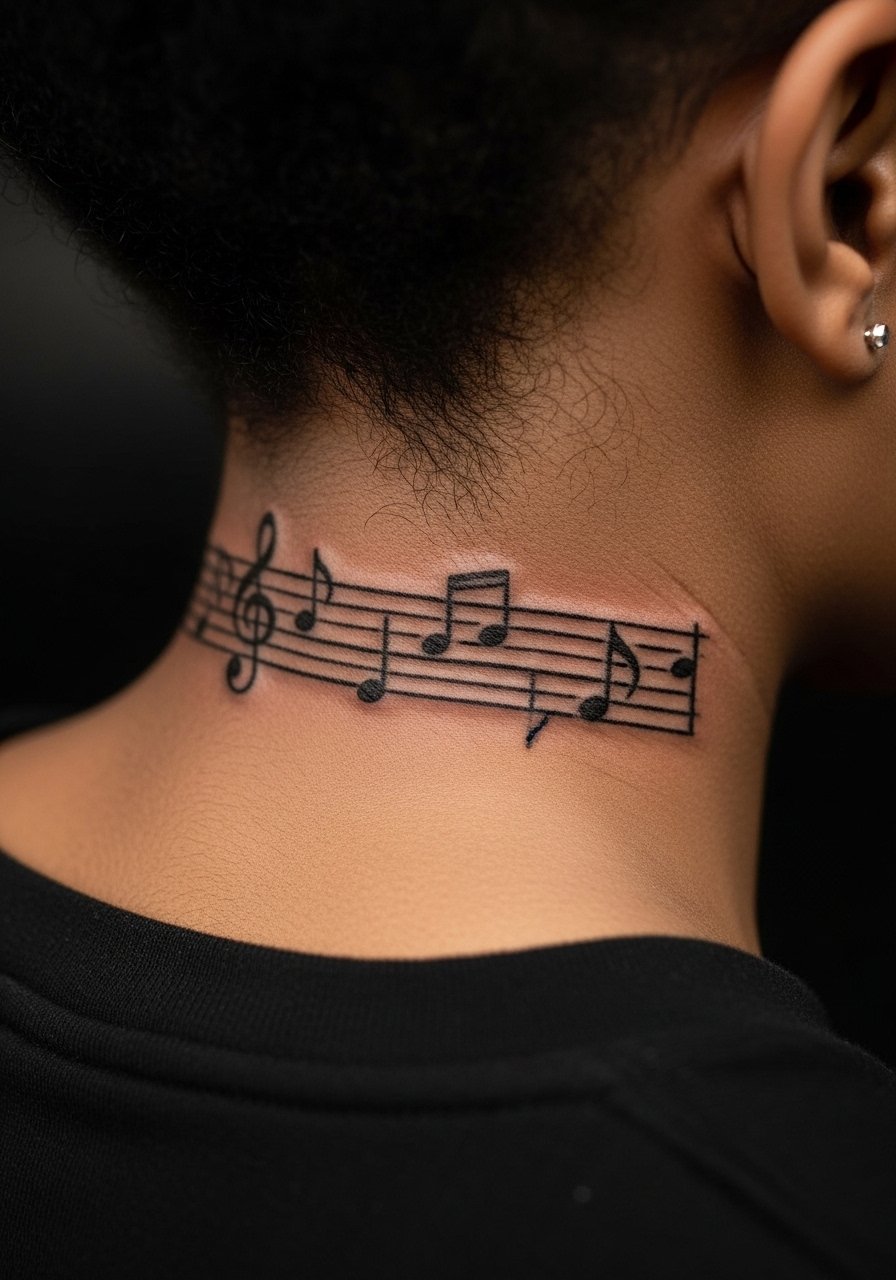
I saw a cellist with this and it framed the neck beautifully. Nape pain is moderate. Sessions are short. Request slightly bolder primary strokes and open spacing between notes. Crowded notation there becomes indistinct. Over time the edges soften, but the flowing line maintains the silhouette if initial spacing is generous. This placement shows with up-dos and is perfect for musicians who perform and want something visible but classy.
16. Geometric Metronome On Ribcage
I like geometric versions for people who want symbolism without literal rendering. The ribcage shape complements vertical geometry. Pain is high. Sessions may be split. Tell your artist you want clear negative spaces to avoid filled-in lumps later. A mistake is using too many thin intersecting lines. Those lines merge during healing. With clean planes the design stays striking at two and five years. This works if you prefer a modern, graphic nod to rhythm.
17. Lyric Line Wrapped Around Forearm
When I recommended this to someone, I told them to pick a short lyric for readability. Forearm pain is mild. Sessions usually take under an hour. Ask for extra spacing between words and slightly heavier lower strokes so the line survives when it softens. People often cram long phrases into a narrow band. That blurs. A wrap-around works best with 3 to 6 words. It looks different on inner forearm versus outer, so consider visibility and sun exposure. Outer forearm holds color longer.
18. Micro-Realism Trumpet On Calf
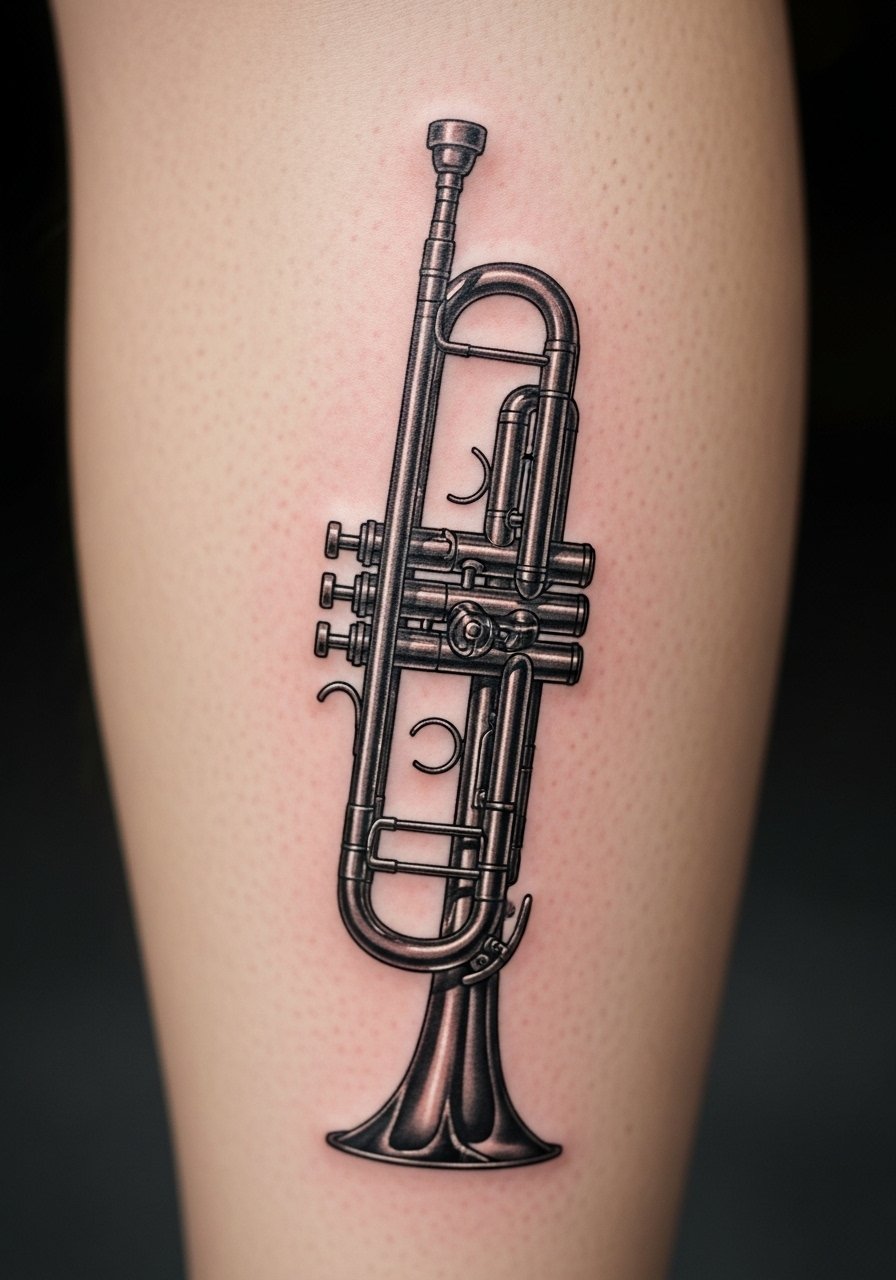
I found that calves handle textured metal shading well. Pain is low to moderate. Sessions can be 1.5 to 3 hours. Tell the artist you want distinct highlights and a few bold edges. Tiny reflective details get lost after a year. The common mistake is over-detailing valve parts. Simplify them and keep the silhouette crisp. Calf placements age well and show motion when you walk. This is ideal for brass players who want a slightly larger piece with depth.
19. Dotwork Drum Kit On Outer Forearm
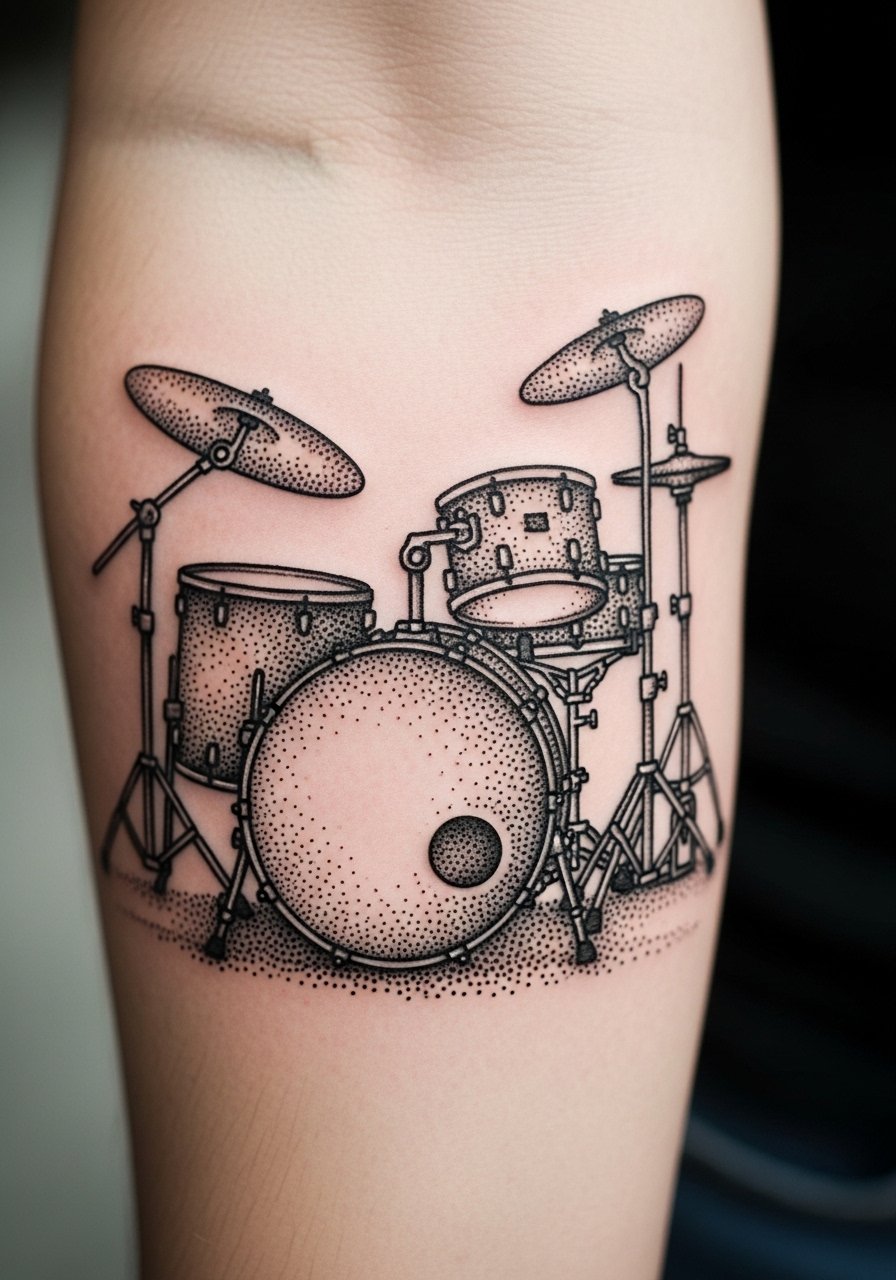
Dotwork creates texture that ages predictably if dots are spaced correctly. I’ve seen dotwork that turned into muddy patches when dot density was too high. Outer forearm is a forgiving place for this technique. Pain is mild. Sessions vary by detail. Ask your artist to keep stippling airy around the edges. For drummers who want detail without heavy black, dotwork reads like a sketch that stays legible at two years. Avoid asking for super dense fills close to thin linework.
20. Negative Space Headphone Silhouette On Chest
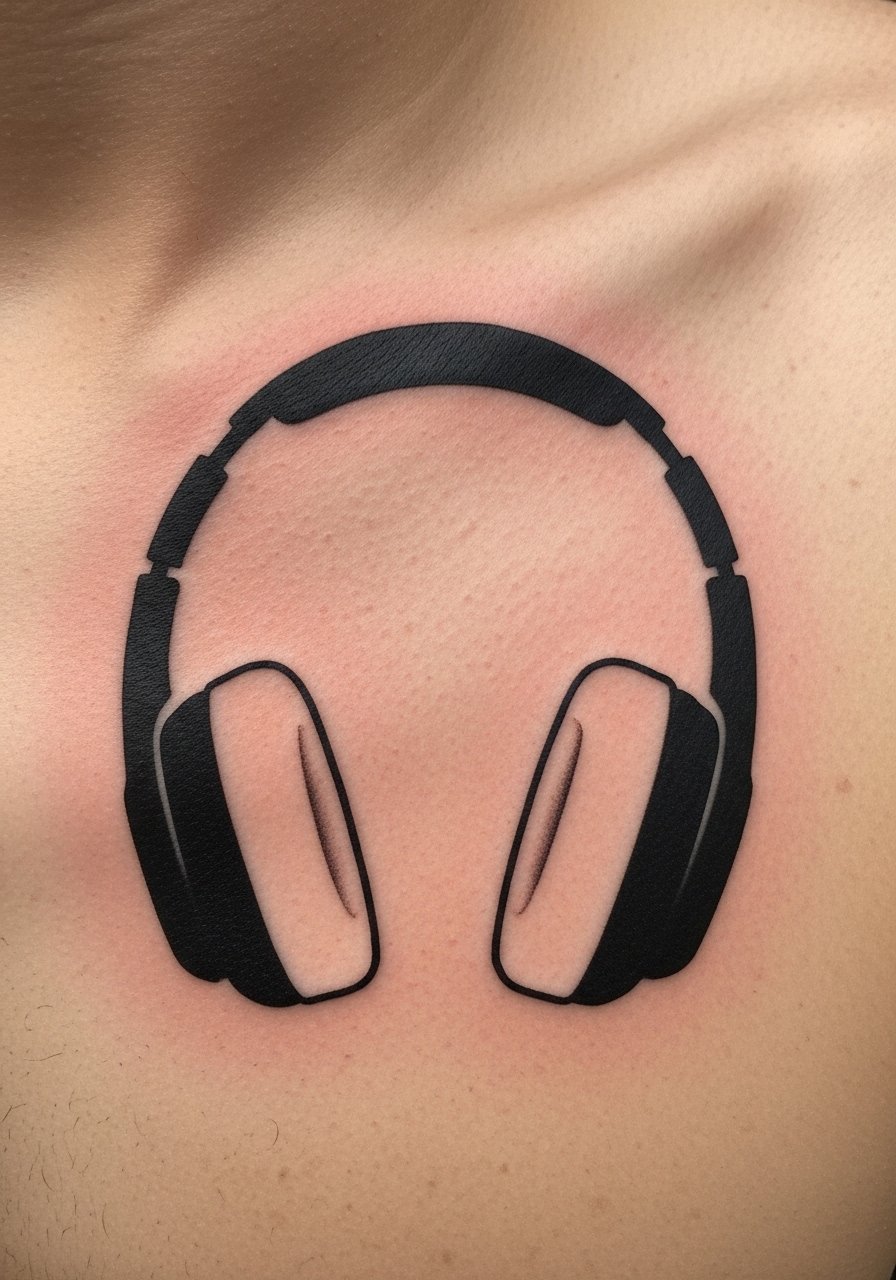
A negative space approach keeps the piece graphic. Chest pain is moderate. Sessions are medium length. I recommend solid surrounding black with clean skin-tone headphones left untouched. The usual mistake is trying to use tiny negative lines inside busy black fills. Those can scar and lose contrast. With a clean outline the negative space stays crisp for years. This placement shows well with crew neck shirts and keeps the design intimate.
21. Stylized Bass Clef Heart On Sternum
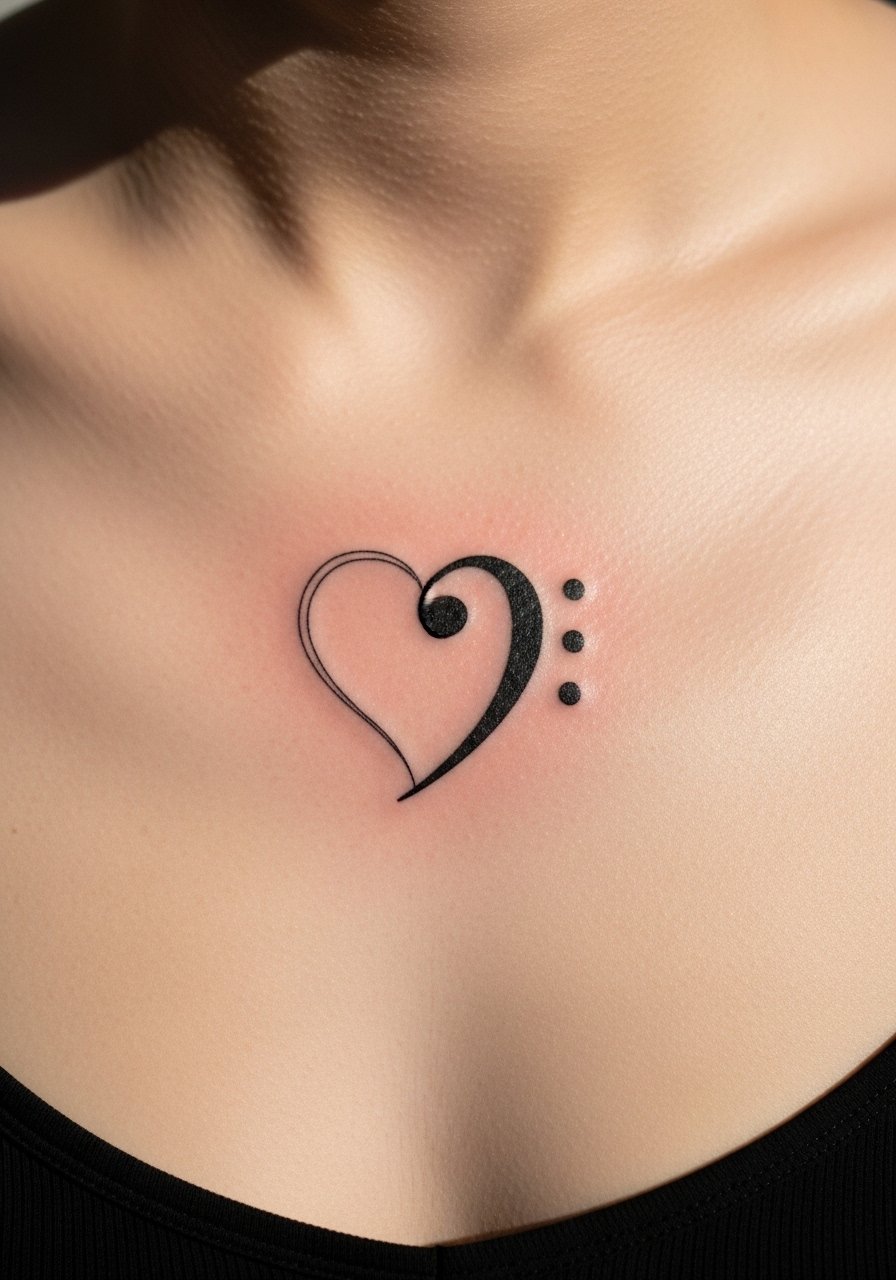
I first noticed this on a bassist who wanted symbolism and body placement to match low frequencies. Sternum pain I found is sharp but brief. Sessions are short. Ask for a sturdier outer line so the heart shape doesn’t round out. Many clients pick ultra-thin lines and regret it as the clef fills in. Kept bold enough, the design ages into a soft emblem that still reads at two years. Works for players who want the motif centered.
22. Retro Radio Micro-Realism On Chest
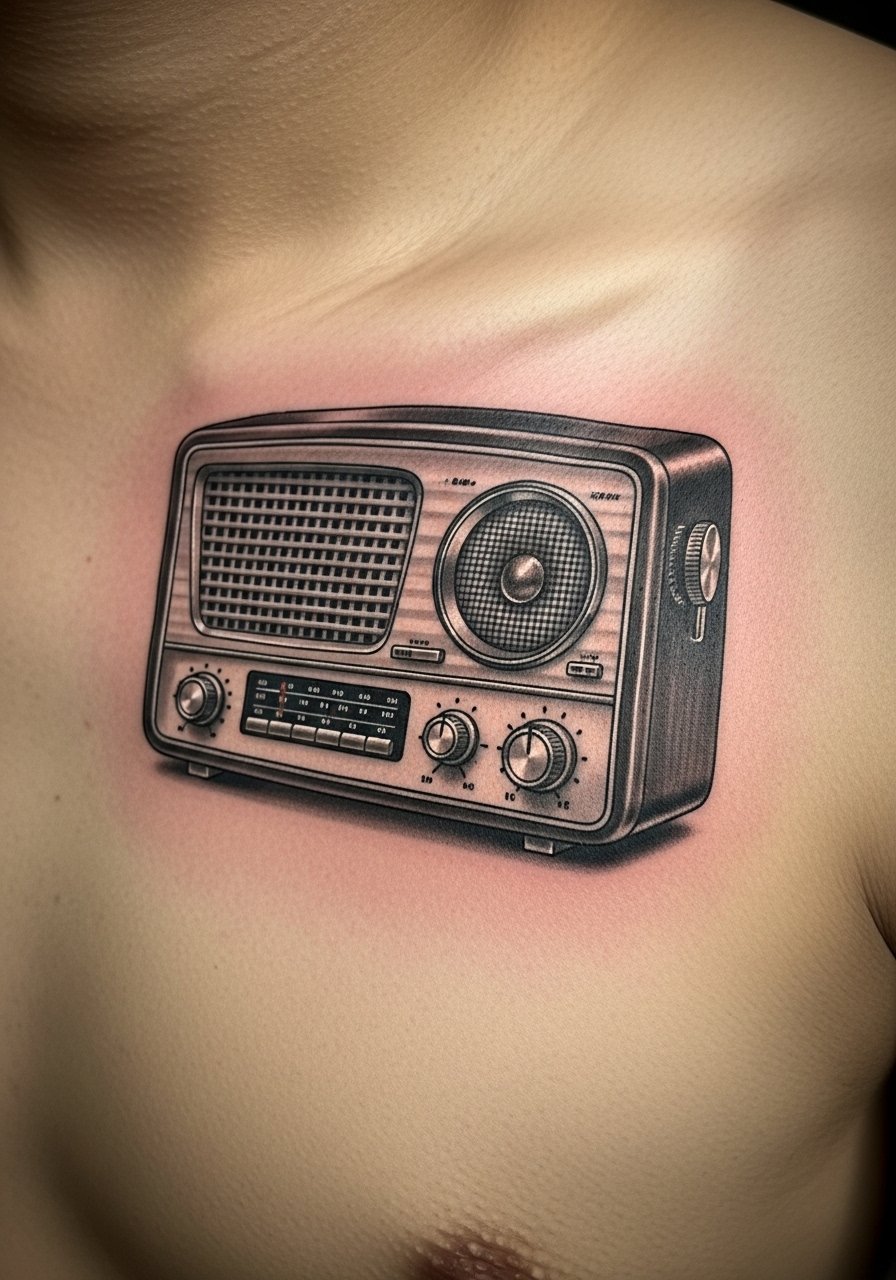
Chest gives room for micro details if you plan for bold focal points. Pain is moderate. Sessions are 1 to 3 hours. Tell your artist to prioritize major shapes like the speaker grill and antenna over tiny text. Detail around knobs fades first. A common mistake is tiny brand lettering. Leave the label blank or use initials. Over time the radio keeps its character if shadow anchors are strong.
23. Album Barcode With Hidden Song On Ribcage
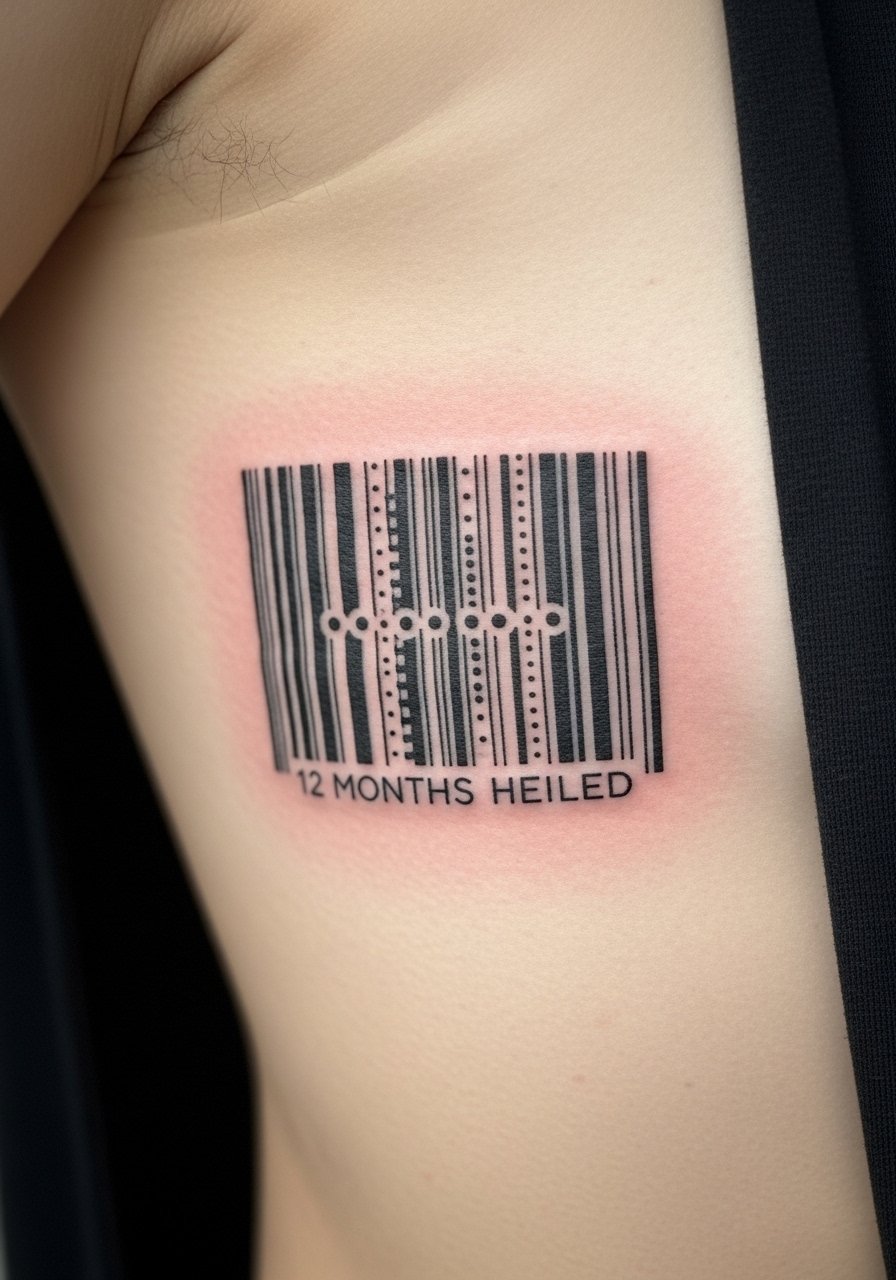
I discovered this trend where barcode lines encode track IDs or initials. Ribs hurt. Expect high pain and careful aftercare. Ask your artist to space the bars a little wider than a digital barcode. Exact machine-printed widths blur into a block otherwise. A smart trick is to add subtle negative space markers that stay readable as the lines soften. It’s a discreet way to carry a song code without obvious lyrics.
24. Neo-Traditional Microphone On Upper Thigh
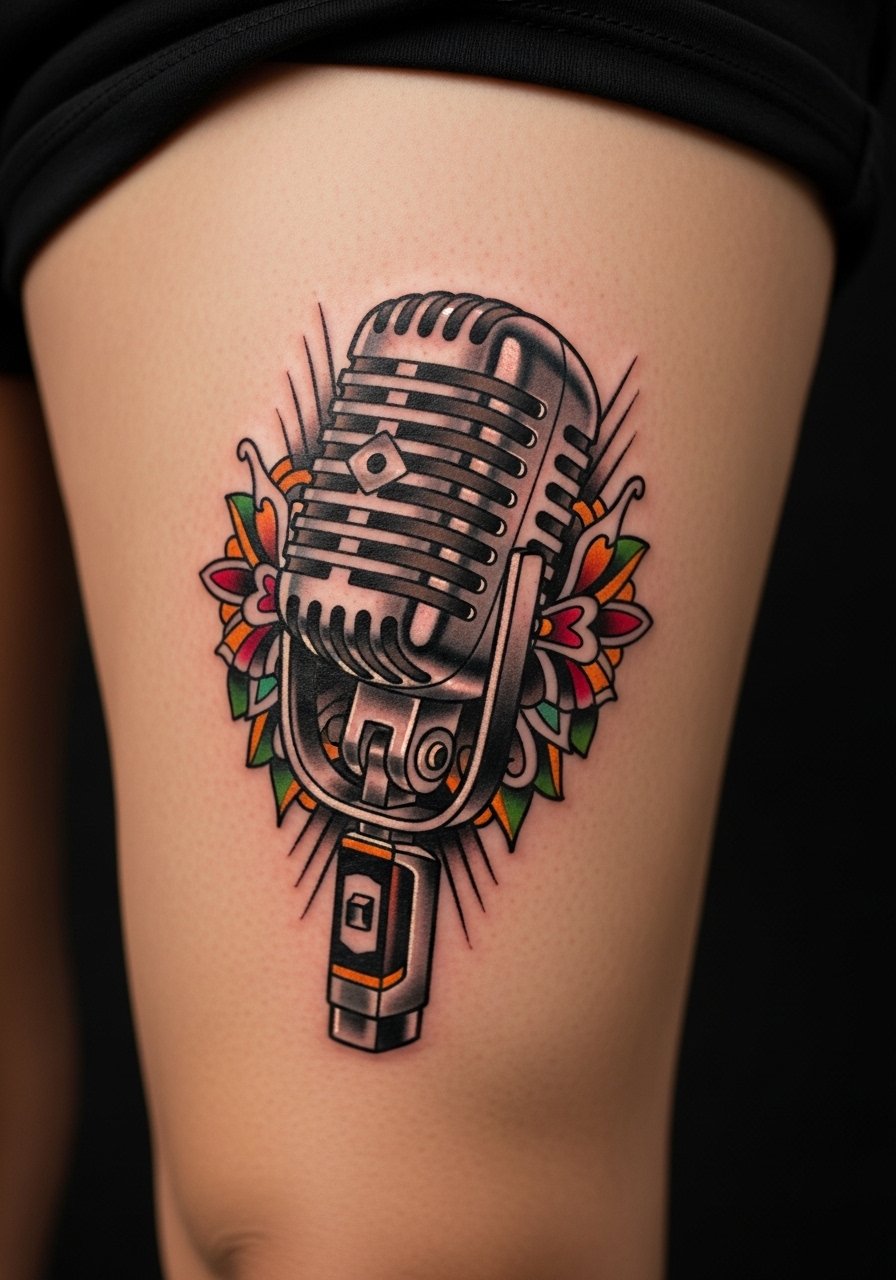
Thighs are great for larger neo-traditional work. Pain is low to moderate. Sessions can be longer, two to four hours for color. Tell the artist to use saturated midtones and bold black outlines. Neo-traditional looks best when outlines age with the piece. A mistake is tiny patterning on the mic grill that disappears. Keep grill patterns suggestionistic rather than hyper-detailed. This suits singers who want a statement piece.
25. Tiny Earbud Cord Script On Ankle
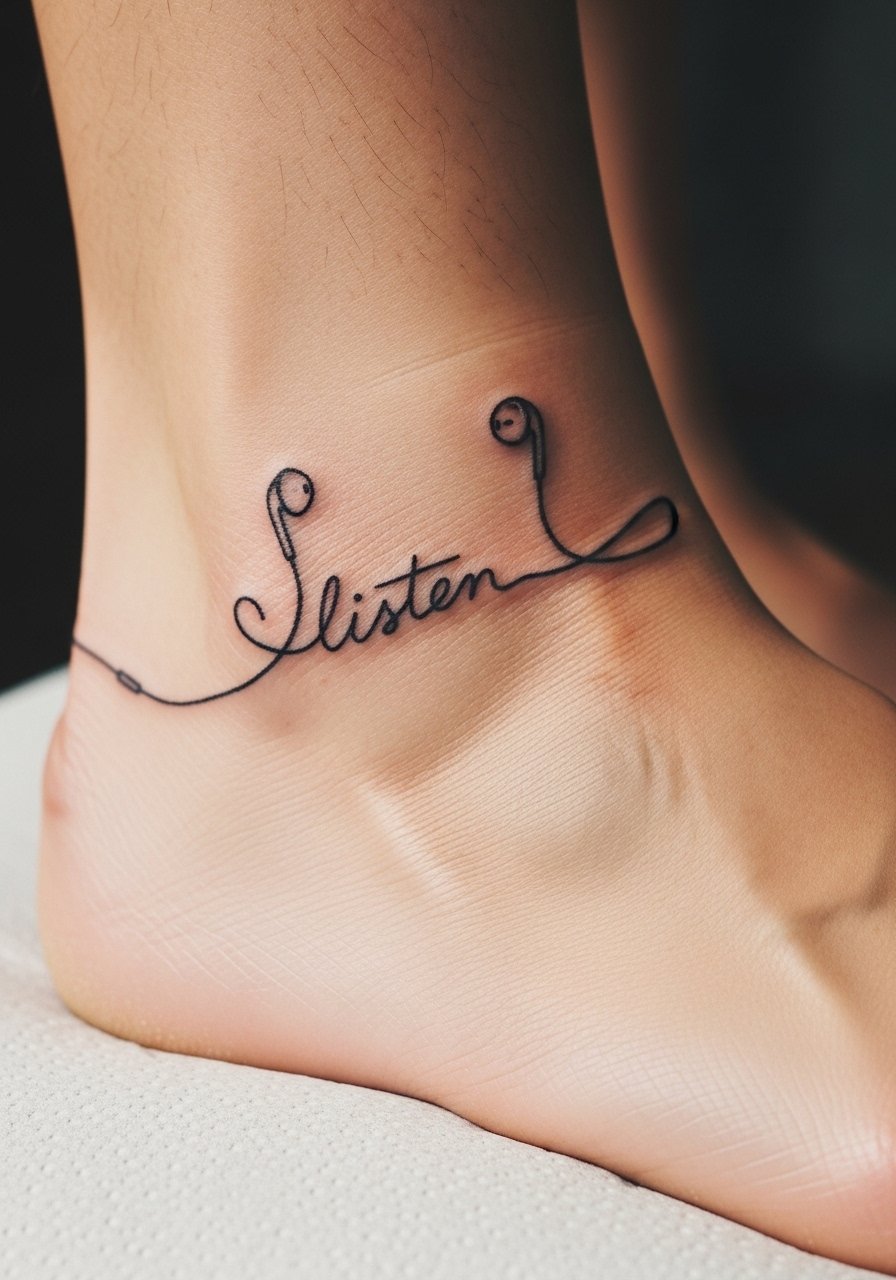
The ankle is sensitive and gets a lot of wear. I recommend keeping lines slightly thicker and avoiding tiny tight curls. Sessions are short. Tell your artist to create cord spacing that accounts for swelling and stretch. A common mistake is requesting exact thin loops from a photo. Those vanish first. This one is casual and playful, perfect for people who love daily music in motion.
26. Micro-Realism Piano Key Finger Tattoo
Finger tattoos are notorious for fading quickly. I learned this after getting a small design there. Expect sharp pain and likely touch-ups. Sessions are brief. Ask your artist to make the black segments larger and accept that light shading will fade faster. Many people regret ultra-fine finger work because it needs yearly refreshes. If you want a piano key on a finger, go bold and accept maintenance.
27. Spectrogram Color Sleeve Accent On Outer Arm
I saw a sleeve where a spectrogram band tied disparate elements together. Outer arm is good for color longevity. Pain is mild. Sessions depend on size. Tell your artist you want pigments layered with anchors so the gradient doesn’t wash out. A mistake is relying solely on pale pastel that disappears in a year. With deep initial saturation and UV care this style keeps its vibrancy. It pairs well with blackwork pieces.
28. Tiny Notation Dot Pattern Behind Ear
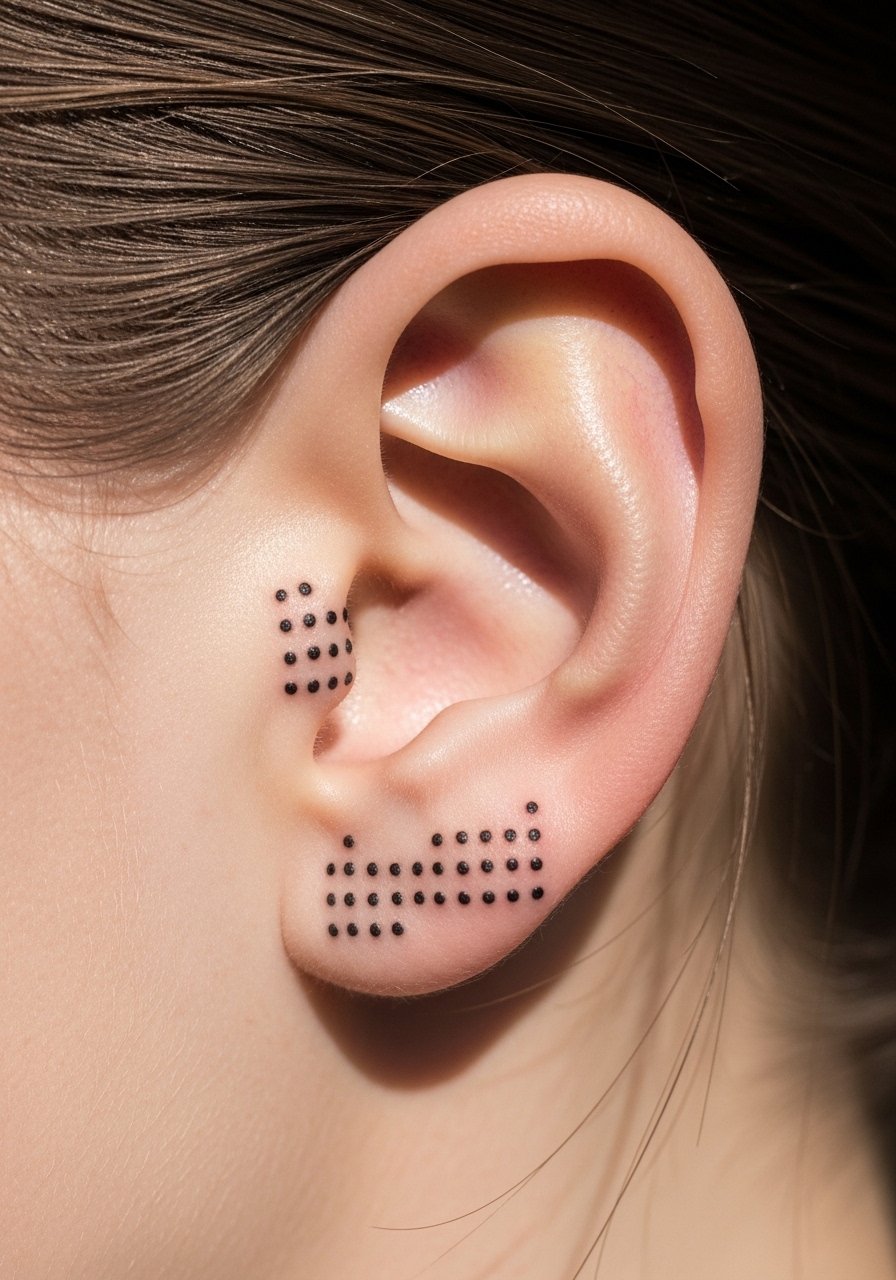
Small dotted notation is a minimalist option for those who like texture. Behind the ear is sharper pain than the forearm. Sessions are very quick. Tell your artist to space dots with breathing room. Crowded dots merge into spots. I recommend this if you want a whisper of musical reference rather than a bold icon. It’s subtle while still personal.
29. Infinity Cassette Tape On Inner Wrist
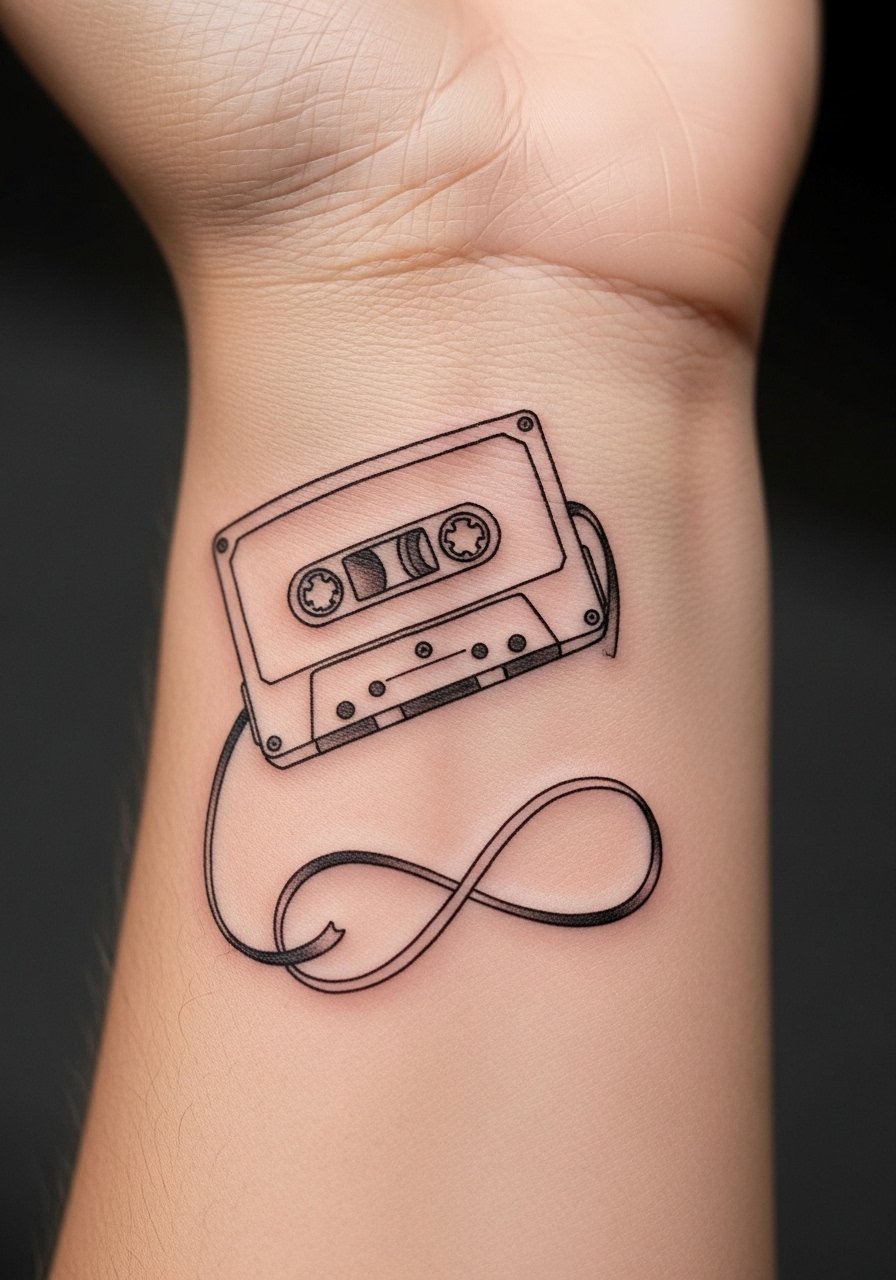
I noticed this design as a popular twist on nostalgia and commitment. The inner wrist gives visibility but also friction from watches and bracelets. Pain is mild. Sessions are brief. Ask for slightly thicker tape lines and leave the infinity loop a bit open so it doesn’t close into a blob. People often want lots of tiny detail inside the tape reels and that detail vanishes first. This version ages cleanly if the main silhouette is strong and you keep sun exposure low.
Tattoo Prep and Aftercare Essentials
Aftercare is the part most people under-prepare for. From what I’ve gathered, artists commonly recommend a staged routine, starting with barrier ointment, gentle cleansing, then fragrance-free moisturizers. I list the items I actually use and that every artist I’ve talked to mentions.
Aftercare Essentials:
- Aquaphor Healing Ointment, 14oz tube — Use for the first 3 to 5 days to protect fresh ink. Artists still reach for this for heavy-duty protection.
- Saniderm Transparent Adhesive Bandage, 6-inch roll — Second-skin method for the first 24 to 72 hours, great for high-friction spots.
- CeraVe Fragrance-Free Moisturizing Lotion, 12oz pump — Good for days 4 to 14, gentle and recommended by many artists.
- Dr. Bronner's Unscented Castile Soap, 32oz — Use diluted for cleaning twice daily in the first week.
Before Your Appointment:
- Numbing Cream With 5% Lidocaine, 30g tube — Apply 30 to 45 minutes before if your artist approves.
- Tattoo Stencil Transfer Paper, pack of 10 — Useful if you want to test placement at home or make custom stencils.
Long-Term Maintenance:
- SPF 50 Sunscreen Stick For Tattoos, 0.47oz — Prevents fading. Use daily on exposed pieces.
- Mad Rabbit Tattoo Balm, 1oz — Popular for keeping healed tattoos vibrant.
- Hustle Butter Deluxe, 4oz — A vegan aftercare alternative artists sometimes recommend.
Optional Comfort Items:
- Tattoo Numbing Spray, 100ml — For touch-ups or very sensitive areas if your artist approves.
- Hydrocolloid Bandages For Small Tattoos, 12 pack — Use on small spots instead of Saniderm when needed.
Notes on use:
- I apply Aquaphor for three days under a breathable bandage, then switch to CeraVe when scabs start to form. Every artist I’ve talked to warns about over-moisturizing. Less is often more.
- Saniderm and hydrocolloids are great for high-friction spots, like ankles and wrists. They create a moist healing environment that many artists prefer over open-air methods.
- SPF is non-negotiable for any exposed tattoo, I’ve seen color fade dramatically without it.
Frequently Asked Questions
Q: Will fine line treble clefs blur if I get a full forearm sleeve later?
A: From what I’ve seen, fine line clefs on wrists or forearms can blur if lines are hairline thin. If you plan a sleeve, tell your artist during consultation that you may add surrounding work. Ask them to give the clef slightly heavier weight so it can integrate into a sleeve without disappearing. For protection while healing, I use Saniderm Transparent Adhesive Bandage, 6-inch roll on high-friction forearm starts.
Q: Do watercolor soundwave tattoos need different aftercare than solid black pieces?
A: In my experience watercolor pieces need careful initial saturation and extra UV protection. The pigment sits more superficially sometimes, so I advise gentle cleansing with Dr. Bronner's Unscented Castile Soap, 32oz and switching to a light moisturizer after the first few days. Long term, use an SPF 50 Sunscreen Stick For Tattoos, 0.47oz on exposed color to slow fading.
Q: How do I tell my artist to make a barcode or spectrogram that won’t turn into a smudge?
A: Tell them you want wider bar spacing and negative space anchors. For spectrogram color bands, ask for layered pigments and deeper saturation at the initial session. I always request anchor lines or shapes in any dense design so there are reference points that remain pleasing as edges soften.
Q: Are finger and hand music tattoos worth it if I want longevity?
A: I’ve noticed fingers and hands require more touch-ups. If longevity is a priority, pick bolder simplified shapes and accept annual maintenance. For fingers, larger blocks of black or minimalist keys with a thicker stroke survive better than micro-detail. Consider using hydrocolloid bandages during early healing for extra protection, like Hydrocolloid Bandages For Small Tattoos, 12 pack.
Q: My ribs hurt. How should I prepare for a sheet music or waveform there?
A: Rest well, avoid alcohol and NSAIDs before your session, and wear loose clothing that won’t rub the area. From what I’ve seen, split sessions work best for large rib designs. Use barrier ointment early and Saniderm for the first few days if your artist approves. Bring snacks and expect slower healing because the area flexes with breathing.
Q: Which products do artists actually recommend for initial healing?
A: Most artists I’ve talked to still recommend an initial barrier like Aquaphor Healing Ointment, 14oz tube for the first 48 to 72 hours. After that they often suggest fragrance-free lotions such as CeraVe Fragrance-Free Moisturizing Lotion, 12oz pump. Saniderm use varies, but many pros appreciate it for areas that rub.
Q: Should I use numbing cream for painful placements like the ribs or sternum?
A: From what I’ve gathered, numbing creams can help for sensitive spots, but always ask your artist first. If they approve, use a product like Numbing Cream With 5% Lidocaine, 30g tube according to their timing advice. Numbing changes the skin feel and can affect how ink sits, so artist guidance matters.
