
I spent months studying portrait work and watching healed photos before committing to my first realistic piece. The problem I kept seeing wasn’t the design—it was choosing a style that actually stays crisp as skin moves and ages. These 26 portrait tattoo ideas lean on 2025–2026 trends and real healed examples so your next portrait feels alive for years.
These picks focus on microrealism, fine line, geometric/blackwork, watercolor hybrids, and Y2K twists. They work on arms, chest, thighs, and ribs—placements that let portraits read clearly. I leaned on trend pieces I saw across several 2025–2026 roundups (see sources below) and made sure each idea addresses real concerns like fading, regret, and artist skill.
Stat notes: Microrealism with color gradients showed up in multiple trend sources (ThesecretTattooStudio, 2025–2026). Geometric/blackwork portrait treatments are also repeatedly flagged as a big 2026 movement (MabeeInk).
Geometric Portrait Sleeve on Outer Forearm
Style/Technique: Geometric / Blackwork
Pain Level: Medium (3-5/10)
Session Time: Multiple sessions
Best For: Statement sleeve, flows with arm movement
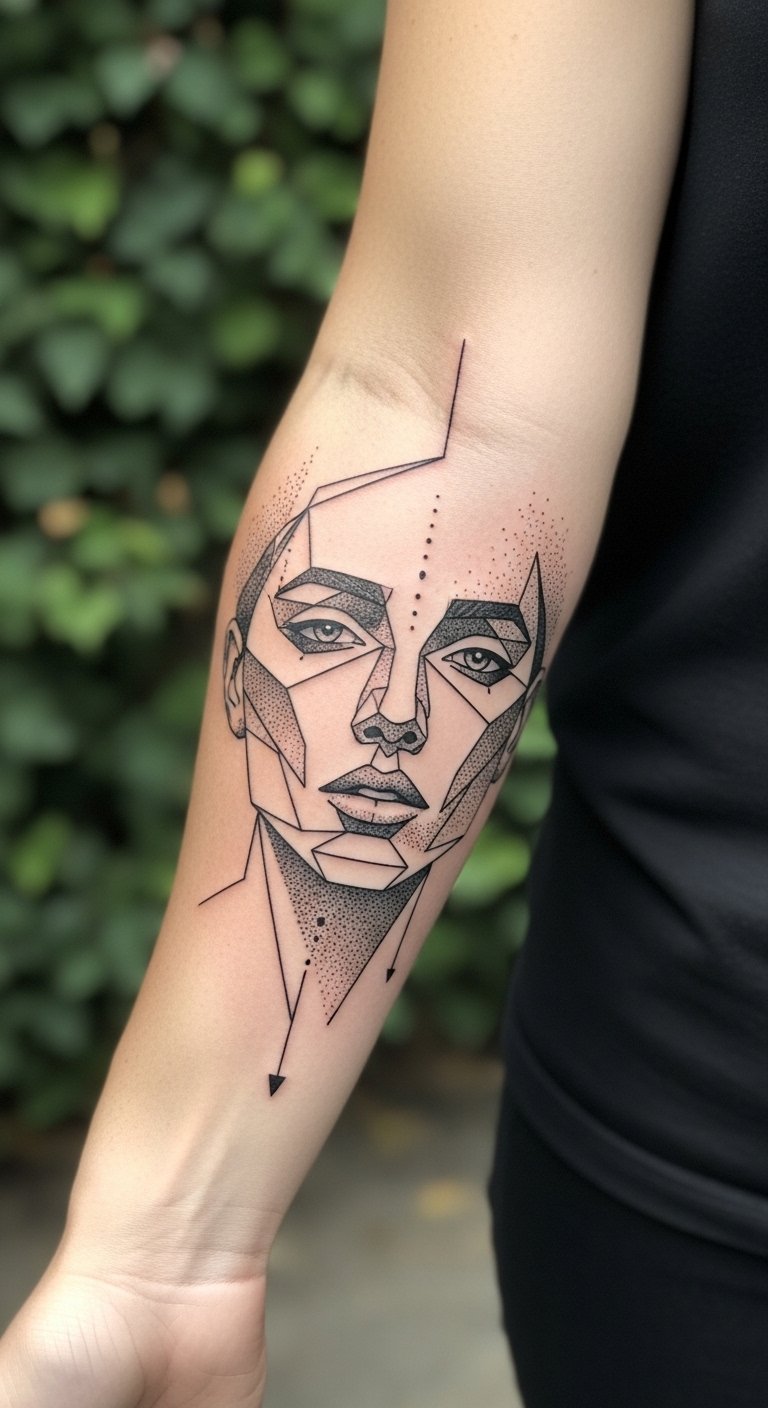
I like geometric portrait sleeves because they give a portrait a structured, modern frame. The symmetry makes faces pop. Placement on the forearm lets the portrait breathe with motion. Pain is moderate; expect multiple sessions. Healing is stable for blackwork but watch for scabbing along crisp lines—keep it moisturized. This style ages well because bold lines hold longer than tiny shading. Common mistake: over-detailing tiny facial features inside small geometric panels—ask for simplified facial tones. Look for artists who list geometric tattoo ideas in their portfolios and who show healed work.
Micro-Realism Pet Portrait on Collarbone
Style/Technique: Microrealism / Color Gradients
Pain Level: Medium-High (4-6/10)
Session Time: 1–2 sessions
Best For: Emotional memorial, visible placement
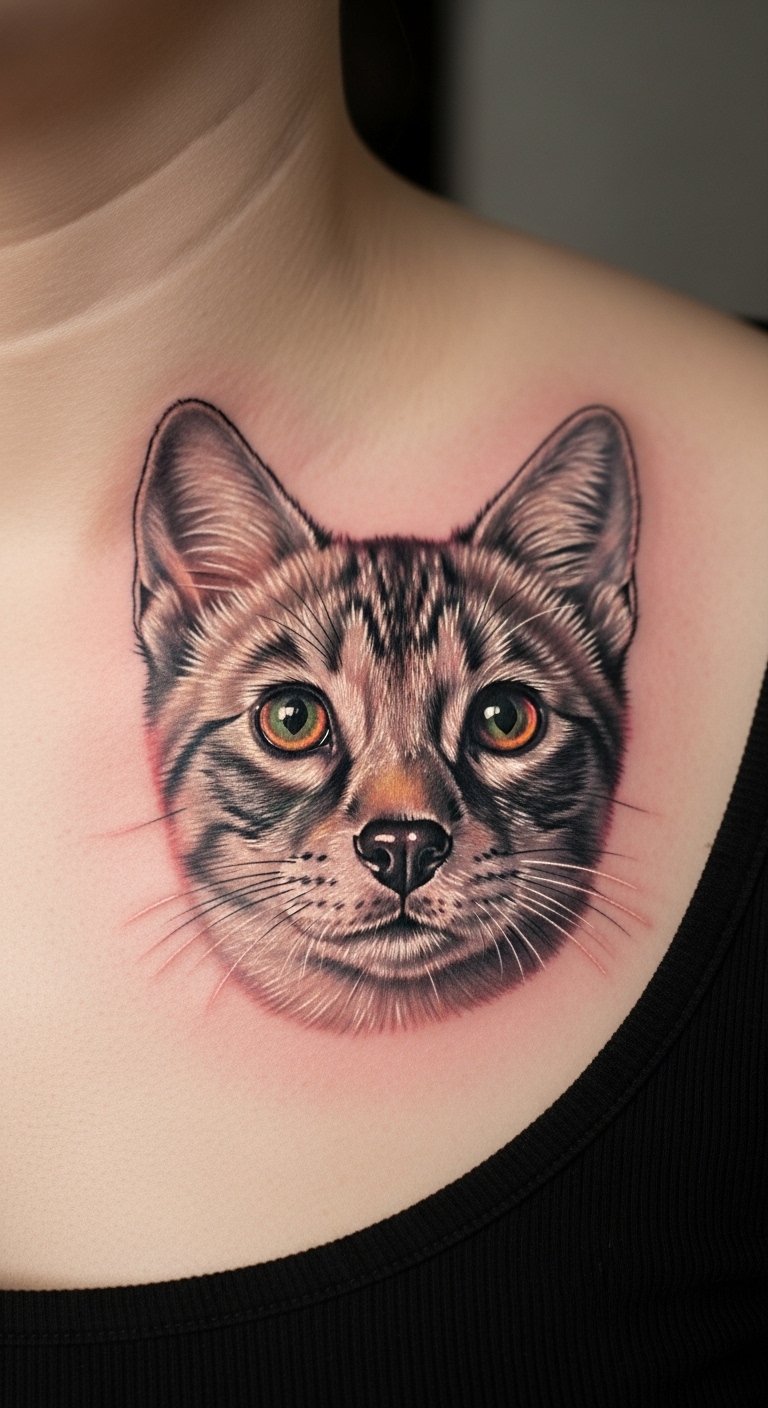
I’ve seen tiny pet portraits that read like photos and still look alive months later. Collarbone placement catches attention and suits detailed microrealism. Pain can be sharper near bone. Healing: expect initial dulling while skin regenerates; colors bloom after a few months. Microrealism tattoo meaning often ties to memory and closeness. Avoid choosing a photo with harsh shadows—ask your artist (or Jesús-style microrealists) for reference photos with even light and clear eyes.
Fine Line Y2K Butterfly Portrait on Inner Bicep
Style/Technique: Fine Line / Y2K Fusion
Pain Level: Medium (3-5/10)
Session Time: 1 session
Best For: Nostalgic, delicate visible piece
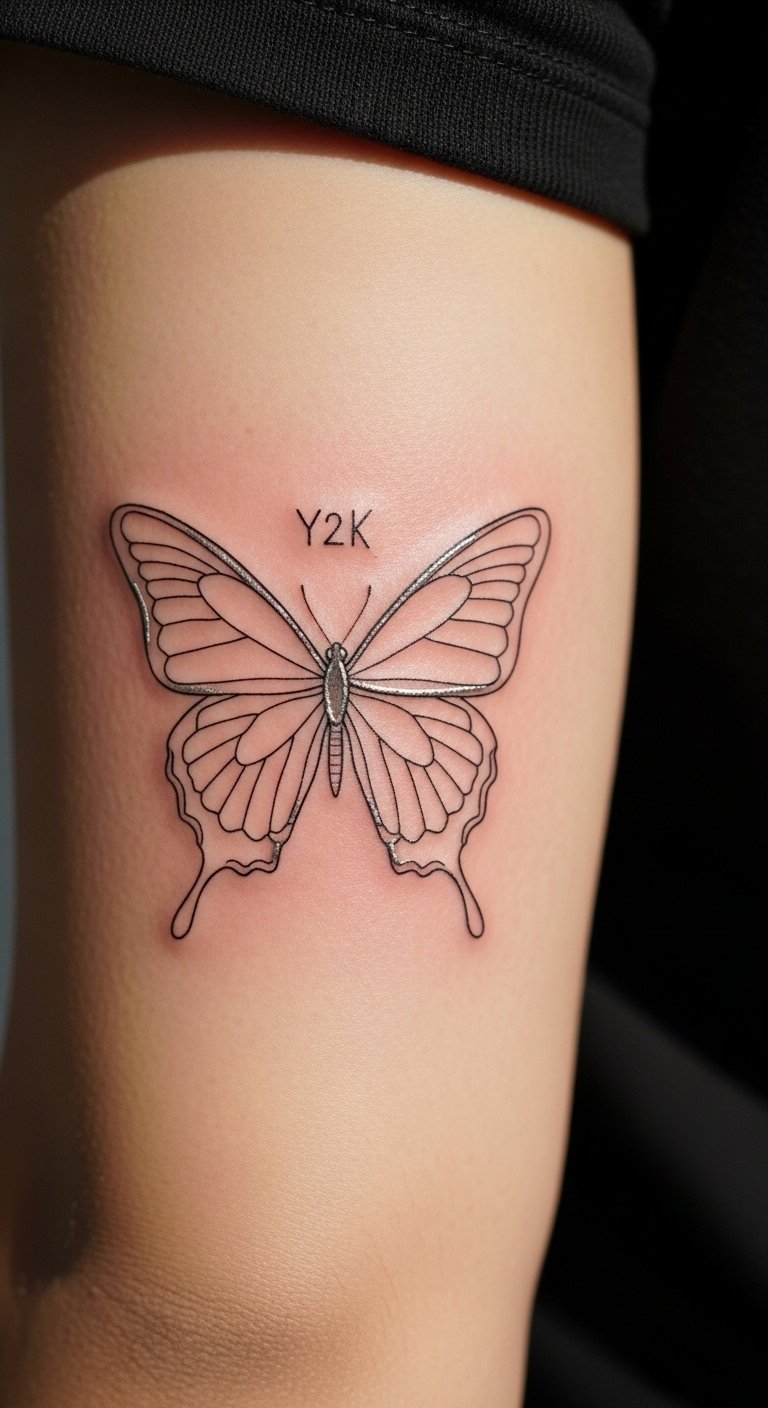
This blend of fine line portraiture and Y2K butterfly framing hits nostalgia without heavy ink. Inner bicep lets details sit sheltered from sun, improving longevity. Pain is moderate because the skin is thinner. Fine line tattoos need expert steady hands—otherwise thin lines blur over time. I recommend asking for slightly bolder anchor lines so the portrait stays legible when healed. Fine line tattoo ideas like this are popular among younger collectors for their subtle look.
Watercolor Floral Portrait Hybrid on Ribcage
Style/Technique: Watercolor / Illustrative
Pain Level: High (6-8/10)
Session Time: Multiple sessions
Best For: Large, artistic statements

I love this one because the portrait feels like a painting. Ribcage placement lets the watercolor flow with body curves. Pain is high; ribs are sensitive. Healing requires careful aftercare since large color areas can scab unevenly. Watercolor elements can fade faster—ask about fade-resistant pigments and plan touch-ups. Common mistake: using too much pale color over thin skin; deeper saturation and layered shading age better. Discuss watercolor tattoo aftercare with your artist before booking.
Bold Blackout Mandala Portrait on Upper Back
Style/Technique: Blackout / Mandala / Negative Space
Pain Level: Medium-High (4-7/10)
Session Time: Multiple long sessions
Best For: Dramatic coverage, high-contrast portraits
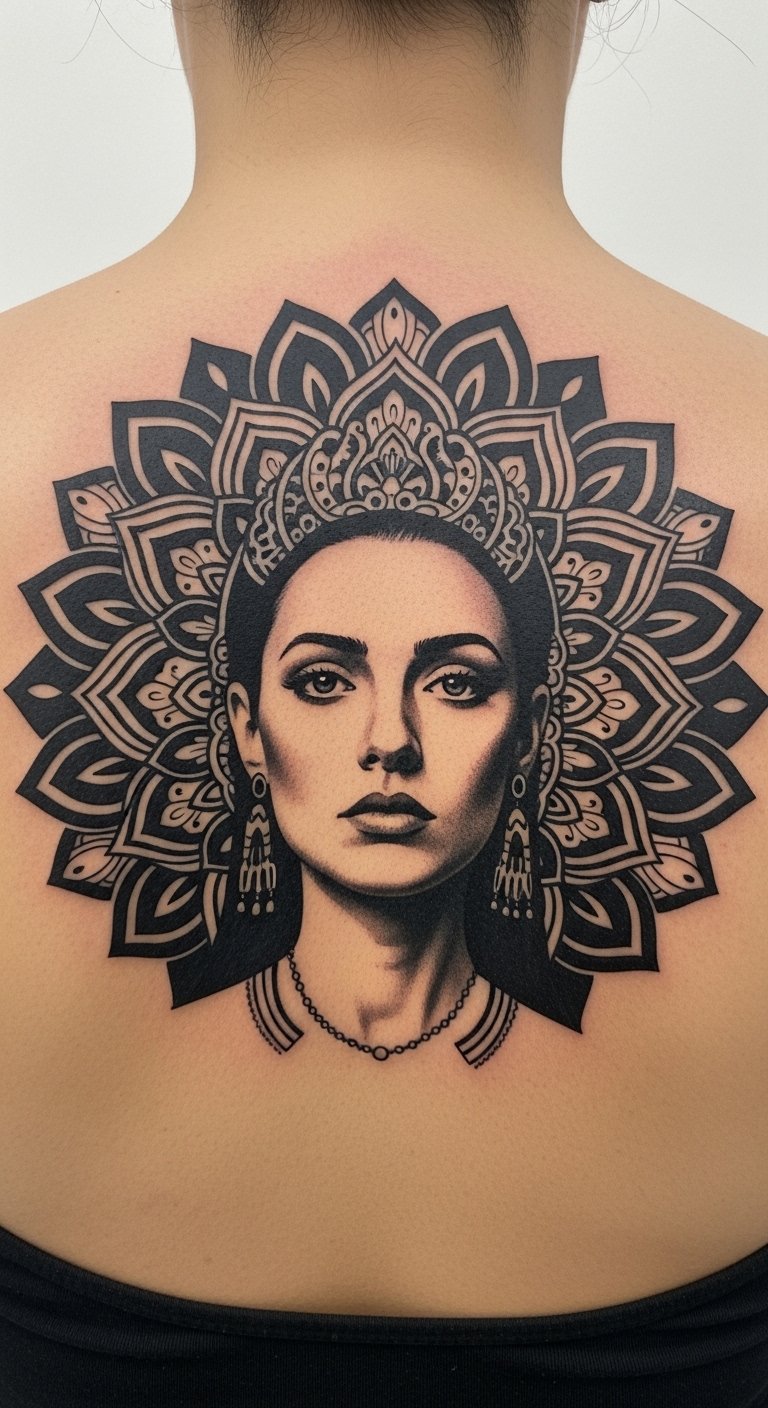
Blackout mandala portraits use negative space to carve a face out of solid black. On the upper back you get room for scale and crisp contrast. Pain is variable across shoulder blades. Blackwork ages well—solid areas stand up to time—yet layered textures are under-covered and can make large black pieces more wearable. Don’t oversaturate small facial features inside blackout; negative-space faces should be bold and simplified. Artists who specialize in blackout/blackwork will show healed photos—ask to see them.
Minimalist Single-Line Face Portrait on Ankle
Style/Technique: Minimalist / Line Art
Pain Level: Medium (4-6/10)
Session Time: 1 session
Best For: Subtle statement, first-timers
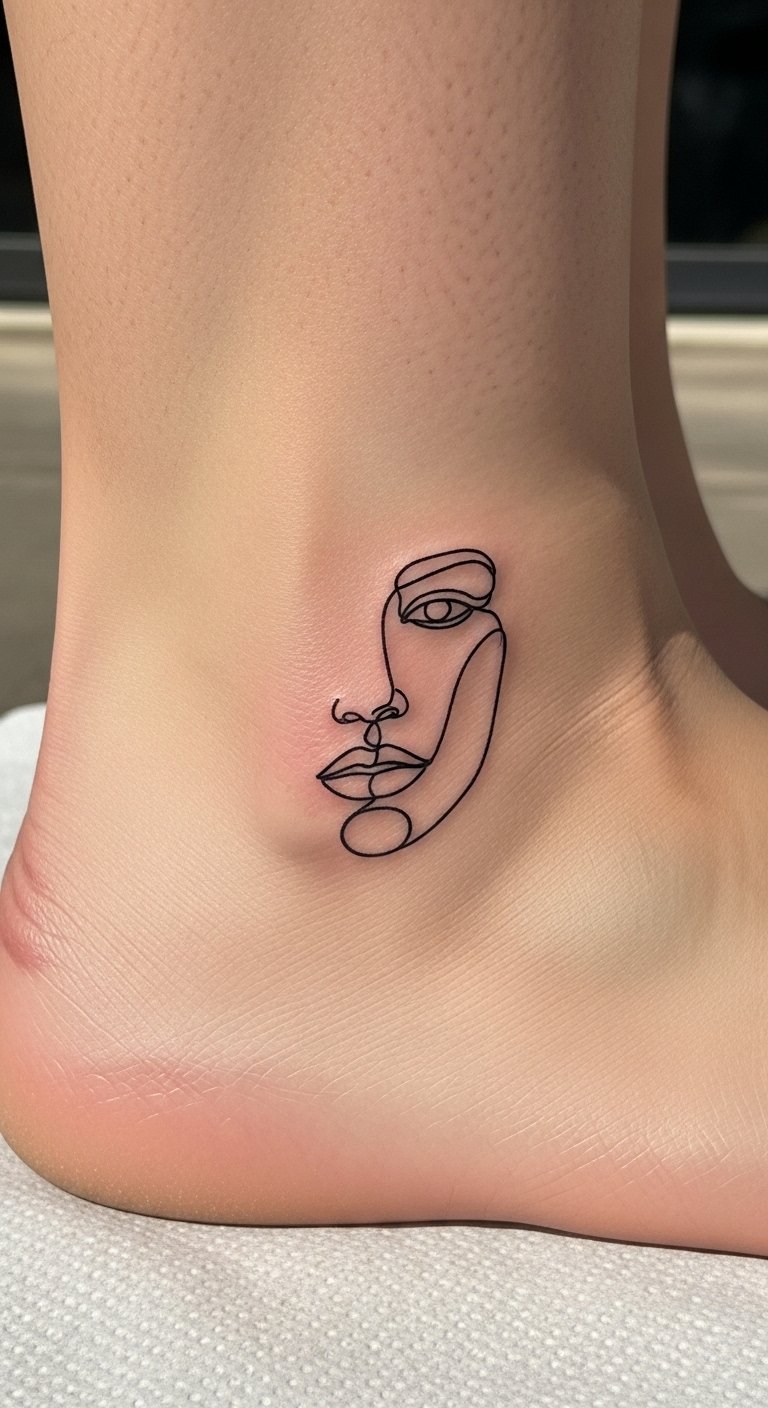
A single continuous line portrait reads as modern and intentional. Ankle placement keeps it small and discreet. Pain on the ankle can be sharper due to bone. Minimalist pieces can last if lines aren’t hair-thin—ask for confident line weight. The main mistake is making a tiny single-line face too small; keep it big enough to age. Fine line tattoo ideas overlap here, but this leans more minimalist than delicate florals.
Botanical Realism Human Portrait on Shoulder Blade
Style/Technique: Realism / Botanical Fusion
Pain Level: Low-Medium (2-4/10)
Session Time: Multiple sessions
Best For: Memorials, large appreciating detail
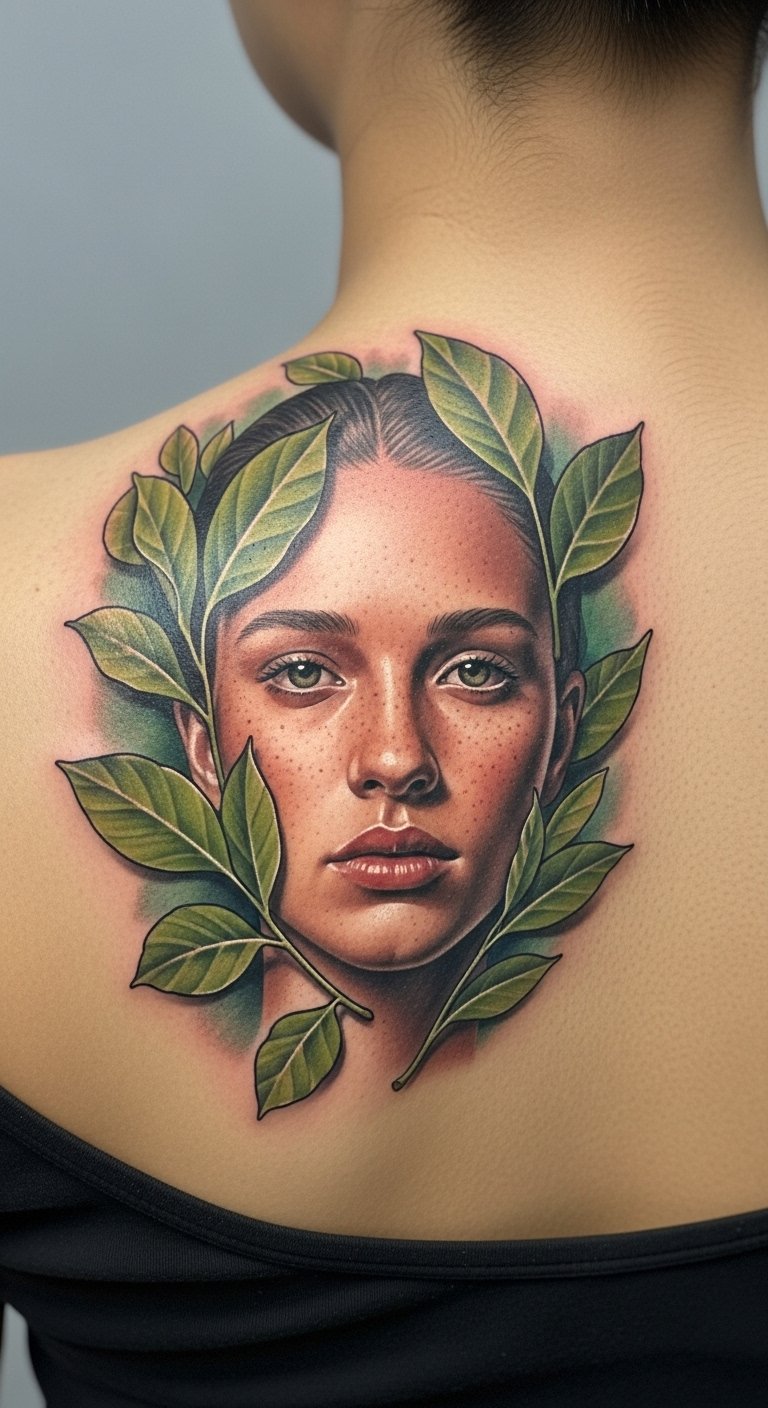
I’ve noticed botanical realism keeps portraits feeling soft and living—foliage frames a face naturally. Shoulder blade placement gives a broad canvas and lower pain compared with ribs. Healing is straightforward; black and gray hold well here. Mistake to avoid: crowding too many tiny leaves into detailed facial areas—let the portrait breathe. Ask artists who do human realism and botanical elements; Jonathan-style portfolios often show this fusion.
Cyber Sigil Abstract Portrait on Forearm
Style/Technique: Digital Surrealism / Blackwork
Pain Level: Medium (3-5/10)
Session Time: 2–3 sessions
Best For: Futuristic, symbolic portraits
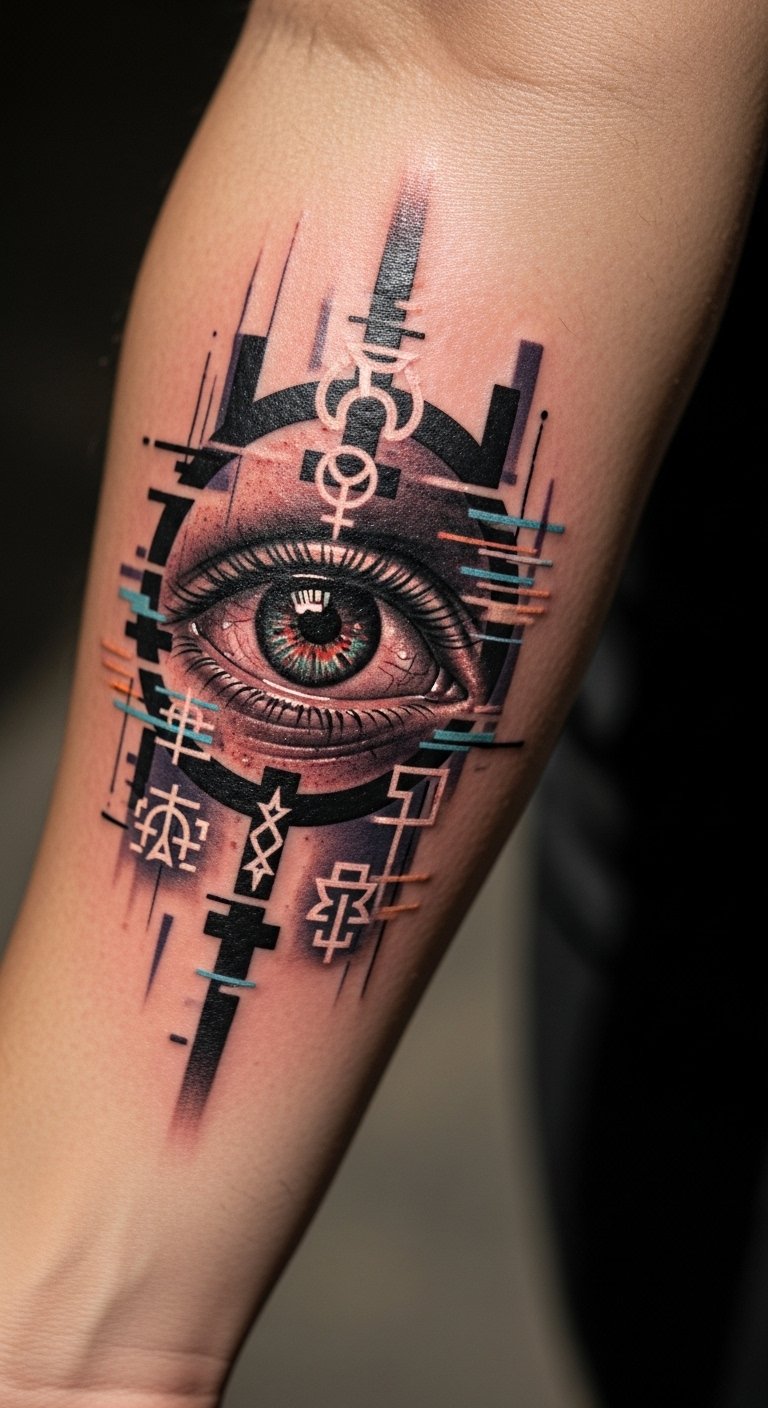
I’m into cyber sigils because they combine spiritual symbolism and futuristic glitch aesthetics. Forearm placement makes the piece readable and interactive with movement. Pain is tolerable. These are an under-covered angle—mixing sigils with portraiture gives depth and a sense of motion. Watch out for overly complex overlays that make the face unreadable; ask for layered textures that still highlight primary facial features. Mention Procreate/AI sketches as references if you want dreamlike compositions.
Fluid Motion Animal Portrait Along Spine Curve
Style/Technique: Illustrative / Organic Flow
Pain Level: High (6-8/10)
Session Time: Multiple sessions
Best For: Dynamic portraits that move with the body
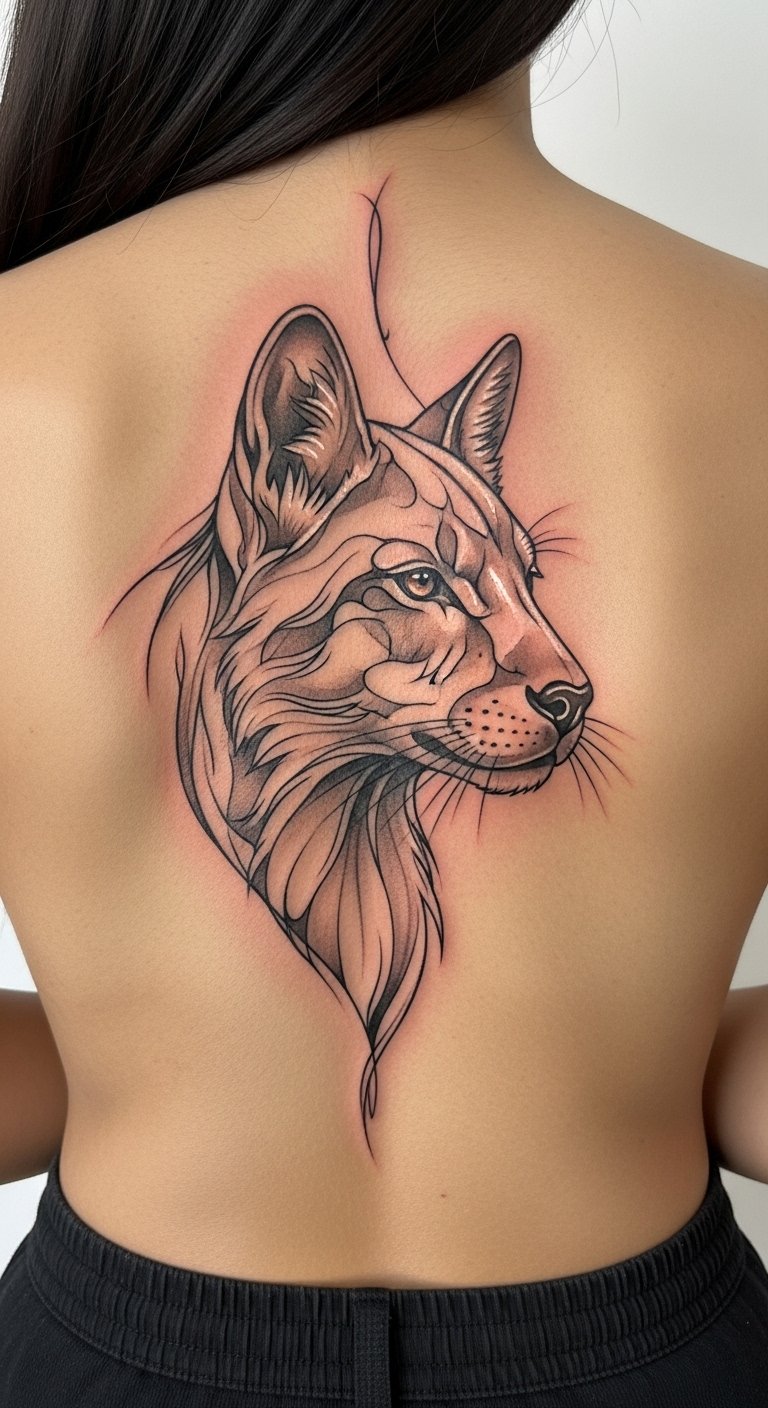
Designs that follow the spine curve look alive when you move. I’ve seen animal portraits that feel animated thanks to flow-aware composition. Pain along the spine is high; expect tougher sessions. Healing needs care—avoid friction from clothing during early weeks. The benefit: when done right these pieces age gracefully because they use movement rather than tiny detail. Common mistake: forcing a rigid portrait onto a curve—work with the artist to design fluid motion.
AI-Inspired Surreal Portrait Mashup on Thigh
Style/Technique: Abstract / AI Fusion
Pain Level: Medium (3-5/10)
Session Time: Multiple sessions
Best For: Highly personalized, experimental pieces

I used AI sketches to iterate ideas and the surreal mashups it produced can be stunning. Thigh placement gives scale and discretion. Pain is moderate and easy to manage. AI-inspired work is a 2026 trend—use the tool for references but refine with your artist. Avoid straight-up AI prints; instead use AI as a starting point and ask the artist to hand-render the final. This approach helps avoid design regret and creates a truly custom portrait tattoo.
Nature-Geometric Fusion Portrait on Calf
Style/Technique: Geometric / Organic Hybrid
Pain Level: Low-Medium (2-4/10)
Session Time: 2–3 sessions
Best For: Modern yet organic statements

Balancing organic textures with geometric frames gives portraits both structure and life. Calf placement reads well and handles medium detail. Pain is relatively low. These designs age well if you avoid hairline dotwork in high-movement areas. A common mistake is mismatched scale between geometric elements and facial detail—ask to harmonize scale so the portrait stays focal.
High-Detail Neon Portrait on Neck
Style/Technique: Microrealism / Neon Accents
Pain Level: High (6-8/10)
Session Time: 1–2 sessions
Best For: Bold visible portraits, nightlife-ready

Neon accents can make a portrait pop, especially in low light. Neck placement is bold and painful; expect sensitivity. Colors may shift during healing—neon requires careful pigment work and touch-ups. Avoid tiny neon dots that fade unevenly. If you want this, ask for healed examples—artists like Jesús do neon microrealism well. Remember SPF and long-term maintenance to preserve vivid hues.
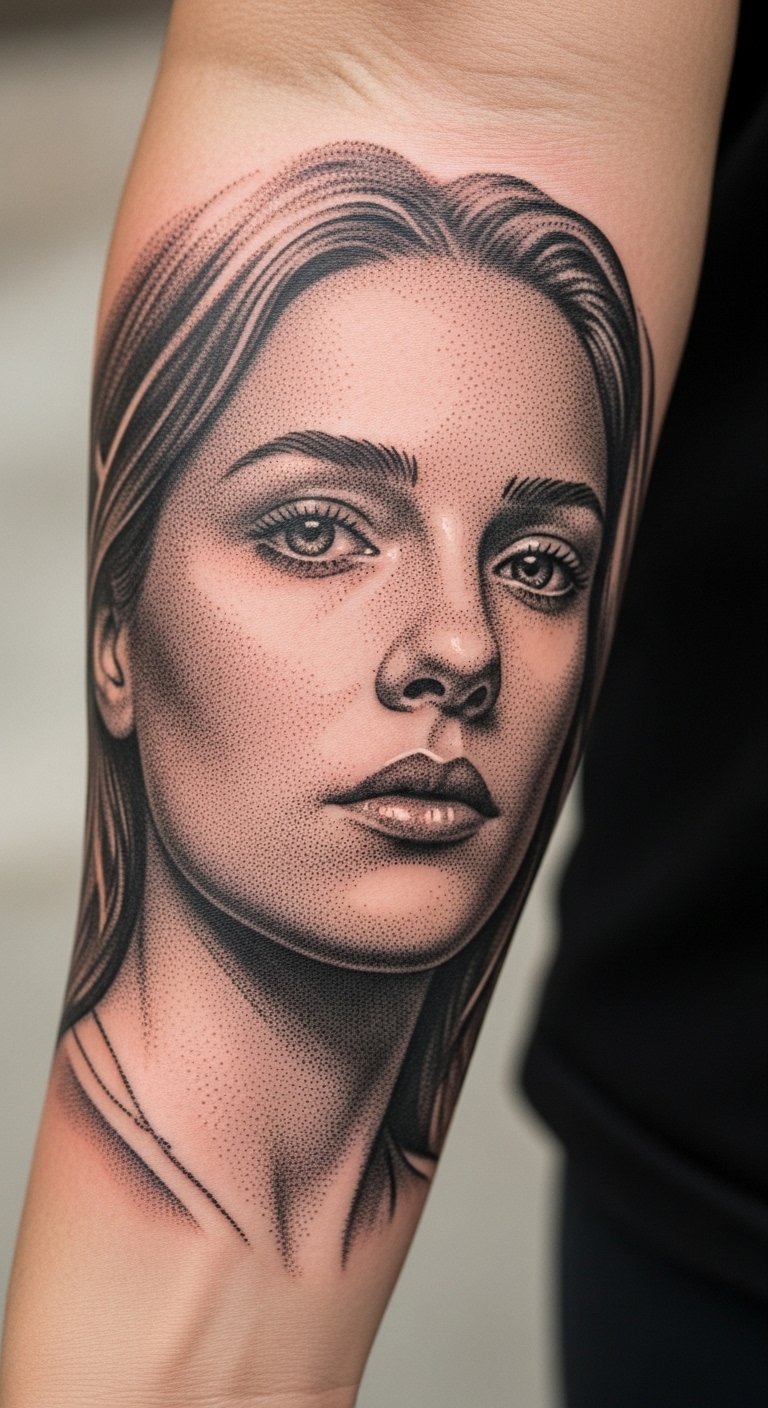
Micro-Realism Human Portrait on Upper Arm
Style/Technique: Microrealism / Black & Gray with Color Options
Pain Level: Low-Medium (2-4/10)
Session Time: 2–3 sessions
Best For: Portraits with emotional detail, durable placement
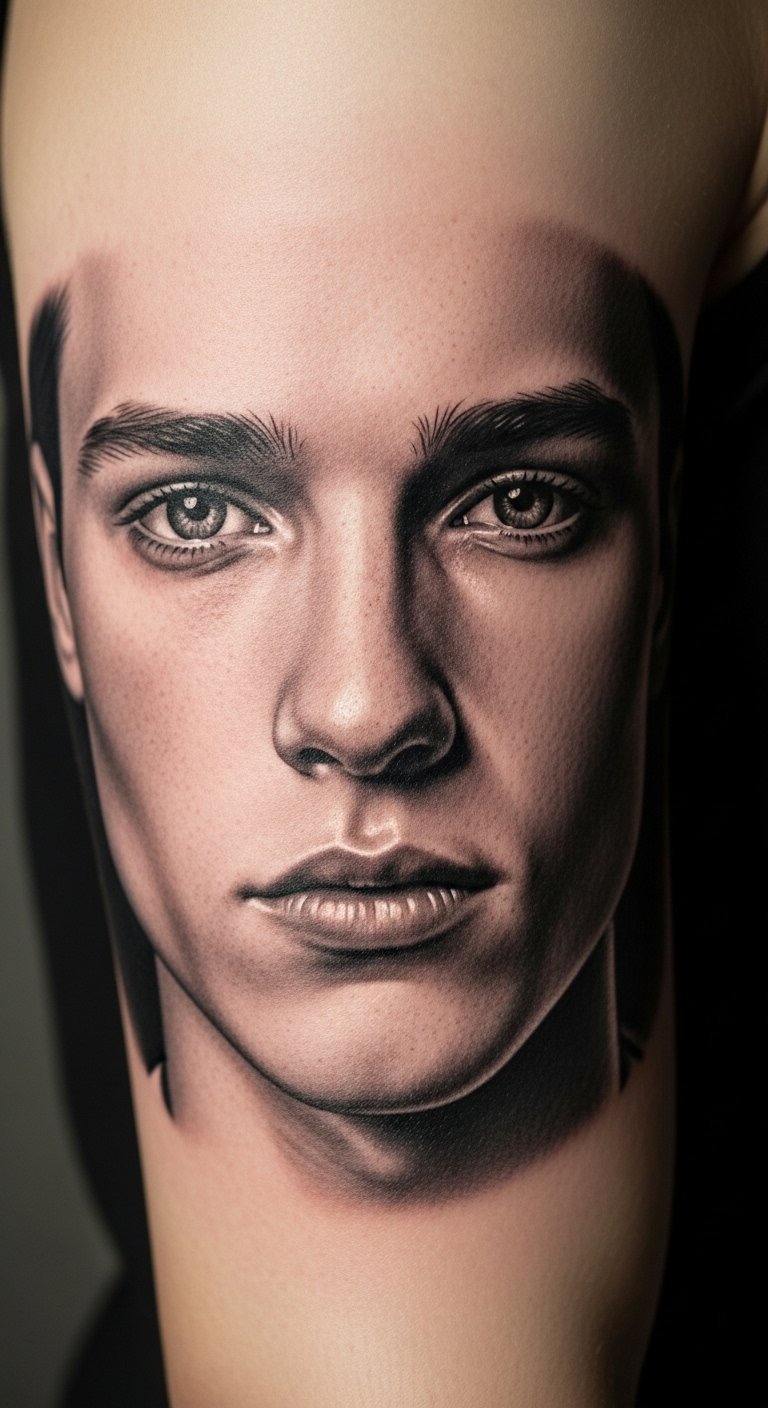
Upper arm is a forgiving spot for microrealism—enough space and lower pain. I prefer black-and-gray microrealism for longevity, though color gradients add life. Healed photos usually show eyes and facial planes that read clearly. Common mistake: using a too-small reference photo; give the artist high-res images. Check portfolios for healed examples; Jonathan-style color realism is a good reference.
Geometric Portrait Calf Panel
Style/Technique: Geometric / Dotwork Hybrid
Pain Level: Low-Medium (2-4/10)
Session Time: 2 sessions
Best For: Modern portrait panels that wrap the leg
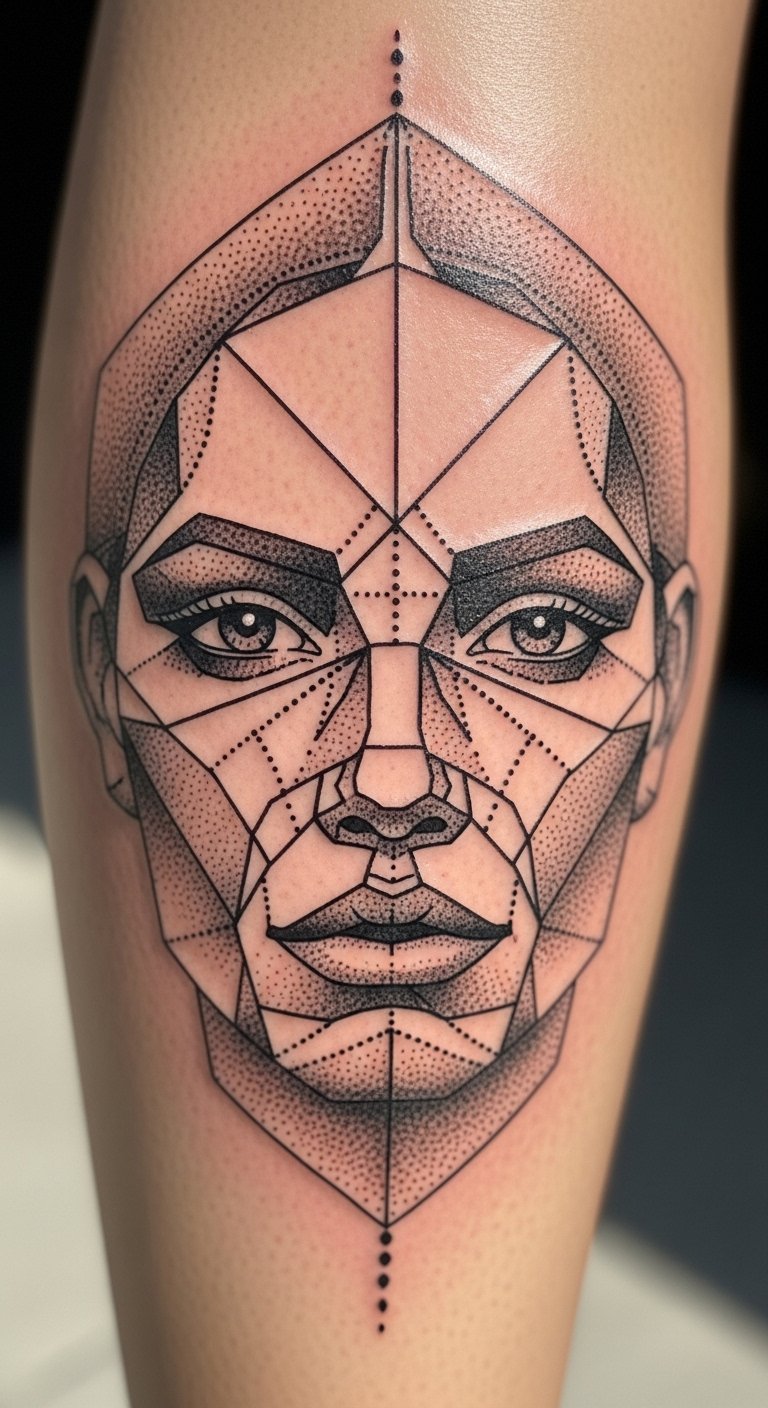
Calf panels let you combine dotwork and geometry around a portrait. Lines and stippling age well on the calf. I advise avoiding overly thin stippling inside facial planes—use gradation to keep faces legible. This is a durable placement and a good choice if you want geometric tattoo ideas that still read as portraits.
Y2K Tribal Flame Portrait Frame on Bicep
Style/Technique: Neo-Traditional / Y2K Fusion
Pain Level: Medium (3-5/10)
Session Time: 1–2 sessions
Best For: Nostalgic portraits with edge
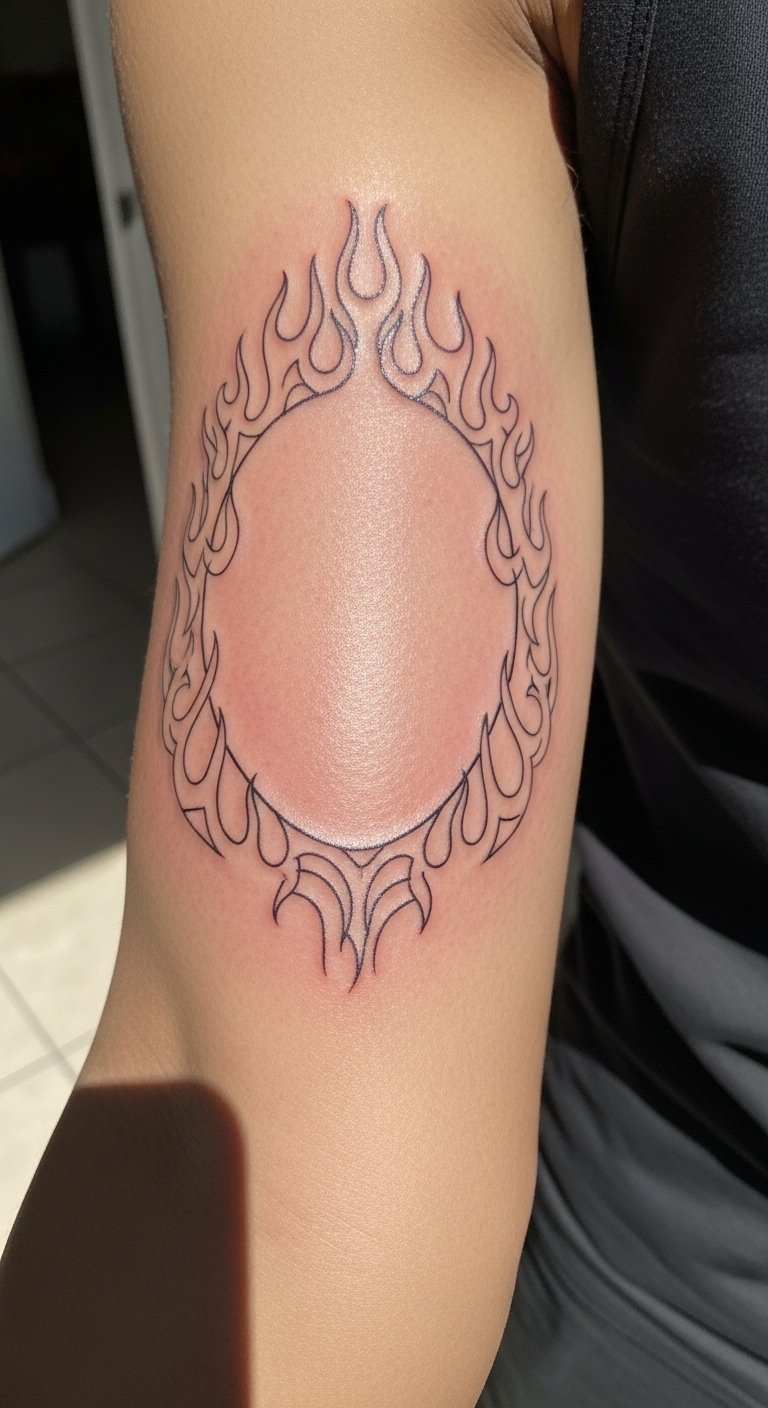
Y2K tribal framing gives portraits an edge without overpowering the face. Outer bicep placement is visible but easy to cover. I see a lot of Gen Z and millennial crossover interest here. Keep flames delicate—too heavy will distract from the portrait. Ask for fine line tattoo ideas that balance nostalgia and modern clarity.
Watercolor Portrait Half-Sleeve on Thigh
Style/Technique: Watercolor / Illustrative
Pain Level: Medium (3-6/10)
Session Time: Multiple sessions
Best For: Large painterly portraits with color play
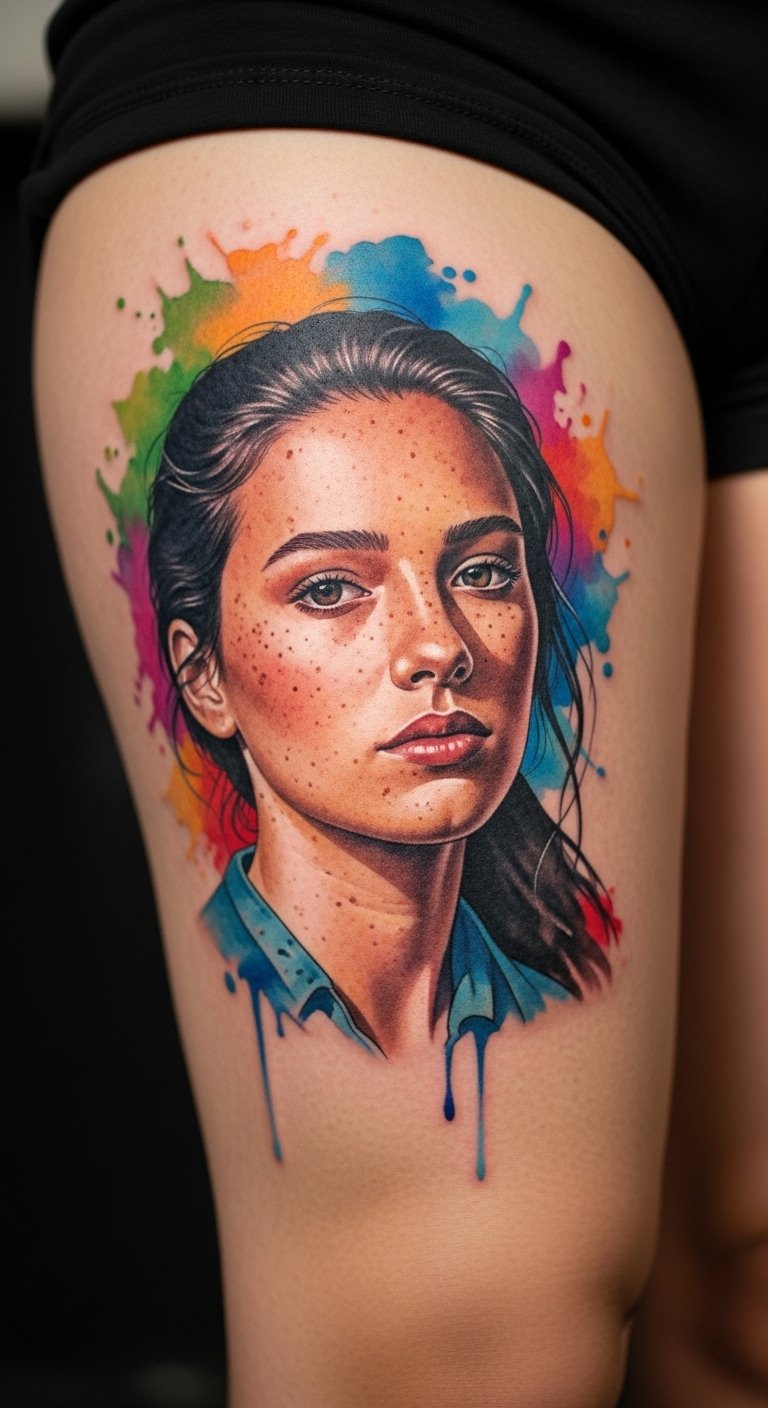
Thighs give space for painterly portrait half-sleeves. Watercolor strokes create motion and softness. Healing is gentler on thighs though large color areas need attentive moisturizing. Watercolor tattoos can be made more fade-resistant by layering richer pigments. Avoid pale washes as they can disappear on deeper skin tones—discuss color saturation with your artist.
Blackout Layered Texture Chest Piece
Style/Technique: Blackout / Layered Texture
Pain Level: Medium-High (5-7/10)
Session Time: Multiple sessions
Best For: Bold front-facing portraits, statement pieces
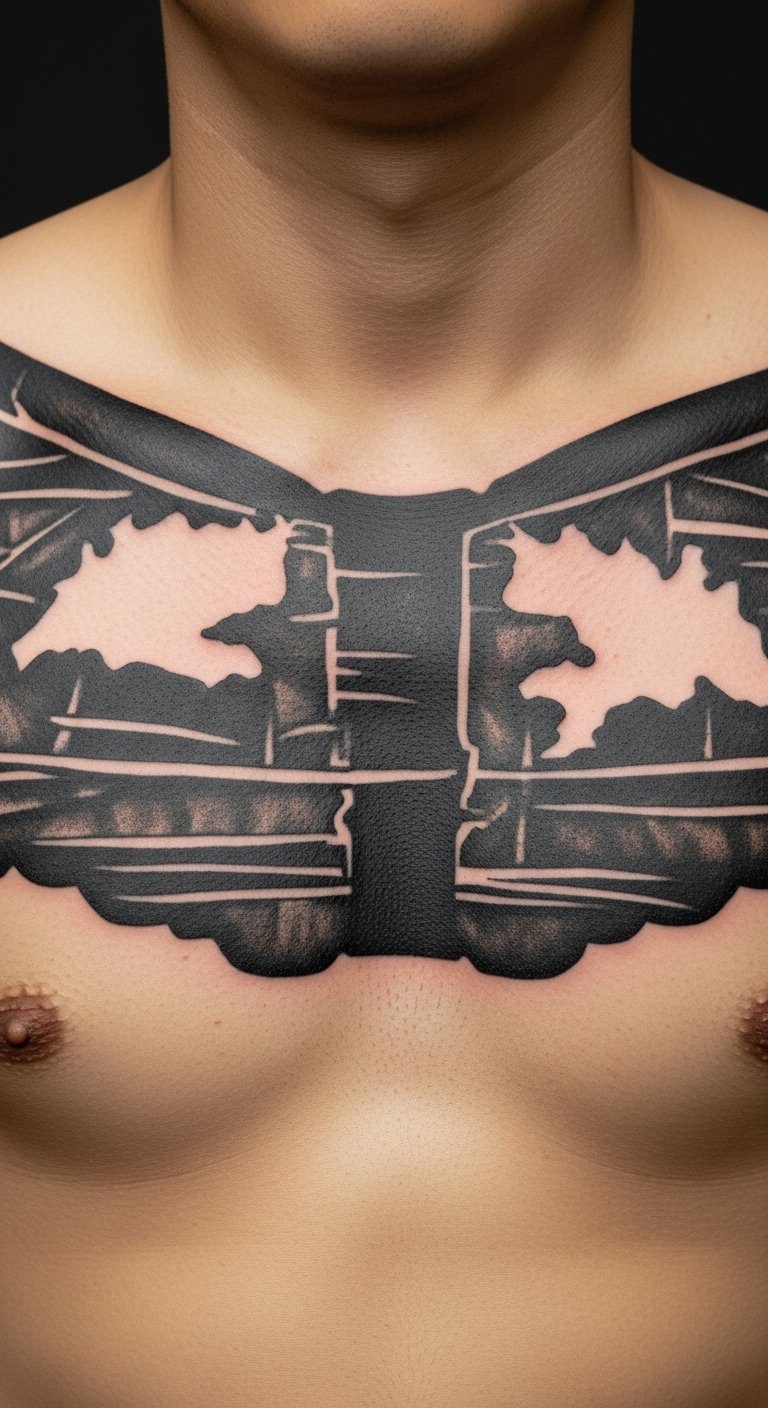
This is an under-covered evolution of blackout work: layered textures let a portrait emerge from black. Chest placement is dramatic and visible. Pain and sessions are substantial. Layering creates wearable texture and helps first-timers embrace blackout without losing portrait clarity. Avoid packing tiny facial details inside heavy black fields.
Fine Line Portrait Behind Ear
Style/Technique: Fine Line / Micro Portrait
Pain Level: High (5-7/10)
Session Time: Single short session
Best For: Hidden, intimate portrait accents
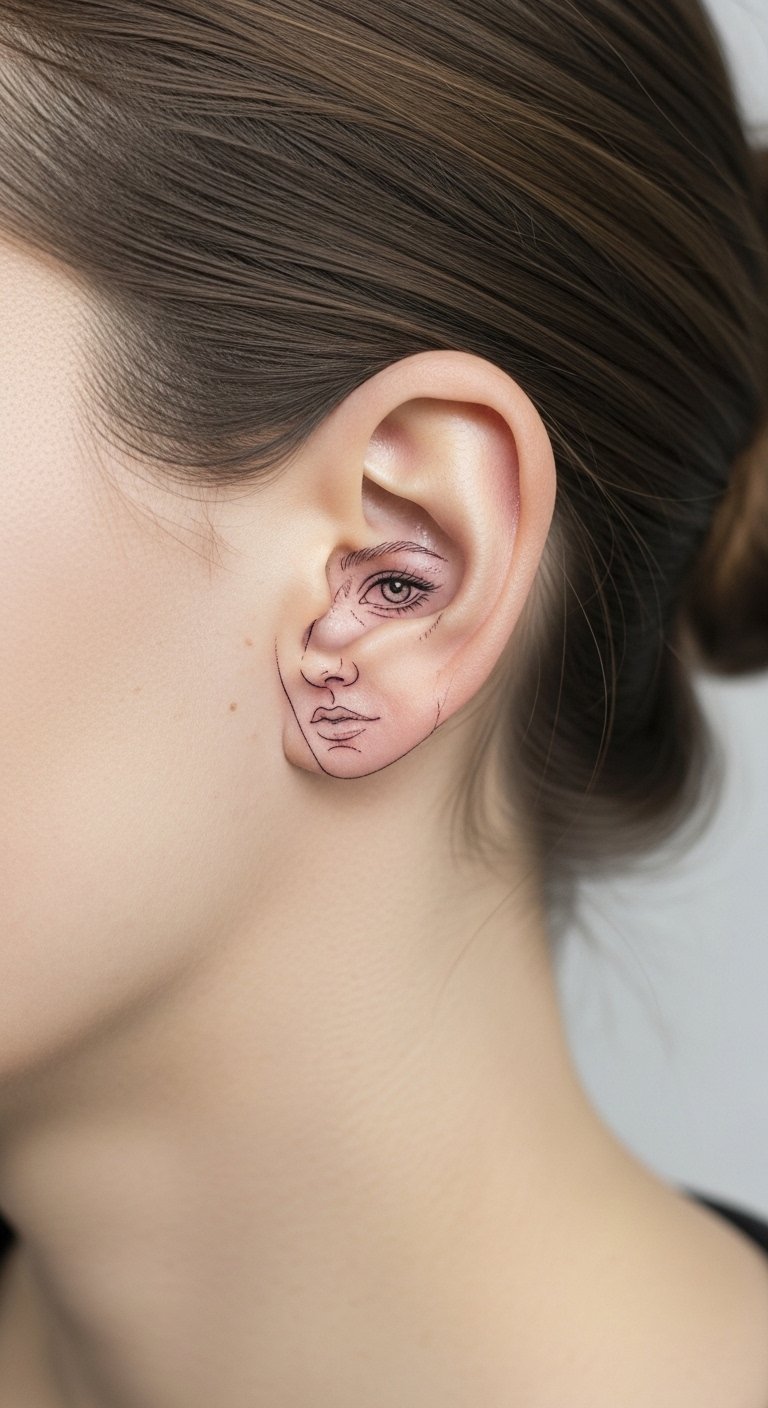
Behind-the-ear portraits are intimate and very small. Pain is surprisingly high due to thin skin and cartilage. Fine line tattoo ideas here need a very steady hand—tiny details can blur, so I usually recommend simplified faces. Heals quickly but is tricky to keep crisp over time. If you want this, choose a larger outline and minimal shading for longevity.
Neo-Traditional Portrait on Upper Arm
Style/Technique: Neo-Traditional / Bold Outline
Pain Level: Low-Medium (2-4/10)
Session Time: 1–2 sessions
Best For: Timeless portrait with illustrative flair

Neo-traditional portraits combine strong outlines with painterly color—these age well because line integrity is prioritized. Upper arm is one of the most forgiving placements. Healing is straightforward. The main mistake: overcomplicating the background—keep the portrait area clear so faces remain the focus. This is a solid choice if you want longevity and character.
Minimalist Line Portrait on Wrist
Style/Technique: Minimalist / Linework
Pain Level: Medium (4-6/10)
Session Time: 1 session
Best For: Tiny, daily-seen portraits
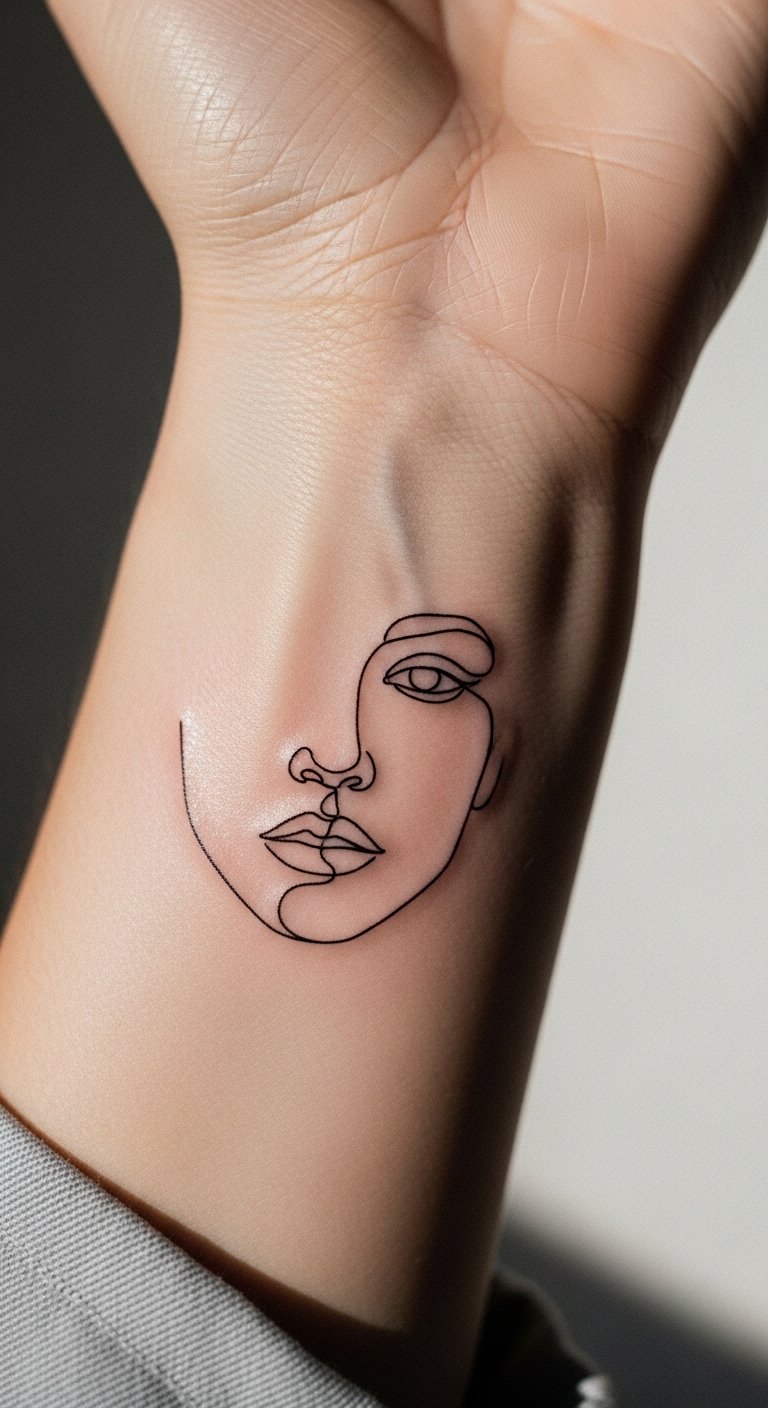
Wrist portraits are visible and constant. The downside is skin movement and sun exposure—both can blur thin lines over time. If you want this, ask for slightly stronger line weight and plan for touch-ups. This helps avoid quick fading and keeps the portrait legible. Good for first-timers who want a meaningful, small image.
Portrait Medallion on Sternum
Style/Technique: Illustrative / Decorative Frame
Pain Level: High (6-8/10)
Session Time: Multiple sessions
Best For: Centered decorative portraits with symmetry
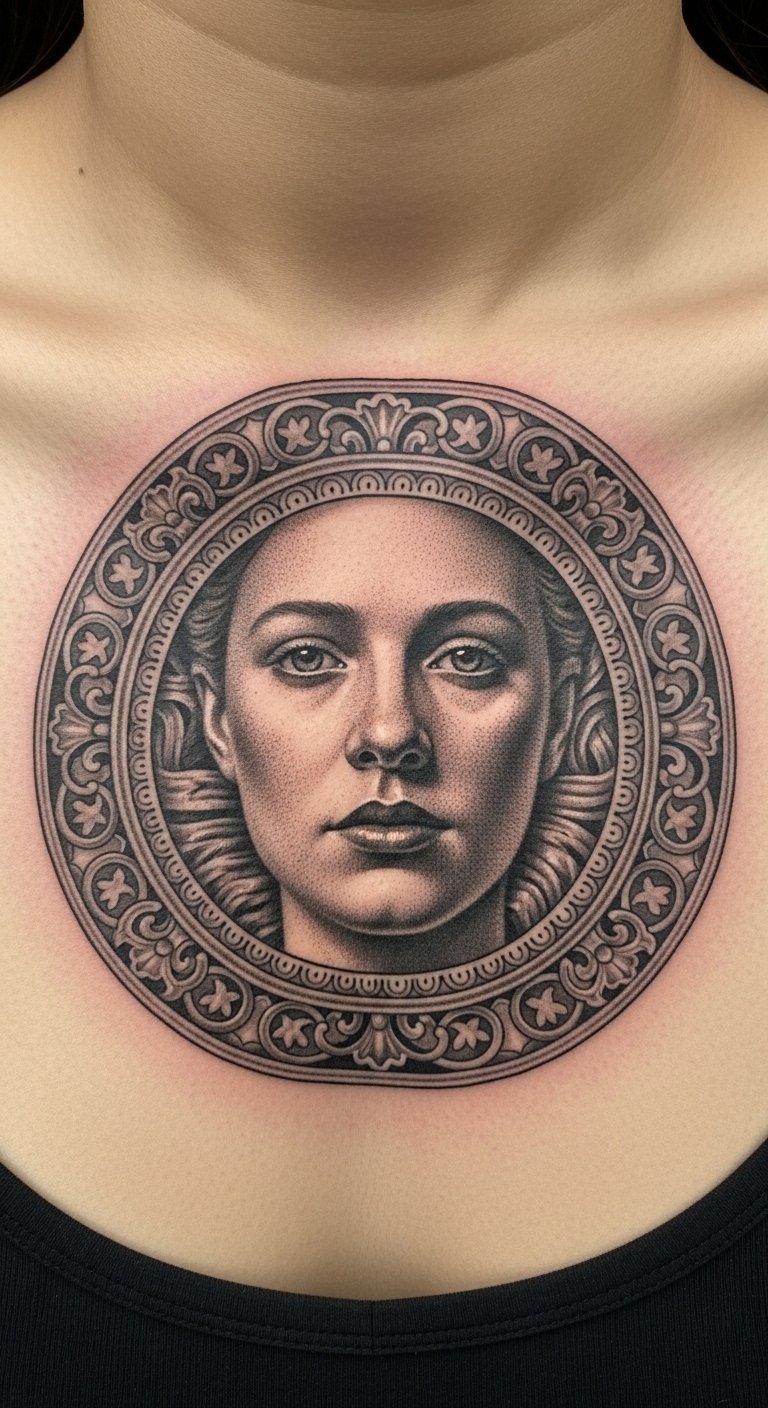
Sternum medallions are dramatic and symmetrical. Pain and healing are intense near the chest bone. The result can look regal and intimate. Avoid over-fussy frames that overwhelm the face—balance is key. Ask to see healed medallions so you know how frames settle and age.
Portrait Sleeve with Dotwork on Outer Forearm
Style/Technique: Dotwork / Sleeve Integration
Pain Level: Medium (3-5/10)
Session Time: Multiple sessions
Best For: Textured sleeves that read from distance
Dotwork portraits build texture and soft transitions without heavy linework. I prefer this when you want subtlety across a sleeve. Dotwork holds well but requires patience; sessions are longer. Avoid using only dots for tiny facial details—combine dots with soft shading for clarity. This technique pairs nicely with geometric tattoo ideas.
Surreal Collage Portrait on Back
Style/Technique: Surreal / Collage Fusion
Pain Level: Medium-High (4-7/10)
Session Time: Multiple sessions
Best For: Large narrative portrait art
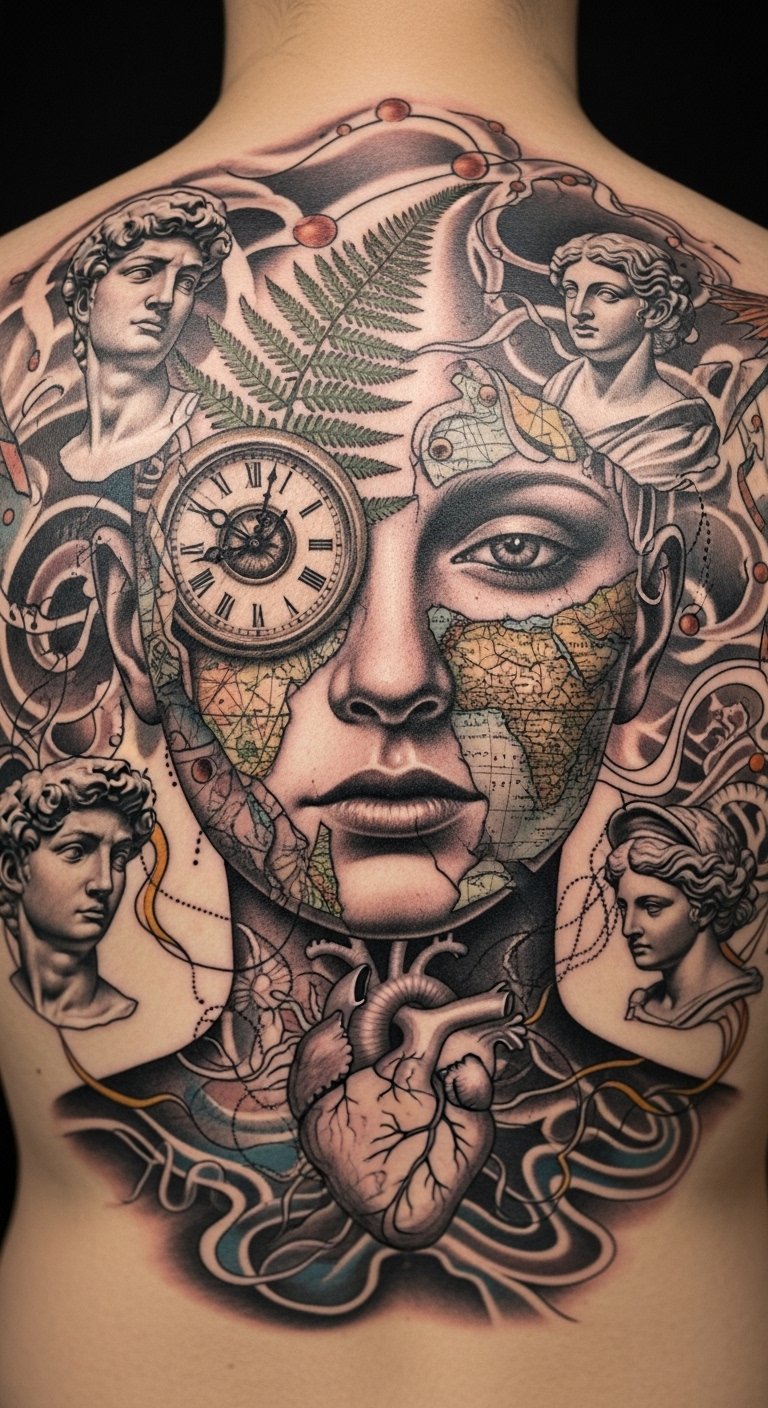
A back collage lets you tell a story with portraits merged into scenes. I used this approach to layer memories into one piece. Healing is manageable on the back. The challenge: keeping faces distinguishable amid collage elements. Work with your artist to prioritize focal faces and use surrounding elements as support.
Pet Portrait Micro on Wrist
Style/Technique: Microrealism / Tiny Pet Portrait
Pain Level: Medium (4-6/10)
Session Time: 1 session
Best For: Sentimental, highly visible small pieces

I’ve seen micro pet portraits that capture a pet’s gaze and still read from arm’s length. The wrist is a high-visibility spot and can be sensitive. Keep the piece slightly larger than you think to preserve detail. Use high-resolution photos for references. Microrealism tattoo meaning is often about closeness and memory—this placement keeps that connection in sight.
Portrait Cameo on Collarbone
Style/Technique: Cameo / Classical Portraiture
Pain Level: Medium (4-6/10)
Session Time: 1–2 sessions
Best For: Vintage-feeling, elegant portraits

Cameo portraits feel timeless. Collarbone placement flatters the shape and allows for a refined look. Pain is noticeable near bone. Healed cameos retain their charm if the artist uses confident outlines and soft shading. Avoid overly thin inner-frame lines that won’t hold years.
Realistic Eye Portrait on Forearm
Style/Technique: Microrealism / Focused Detail
Pain Level: Low-Medium (2-4/10)
Session Time: 1 session
Best For: Striking focal point portraits
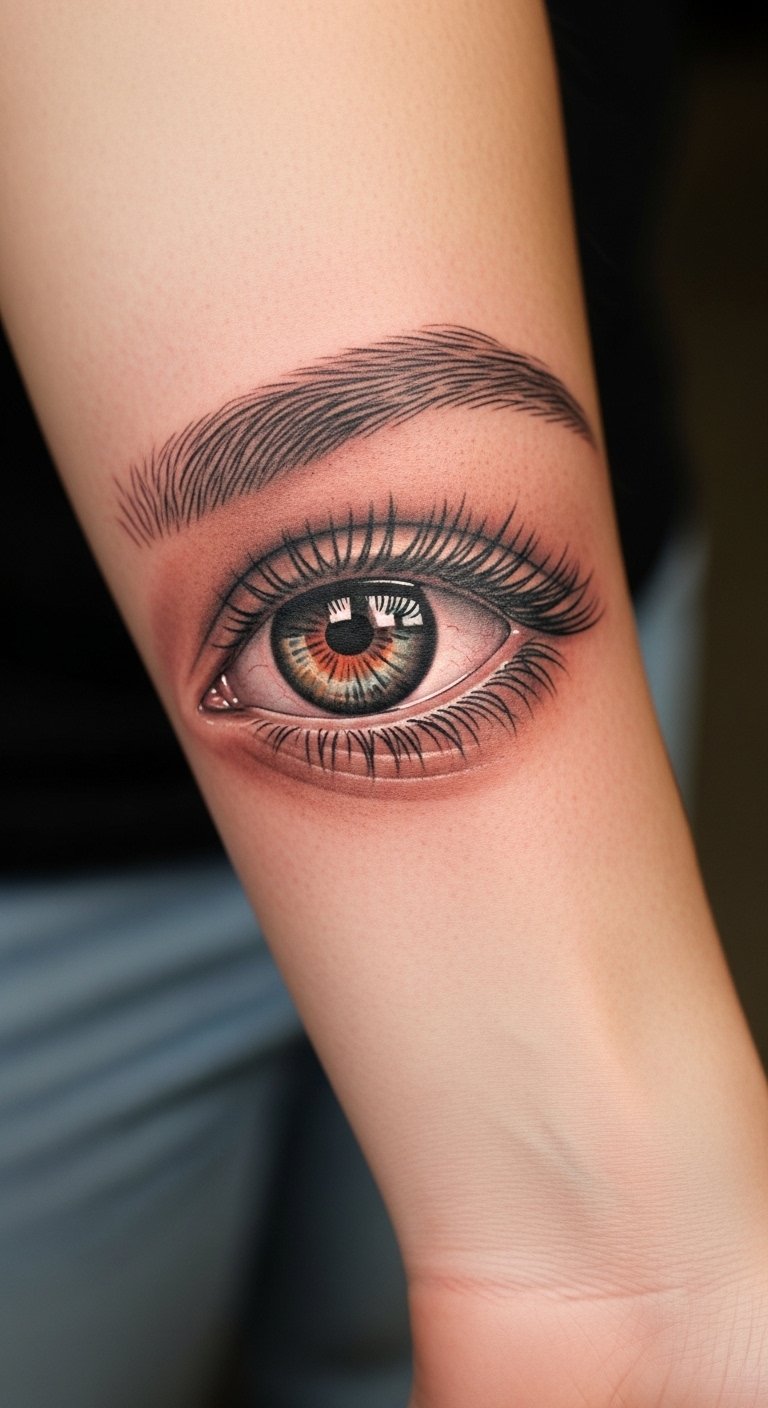
Eyes are a powerful focus and can carry a portrait’s emotion alone. Forearm placement is ideal for visibility and motion. Fine detail around the iris must be balanced against future blur—ask for slightly bolder contrast so it reads when healed. Artists who specialize in microrealism produce the best eye work.
Geometric Portrait Collar Panel
Style/Technique: Geometric / Collar Placement
Pain Level: High (5-7/10)
Session Time: Multiple sessions
Best For: Frontal portraits with symmetry and structure
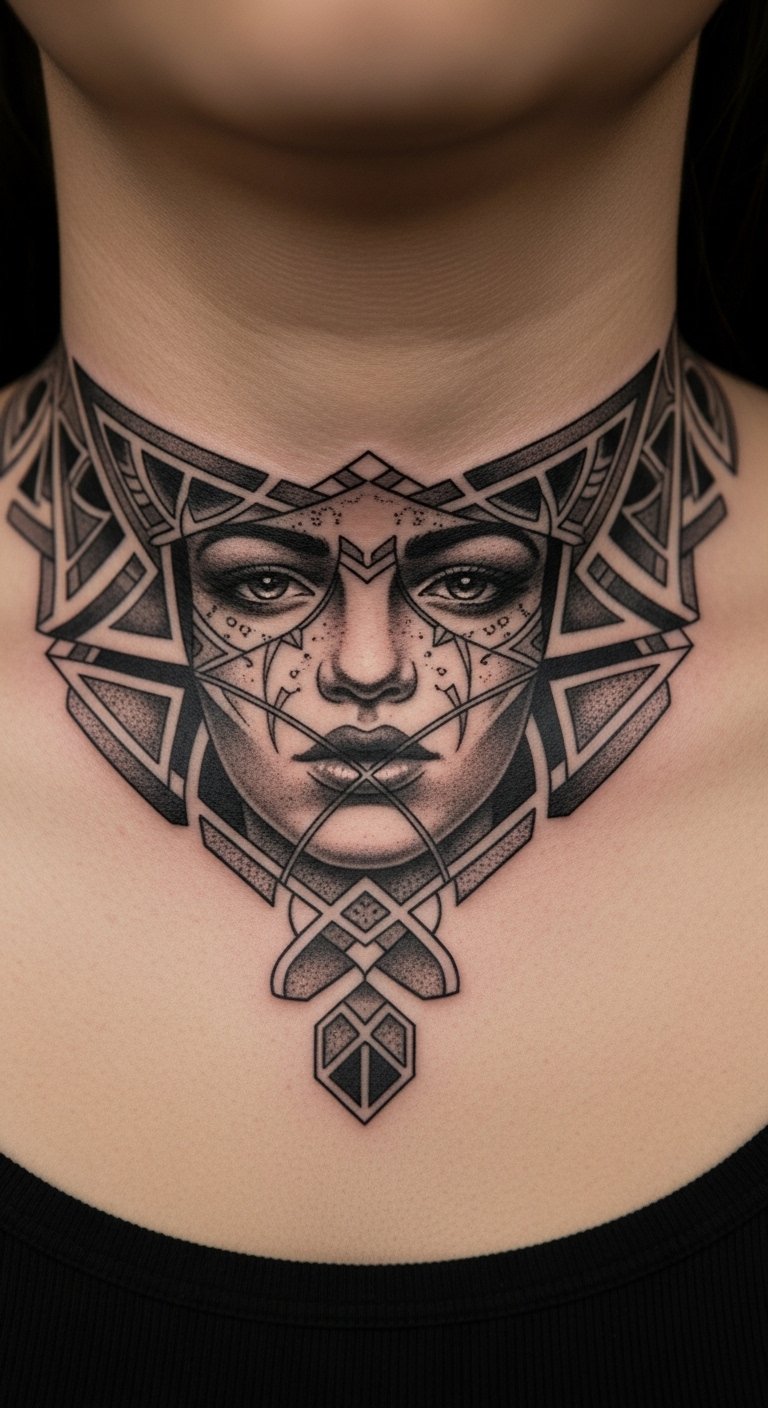
A collar panel frames a portrait across the clavicle for a bold frontal look. Pain is higher near bone. Geometric elements help portraits hold form and create a modern silhouette. Avoid tiny facial details between strict geometric lines—prioritize readable planes and contrast.
Tattoo Prep and Aftercare Essentials
Healing and maintenance are as important as the design. These are products I recommend (artists I trust often name them). All links open Amazon search results with my tag.
Aftercare Essentials:
- Aquaphor Healing Ointment, 14oz tube — Recommended for first 2–4 days to protect fresh ink
- Saniderm Transparent Adhesive Bandage, 6-inch roll — Second-skin method many pros use for early healing
- CeraVe Fragrance-Free Moisturizing Lotion, 12oz — For days 4–14 to keep skin supple
- Dr. Bronner's Unscented Castile Soap, 32oz — Gentle cleaning during first two weeks
Before Your Appointment:
- Numbing Cream with 5% Lidocaine — Use only if your artist approves; helps with sensitive areas
- Tattoo Stencil Transfer Paper — Useful if you and artist iterate designs at home
Long-Term Maintenance:
- SPF 50 Sunscreen Stick for Tattoos — Daily protection to prevent fading
- Mad Rabbit Tattoo Balm, 2oz — For keeping healed ink vibrant
- Hustle Butter Deluxe, 8oz — Vegan aftercare alternative artists recommend
Optional Comfort & Repair:
- Tattoo Numbing Spray — For touch-ups or sensitive sessions (ask first)
- Hydrocolloid Bandages, Large Pack — For small scabs or blisters as needed
Artists often recommend Aquaphor and Saniderm for the immediate phase and a fragrance-free lotion for longer healing. Sunscreen and occasional balm keep portraits vibrant.
Frequently Asked Questions
Q: How bad does a tattoo actually hurt?
A: Pain depends on placement and tolerance. Outer arm/upper arm = lower pain. Ribs, spine, and neck = higher pain. It’s more an annoying burning or scratching. For very sensitive spots ask about numbing cream with lidocaine but always check with your artist first.
Q: What if I regret my portrait?
A: I’ve seen regret stem from impulse designs. Sit with your idea for months, use AI or Procreate to iterate, and prefer custom portrait tattoos tied to real meaning. Start with hidden placements if unsure.
Q: How do I keep my portrait from fading?
A: UV exposure is the biggest culprit. Daily use of SPF 50 sunscreen and regular moisturizing with fragrance-free lotion will slow fading. Blackwork ages best; pale watercolors need touch-ups.
Q: Can I work out after getting tattooed?
A: Wait 48–72 hours minimum and longer if the area flexes. Sweating and friction can cause infection and ink loss. Keep it clean and dry during early healing.
Q: Should I get a tiny portrait first to test pain?
A: Only if you actually want a tiny portrait. Pain varies more by placement than size. The wrist or ankle may hurt more than a larger flat area like the outer arm.
Q: How long do portraits take to heal?
A: Surface healing: 2–3 weeks. Full settling: 2–3 months. Expect initial dulling and peeling. Use Saniderm or Aquaphor in the first days and switch to lotion.
Q: Do portraits look different on darker skin tones?
A: Yes. Black and gray portraits read strongly across tones. Bright colors can appear muted on deeper skin—ask to see healed examples from your artist on similar skin.
I included trend observations from these sources: MabeeInk (geometric/blackwork trends) and The Secret Tattoo Studio (microrealism/color gradients). See their write-ups for context.
Start with a consultation and sample healed photos. Proper aftercare—Aquaphor and sunscreen—makes a big difference. Which of these portrait styles are you leaning toward?
